Page is loading ...

NCTC Avaya IP Office 9500/9600 User Guide
Doc Rev1 P a g e | 1
Avaya 9500 & 9600 Series Deskphone
User Guide

NCTC Avaya IP Office 9500/9600 User Guide
Doc Rev1 P a g e | 2
Table of Contents
Description .................................................................................................................................................... 3
Making Calls .................................................................................................................................................. 4
Set a Callback ............................................................................................................................................ 4
Calling a Person from the Contact/Directory ............................................................................................ 4
Redialing a Previously Dialed Number ...................................................................................................... 5
Answering Calls ............................................................................................................................................. 5
Answering a Second Call ........................................................................................................................... 5
Divert a Call to Voicemail .......................................................................................................................... 5
Quiet a Ringing Call ................................................................................................................................... 5
Call Handling ................................................................................................................................................. 6
Adjusting the Call Volume ......................................................................................................................... 6
Muting a Call ............................................................................................................................................. 6
Ending a Call .............................................................................................................................................. 6
Conference Calling ........................................................................................................................................ 6
Dropping/Muting Conference Parties....................................................................................................... 6
Transferring Calls .......................................................................................................................................... 7
Transfer to Voicemail ................................................................................................................................ 7
Parking Calls .................................................................................................................................................. 7
Redirecting Calls ............................................................................................................................................ 7
Do Not Disturb (DND) ............................................................................................................................... 7
Call Forwarding ......................................................................................................................................... 8
Follow Me To......................................................................................................................................... 8
Follow Me Here ..................................................................................................................................... 8
Forward Unconditional ......................................................................................................................... 8
Forward Busy/No Answer ..................................................................................................................... 8
Mobile Twinning ................................................................................................................................... 8
Directory Contacts ........................................................................................................................................ 8
Add a Directory Contact from Call History ................................................................................................ 9
Voicemail ....................................................................................................................................................... 9
Voicemail Setup ........................................................................................................................................ 9
Checking Voicemail from Your Avaya Phone ............................................................................................ 9

NCTC Avaya IP Office 9500/9600 User Guide
Doc Rev1 P a g e | 3
Checking Voicemail from Outside the Office .......................................................................................... 10
Voicemail Menu ...................................................................................................................................... 11
Description
The Avaya 9500 & 9600 desk phone supports 24 programmable call appearance/feature buttons (3
pages of 8). The labels for these are displayed in the main display and can be controlled by adjacent
buttons. To scroll through the 3 pages of buttons, use the left/right Navigation keys.
Functions can be assigned to the phone’s call appearance/feature buttons by your system administrator
or by yourself using self-administration. You cannot replace call appearance/feature buttons set by your
system administrator. There may be features that the system administrator has set that are not
available to be changed/assigned.
Note that the 9504/9508 are digital desk phones and the 9608 is an IP desk phone. The majority of
features and buttons operate the same on both the 9500 and 9600 series desk phones.
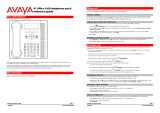
Figure 1 9500/9600 Desk Phone
Message Waiting – will flash when new, unheard voicemail messages exist or when the phone is ringing
LCD Display – will display time/date, extension and other information related to the state of your phone

NCTC Avaya IP Office 9500/9600 User Guide
Doc Rev1 P a g e | 4
Appearance/Feature Keys – there are 24 appearance/feature keys consisting of 3 pages of 8 buttons.
Each key can represent a call appearance, a BLF key or a feature key
Soft Keys – there are 4 soft keys. Each soft key will represent features most relevant to the current
status of your phone
Message Key – used to access your voice messages, Visual Voice
Navigation Keys – used to navigate through various menus on the phone display. Allows up, down and
OK/select (center key)
Home Key – used to exit from a menu screen to return to the home/idle screen
Contact Key – used to access the directory, displaying system directory entries as well as personal
directory entries if created
Avaya Key – used to access phone settings such as call settings, screen & sound options, etc
History Key – used to access call history, can be filtered by call type (all, missed, incoming, outgoing)
Headset Key – used to enable or disable an optional external headset
Speaker Key – used to enable or disable the built in speakerphone
Volume Rocker – used to adjust the speaker, handset and ringer volumes
Mute Key – used to temporarily mute the microphone while active on a call, applies to handset or
speakerphone calls
Making Calls
If you are not already on a call, simply dial the number. The first available call appearance button is used
for the call. Alternatively, press a specific call appearance button to make a call using that appearance.
Note that to place an outgoing call, you must dial a 9. Extension to extension calls can be placed by
simply dialing the extension that you wish to call.
Dialing with the handset on the cradle will automatically activate the speakerphone. To use the handset
instead, simply lift the handset.
Set a Callback
If the call is to an internal user and they do not answer, you can press the CallBack soft key to end the
call attempt. When the user ends their current or next call, the system sill call you, and when you
answer, automatically make another call attempt to the user.
Calling a Person from the Contact/Directory
You can use any directory contact to make a call. You can also use the directory in any function where
the Dir softkey is displayed.
1. Press the Directory key, the directory menu is displayed
2. Use the left/right Navigation keys to select the type of directory entry you want to display
(External, Users, Groups, Personal or All)
3. Use the up/down Navigation keys to scroll through the list or start typing the name using the
telephone keypad to find a matching entry. If you misdial a name, press the Clear softkey to
return to the full list.

NCTC Avaya IP Office 9500/9600 User Guide
Doc Rev1 P a g e | 5
4. To view more details of the highlighted name, press the Details softkey. To return to the list,
press the List softkey.
5. When to desired entry is highlighted, press the Call softkey to place the call
Redialing a Previously Dialed Number
1. Press the Redial softkey. Use the up/down Navigation keys to scroll through the most 10 most
recently dialed outgoing calls
2. Press the Call softkey to call the highlighted number in the call record.
Answering Calls
A slow flashing call appearance key represents an alerting call. This may also be accompanied by ringing
and by the message waiting lamp flashing. If you are currently on a call:
To quiet the ringing, press the Ignore softkey. The call will still continue to alert visually.
To redirect the call to your mailbox, press the To VM softkey
To answer the call using the handset, simply lift the handset
To answer the call using the speakerphone, press the Answer softkey or press the Speaker key
To answer the call using an optional headset, press the Headset key
Answering a Second Call
If you are already on a call, answering a new call automatically puts the existing call on hold.
To answer the call, press the ringing call appearance key, your existing call will be placed on hold
Alternatively, use the up/down Navigation keys to scroll the display to highlight the waiting call
and select the Answer, To VM, Ignore or Drop softkey to act upon the call.
Divert a Call to Voicemail
You can redirect a call targeting to you directly to your voice mailbox
1. If the call is not the currently highlighted call on the display, use the up/down Navigation keys to
highlight it.
2. Press the To VM softkey to redirect the call to your voice mailbox.
Quiet a Ringing Call
You can quiet the ringer of a currently alerting call. The call will continue to alert visually with no audible
ring.
1. If the call is not the currently highlighted call on the display, use the up/down Navigation keys to
highlight it.
2. Press the Ignore softkey.
3. Calls ignored will follow any forwarding to voicemail or call forward no answer once the
associated timer expires.

NCTC Avaya IP Office 9500/9600 User Guide
Doc Rev1 P a g e | 6
Call Handling
Adjusting the Call Volume
You can adjust the volume of the incoming audio while you are on a call
1. With a call connected, press the Volume rocker + or – key to adjust the volume accordingly
Note – the volume is separately adjusted for the device (handset, headset or speakerphone) you are
currently using.
Muting a Call
Muting a call temporarily mutes the microphone (handset, headset or speakerphone) during a call.
When muting, you will still be able to hear the remote side of the call. The mute setting remains active
even if you switch between calls using hold or appearance buttons. If you change how you are listening
to a call, for example switching from the handset to the speaker, the mute setting is cancelled.
1. To activate mute, press the Mute key. The button will be lit while mute is active.
2. To switch mute off, press the Mute key again.
Ending a Call
The Drop softkey can be used to end the currently highlighted call.
If the call is on the speakerphone, the Speaker key will be lit. Pressing the Speaker key will end
the call
If the call is on the headset, the Headset key will be lit. Pressing the Headset key will end the call
If the call is on the handset, replace the handset to end the call
Conference Calling
If you have a connected call and have held alternate calls, pressing the Conf softkey will start a
conference with all of those calls. Otherwise, to start a conference or add another party to a conference:
1. Press the Conf softkey. Your current call is automatically placed on hold.
2. Dial the party that you want to add to the conference
3. Once they answer, press the Conf softkey again to add them
4. If they do not answer, press the Drop softkey and return to the original party by pressing the
flashing call appearance key (held call).
Dropping/Muting Conference Parties
While active in the conference, press the Details softkey. Scroll through the list of caller sin the
conference and:
To drop a caller, highlight the participant and press the Drop softkey
To mute a caller, highlight the participant and press the Mute softkey; to un-mute them, press
the Mute softkey again

NCTC Avaya IP Office 9500/9600 User Guide
Doc Rev1 P a g e | 7
To return to the call display, press the Back softkey
Transferring Calls
To transfer a call, your phone must have an available call appearance key. If all of your call appearance
keys are in use, end or park one of your existing calls.
1. Press the Transfer softkey. The current call is automatically placed on hold.
2. Dial the number for the transfer. Alternatively, press the Dir softkey to select a destination from
the directory.
a. To complete the transfer, press the Complete softkey while the call is ringing or after it
has been answered.
b. If the transfer destination does not answer or does not want to accept the transfer,
press the Cancel softkey.
Transfer to Voicemail
You can use the Message key to transfer a call to a user or group mailbox.
1. With a call connected, press the Message key, you will still be connected to the caller
2. Dial the extension/mailbox number of the user or group and press select or press the Dir softkey
to search for a destination extension/mailbox number.
3. The selected destination will be displayed, press the Select softkey to complete the transfer.
Parking Calls
If configured, the Park feature allows you to place a call into a held/parked state where the call can be
picked up from any extension.
1. With a call connected, press the Park feature key
2. The display will automatically display the park extension where the call will be parked. Make
note of the extension displayed.
3. If configured and you wish to page, press the Page softkey, otherwise press the Exit softkey to
complete the park.
4. If the Page option is selected, a list of configured page zones will be displayed. Highlight the
desired page zone using the up/down Navigation keys to highlight the desired zone and press
the Page softkey to announce the parked call.
Redirecting Calls
Do Not Disturb (DND)
When you are in DND, your calls are redirected to your voicemail automatically. Calls to any group of
which you are a member are not presented to you while in DND. You can still use your phone to make

NCTC Avaya IP Office 9500/9600 User Guide
Doc Rev1 P a g e | 8
outgoing calls. While in DND, when you go off hook, a broken dialtone will be heard to remind you that
you are in DND.
To activate/deactivate DND:
1. Press a programmed DND feature key or select the Features softkey then use the up/down
Navigation keys to highlight Call Settings then press Select
2. Press the Change softkey, to toggle the setting (on or off)
3. Press the Save softkey to save the setting.
Note – if using a DND feature key, the light will illuminate when active and be extinguished when
inactive. Additionally regardless of the method used to enable/disable DND, when active a N will be
displayed in the grey bar at the top of your display. Additionally, a Status softkey will be visible. Pressing
the Status softkey will show that DND is On. To turn it off, simply press the Off softkey.
Call Forwarding
You may be able to change your forward unconditional settings using the Features softkey
1. Press the Features softkey and use the up/down Navigation keys to highlight Forward then
press Select.
2. Use the up/down Navigation keys to highlight and then select the call forwarding that you wish
to administer.
Follow Me To
Forward your calls to another extension, administered from your extension
Follow Me Here
Forward your calls to the extension you are currently in front of
Forward Unconditional
Forward all calls to another destination
Forward Busy/No Answer
Forward calls to another destination in a busy and/or no answer condition
Mobile Twinning
If this feature is enabled, you can twin all calls to your extension to an alternate destination such as a
mobile phone. When twinning is enabled, inbound calls will ring your deskphone as well as the
destination number configured.
Directory Contacts
You can add up to 100 personal directory contacts. For each directory contact, you will specify a name
and associated phone number.
1. Press the Directory key and use the left/right Navigation keys to select Personal

NCTC Avaya IP Office 9500/9600 User Guide
Doc Rev1 P a g e | 9
2. Press the New softkey to add a new contact
3. In the name field, enter the name of the contact using the telephone keypad (T3 method). For
example for a “C” you would press the 2 key three times. The cursor will automatically
increment to allow you to enter subsequent letters. Once complete, press the down Navigation
key to scroll the Number field.
4. In the Number field, enter the destination number to be associated with this contact. Note that
if the destination number is an outside phone number, you must include the 9 in the number.
5. When both the Name and Number fields are completed, press the Save softkey to save the
entry.
Add a Directory Contact from Call History
You can add a name and number shown in your call history to your personal contacts.
1. Press the History key and use the left/right Navigation keys to select All, Missed, Incoming or
Outgoing
2. Use the up/down Navigation keys to highlight an entry in the history
3. Press the More softkey they press the +Contact softkey
4. The Name and Number fields will be filled with the Caller ID information received on the call.
You can modify these however by using the up/down Navigation keys to select the field desired
and modify as described in the previous section.
Voicemail
Your voicemail needs to be setup as one of the first tasks associated with using your new phone.
Voicemail Setup
1. Dial *17 to access your voicemail the very first time
2. When prompted, enter your extension number followed by #
3. When prompted for your password, press # (no password)
4. When prompted, enter the password you wish to use. Note that there may be security
requirements on setting your password.
5. Follow the prompts to set your password and record your name for the directory.
Checking Voicemail from Your Avaya Phone
When new messages exist, your message light will flash. You will be able to use Visual Voice from your
Avaya phone to view and manage your messages as well as administer mailbox settings.
1. Press your Message key to access Visual Voice
2. The Visual Voice will menu will be displayed. Within the Visual Voice menu, several items will be
displayed, use the up/down Navigation keys to select the item to administer.
a. Listen – shows the number of new/old/saved messages (0/0/0). Select it to view
messages in each state

NCTC Avaya IP Office 9500/9600 User Guide
Doc Rev1 P a g e | 10
b. Message – allows you to record a message to be delivered to another Avaya user. Select
it to record a message and deliver to specific mailboxes
c. Greeting – allows you to record a personal greeting to be played to callers. Select it to
make a personal greeting
d. Passcode – allows you to change your voicemail password. Select it to change your
current password to a new one
e. Email – if enabled, will allow you to change your voicemail to email settings. Select it to
set your voicemail to email to be Copy, Forward, Alert or Off
f. Voicemail – If enabled your voicemail will automatically answer if calls to your phone
are unanswered. If disabled, automatic forwarding to your voicemail will be turned off.
Checking Voicemail from Outside the Office
Your system configuration will dictate the best method to check your messages while out of the office.
Some options include:
If answered by auto attendant, dial the main number, press * during the greeting and follow the
prompts
Dial your DID, when your mailbox greeting plays, press the *7 and follow the prompts

NCTC Avaya IP Office 9500/9600 User Guide
Doc Rev1 P a g e | 11
Voicemail Menu
Figure 2 Intuity Mode Menu

NCTC Avaya IP Office 9500/9600 User Guide
Doc Rev1 P a g e | 12
Programming Call Appearance/Feature Keys
To program a Call Appearance/Feature Key:
1. Press the Features softkey
2. Scroll to Phone User and press the Select softkey
3. Scroll to Self Administer and press the Select softkey
4. If prompted, enter the Security PIN. If you do not know the Security PIN, consult with your
system administrator
5. A list of buttons will be displayed along with their current assignment. To change an existing
button, scroll to it using the up/down Navigation keys and press the Replace softkey. Note that
if the Replace softkey does not appear for the highlighted button, that means that the button
cannot be changed as an end user. You can also select the Erase softkey to remove the button.
To assign a button to a blank button, highlight the button and press the Replace softkey. A list of
available features will be displayed. Scroll to the feature that you wish to assign using the
up/down Navigation keys to highlight it and press the Select softkey to assign it. Note that some
features require additional input such as User BLF and Group BLF which will require that you
enter the user extension or group extension that you wish to monitor.
/