Page is loading ...

Installation Instructions RSDA16A-E
Issue Date May 18, 2023
RSDA16 Series Encapsulated Replacement Solenoid Coil
© 2023 BASO Gas Products 1
Part No. BASO-INS-RSDA16A-E, Rev. B www.baso.com
RSDA16 Series Encapsulated Replacement Solenoid Coil
Installation
IMPORTANT: These instructions are intended as
a guide for qualified personnel installing or servicing
BASO® Gas Products. Carefully follow all instructions in
this bulletin and all instructions on the appliance. Limit
repairs, adjustments, and servicing to the operations listed
in this bulletin or on the appliance.
!
WARNING: Risk of Electric Shock.
Disconnect the power supply before wiring connections
are made to avoid possible electric shock or damage to
equipment.
!
WARNING: Risk of Equipment Damage.
Label all wires prior to disconnection when servicing
valves. Wiring errors can cause improper and dangerous
operation. Verify proper operation after servicing.
Only a trained service professional should perform this
procedure. To replace the coil:
1. Disconnect the power supply to the valve.
2. Label and remove all wires connected to the coil.
3. Remove the existing solenoid. (Optional Attachments)
a. Locknut: Using a wrench, loosen the locknut at the
top of the coil and remove both the nut and washer.
b. E-ring: Use a flat blade screw driver and remove
the E-ring.
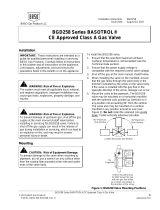
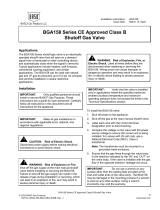
Rotate
360
Yellow
Dot
ID
Figure 1: Encapsulated Replacement
Solenoid Coil Procedure
4. Carefully lift the coil off the solenoid guide.
!
WARNING: Risk of Shock.
Do not apply undue force on the solenoid guide during
removal or replacement. The plunger is housed within this
guide and any distortion could tighten around the plunger
and prevent the valve from closing.
5. Place the new replacement coil on the solenoid guide.
6. a. Replace the washer and locknut if the solenoid guide
uses the threaded stud.
b. Carefully tighten the locknut. Do not over tighten.
Tighten the locknut to 25 lbs – in (2.82 N.m)
7. Replace the E-ring if the solenoid guide uses the slotted
head. Use a channel lock pliers and squeeze the E-ring
back in place. Ensure the cup part of the E-ring is up
before assembly.
8. Connect all wires according to the labels applied in
Step 2.
9. Turn on the power to the valve.
10. Run the valve through several cycles of operation and
check that all functions are satisfactory.
Repairs and Replacement
Table 1: Replacement Solenoid Coil
Part Number
(Coil Color)
Description
RSDA16A-E12
(Red)
12 VDC; 2-tab 15 VA Coil
RSDA16A-E25
(Green)
25 VAC; 50/60 Hz; 3-tab 15 VA Coil
RSDA16A-E120
(Blue)
120 VAC; 50/60 Hz; 3-tab 15 VA Coil
RSDA16A-E240
(Black)
240 VAC; 50/60 Hz; 3-tab 15 VA Coil
RSDA16AH-120
(Blue)
120 VAC; 50/60 Hz; 3-tab 15 VA Coil
RSDA16AH-240
(Black)
240 VAC; 50/60 Hz; 3-tab 15 VA Coil
450 East Horseshoe Road
PO Box 170
Watertown, WI 53094 www.baso.com
1-877-227-6427 (1-877-BASOGAS) Printed in U.S.A.
/