Page is loading ...


1
Congratulations on purchasing the Honeywell
evotouch multi-zone ‘wireless’ comfort controller.
The evotouch allows independent temperature
control of up to eight zones completely automatically
according to your needs.
This independent zone control means that only the
occupied areas of your home are controlled at a
comfortable temperature whilst the unused areas
remain at a reduced temperature resulting in optimal
comfort combined with maximum energy saving.
As evohome is a ‘wireless’ solution there is no need
to run wires around your home, making installation
and any future upgrades simple and convenient.
Keep in touch with your installer or visit the
Honeywell website to learn of future upgrades that
can deliver even more comfort and convenience into
your evohome system.
ENGLISH
ENGLISH
Quick Start User Guide

2
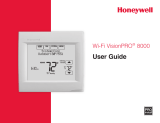
1 Current date and time
The clock is automatically adjusted for Daylight Saving Time.
2 Current zone
Shows the zone currently being controlled.
3 Measured temperature
Shows the measured temperature in the current location.
4 Increase temperature setting
Increases the set temperature until the next period.
5 Current temperature setting
Shows the set temperature defined by the schedule, or an override.
1 2 3
4
5
6
10 9 8 7
Home screen overview
6 Reduce temperature setting
Reduces the set temperature until the next period.
7 Select other options
Allows you to display an overview of the temperatures in all zones,
edit schedules, and change other settings.
8 Display/set zones
Allows you to define different schedules for different areas of your
home.
9 Set economy mode
Reduces the temperature settings in all zones by 3 °C at a single
button press, to save energy.
10 Lifestyle
For specific purposes e.g. holiday, shift program.
11 Information on additional components
Shows e.g. the outdoor temperature, when available.
12 Battery level
Shows the battery level when evotouch is not fitted to the dock.
11
12

3
The Honeywell evotouch is a wireless programmable controller
which can individually control up to 8 zones. It will control your
heating system efficiently to provide maximum comfort and energy
savings.
The evotouch is controlled via a large touch-screen display, with an
intuitive user interface for easy operation.
The evotouch supports a wide range of applications, from simple
single zone boiler control to multi-zone underfloor heating and
radiator control using our proven RF (Radio Frequency) technology
for communication with the peripheral devices.
Mounting
You can either mount your evotouch on a wall mounted dock, or
on a table-top stand. For convenience you can remove evotouch
from the dock and program the unit in your hands. When removed
from the stand the evotouch will remain powered for about 2 hours
before needing to be replaced for charging.
Wireless control
The evotouch uses wireless communication to transmit and receive
information from the other control devices in the system. These
can include, for example, individual radiator controllers, room
sensors, under floor heating controllers, and other wireless devices
depending on the application.
Introduction
ENGLISH

4
System functions
Zoning
You can independently control the temperature in individual rooms,
or groups of rooms, according to different schedules. This allows
you to optimise comfort and minimise energy usage, reducing your
fuel bills.
Domestic hot water
The domestic hot water setpoint temperature can be set and
controlled by the time schedule.
Optimisation
Your control system has several Optimisation functions. These
functions aim to save energy while making you as comfortable as
possible. Optimisation can be activated individually for each zone.
Optimum start works by measuring how quickly your system
normally heats. evotouch will calculate the correct time to start
heating, so that you reach your comfort temperature when you want
it.
The times you set are the times when you want the heating to
be at a desired temperature. The system will start heating the
zone early to meet it‘s time schedule.
Delayed start works by using the normal programmed start times,
comparing the current temperature with the set temperature
and delaying the start a little depending on how close these
temperatures are to each other.
Optimum stop saves energy and money by switching off a little
bit earlier than the normal programme time. If your home is up to
temperature, you will not notice the effect on the temperature, but
you will see a difference in your fuel bill.
Optimisation only applies to your heating.
Special day
The special day function provides 2 independent time programs
with daily schedule for up to 99 days for specific purposes, e.g.
early and late shift program.
Future expansion
evotouch is in an expandable system. An upgrade port on the
controller allows your installer to update the unit to take advantage
of future developments and new functionality.

5
• Ifnecessarypressthemainscreentodisplaythehomescreen: To set the time
You can optionally press CLOCK SETTINGS to change the time
format between 24 HR and 12 HR, and choose automatic Daylight
Saving time.
To set the date
NOTE:PressingBACK from any screen cancels any changes you
made and returns to the previous screen.
Press or to set
the day, month, and
year
PressSET DATE to set
the date
Press or to set
the hour and minutes.
PressMENU to display
the MAIN MENU
PressSETTING MENU
to display the SETTING
MENU
PressTIME/DATE
SETTING to set the
time PressDONE to set the
date
Changing the time and date
ENGLISH

6
The standby display shows the measured temperature from
evotouch’sinternalsensor,andthedateandtime:
Either a static or a dynamic screensaver is available.
• PressanywhereonthisscreentodisplaytheHomeScreen.
To override the programmed temperature
The temperature will stay at the value you have set until the start of
the next scheduled period. The time is shown below the measured
temperature;forexample:Set until 18:00.
To change the override duration
Thefollowingscreenisdisplayed:
• PressDONE to confirm.
Once you have created an override you can change or cancel it at
any time by pressing Press to Change on the Home Screen.
Manual override
Press or to adjust
the temperature setting
PressPress to
Change
Press or to specify
when the override
should end
PressPERMANENT
to make the override
permanent

7
ENGLISH
If there are several zones the next screen shows information about
the first zone. PressPREVIOUS ZONE or NEXT ZONE to change zone.
The VIEW SCHEDULE screen then shows you the schedule for
MONDAYandallowsyoutoeditit:
To edit a period
• Pressthebuttonoftheperiodyouwanttoedit.
Thefollowingscreenisdisplayed:
When you change the start time, the end time of the previous period
will automatically be changed to match.
• PressDONE to show the changes on the VIEW SCHEDULE
screen for the day.
If you have more than one zone you are given the option of copying
the schedule to another zone.
Changing the schedules
From the Home
Screen press ZONING
(or VIEW/EDIT
SCHEDULE)
PressVIEW/EDIT
SCHEDULE
Press or in the
START TIME section to
change the start time
of the period
Press or in the
SETTING section to
change the temp erature
PressNEXT DAY to
change day

8
To add a period
• SettheSTARTTIMEandSETTINGforthenewperiod,as
described in To edit a period, page 7.
The existing periods will be adjusted accordingly.
• PressDONE to show the new period on the VIEW SCHEDULE
screen for the day.
To delete a period
NOTE:Youcannotdeletethelastremainingperiod.
To copy the schedule to other days
Thisscreenletsyouspecifywhichdaystocopy:
• PressDONE.
A screen will confirm which days the schedule has been copied to.
• PressDONE to return to the VIEW SCHEDULE screen.
When you press DONE you will then be given the option of copying
the schedule to another zone, or editing another schedule.
• Selectanoption,orpressDONE to return to the ZONING menu.
PressDELETE
PERIOD
PressADD PERIOD
PressCOPY
Pressthedaysyou
want to copy to
PressWEEK DAYS to
select all the week days
PressWEEKEND DAYS
to select SAT and SUN
Adding and deleting periods

9
ENGLISH
ManyoftheevotouchscreensprovideaHELPbutton,toprovide
additionalinformationaboutwhatyouneedtodo:
• PressHELPtodisplayahelpscreen:
Using Help
When you’ve read the
help press BACK to
return
Troubleshooting
This section provides suggested answers to typical problems that
users may encounter with evotouch.
Problem Solution
Display stays blank Check that power is reaching the wall
plate/table-top stand.
Check that power is connected correctly.
The evotouch fails when
removed from wall plate/
table-top stand.
Check that batteries are fitted correctly.
Check that insulation tab has been
removed.
I set an override to the
temperature, but now it’s
reverted to the scheduled
temperature
The override will only last until the end
of the current scheduled period, unless
you have explicitly set an end time, or
chosenPERMANENT.
How do I edit the end time
of a period?
The end of a period is automatically set
to the beginning of the next period. Edit
the START TIME of the next period.
When I try to add a period
nothing happens
You may be trying to add a period with
the same start time as an existing period.
Try again with a different start time.
When I add a period it
changes my existing
periods.
When you add a period, the START TIME
you specify will determine where it gets
inserted in between the existing periods,
and the previous period will be truncated
to accommodate the new period.
The heating turned on
before the time I specified
in the period
If optimization operation has been
selected, the evotouch automatically
predicts the time it will take for the
heating to achieve the temperature you
have set.
Manufactured for and on behalf of the Environmental and Combustion Controls Division of
HoneywellTechnologiesSàrl,ACS-ECCEMEA,Z.A.LaPièce16,1180Rolle,Switzerlandby
its Authorised Representative Honeywell Inc.
Honeywell Control Systems Ltd.
ArlingtonBusinessPark,
Bracknell, Berkshire
RG12 1EB
TechnicalHelpDesk:08457678999
www.honeywelluk.com


/