Page is loading ...

Quick-Start Guide
To view manuals, FAQs, videos, drivers, downloads, technical drawings, and more, visit www.startech.com/support.
Manual Revision: March 10, 2023 5:13 PM
To view manuals, FAQs, videos, drivers, downloads, technical drawings, and more, visit www.startech.com/support
Product ID
XXXL-PRIVACY-SCREEN / PRIVSCNMONXX / PRIVACY-SCREEN-XXXX / XXXXX-PRIVACY-SCREEN
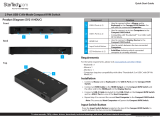
Component Function
1Privacy Filter
• Privacy eect when viewing the screen at angles
greater than 30° o-center from the Left or Right
• The total Field of View is 60 degrees
2Mounting Tabs
• Secure the Privacy Filter to the Display Bezels
Note: The adhesive on the Mounting Tabs becomes
less eective with frequent removal/reapplication
3Adhesive Strips
(Not shown)
• Secure the Privacy Filter to the Screen surface
Note: The Adhesive Strips become less eective with
frequent removal/reapplication
4Finger Notch • Helps to grab the Privacy Filter for removal
Package Contents
• Privacy Screen x 1
• Set of Adhesive Strips x 1
• Set of Mounting Tabs x 1
• Wiping Cloth x 1
• Quick Start Guide x 1
Requirements
For the latest manuals, product information, technical specications, and declarations
of conformance, please visit: www.startech.com/support
Privacy Filter
Install the Privacy Filter
Note: For installations intended to be permanent or if the display features slim bezels,
it is recommended to use the Adhesive Strips.
For installations that require frequent removal of the Privacy Filter, it is recommended
to use the Mounting Tabs.
Adhesive Strips
1. Clean the Screen and Bezels using the Wiping Cloth.
2. Select the side of the Privacy Filter intended to Face Outward (i.e. matte or glossy).
Place the Privacy Filter on a clean and at surface with the selected side Facing
Down.
3. Remove all Adhesive Strips from the Transparent Lining.
4. Carefully align the Adhesive Strips along the Top, Bottom, Left, and Right edges of
the Privacy Filter. Apply Firm Pressure to ax them to the Privacy Filter.
5. Carefully remove the Protective Backing from the Adhesive Strips
*Product may vary from image
3
1
2/3

Regulatory Compliance
Use of Trademarks, Registered Trademarks, and other Protected Names and Symbols
This manual may make reference to trademarks, registered trademarks, and other protected names and/or symbols of third-
party companies not related in any way to StarTech.com. Where they occur these references are for illustrative purposes only
and do not represent an endorsement of a product or service by StarTech.com, or an endorsement of the product(s) to which
this manual applies by the third-party company in question. StarTech.com hereby acknowledges that all trademarks, registered
trademarks, service marks, and other protected names and/or symbols contained in this manual and related documents are the
property of their respective holders.
Warranty Information
This product is backed by a two-year warranty.
For further information on product warranty terms and conditions, please refer to www.startech.com/warranty.
Limitation of Liability
In no event shall the liability of StarTech.com Ltd. and StarTech.com USA LLP (or their ocers, directors, employees or agents)
for any damages (whether direct or indirect, special, punitive, incidental, consequential, or otherwise), loss of prots, loss of
business, or any pecuniary loss, arising out of or related to the use of the product exceed the actual price paid for the product.
Some states do not allow the exclusion or limitation of incidental or consequential damages. If such laws apply, the limitations
or exclusions contained in this statement may not apply to you.
FR: startech.com/fr
DE: startech.com/de
ES: startech.com/es
NL: startech.com/nl
IT: startech.com/it
JP: startech.com/jp
StarTech.com Ltd.
45 Artisans Crescent
London, Ontario
N5V 5E9
Canada
StarTech.com Ltd.
Unit B, Pinnacle 15
Gowerton Road
Brackmills,
Northampton
NN4 7BW
United Kingdom
StarTech.com LLP
4490 South Hamilton
Road
Groveport, Ohio
43125
U.S.A.
StarTech.com Ltd.
Siriusdreef 17-27
2132 WT Hoofddorp
The Netherlands
6. Attach the Privacy Filter to the Screen, starting from the Bottom and working
towards the Top. The Adhesive Side should face toward the Screen.
7. Apply Gentle Pressure on the Locations where the Adhesive Strips were installed.
8. Clean any ngerprints on the Privacy Filter using the Wiping Cloth.
Mounting Tabs
1. Clean the Screen and Bezels using the Wiping Cloth.
2. Separate the Mounting Tabs.
3. Remove the Protective Backing from the Mounting Tabs.
4. Install One Short and One Long Mounting Tab on the Left Bezel.
5. Repeat Step 4 for the Right Bezel.
6. Install One Short Mounting Tab on the Bottom Bezel.
Note Depending on the display size, additional Mounting Tabs may need to be
installed on the side or bottom bezels.
7. Slide the Privacy Filter in-between the Mounting Tabs and the Screen.
8. Clean any ngerprints on the Privacy Filter using the Wiping Cloth.
FR
/