EXHAUSTO Conbox til DEX3000 Operating instructions
- Type
- Operating instructions

DEX3000
GEGENSTROM-
WÄRMETAUSCHER
SERIE
CONBOX DEX3000
Assembly and installation
Montage og installation
Montage und installation
3006727-2023-11-08 CONBOX DEX3000
EXHAUSTO A/S
Odensevej 76
5550 Langeskov, Denmark
Tel.: +45 65 66 12 34
Fax: +45 65 66 11 10
www.exhausto.dk

1. EN
1.1. Dimensions - CONBOX DEX3000.......................................................................................................... 3
1.1.1. Dimensional drawings.....................................................................................................................3
1.2. Ceiling-mounted or semi-integrated assembly....................................................................................9
1.2.1. Ceiling and installation requirements.............................................................................................. 9
1.2.2. Step by step assembly .................................................................................................................10
1.3. Technical Data.......................................................................................................................................12
1.3.1. Weight .........................................................................................................................................12
1. DK
1.1. Dimensioner - CONBOX DEX3000.......................................................................................................13
1.1.1. Målskitser......................................................................................................................................13
1.2. Lofthængt eller delintegreret montage...............................................................................................19
1.2.1. Krav til loft og installation.............................................................................................................. 19
1.2.2. Montage trin for trin ......................................................................................................................20
1.3. Tekniske data........................................................................................................................................ 22
1.3.1. Vægt ........................................................................................................................................... 22
1. DE
1.1. Abmessungen - CONBOX DEX3000....................................................................................................23
1.1.1. Maßskizzen...................................................................................................................................23
1.2. Deckenmontiert oder teilintegrierte Montage.................................................................................... 29
1.2.1. Anforderungen an Decke und Installation.....................................................................................29
1.2.2. Montage Schritt für Schritt............................................................................................................ 30
1.3. Technische Daten................................................................................................................................. 32
1.3.1. Gewicht ....................................................................................................................................... 32
3006727-2023-11-08
2/36

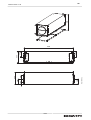
1. EN
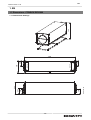
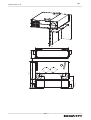
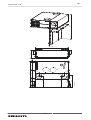
1.1 Dimensions - CONBOX DEX3000
1.1.1 Dimensional drawings
1830
500
263
700
524
240
RD14439-02
263
240
O315
O315
267
3006727-2023-11-08 EN
3/36

2206
500
263
1577
313
739
253 1640
110
739
769
926
RD14444-01
O
315
O
315
1660
392
240
267
240
263
3006727-2023-11-08 EN
4/36

2406
600
290
800
609
280
RD14441-02
290
140
280
400O
400O
321
3006727-2023-11-08 EN
5/36

1830
500
263
1577
313
739
272 1245
110
739
769
926
RD14443-01
O
315
O
315
1660
392
240
267
240
263
3006727-2023-11-08 EN
6/36

2206
500
263
1577
313
739
253 1640
110
739
769
926
RD14444-01
O
315
O
315
1660
392
240
267
240
263
3006727-2023-11-08 EN
7/36

2406
600
290
1957
276
858
273 1857
627 80
858
907
633
RD14445-01
O
400
O
400
2025
224
280
140
280
290
321
3006727-2023-11-08 EN
8/36

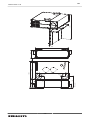
1.2 Ceiling-mounted or semi-integrated assembly
1.2.1 Ceiling and installation requirements
RD14287-01
When fitting the air handling unit, the ceiling must be:
● flat
● resistant to vibration
● level
● designed to bear the weight of the unit
The installer is responsible for ensuring that:
● correct and safe installation of the unit in accordance with applicable laws and regulations
● properly used fastening of the given design
3006727-2023-11-08 EN
9/36

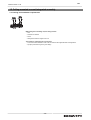
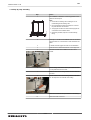
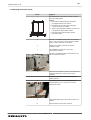
1.2.2 Step by step assembly
Step Action
1
RD14465-01
The CONBOX is delivered in a standing position on the
pallet for safe transport.
Note:
● Check the air handling unit for damage– do not
install damaged air handling units.
● Once the plastic has been removed, the unit must
be protected from dirt and dust.
● The spigots should be covered until the spigots are
connected to the ventilation ducts.
● Whenever possible, keep the unit closed during
fitting.
2 Carefully turn the DEX and CONBOX down on the doors
and place them on a soft surface to avoid scratches and
dents.
3 If needed, relocate spigots to fit the current installation.
4 Install the cover rail behind the doors on the hinge side.
5 Assemble the DEX and CONBOX and mount the 4
screws.
6 On the ceiling, measure the centre point where the DEX
is to be positioned and mark it off.
7 Mark the holes for the ceiling brackets and the holes for
the ducts.
8 Drill all marked holes. The mounting method, hole sizes
etc. will depend on the material of the ceiling.
9 Mount and insulate the duct penetrations in the ceiling.
10 Mount the cowls on the roof.
3006727-2023-11-08 EN
10/36

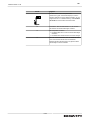
Step Action
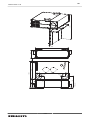
11
RD13270_01
Lift the DEX into place with suitable lifting equipment
(e.g. an electric stacker), protecting the door from
scratches with a piece of cardboard or similar material
between the door and the lifting equipment. See unit
weight in the technical data section.
12 Check that the DEX is level and fix the unit by tightening
all ceiling brackets.
13 Mount the housing panels:
● Hook the housing panel onto the top of the black
brackets
● Lightly press the plate into place
14 If beneficial, the CONBOX can also be installed first. The
subsequent installation of the DEX occurs in the same
way as on the floor.
3006727-2023-11-08 EN
11/36

1.3 Technical Data
1.3.1 Weight
Type DEX3060 [kg] DEX3090 [kg] DEX3120 [kg]
CONBOX 65 77 115
DEX3000 200 220 300
3006727-2023-11-08 EN
12/36

1. DK
1.1 Dimensioner - CONBOX DEX3000
1.1.1 Målskitser
1830
500
263
700
524
240
RD14439-02
263
240
O315
O315
267
3006727-2023-11-08 DK
13/36

2206
500
263
1577
313
739
253 1640
110
739
769
926
RD14444-01
O
315
O
315
1660
392
240
267
240
263
3006727-2023-11-08 DK
14/36

2406
600
290
800
609
280
RD14441-02
290
140
280
400O
400O
321
3006727-2023-11-08 DK
15/36

1830
500
263
1577
313
739
272 1245
110
739
769
926
RD14443-01
O
315
O
315
1660
392
240
267
240
263
3006727-2023-11-08 DK
16/36

2206
500
263
1577
313
739
253 1640
110
739
769
926
RD14444-01
O
315
O
315
1660
392
240
267
240
263
3006727-2023-11-08 DK
17/36

2406
600
290
1957
276
858
273 1857
627 80
858
907
633
RD14445-01
O
400
O
400
2025
224
280
140
280
290
321
3006727-2023-11-08 DK
18/36

1.2 Lofthængt eller delintegreret montage
1.2.1 Krav til loft og installation
RD14287-01
Ved ophængning af aggregatet kræves det, at loftet er:
● plant
● svingningsdødt
● vandret
● konstrueret så det kan bære aggregatets vægt
Installatøren har ansvar for at sikre:
● korrekt og sikker installation af anlægget i henhold til gældende lov og regler
● korrekt anvendt befæstelse af givne konstruktion
3006727-2023-11-08 DK
19/36

1.2.2 Montage trin for trin
Trin Handling
1
RD14465-01
CONBOX'en leveres stående på pallen, for sikker
transport.
Bemærk
● Tjek aggregatet for skader - undlad at montere
beskadigede aggregater.
● Når plasten er fjernet skal aggregatet beskyttes mod
snavs og støv.
● Studse bør være afdækket indtil studsene tilluttes
ventilationskanalerne.
● Hold så vidt muligt aggregatet lukket under
montagen.
2 DEX og CONBOX'en vendes forsigtigt ned på lågerne og
lægges på et blødt underlag for at undgå ridser og buler.
3 Flyt evt. studse så det passer med den aktuelle
installation.
4 Monter afdækningsskinnen bag lågerne i hængselssiden.
5 Saml DEX og CONBOX og monter de 4 skruer.
6 Mål op på loftet til midten af hvor DEX'en skal placeres,
og afmærk punktet.
7 Afmærk huller for loftbeslag, samt huller for kanaler.
8 Bor alle de markerede huller. Montagemetode,
hulstørrelser mv. afhænger af loftets materiale.
9 Monter og isoler kanalgennemføringerne i loft.
10 Monter taghætter på taget.
11
RD13270_01
Løft DEX'en op på plads med relevant løfteudstyr (f.eks.
en el-stabler), beskyt lågen mod ridser f.eks. med et
stykke pap mellem låge og løfteudstyret. Se aggregatets
vægt under afsnittet de tekniske data.
3006727-2023-11-08 DK
20/36
Page is loading ...
Page is loading ...
Page is loading ...
Page is loading ...
Page is loading ...
Page is loading ...
Page is loading ...
Page is loading ...
Page is loading ...
Page is loading ...
Page is loading ...
Page is loading ...
Page is loading ...
Page is loading ...
Page is loading ...
Page is loading ...
-
 1
1
-
 2
2
-
 3
3
-
 4
4
-
 5
5
-
 6
6
-
 7
7
-
 8
8
-
 9
9
-
 10
10
-
 11
11
-
 12
12
-
 13
13
-
 14
14
-
 15
15
-
 16
16
-
 17
17
-
 18
18
-
 19
19
-
 20
20
-
 21
21
-
 22
22
-
 23
23
-
 24
24
-
 25
25
-
 26
26
-
 27
27
-
 28
28
-
 29
29
-
 30
30
-
 31
31
-
 32
32
-
 33
33
-
 34
34
-
 35
35
-
 36
36


EXHAUSTO Conbox til DEX3000 Operating instructions
- Type
- Operating instructions
Ask a question and I''ll find the answer in the document
Finding information in a document is now easier with AI
in other languages
Other documents
-
CTX G-26 User manual
-
 Chroma 2238 User manual
-
Trane RT-PRC010-EN User manual
-
Trane IntelliPak SXHF C50 User manual
-
-
-
Eneo VPT-601/HZRAL7035 Installation & Operating Manual
-
 Cypress ISR 37000 CPLD User manual
-
Delta Tau ACC-11E Owner's manual
-
Roland JUPITER-80 Owner's manual

