NewAge Products 53500 Installation guide
- Category
- Flat panel wall mounts
- Type
- Installation guide

Performance 2.0
Series
Warning: Excessive weight hazard!
Use two or more people to move, assemble or install cabinets and locker to avoid back injury.
Do not leave children unattended near cabinets. High risk of tipping if cabinets are installed
incorrectly: securely attach cabinets to the wall to avoid serious injury.
R4
STOP
ATTENTION: Is your cabinet damaged?
Need help or spare parts? For fastest service,
contact NewAge Products at 1-877-306-8930;
or suppor[email protected]om.
Do not return to the retailer.
Use two or more people to move, assemble, or
install cabinets and locker to avoid back injury.
Do not leave children unattended near cabinets.
High risk of tipping if cabinets are installed
incorrectly: securely attach cabinets to the
wall to avoid serious injury. For assistance, call
1.877.306.8930; for U.K 0800.031.4069: e-mail at
info@newageproducts.com.
Warning: Excessive weight
hazard!

2
INDEX
Product Overview:
Unpacking - 3
Tools Needed - 3
Included Quantities - 4
Included Parts - 4
Weight Capacity - 5
Worktop Options - 5
Installation Options - 6
Installation Overview:
Floor Installation - 7
Wall Mount Installation - 8
Slatwall Installation - 9
Sets with Casters - 10
Corner Set Installation - 11
Hanging Wall Cabinets:
On Studded Wall -12
On Slatwall - 13
Securing Wall Cabinets:
To Wall - 14
To Other Cabinets - 15
Fastening Cabinets on Casters - 16
Installing Worktop:
Standard installation on cabinets - 17
Using Support Brackets - 18
Corner Worktop - 19
General Assembly:
Feet & Levelling cabinets - 20
Casters - 21
Drawers - 22
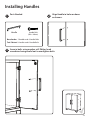
Handles - 23
Stacking - 24
Closet Rod - 25
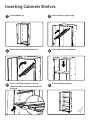
Shelves - 26
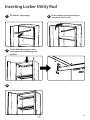
Utility hole - 27
Magnetic Racing Stripe -28
Warranty - 29

3
Tools Needed
1 x 12” Magnetic Level
1 x #2 Phillips Bit
1 x Tape Measure
1 x 7/16” socket
1 x Cordless
Power Drill
1 x Stud Finder
1 x Pencil
1 x Hammer Drill 1 x Masonry Bit
1 x Adjustable wrench
1 x 7/16” Socket driver wrench
1 x #2 Phillips head
screwdriver
[optional for masonry]
1 x
6 mm or 3/16”
drill bit
Unpacking
• Begin by placing the package on a covered at surface.
• Remove all cardboard, foam packaging material and clear plastic bags.
• Dispose / recycle all packaging materials.
• Verify all the contents in the box and gather the required tools. See “Tools Needed” , and
“Included Quantities” list.

4
Individual Parts
Hardware Pack
Cabinet Leg
Leveling Foot
Adjustable Steel Shelves
Handles
Closet Rod
Locker Support Bracket
Joining Bracket
Worktop Wall Support
EVA Foam Drawers Liners
Utility Hole Grommet
NewAge Logo
Base
Cabinet
Tool
Drawer
Locker Wall Corner
Wall
1
4
4
1
2
0
0
1
0
0
1
1
1
4
4
0
3
0
0
1
0
3
0
1
1
4
4
3
2
1
1
0
0
0
1
1
1
0
0
0
0
0
0
0
0
0
0
1
1
0
0
0
0
0
2
2
2
0
0
1
Cabinet Leg
Hardware PackJoining
Bracket
NewAge
Logo
Worktop
Wall Support
EVA Foam
Drawer Liners
Adjustable Steel
Shelves
Coset Rod
Locker
Support Bracket
Handle
Utility Hole
Grommet
Leveling
Foot
(M10 x 65mm)
Hardware Pack
Included Quantities

5
72” Worktop. Fits over 3 Cabinets
48” Worktop. Fits over 2 Cabinets
21” Corner Worktop
Worktop Options
200
lbs.
100
lbs.
150 lbs.
200
lbs.
150
lbs.
150
lbs.
150
lbs.
150
lbs.
Locker
Max 800lbs.
Tool Cabinet
Max 600 lbs.
Base Cabinet
Max 600 lbs.
Wall Cabinets
Max 100 lbs.
200
lbs.
200
lbs.
200
lbs.
100 lbs.
100 lbs.
100 lbs.
100
lbs.
200
lbs.
Weight
Capacity
Worktop on Cabinets
Max 200 lbs. / Cabinet
250 lbs per foot.
1000 lbs. per Set of 4
150 lbs. per 3” Caster
500 lbs. per Set of 4

6
Installation options for Cabinets
Wall mount on slatwall using slatwall
brackets (sold seperately).
Wall mount cabinets o oor.
Floor mount with adjustable levelling legs.
Important information: Please read
before beginning installation.
Sets with casters and adjustable leveling legs.
Note: Casters cannot be installed on Locker
cabinets. Casters not included in all sets.
Corner set installation. Note: Corner cabinets
can be installed using all installation options.
• Layouts shown are only examples.All
cabinets are mobile and can be congured
in a variety of dierent layouts.
• Plan layout and measure space before
installing.
• Locate wall studs prior to installation.
• Consider the location of electrical outlets
when planning layout.
• Measure height of cabinets for clearence.
• Base cabinets can be mounted ush front
or ush back with Locker cabinets.
Option 1. - see page 7.
Option 2. - see page 8.
Option 4. - see page 10
Option 3. - see page 9.
Option 5. - see page 11

7
Floor Installation Overview
1
Begin by securing Locker cabinet to wall
in determined postion. See Page 14 for
full instructions.
2
Attach feet to cabinets. See feet
installation on page 20.
Plan layout before installing cabinets.
• It is recommended to begin
installation with Locker cabinet.
• Cabinets must be fully secured
to wall using (4) wall screws per
cabinet.
• Casters can not be installed on
locker cabinets.
5
4
Position and secure remaining cabinets
to wall. Install cabinets one at a time. See
page 14 for full instructions.
Attach cabinets together. See page 15 for
detailed fastening instructions.
Attach worktop. See page 17 for full
instructions.
3
Option 1

8
Wall Mount Installation Overview
Plan layout before installing cabinets.
• Determine height cabinets will be
installed o the ground.
• It is recommended to begin
installation with Locker cabinet.
• Install cabinets one at a time.
• Cabinets must be fully secured
to wall using (4) wall screws per
cabinet.
Begin by attaching Locker cabinet to
wall. See page 12 for full instructions
on hanging cabinets.
Position and secure remaining base
cabinets, and wall cabinets to wall.
See page 12.
Attach cabinets together. See page 15.
Attach worktop. See page 17 for full
instructions.
1
2
3
4
Option 2

9
Slatwall Installation Overview
Plan layout before installing cabinets.
• Determine height cabinets will be
installed o the ground.
• Slatwall bracket sold seperately
• Slatwall brackets for use with
standard 3” slatwall.
• Check slatwall manufacturer for
rated load capacity.
• Do not overload.
Begin by attaching locker cabinet to
slatwall using slatwall bracket. See page
13 for slatwall hanging instructions.
Position and secure remaining base
cabinets, and wall cabinets.
Attach cabinets together. See page 15.
Attach worktop. See page 17 for full
instructions.
1
2
3
4
Option 3
Slatwall brackets sold separately. See
below for quantities needed.
• Locker, Tool and Base Cabinets - per
cabinet (2) x 24” Slatwall Brackets. Part
# 50979
• Wall Cabinets - per cabinet (1) x 24”
Slatwall Brackets. Part # 50979
• Corner Wall Cabinets - per cabinet (2)
x12” Slatwall Cabinets. Part # 50980

10
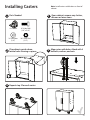
Caster Set Installation Overview
Plan layout before installing cabinets.
• It is recommended to begin
installation with Locker cabinet.
• Install cabinets one at a time.
• Locker and wall cabinets must be
fully secured to wall using (4) wall
screws per cabinet.
• Casters not included in all sets.
Attach base cabinets together using
joining plate and attach worktop. See
page 16- 17.
Position cabinets.
4
5
1
Attach feet to locker cabinets. Attach
casters to base cabinets. See full
installation on pages 20 & 21.
Begin by securing Locker cabinet to
wall in determined postion. See Page
14 for full instructions.
2
Secure wall cabinets to wall and fasten together.
A gap of 2” is recommended between wall and
locker to allow clearence for cabinets on casters.
See page 14 & 15 for full instructions.
3
Option 4

11
Corner Cabinet Installation Overview
1
Install corner wall cabinets followed
by remaining wall cabinets. See full
instructions on pages 14.
2
Attach feet to cabinets. See full feet
installation on page 20.
3
4
5
6
Install corner worktop supports and base
cabinets. See page 19.
Position,secure and attach all remaining
cabinets and worktops. See pages, 14, 15
and 17.
Install corner worktop. See page 19.
Option 5

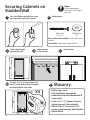
12
Use stud nder to locate the studs
and mark a line on the wall with a pencil
at desired height.
5
Hanging Cabinets on
Studded Wall
1
Gather parts.
2
• Follow steps 3 to 5.
• Drill 4 pilot holes through the perforated
strip with hammer drill & masonry bit.
• Use 4 x (2 ¼” x ¼” )Tapcon Concrete
Anchor into wall. (Not Included)
• OR 4 x (#10 x 2” )Screw with 3/16”
masonry plug into wall. (Not Included)
• Follow Step 6.
Wall Screw
(1/4” x 2.5”)
Wall Washer
(1/4”)
Masonry.
Attach remaining base cabinets (2),
and wall cabinets(3) to wall using same
method as locker cabinet(1)attachment.
4 Wall Screws per cabinet
4 Washers per cabinet
Note:
Do not load cabinet
without rst securing to
the wall.
Begin by attaching locker to wall. Line up
top of cabinet with pencil line(1), and pre-
drill 3/16” (6mm) holes into studs through
holes in cabinet(2). Use wall screws to
secure to wall(3).
4
3
D
e
t
er
mined He
ight
1
2
3
1
2
3
Finish by fastening cabinets together.
See page 15 for detailed instructions.
4 X
per Cabinet
4 X
per Cabinet
4 X
per Cabinet

13
4
Attach bracket to slatwall at desired
height.
Bracket Placement. Brackets needed per
cabinet. Wall - 1, Locker,Base and Tool - 2.
Align bolt with slots on back of cabinet
and hang cabinet.
Note:For Locker cabinet attach second
bracket 66” below rst bracket.For Base
cabinet attach second bracket 18” below
rst bracket.
2
3
Note: Slatwall Brackets for use with standard 3” slatwall Sold Separately. Check with your
slatwall supplier to determine the rated capacity of your slatwall. DO NOT OVERLOAD.
Hanging Cabinets on Slatwall
1
Insert bolts through slatwall bracket.
Parts Needed.
Hex Bolt
(¼” x ⁵/₈”)
Washer
(¼”)
Slatwall Bracket
Lock Nut
(¼”)
1.
1.
1.
2.
2.

14
• Follow steps 3 to 5.
• Drill 4 pilot holes through the
perforated strip with hammer drill &
masonry bit.
• Use 4 x (2 ¼” x ¼” )Tapcon Concrete
Anchor into wall. (Not Included)
• OR 4 x (#10 x 2” )Screw with 3/16”
masonry plug into wall. (Not Included)
• Follow Step 6.
Wall Screw
(¼” x 2½”)
Wall Washer
(¼”)
Masonry.
Base, Locker, Tool and Wall: 4 wall screws and 4
washers
Corner Wall: 6 wall screws and 6 washers
Note:
Do not load cabinet
without rst securing to
the wall.
Securing Cabinets on
Studded Wall
1
Level cabinet.
Gather parts.
2
Align cabinet
to stud marks.
Use stud nder to locate the studs
and mark the wall with a pencil.
4
3
5
Place cabinet tight
against the wall.
X4
6
Pre-drill (4) 1/4” (6.5mm) then drill
4 wall screws and washers through
perforated holes into studs.

15
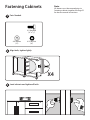
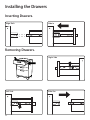
Fastening Cabinets
Note:
All drawers must be removed prior to
fastening cabinets together.See Page 22
for drawer removal instructions.
Align bolts, tighten lightly.
Level cabinets and tighten all bolts.
X4
1
2
Parts Needed.
4 X Lock nut
(¼”)
8 X Washer
(¼”)
4 X Hex Bolt
(¼” x ⁵/₈”)
3

16
Fastening Cabinets with Casters
1
Flip cabinets and push sides
together, locate holes on edges.
2
Parts Needed.
1
1
Open cabinets, remove any shelves,
drawers or loose items.
Attach casters and fasten cabinets
together. See pages 15. & 21.
5
4
Align holes with joining plate and attach using
foot attachment screws.
3
2 x Joining
Brackets
8 x Foot
Attachment
Screw
1
1

17
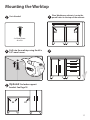
Mounting the Worktop
1
X2
X2
Place Worktop on cabinets. Locate the
punch holes on the tops of the cabinets.
2
Drill into the worktop using the #8 x
5/8” wood screws.
3
I
Parts Needed.
4 x Wood Screw
#8 x 5/8
Optional: For locker support
bracket. See Page 18.
X4 X2

18
Installing Worktop
Side Support Bracket
Note: Support Bracket included with Lockers
A support bracket is to be used if the worktop is
added to the set without a secondary supporting
base/tool cabinet.
Open locker doors and locate holes on either side.
2
Tighten nuts & bolts.
Parts Needed.
4
3
Align bracket holes with locker holes
and insert hex bolts through holes.
1
2 X Lock Nut
(1/4”)
4 X Washer
(1/4”)
2 X Hex Bolt
(.25” x 5/8”)
X2
Use #8 x 5/8” wood screws and washers,
provided in the locker packaging.
X2
4 x Wood Screw
#8 x 5/8
5
X4 X2

19
Position one cabinet into position and
attach corner cabinets to brackets using
#8 x 5/8” wood screws.
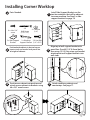
Installing Corner Worktop
1
Position both cabinets in desired corner.
Locate studs and mark a level pencil line
at height of cabinets.
Align top of wall support bracket with
pencil line. Pre-drill 1/4” (6.5mm) holes,
then using (2) X 2.5 lag screw per bracket
attach corner wall support brackets into
wall studs.
2
Install Side Support Brackets on the
two base cabinets that will be adjacent
to corner worktop. See Step 2 in side
support brackets on page 18.
Parts Needed.
3
4 x Washer
(1/4”)
6 x # 8 x 5/8”
screw
4
2 x Wall Support
Bracket
2 x Worktop
Support Bracket
4 X
Wall Screw
(1/4” x 2.5”)
2 X Hex Bolt
(1/4” x 5/8”)
Attach remaining cabinets and
countertops. See page 17.
5

20
Installing Feet
1
Flip cabinet upside down,
locate holes at corners.
2
Stand & level feet.
Parts Needed.
Open cabinet, remove any shelves,
drawers or loose items.
Repeat steps 3 for each corner.
5
4
Align leg with edge of cabinet. Screw in
4 x Foot attachment screws & leveling foot.
3
4 x Cabinet Leg
16 x Foot Attachment
Screws
4 x
M10 x 65mm
Levelling
Foot
Page is loading ...
Page is loading ...
Page is loading ...
Page is loading ...
Page is loading ...
Page is loading ...
Page is loading ...
Page is loading ...
Page is loading ...
-
 1
1
-
 2
2
-
 3
3
-
 4
4
-
 5
5
-
 6
6
-
 7
7
-
 8
8
-
 9
9
-
 10
10
-
 11
11
-
 12
12
-
 13
13
-
 14
14
-
 15
15
-
 16
16
-
 17
17
-
 18
18
-
 19
19
-
 20
20
-
 21
21
-
 22
22
-
 23
23
-
 24
24
-
 25
25
-
 26
26
-
 27
27
-
 28
28
-
 29
29


NewAge Products 53500 Installation guide
- Category
- Flat panel wall mounts
- Type
- Installation guide
Ask a question and I''ll find the answer in the document
Finding information in a document is now easier with AI
Related papers
-
 NewAge Products 55382 Installation guide
-
NewAge Products 59550 Installation guide
-
 NewAge Products 53255 Operating instructions
-
 NewAge Products 65884 Installation guide
-
NewAge Products 50516 User manual
-
NewAge Products 53466 User guide
-
 NewAge Products 50405 Installation guide
-
 NewAge Products 52097 Installation guide
-
 NewAge Products 50322 Installation guide
-


Other documents
-
Intermetro M3-382825C Operating instructions
-
Luxor WT34P-B Installation guide
-
-
-
Carlisle UC401823 Operating instructions
-
Heartland Cabinetry 8000405P Operating instructions
-
 Furniture of America IDF-4112C Installation guide
-
Everbilt EH-WSTHDUS-330 User manual
-
Ekena Millwork BKTM02X05X08TNE Installation guide
-
 ferm LIVING Haze vitrine Assembly Manual

