Page is loading ...

8,BECKER
INSTRUCTIONMANUAL
IF YOU SHOULD HAVE A QUESTION OR
EXPERIENCE A PROBLEM WITH YOUR
KEY INFORMATION YOU SHOULD KNOW:
• Charge battery for 9 hours before first use.
• DO NOT OVER-TENSION CHAIN. Refer to "ADJUSTING
CHAIN TENSION" for proper method of tensioning chain.
• Retighten chain frequently during first two hours of use.
BLACK & DECKER PRODUCT,
CALL 1-800-544-6986
BEFORE YOU CALL, HAVETHE FOLLOWING INFORMATION
AVAILABLE,CATALOG No.,TYPE No.,AND DATECODE (e.g.0130M).
IN MOST CASES, A BLACK & DECKER REPRESENTATIVE CAN
RESOLVE YOUR PROBLEM OVER THE PHONE. IFYOU HAVEA
SUGGESTION OR COMMENT, GIVE US A CALL. YOUR FEEDBACK IS
VITAL TO BLACK & DECKER.
SAVETHISMANUALFORFUTUREREFERENCE•
VEAELESPANOLENLACONTRAPORTADA.
POUR LEFRANCAIS, VOIR LACOUVERTUREARRII:RE.
IN.STRUCTIVO DE O.PERACION, CENTROS. DE SERVICIO Y
POLIZA DE GARANTIA. ADVERTENClA: LEASE ESTE
INSTRUCTIVO ANTES DE USAR EL PRODUCTO.

IMPORTANT SAFETY RULES
_WARNING: Read and understand all instructions. Failure to
follow all instructionslisted below may result inelectric shock, fire
and/or serious personal injury.
SAVE THESE INSTRUCTIONS
Before Operating Pole Saw
• For safe operation, read and understand all instructionsbefore
using the Pole Saw. Follow all safety instructions. Failure to follow
all safety instructions listed below, can result in serious personal
injury.
• Watch what you are doing. Use common sense. Do not operate
Pole Saw when you are tired.
• Use Pole Saw for cutting wood only. Do not use Pole Saw for
purpose not intended. Do not use for cutting non-wood items.
• Only well-instructed adults should operate Pole Saw. Never allow
children to operate.
• Do not allow children or untrained individuals to use this unit.
• Wear the following safety gear when operating Pole Saw:
- heavy-duty gloves
- steel-toed safety footwear with non-skid soles
- safety glasses, goggles or face screen that are marked to
comply with ANSI Z87
- safety hard hat
- ear mufflers or ear plug
- face or dust mask (if working in dusty areas)
• Wear heavy long pants and boots. Do not wear loose fitting
clothing, short pants, jewelry of any kind, or go barefoot.
• Secure long hair so it is above shoulder level to prevent
entanglement in any moving parts.
• Before cutting, always provide the following:
- clear work area
- secure footing
- planned retreat path from falling limbs
• Inspect tree before trimming. Make allowance for branches to fall
freely to the ground.
• Do not use your Pole Saw to fell saplings.
While Operating Pole Saw
• Stay alert. Use common sense while operating the unit.
• Keep work area clean. Cluttered areas invite injuries.
• Keep children, animals and bystanders at least 50 ft. (15 m) away
from Pole Saw. Only Pole Saw user should be in work area.
• Do not use the Pole Saw to cut down trees.
• Grip Pole Saw securely - one hand on the pole, the other on the
handle.
• Keep finger off trigger until ready to make cut.
• Before starting Pole Saw, make sure chain is not touching anything.
• Keep all parts of body away from chain when Pole Saw is running.
• Do not force Pole Saw while cutting. Apply light pressure. Itwill do
the job better and safer at the rate for which it was intended.
• Carry Pole Saw from one place to another
- with battery removed
- by holding pole at balance point
- with guide bar and chain to rear and with scabbard attached
• Do not cut small brush and saplings with the Pole Saw. Slender
matter may catch in the chain and be whipped toward you. This
could also pull you off balance.
• Do not operate in poor lighting.
• Keep firm footing and balance. Do not overreach. Overreaching
can result in loss of balance or exposure to hot surfaces.
• Keep all parts of your body away from any moving part.
• Do not, under any circumstance, use any attachment or accessory
on this product, which was not provided with the product, or
identified as appropriate for use with this product inthis Instruction
Manual.
Do not operate Pole Saw:
- while under the influence of alcohol, medication, or drugs
- in rain or in damp or wet areas
- where highly flammable liquids or gases are present

-ifPoleSawisdamaged,adjustedwrong,ornotfullyand
securelyassembled
-iftriggerdoesnotturnPoleSawonandoff.Chainmuststop
movingwhenyoureleasetrigger.Havefaultyswitchreplacedby
authorizedservicecenter.See"ServiceInformation".
-whileinahurry
-whileintreeoronaladder
-whileonaerialbooms,bucketsorplatforms
-duringhighwindorstormingweather
G ewAneralSafety Rules
RNING: Shock Hazard. To protect yourself from electrocution,
do not operate within 50 feet (15 m) of overhead electrical lines.
Failure to do this could result in severe personal injury.
• To protect yourself from falling branches do not stand directly under
the branch or limb being cut. This unit should not be held at an
angle over 60 degrees from ground level.
• Keep the handles dry, clean, and free of oil.
• Before you start the unit, make sure the chain is not contacting any
object.
• Make sure the cutting chain has stopped before setting the unit
down.
Service
• Tool service must be performed only by qualified repair
personnel. Service or maintenance performed by unqualified
personnel could result in a risk of injury. See "Service Information".
• When servicing a tool, use only identical replacement parts.
Follow instructions in the Maintenance section of this manual.
Use of unauthorized parts or failure to follow Maintenance
Instructions may create a risk of electric shock or injury.
Guard Against Kickback
z_WARNING: KICKBACK may occur when the nose or tip of the
guide bar touches an object, or when the wood closes inand pinches
the saw chain in the cut. Tip contact in some cases may cause a
lightning fast reverse reaction, kicking the guide bar up and back
towards the operator. Pinching the saw chain along the top of the
guide bar may push the guide bar rapidly back towards the operator.
Either of these reactions may cause you to lose control of the saw
which could result in serious injury to user.
The following precautions should be followed to minimize
kickback:
• Grip Pole Saw firmly. Hold the saw firmly with both hands when the
unit is running. Use a firm grip with thumbs and fingers encircling
the saw handle and pole.
• Do not over reach.
• Keep proper footing and balance at all times.
• Don't let the nose of the guide bar contact a log, branch, ground or
other obstruction.
• Do not extend Pole Saw handle above shoulder height.
• Use devices such as low kickback chain, chain braking system and
special guide bars that reduce the risks associated with kickback.
• Only use replacement bars and chains specified by the
manufacturer or the equivalent.
• Never let the moving chain contact any object at the tip of the guide
bar.
• Keep the working area free from obstructions such as other trees,
branches, rocks, fences, stumps, etc. Eliminate or avoid any
obstruction that your saw chain could hit while you are cutting
through a particular log or branch.
• Keep your saw chain sharp and properly tensioned. A loose or dull
chain can increase the chance of kickback. Check tension at
regular intervals with the motor stopped and battery removed.
• Begin and continue cutting only with the chain moving at full speed.
If the chain is moving at a slower speed, there is a greater chance
for kickback to occur.
• Cut one branch at a time.
• Use extreme caution when re-entering a previous cut. Engage
spiked bumpers into wood and allow chain to reach full speed
before proceeding with cut.
• Do not attempt plunge cuts or bore cuts.
• Watch for shifting branches or other forces that could close a cut
and pinch or fall into chain.
Kickback Safety Features
z_Warning: The following features are included on your Pole Saw
to help reduce the hazard of kickback; however such features will
not totally eliminate this dangerous reaction. As a chain saw user do
not rely only on safety devices. You must follow all safety
precautions, instructions, and maintenance in this manual to help
avoid kickback and other forces which can result in serious injury.
• Reduced-Kickback Guide Bar, designed with a small radius tip
which reduces the size of the kickback danger zone on bar tip. A
reduced- kickback guide bar is one which has been demonstrated
to significantly reduce the number and seriousness of kickbacks
when tested in accordance with safety requirements for electric
chain saws.
• Low-Kickback Chain, designed with a contoured depth gauge and
guard link which deflect kickback force and allow wood to gradually
ride into the cutter. A low-kickback chain is a chain which has met
kickback performance requirements of ANSI B175.1 when tested
on the representative sample of chain saws.
±Specific Safety Rules
• Hold tool by insulated gripping surfaces when performing an
operation where the cutting tool may contact hidden wiring.
Contact with a "live" wire will make exposed metal parts of the toot
"live" and shock the operator.
Z_WARNING: Some dust created by power sanding, sawing,
grinding, drilling, and other construction activities contains chemicals
known to cause cancer, birth defects or other reproductive harm.
Some examples of these chemicals are:
• lead from lead-based paints,
• crystalline silica from bricks and cement and other masonry
products, and
• arsenic and chromium from chemically-treated lumber. (CCA)
Your risk from these exposures varies, depending on how often you
do this type of work. To reduce your exposure to these chemicals:
work in a well ventilated area, and work with approved safety
equipment, such as those dust masks that are specially designed
to filter out microscopic particles.
• Avoid prolonged contact with dust from power sanding,
sawing, grinding, drilling, and other construction activities.
Wear protective clothing and wash exposed areas with soap
and water. Allowing dust to get into your mouth, eyes, or lay on the
skin may promote absorption of harmful chemicals.
z_WARNING: Use of this tool can generate and/or disburse
dust, which may cause serious and permanent respiratory or
other injury. Always use NIOSH/OSHA approved respiratory
protection appropriate for the dust exposure. Direct particles away
from face and body.
SAVE THESE INSTRUCTIONS
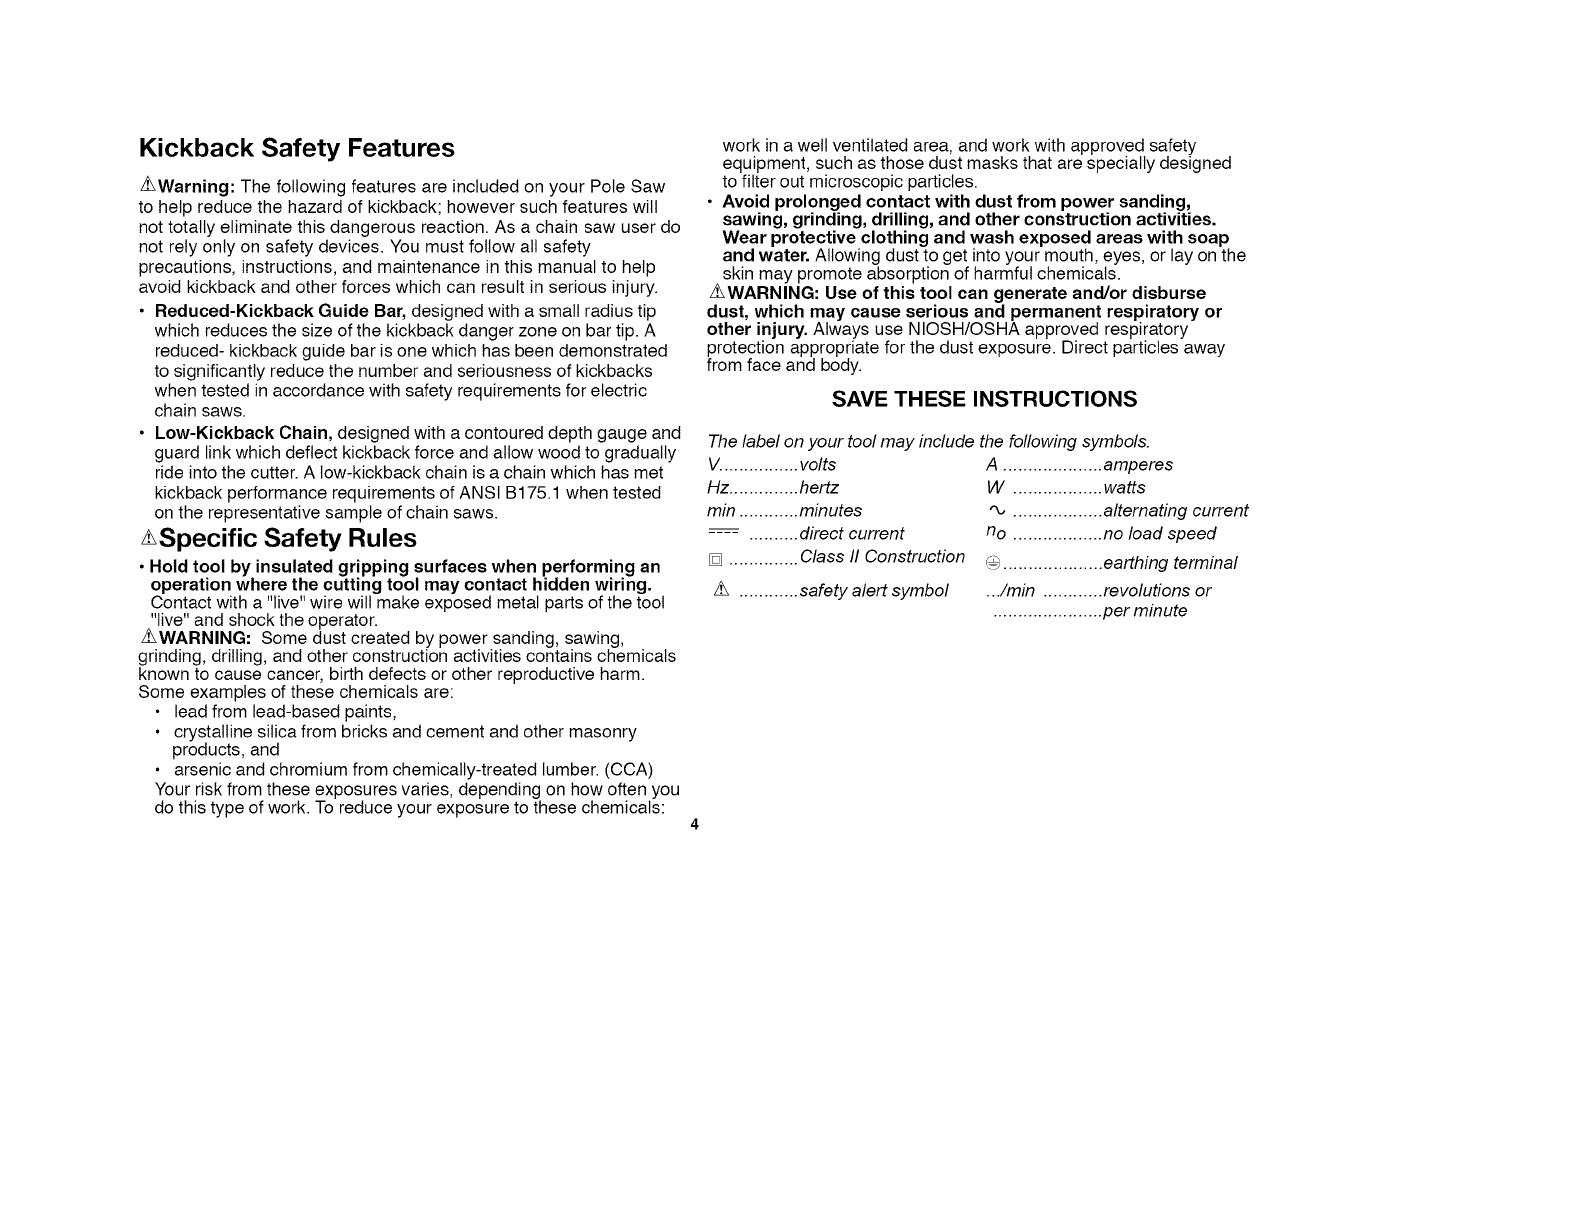
The label on your tool may include the following symbols.
V................ volts
Hz.............. hertz
rain ............ minutes
.... .......... direct current
[] .............. Class II Construction
z_ ............ safety alert symbol
A .................... amperes
W .................. watts
"_ .................. alternating current
no .................. no load speed
G .................... earthing terminal
•../min ............ revolutions or
...................... per minute
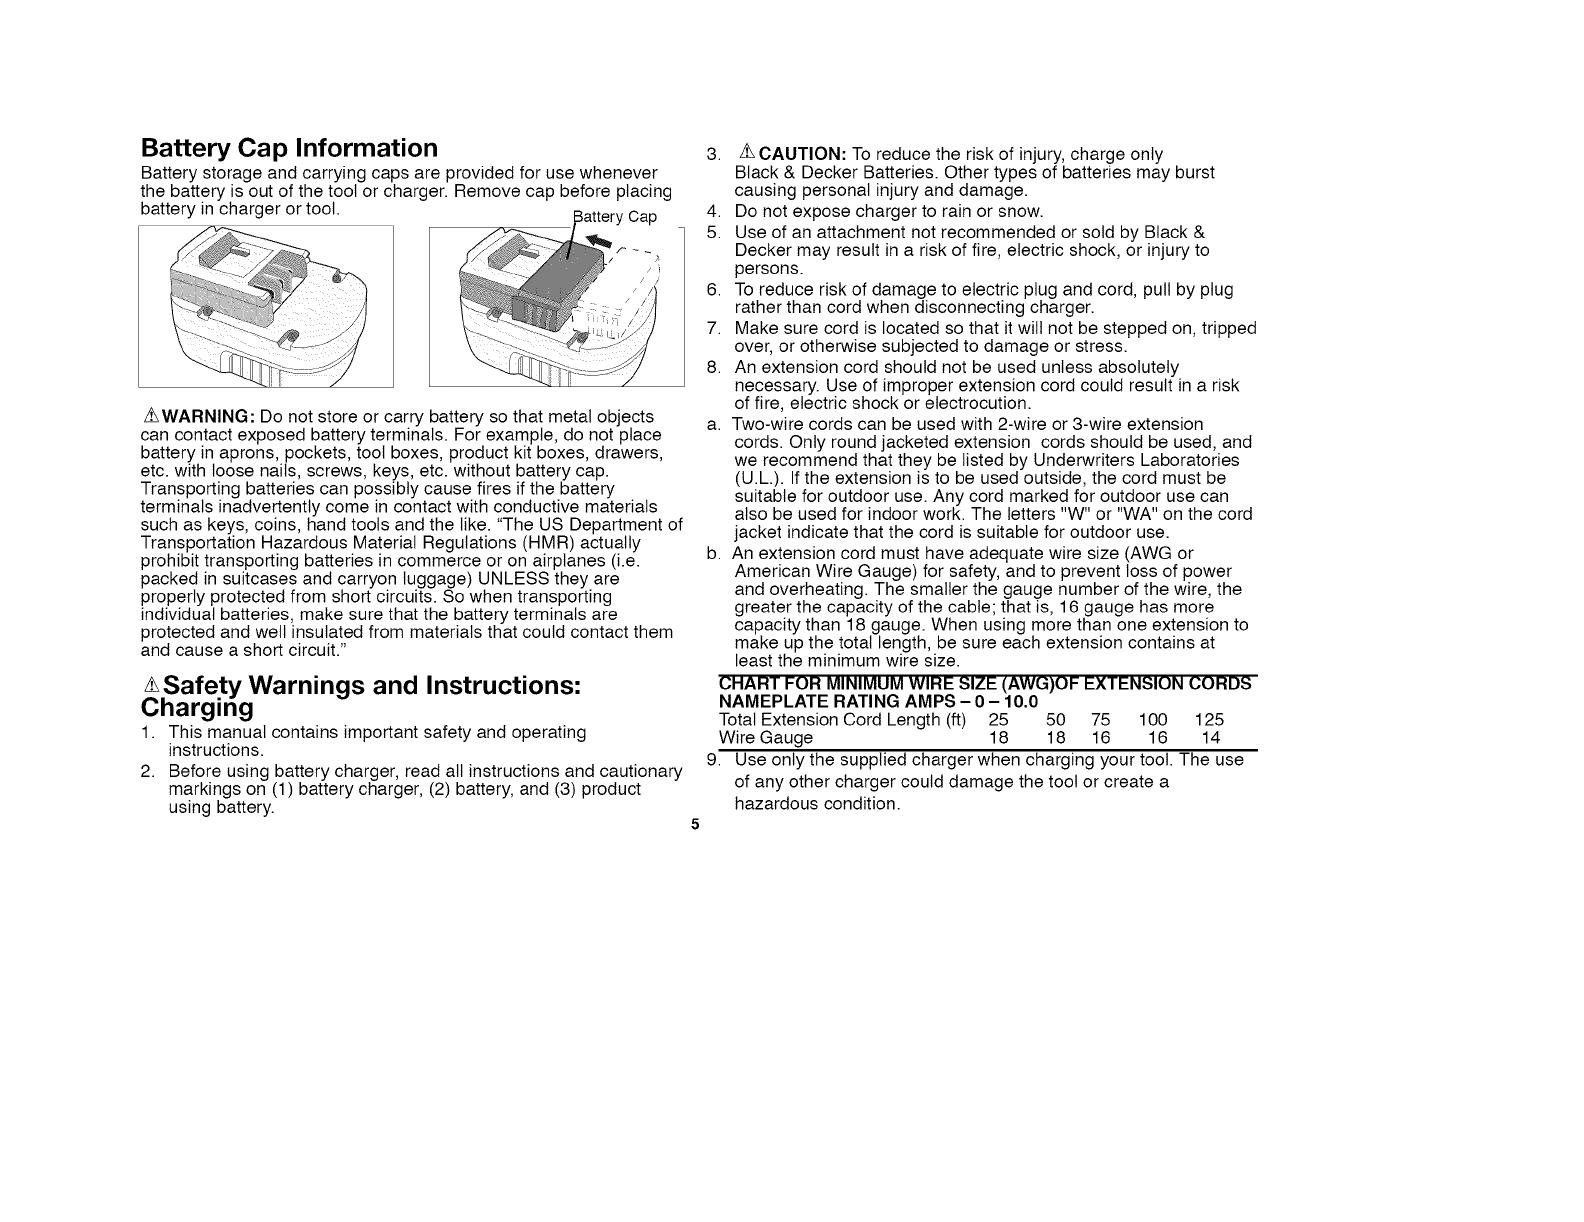
Battery Cap Information
Battery storage and carrying caps are provided for use whenever
the battery is out of the tool or charger. Remove cap before placing
battery in charger or tool. Battery Cap
z_WARNING: Do not store or carry battery so that metal objects
can contact exposed battery terminals. For example, do not place
battery in aprons, pockets, tool boxes, product kit boxes, drawers,
etc. with loose nails, screws, keys, etc. without battery cap.
Transporting batteries can possibly cause fires if the battery
terminals inadvertently come in contact with conductive materials
such as keys, coins, hand tools and the like. "The US Department of
Transportation Hazardous Material Regulations (HMR) actually
prohibit transporting batteries in commerce or on airplanes (i.e.
packed in suitcases and carryon luggage) UNLESS they are
properly protected from short circuits. So when transporting
individual batteries, make sure that the battery terminals are
protected and welt insulated from materials that could contact them
and cause a short circuit."
Safety Warnings and Instructions:
Charging
1. This manual contains important safety and operating
instructions.
2. Before using battery charger, read all instructions and cautionary
markings on (1) battery charger, (2) battery, and (3) product
using battery.
3. z_CAUTION: To reduce the risk of injury, charge only
Black & Decker Batteries. Other types of batteries may burst
causing personal injury and damage.
4. Do not expose charger to rain or snow.
5. Use of an attachment not recommended or sold by Black &
Decker may result in a risk of fire, electric shock, or injury to
persons.
6. To reduce risk of damage to electric plug and cord, pull by plug
rather than cord when disconnecting charger.
7. Make sure cord is located so that it wilt not be stepped on, tripped
over, or otherwise subjected to damage or stress.
8. An extension cord should not be used unless absolutely
necessary. Use of improper extension cord could result in a risk
of fire, electric shock or electrocution.
a. Two-wire cords can be used with 2-wire or 3-wire extension
cords. Only round jacketed extension cords should be used, and
we recommend that they be listed by Underwriters Laboratories
(U.L.). If the extension is to be used outside, the cord must be
suitable for outdoor use. Any cord marked for outdoor use can
also be used for indoor work. The letters "W" or "WA" on the cord
jacket indicate that the cord is suitable for outdoor use.
b. An extension cord must have adequate wire size (AWG or
American Wire Gauge) for safety, and to prevent loss of power
and overheating. The smaller the gauge number of the wire, the
greater the capacity of the cable; that is, 16 gauge has more
capacity than 18 gauge. When using more than one extension to
make up the total length, be sure each extension contains at
least the minimum wire size.
CHART FOR MINIMUM WIRE SIZE (AWG)OF EXTENSION CORDS
NAMEPLATE RATING AMPS- 0 - 10.0
Total Extension Cord Length (ft) 25 50 75 100 125
Wire Gauge 18 18 16 16 14
9. Use only the supplied charger when charging your tool. The use
of any other charger could damage the tool or create a
hazardous condition.

10.Useonlyonechargerwhencharging.
11.Donotattempttoopenthecharger.Therearenocustomer
serviceablepartsinside.ReturntoanyauthorizedBlack&Decker
servicecenter.
12.DONOTincineratethetoolorbatteryeveniftheyareseverely
damagedorcompletelywornout.Thebatteriescanexplodeina
fire.
13.Asmallleakageofliquidfromthebatterycellsmayoccurunder
extremeusage,chargingortemperatureconditions.Thisdoesnot
indicateafailure.However,iftheouterseatisbrokenandthis
leakagegetsonyourskin:
a. Washquicklywithsoapandwater.
b. Neutralizewithamildacidsuchaslemonjuiceorvinegar.
c. Ifthebatteryliquidgetsinyoureyes,flushthemwithcleanwater
foraminimumof10minutesandseekimmediatemedical
attention.MEDICAL NOTE: The liquid is a 25-35% solution of
potassium hydroxide.
Charging the Battery
THE BATTERY IS NOT FULLY CHARGED AT THE FACTORY.
BEFORE ATTEMPTING TO CHARGE THE BATTERY
THOROUGHLY READ ALL OF THE SAFETY INSTRUCTIONS.
The charger is designed to use standard household 120 volt 60 Hz
power.
1. Ptug the charger into any standard 120 Volt 60 Hz electrical
outlet. NOTE: Do not charge by means
of an engine generator or DC power
source. Use only 120V AC.
2. Slide the charger onto the battery as
shown in figure 1 and let the battery
charge initiallyfor 9 hours. After the , ,initial charge, under normal usage, your ,.... ..
battery should be fully charged in 3 to 6 _\_ _ _
hours.
3. Unplug charger, and remove the battery.
Important Charging Notes
1. After normal usage, your battery should be fully charged in 3 to
6 hours. If the battery is run-down completely, it may take up to
6 hours to become fully charged. Your battery was sent from the
factory in an uncharged condition. Before attempting to use it, it
must be charged for at least 9 hours.
2. DO NOT charge the battery in an air temperature below 40°F
(4,5 °C) or above 105°E(40,5 °C) This is important and wilt
prevent serious damage to the battery. Longest life and best
performance can be obtained if battery is charged when air
temperature is about 75°F.(24°C).
3. While charging, the charger may hum and become warm to
touch. This is a normal condition and does not indicate a
problem.
4. If the battery does not charge property--(1) Check current at
receptacle by plugging in a lamp or other appliance. (2) Check
to see if receptacle is connected to a light switch which turns
power off when you turn out the lights. (3) Move charger and
battery to a surrounding air temperature of 40°F (4,5 °C) to
105°F.(40,5 °C) (4) If the receptacle and temperature are OK,
and you do not get proper charging, take or send the battery
and charger to your local Black & Decker service center. See
Tools Electric in yellow pages.
5. The battery should be recharged when it fails to produce
sufficient power on jobs which were easily done previously. DO
NOT CONTINUE using product with its battery pack in a
depleted condition.
6. To prolong battery life, avoid leaving the battery on charge for
extended periods of time (over 30 days without use). Although
overcharging is not a safety concern, it can significantly reduce
overall battery pack life.
7. The battery will reach optimum performance after being cycled 5
times during normal usage. There is no need to run the batteries
down completely before recharging. Normal usage is the best
method of discharging and recharging the batteries
Pole Saw Names and Terms
• Chain Brake - A device used to stop the Pole Saw.
• Drive Sprocket or Sprocket - The toothed part that drives the saw
chain.
• Guide Bar -A solid railed structure that supports and guides the
saw chain.
• Guide Bar Scabbard - Enclosure fitted over guide bar to prevent
tooth contact when saw isnot in use.
• Kickback - The backward or upward motion, or both of the guide
bar occurring when the saw chain near the nose of the top area of
the guide bar contacts any object such as a log or branch, or when
the wood closes in and pinches the saw chain in the cut.
• Low-Kickback Chain - A chain that complies with the kickback
performance requirements of ANSI B175.1-1991 (when tested on a
representative sample of chain saws.
• Reduced Kickback Guide Bar - A guide bar which has been
demonstrated to reduce kickback significantly.
• Replacement Saw Chain - A chain that complies with kickback
performance requirements of ANSI B175.1-1991 when tested with
specific chain saws. It may not meet the ANSI performance
requirements when used with other saws.
• Saw Chain - A loop of chain having cutting teeth, that cut the wood,
and that is driven by the motor and is supported by the guide bar.
• Spiked Bumper (Spike) - The pointed tooth or teeth for use when
pruning to pivot the saw and maintain position while sawing.
• Switch - A device that when operated will complete or interrupt an
electrical power circuit to the motor of the chain saw.
• Switch Lockout - A movable stop that prevents the unintentional
operation of the switch until manually actuated.
• Trimming (Pruning) - Process of cutting limbs from a tree.
• Undercut - An upward cut from underside of a log or limb.This is
done while in normal cutting position and cutting with top of guide
bar.
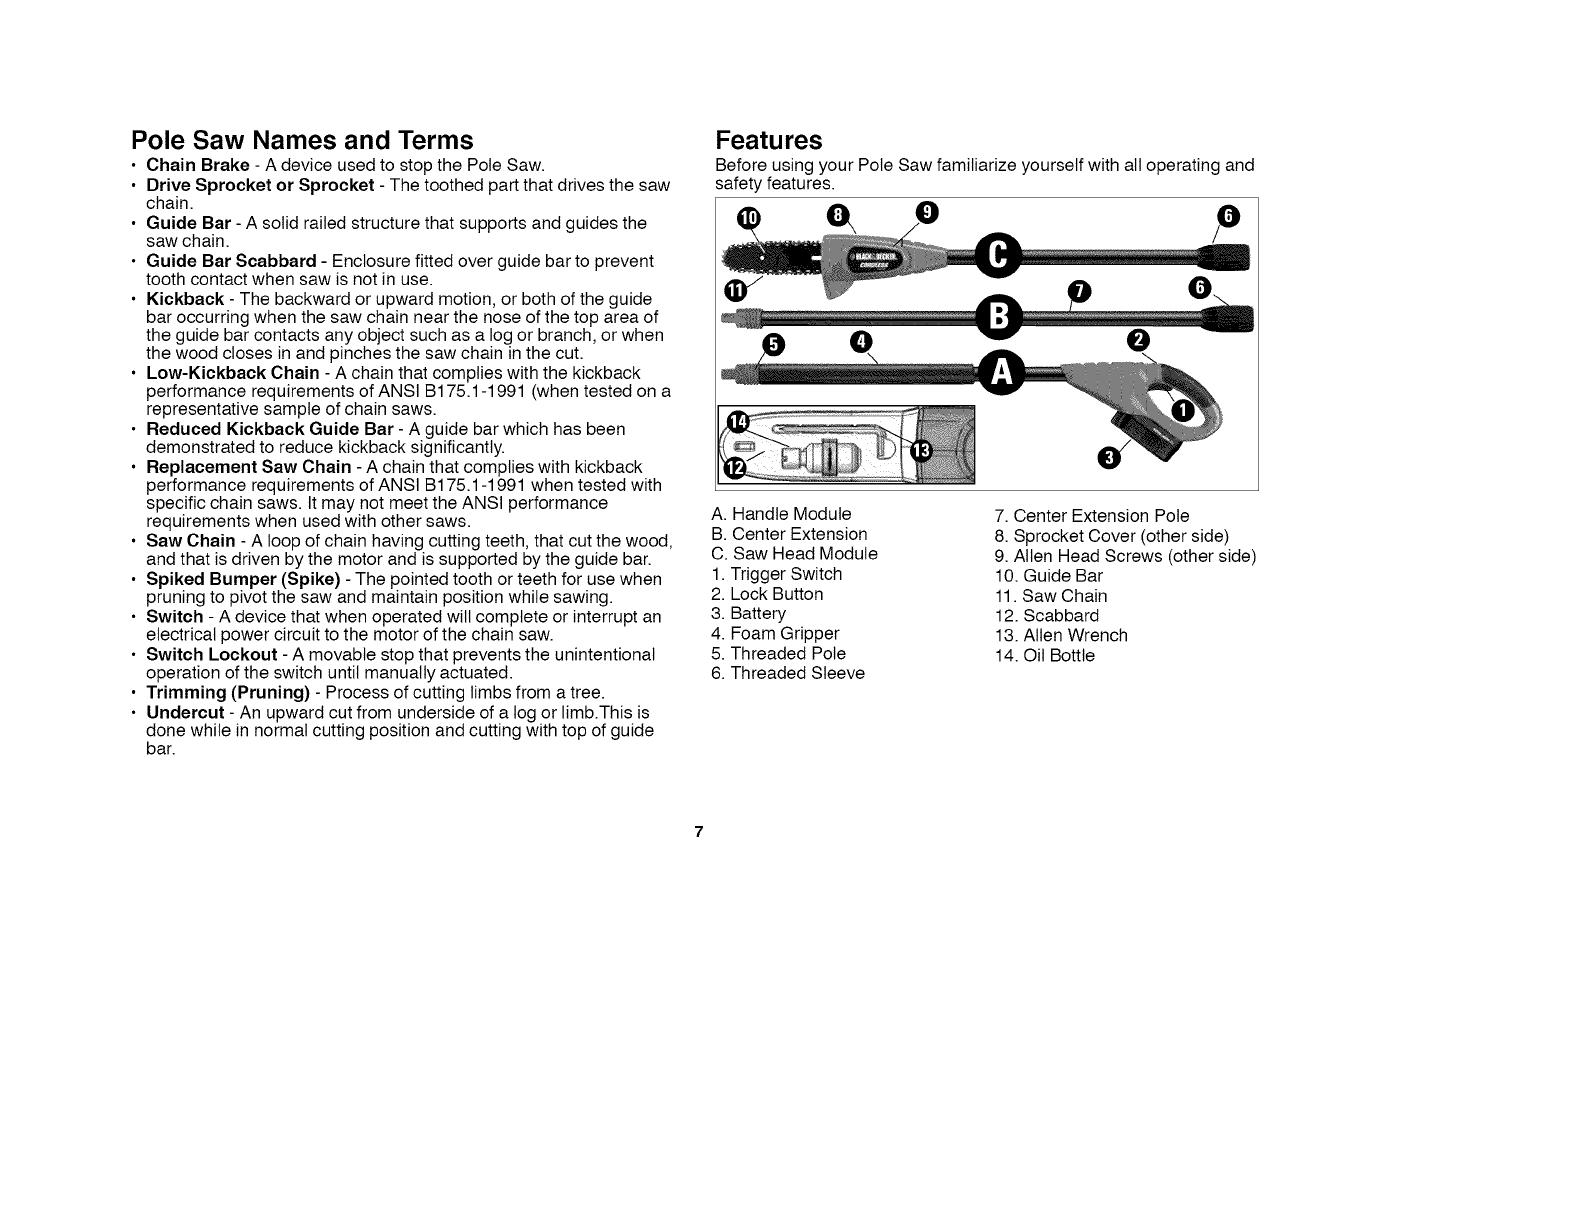
Features
Before using your Pole Saw familiarize yourself with all operating and
safety features.
A. Handle Module
B. Center Extension
C. Saw Head Module
1. Trigger Switch
2. Lock Button
3. Battery
4. Foam Gripper
5. Threaded Pole
6. Threaded Sleeve
7. Center Extension Pole
8. Sprocket Cover (other side)
9. Allen Head Screws (other side)
10. Guide Bar
11. Saw Chain
12. Scabbard
13. Allen Wrench
14. Oil Bottle

Preparing Your Pole Trimmer for Use
_WARNING: Read and understand all instructions. Failure to
follow all instructionslisted below may result inelectric shock, fire
and/or serious personal injury.
Installing and Removing Saw Chain
_WARNING: Sharp moving blade. To prevent accidental
operation, insure that battery is disconnected from the handle
before performing the following operations. Failure to do this
could result in serious personal injury.
CAUTION: Sharp moving blade. Always wear protective
gloves when installing or removing the chain. The chain is sharp
and can cut you when it is not running.
• Place the saw on a firm surface.
Rotate the two allen head screws
counterclockwise with the wrench
provided as shown in figure 2.
• Remove sprocket cover, bar clamp,
and allen head screws.
• To remove the chain, rotate the screw
in the front of the housing using the
flat screwdriver end of the wrench as
shown in figure 3. Turning the screw
counterclockwise allows the guide
bar to recede and reduces the
tension on the chain so that it may be
removed.
• Lift the worn chain out of the groove
in the guide bar.
• Flip guide bar over.
• To replace the chain, check to make
sure that the slot in the guide bar is
over the two location pins shown in
figure 3A and that the hole below the
slot is located over the adjustment
pin.
LOCATINGPINS
• Place new chain in groove of guide bar and around sprocket. Make
sure saw teeth are facing correct direction by matching arrow on
chain with graphic on housing shown here. I__
• Rotate the screw in the front of the
housing clockwise to increase the chain tension as in Figure 3.
• Replace sprocket cover, bar clamp, and allen head screws.
• Follow instructions for adjusting the chain tension.
Adjusting Chain Tension
• With the saw still on a firm surface
check the chain tension. The tension
is correct when the chain snaps back
after being pulled 1/8" (3mm) away
from the chain bar with light force
from the middle finger and thumb as
shown in figure 4. There should be
no "sag" between the guide bar and the
chain on the underside as shown in
figure 5.
• To adjust saw chain tension, loosen
allen head screws
• Rotate the screw in the front of the
housing using the flat screwdriver end
of the wrench as shown in figure 3.
• Do not over-tension the chain as this will lead to excessive wear
and will reduce the life of the bar and chain. Overtensioning also
reduces the amount of cuts you wilt get per battery charge.
• Once chain tension is correct, tighten allen head screws to clamp
bar.
• When the chain is new check the tension frequently (after
disconnecting battery) during the first 2 hours of use as a new chain
stretches slightly.
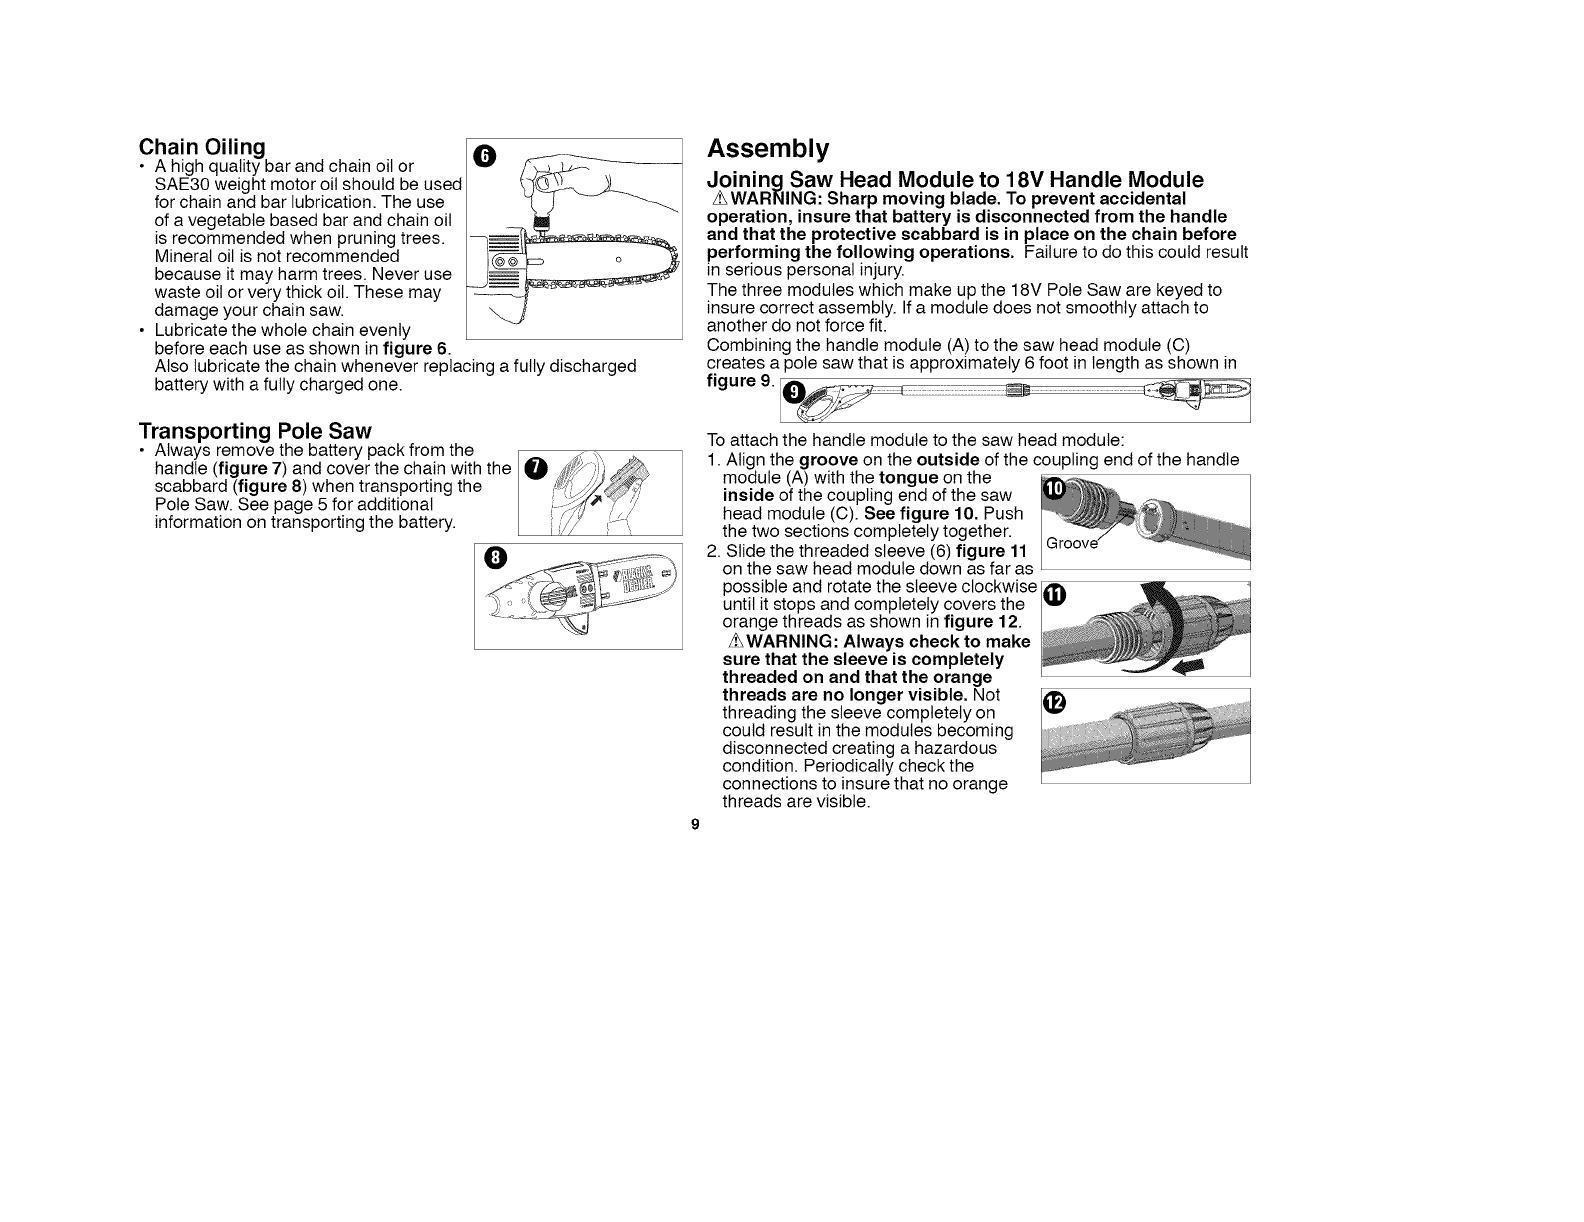
Chain Oiling
• A high quality bar and chain oil or
SAE30 weight motor oil should be used
for chain and bar lubrication. The use
of a vegetable based bar and chain oil
is recommended when pruning trees.
Mineral oil is not recommended
because it may harm trees. Never use
waste oil or very thick oil. These may
damage your chain saw.
• Lubricate the whole chain evenly
before each use as shown in figure 6.
Also lubricate the chain whenever replacing a fully discharged
battery with a fully charged one.
Transporting Pole Saw
• Always remove the battery pack from the
handle (figure 7) and cover the chain with the
scabbard (figure 8) when transporting the
Pole Saw. See page 5 for additional
information on transporting the battery.
Assembly
Joining Saw Head Module to 18V Handle Module
!_WAR_IING: Sharp moving blade. To prevent accidental
operation, insure that battery is disconnected from the handle
and that the protective scabbard is in place on the chain before
performing the following operations. Failure to do this could result
in serious personal injury.
The three modules which make up the 18V Pole Saw are keyed to
insure correct assembly. Ifa module does not smoothly attach to
another do not force fit.
Combining the handle module (A) to the saw head module (C)
creates a pole saw that is approximately 6 foot in length as shown in
Toattach the handle module to the saw head module:
1.Align the groove on the outside of the coupling end of the handle
module (A) with the tongue on the
inside of the coupling end of the saw
head module (C). See figure 10. Push
the two sections completely together.
2. Slide the threaded sleeve (6) figure 11
on the saw head module down as far as
possible and rotate the sleeve clockwise
until it stops and completely covers the
orange threads as shown in figure 12.
_WARNING: Always check to make
sure that the sleeve is completely
threaded on and that the orange
threads are no longer visible. Not
threading the sleeve completely on
could result in the modules becoming
disconnected creating a hazardous
condition. Periodically check the
connections to insure that no orange
threads are visible.
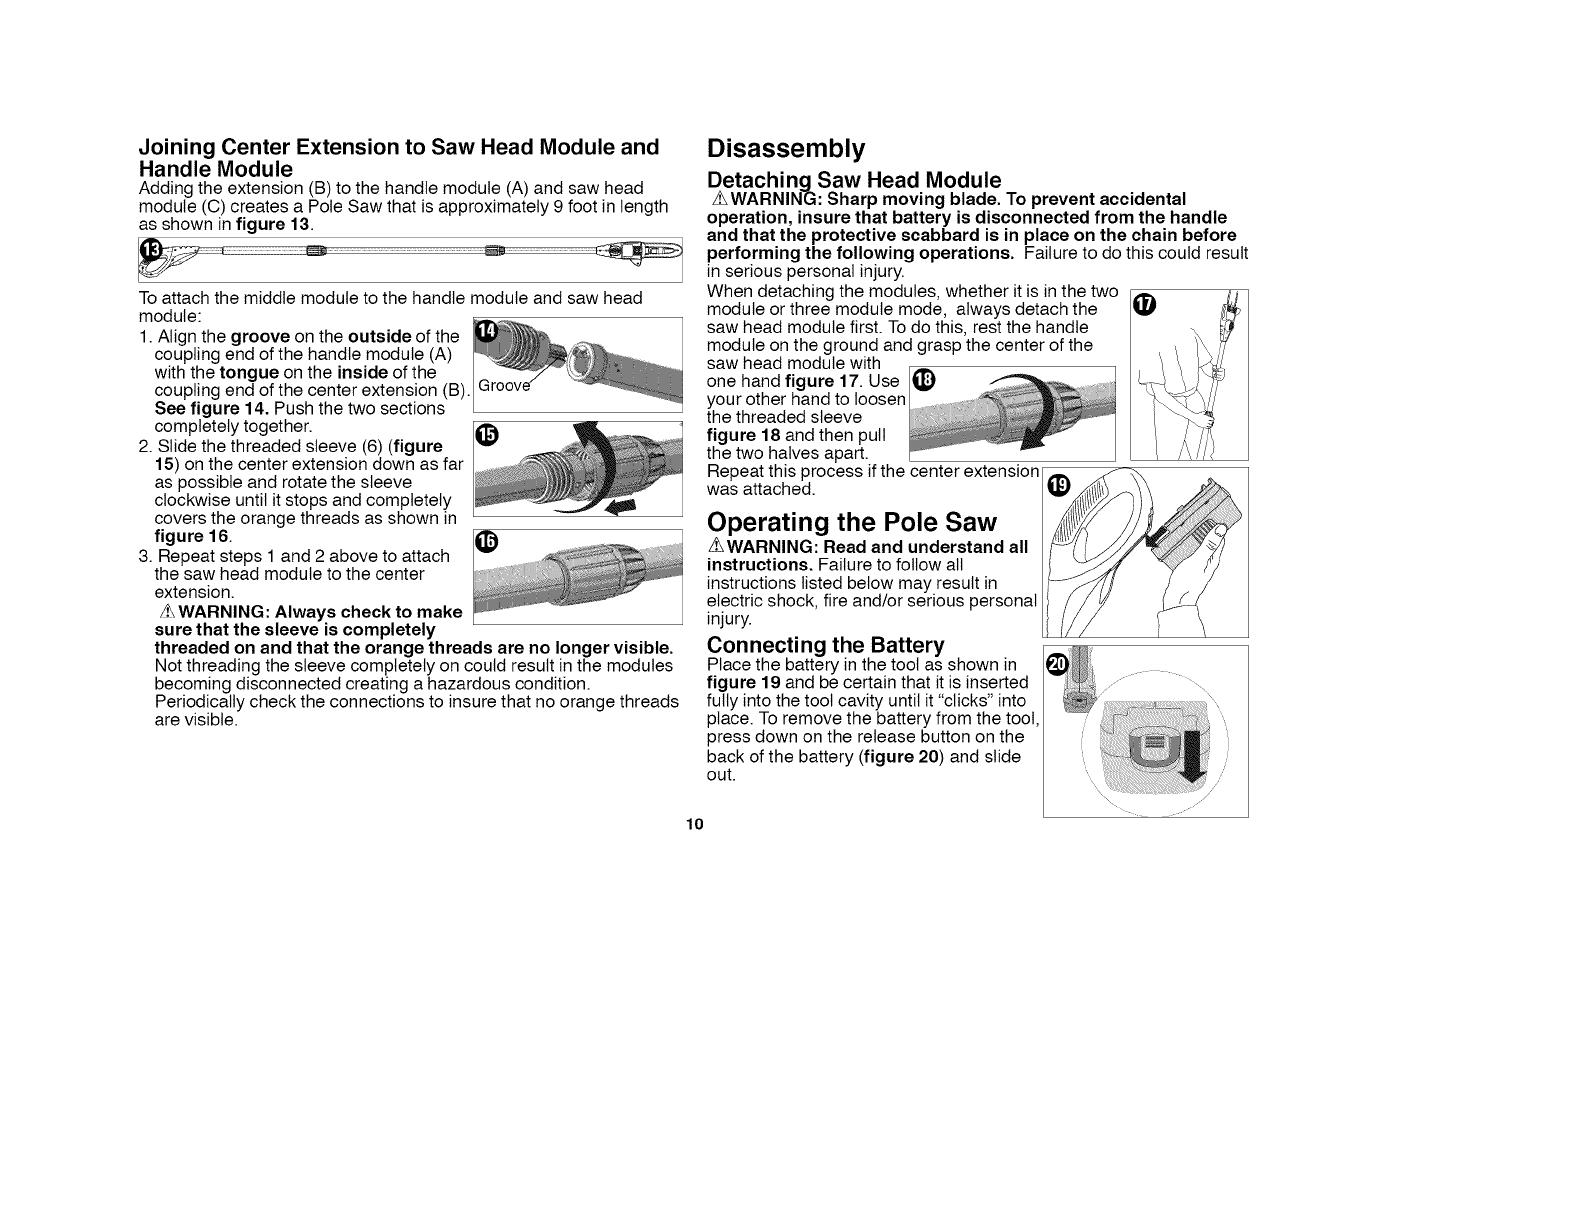
Joining Center Extension to Saw Head Module and
Handle Module
Adding the extension (B) to the handle module (A) and saw head
module (C) creates a Pole Saw that is approximately 9 foot in length
as shown in figure 13.
Toattach the middle module to the handle module and saw head
module:
1.Align the groove on the outside of the
coupling end of the handle module (A)
with the tongue on the inside of the
coupling end of the center extension (B).
See figure 14. Push the two sections
completely together.
2. Slide the threaded sleeve (6) (figure _I
15) on the center extension down as far
as possible and rotate the sleeve
clockwise until it stops and completely
covers the orange threads as shown in
figure 16.
3. Repeat steps 1 and 2 above to attach
the saw head module to the center
extension.
_WARNING: Always check to make
sure that the sleeve is completely
threaded on and that the orange threads are no longer visible.
Not threading the sleeve completely on could result in the modules
becoming disconnected creating a hazardous condition.
Periodically check the connections to insure that no orange threads
are visible.
Disassembly
DetachingSaw Head Module
z_WARNIN-G: Sharp moving blade. To prevent accidental
operation, insure that battery is disconnected from the handle
and that the protective scabbard is in place on the chain before
performing the following operations. Failure to do this could result
in serious personal injury.
When detaching the modules, whether it is in the two
module or three module mode, always detach the
saw head module first. To do this, rest the handle
module on the ground and grasp the center of the
saw head module with
one hand figure 17. Use
your other hand to loosen
the threaded sleeve
figure 18 and then pull
the two halves apart.
Repeat this process if the center extension
was attached.
Operating the Pole Saw
Z_WARNING: Read and understand all
instructions. Failure to follow all
instructionslisted below may result in
electric shock, fire and/or serious personal
injury.
Connecting the Battery
Place the battery in the tool as shown in
figure 19 and be certain that it is inserted
fully intothe tool cavity until it"clicks" into
place. To remove the battery from the tool.
press down on the release button on the
back of the battery (figure 20) and slide
out.
lO
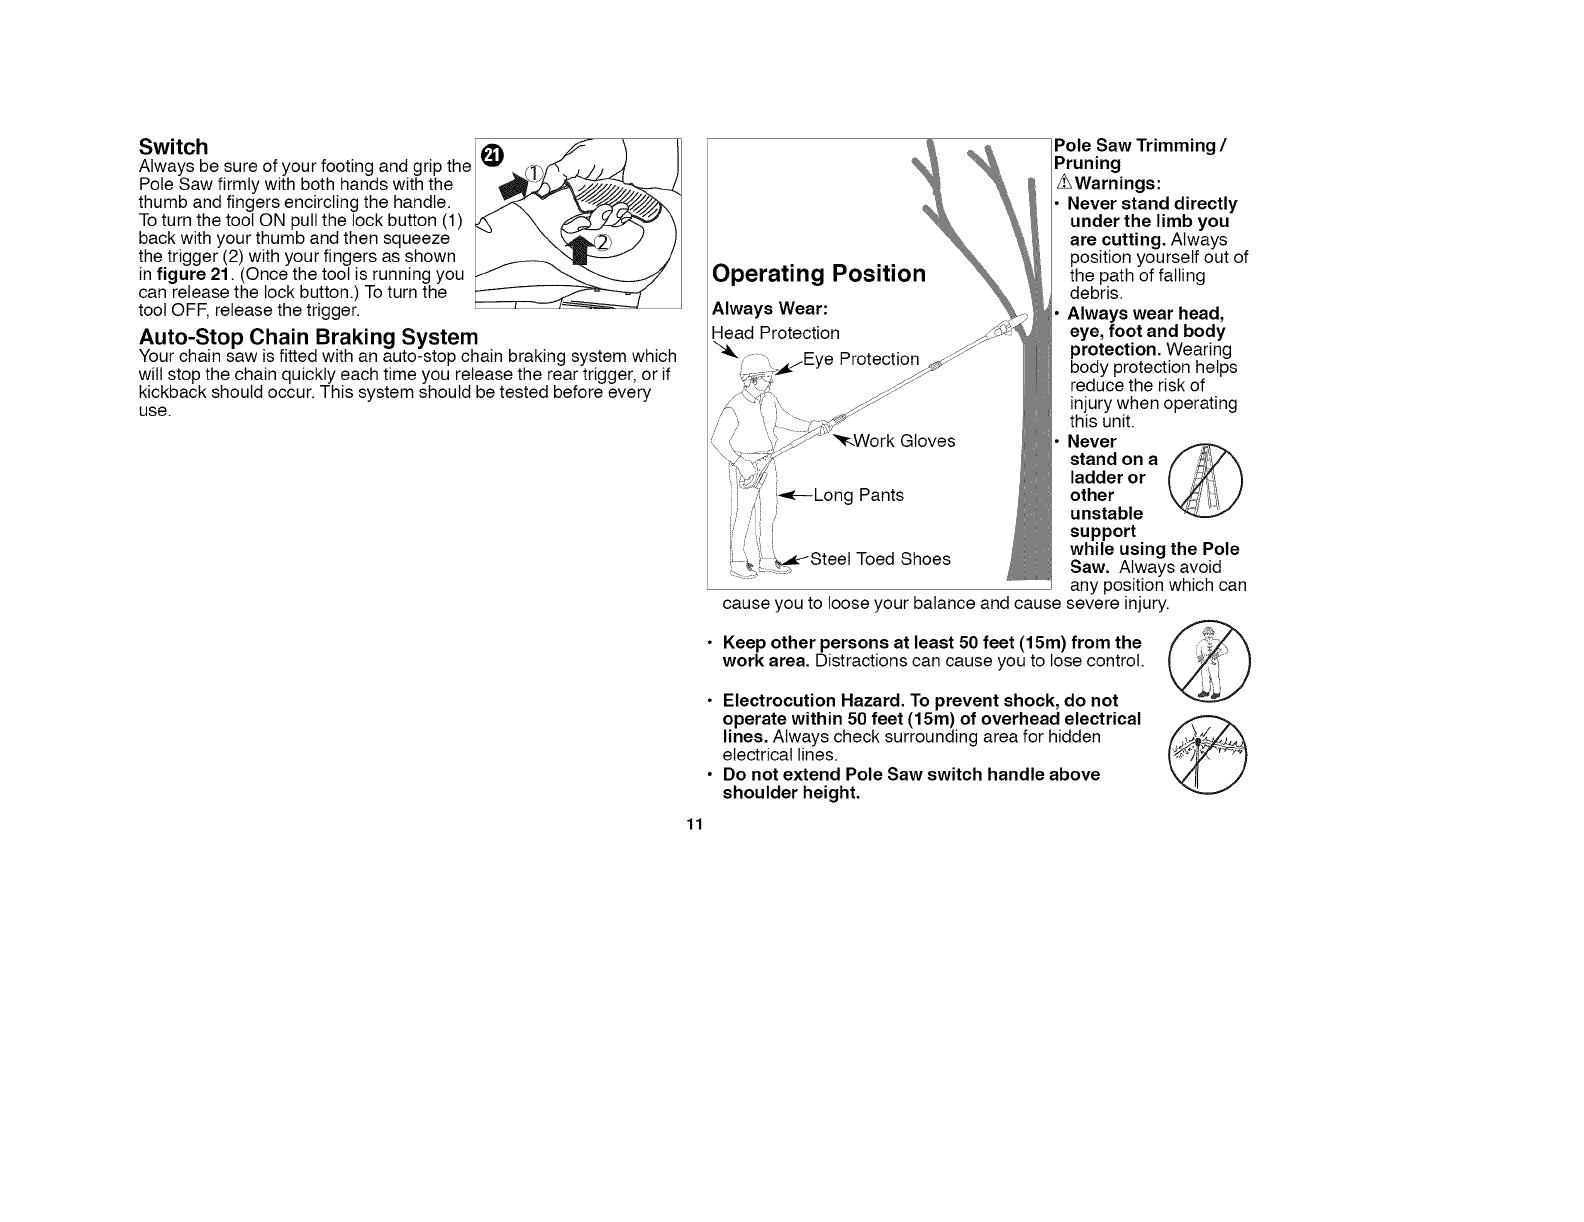
Switch
Always be sure of your footing and grip the
Pole Saw firmly with both hands with the
thumb and fingers encircling the handle.
Toturn the toot ON pull the lock button (1)
back with your thumb and then squeeze
the trigger (2) with your fingers as shown
in figure 21. (Once the tool is running you
can release the lock button.) Toturn the
tool OFF, release the trigger.
Auto-Stop Chain Braking System
Your chain saw is fitted with an auto-stop chain braking system which
will stop the chain quickly each time you release the rear trigger, or if
kickback should occur. This system should be tested before every
use.
11
Operating Position
Always Wear:
Head Protection
Protection
Gloves
Shoes
cause you to loose your balance and cause
• Keep other persons at least 50 feet (15m) from the
work area. Distractions can cause you to lose control.
• Electrocution Hazard. To prevent shock, do not
operate within 50 feet (15m) of overhead electrical
lines. Always check surrounding area for hidden
electrical lines.
• Do not extend Pole Saw switch handle above
shoulder height.
Pole Saw Trimming /
Pruning
ZLWarnings:
Never stand directly
under the limb you
are cutting. Always
position yourself out of
the path of falling
debris.
Always wear head,
eye, foot and body
protection. Wearing
body protection helps
reduce the risk of
injury when operating
this unit.
Never
stand on a
ladder or
other
unstable
support
while using the Pole
Saw. Always avoid
any position which can
severe injury.
@
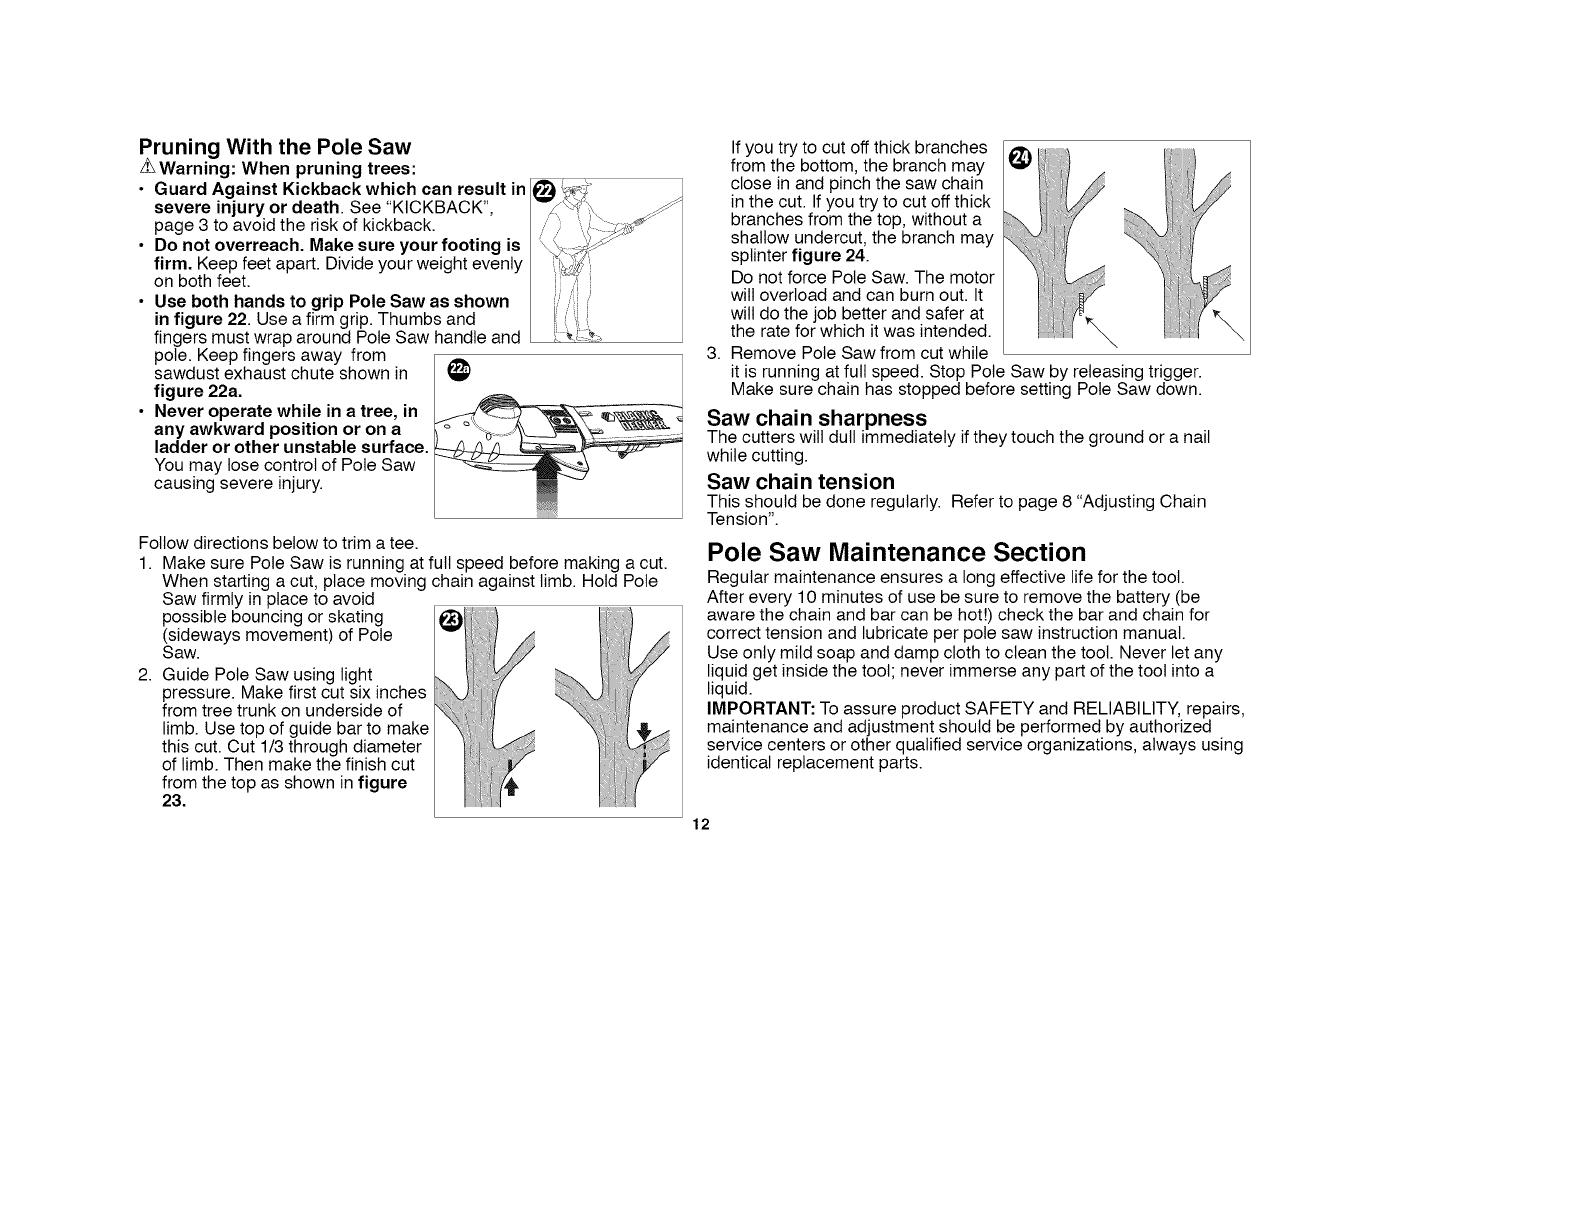
Pruning With the Pole Saw
Warning: When pruning trees:
• Guard Against Kickback which can result in
severe injury or death. See "KICKBACK",
page 3 to avoid the risk of kickback.
• Do not overreach. Make sure your footing is
firm. Keep feet apart. Divide your weight evenly
on both feet.
• Use both hands to grip Pole Saw as shown
in figure 22. Use a firm grip. Thumbs and
fingers must wrap around Pole Saw handle and
pole. Keep fingers away from
sawdust exhaust chute shown in _)
figure 22a.
• Never operate while in a tree, in
any awkward position or on a
ladder or other unstable surface.
You may lose control of Pole Saw
causing severe injury.
Follow directions below to trim a tee.
1. Make sure Pole Saw is running at full speed before making a cut.
When starting a cut, place moving chain against limb. Hold Pole
Saw firmly in place to avoid
possible bouncing or skating
(sideways movement) of Pole
Saw.
2. Guide Pole Saw using light
pressure. Make first cut six inches
from tree trunk on underside of
limb. Use top of guide bar to make
this cut. Cut 1/3 through diameter
of limb. Then make the finish cut
from the top as shown in figure
23. _
Ifyou try to cut off thick branches
from the bottom, the branch may
close in and pinch the saw chain
in the cut. If you try to cut off thick
branches from the top, without a
shallow undercut, the branch may
splinter figure 24.
Do not force Pole Saw. The motor
will overload and can burn out. It
will do the job better and safer at
the rate for which it was intended.
3. Remove Pole Saw from cut while
it is running at full speed. Stop Pole Saw by releasing trigger.
Make sure chain has stopped before setting Pole Saw down.
Saw chain sharpness
The cutters will dull immediately if they touch the ground or a nail
while cutting.
Saw chain tension
This should be done regularly. Refer to page 8 "Adjusting Chain
Tension".
\
Pole Saw Maintenance Section
Regular maintenance ensures a long effective life for the tool.
After every 10 minutes of use be sure to remove the battery (be
aware the chain and bar can be hot!) check the bar and chain for
correct tension and lubricate per pole saw instruction manual.
Use only mild soap and damp cloth to clean the toot. Never let any
liquid get inside the toot; never immerse any part of the tool into a
liquid.
IMPORTANT: To assure product SAFETY and RELIABILITY, repairs,
maintenance and adjustment should be performed by authorized
service centers or other qualified service organizations, always using
identical replacement parts.
12
Accessories
Replacement chain and bar are available from your nearest Black &
Decker service center.
Replacement chain # 623382-00
Replacement bar # 623381-00
The use of accessories not recommended in this manual may be
hazardous.
Troubleshooting Section
If your Pole Saw does not operate correctly check the following:
Problem Possible Cause Possible Solution
• Tool wilt not • Battery not
start, installed properly.
• Battery not •
charged.
• Lock-out button not •
actuated.
• Pole connections •
not properly
tightened.
• Unit wilt not • Battery not
charge, inserted into
charger.
• Bar / chain • Chain too tight. •
overheated.
• Lubrication •
needed.
• Chain is • Chain tension set •
loose, incorrectly.
• Poor cut • Chain tension set •
quality, incorrectly.
• Chain needs
replacement.
Check battery installation.
Check battery charging
requirements.
Pull back on lock
button/actuate trigger.
Refer to instruction manual
for pole connections.
Insert battery into charger
until red LED appears.
Charge up to 8 hours if
battery totally drained.
Refer to section on
adjusting chain tension.
Refer to sections for chain
oiling application.
Refer to section for chain
tensioning.
Refer to section on
adjusting chain tension.
Note: Excessive tension
leads to excessive wear
and reduction in life of bar
& chain.
Lubricate after every 10
minutes of use.
Refer to section for
installation of chain.
13
Troubleshooting Section Con't.
Problem Possible Cause Possible Solution
• Unit runs but • Chain installed
does not cut. backwards.
Refer to sections for
installing and removing
chain.
Service Information
Whether you need technical advice, repair, or genuine factory
replacement parts, contact the Black & Decker location nearest you.
Tofind your local service location, refer to the yellow page directory
under "Tools-Electric" or call: 1-800-54-HOW TO (544-6986).
Full Two-Year Home Use Warranty
Black & Decker (U.S.) Inc. warrants this product for two years against
any defects in material or workmanship. The defective product will be
replaced or repaired at no charge in either of two ways:
The first, which will result in exchanges only, is to return the product
to the retailer from whom it was purchased (provided that the store is
a participating retailer). Returns should be made within the time
period of the retailer's policy for exchanges (usually 30 to 90 days
after the sate). Proof of purchase may be required. Please check with
the retailer for their specific return policy regarding returns that are
beyond the time set for exchanges.
The second option is to take or send the product (prepaid) to a Black
& Decker owned or authorized Service Center for repair or
replacement at our option. Proof of purchase may be required. Black
& Decker owned and authorized service centers are listed under
"Toots-Electric" in the yellow pages of the phone directory.
This warranty does not apply to accessories. This warranty gives you
specific legal rights and you may have other rights which vary from
state to state. Should you have any questions, contact the manager
of your nearest Black & Decker Service Center. This product is not
intended for commercial use.
FREE WARNING LABEL REPLACEMENT: If your warning labels
become illegible or are missing, call 1-800-544-6986 for a free
replacement
14
Black & Decker (U.S.) Inc.,
701 E. Joppa Rd.
Towson, MD 21286 U.S.A.
See 'Tools-Electric'
- Yellow Pages -
for Service & Sales

GUIDE D'UTILISATION
RENSEIGNEMENTS IMPORTANTS
• Recharger la pile pendant 9 heures avant sa premiere
utilisation.
• NE PAS SUR TENDRE LA CHAINE. Se reporter b.la
section ,, RC:GLAGE DE LA TENSION DE LA CHA[NE _
pour savoir comment tendre correctement la chafne.
• Retendre la chafne frequemment pendant les deux
premieres heures d'utilisation.
w
CONSIGNES DE SECURITE IMPORTANTES
Z_AVERTISSEMENT : Life, comprendre et suivre toutes les
directives precis6es ci-dessous afin d'eviter les risques de choc
electrique, d'incendie ou de btessure grave.
CONSERVER CES DIRECTIVES
Avant toute utilisation de la scie a long manche
• Pour votre securit6, lire et comprendre toute instruction avant toute
utitisation de la scie b.long manche. Suivre toutes les directives de
securit& Tout manquement aux directives de s6curite suivantes
pose des risques de btessure serieuse.
• Rester vigilant. Faire preuve de bon sens. Ne pas utiliser la scie &
long manche en cas de fatigue.
• N'utiliser la scie a.long manche que pour couper du bois. Ne pas
utiliser la scie a.long manche pour des t&ches pour lesquetles ette
n'a pas 6te congue. Ne pas utitiser pour couper des objets qui ne
sont pas en bois.
• La scie a.long manche ne dolt ¢tre utilisee que par des aduttes
experiment6s. Ne jamais permettre son utilisation par des enfants.
• Ne permettre a.aucun enfant ou individu non exp6rimente d'utiliser
cet outil.
• Porter les 6tements de protection suivants pendant I'utilisation de la
scie & tong manche :
- gants epais
- chaussures de s6curite antiderapantes &embouts d'acier
- lunettes ou masque de protection conformes aux normes
ANSI Z87
- casque de protection
- silencieux ou protege-tympans
- masque ou masque antipoussieres (en presence de poussieres)
• Porter des pantatons longs et des bottes. Ne pas porter de
vCtements amples, de shorts, de bijoux de toute sorte, et ne pas
marcher pieds nus.
• Attacher les cheveux au-dessus des epaules pour qu'ils ne se
prennent pas darts les pieces mobiles.
15

• Avant toute decoupe, s'assurer de bien :
- evacuer I'aire de travail
- maintenir un bon equilibre
- se premunir contre toute chute de branches
• Inspecter I'arbre avant I'elagage. Prevoir un espace suffisant pour
la chute des branches.
• Ne pas utiliser la scie & long manche pour decouper des gautes.
Pendant I'utilisation de la scie a long manche
• Rester prudent. Faire preuve de bon sens pendant I'utitisation de
I'appareik
• Maintenir I'aire de travail propre. Les lieux encombres sont
propices aux accidents.
• Maintenir enfants, animaux et curieux a.au moins 15 m (50 pi) de la
scie & long manche. Seut I'utilisateur de la scie & long manche doit
se trouver sur I'aire de travail.
• Ne pas utiliser la scie a.long manche pour abattre des arbres.
• Maintenir la scie a.long manche solidement, une main sur le
manche et I'autre sur la poignee.
• Maintenir le doigt loin de la g&chette tant que I'on est pas pr6t &
decouper.
• Avant de demarrer la scie & long manche, s'assurer que la chaine
ne touche aucune surface.
• Maintenir toute pattie du corps eloign6e de la chafne pendant te
fonctionnement de la scie a.long manche.
• Ne pas forcer ta scie & tong manche pendant la decoupe. Apptiquer
une pression legere. La scie effectuera un meilleur travail, de fa£on
plus sQreet & la vitesse d6siree.
• Transporter la scie & long manche d'un endroit &I'autre
- sans sa pile,
- en maintenant t'equilibre du manche,
- avec le guide-chafne et la chafne &I'arriere avec I'envetoppe en
place.
• Ne pas utiliser la scie a.long manche pour decouper des buissons
ou des gaules. Des materiaux fins pourraient se prendre darts la
chaine et 6tre projetes sur I'utitisateur. Ceta pourrait aussi faire
perdre I'equilibre a.I'utilisateur.
Ne pas utitiser l'appareil en cas d'eclairage insuffisant.
Maintenir son equilibre et les pieds sotidement ancres au sol. Ne
pas effectuer de travaux hors de portee. I1y a risque de perdre
I'equilibre et risques de brQlures.
Maintenir toute partie du corps etoign6e de toute piece mobile.
Ne pas, en aucune circonstance, utitiser aucun accessoire avec cet
appareil n'ayant pas et6 fourni avec t'appareil ou reconnu comme
approprie pour 6tre utilise avec cet appareil dans le manuel
d'instructions.
Ne pas utiliser la scie a long manche •
- sous I'influence de la drogue, I'alcool ou les medicaments
- sous la pluie ou sur des lieux humides ou d6trempes
- en presence de liquides ou gaz hautement inflammables
- si la scie a.long manche est endommagee, mal regl6e ou pas
completement ou solidement assembtee
- si I'interrupteur de ta scie & long manche est defectueux. La
chafne doit s'arr6ter Iorsqu'on ret&che ta g&chette. Faire
remptacer tout interrupteur defectueux par un centre de service
autorise. Se reporter a.la section, Information d'entretien >>.
- Iorsqu'on est presse
- darts un arbre ou sur une echelle
- sur un promontoire, un seau ou une ptate-forme
- en cas de vents puissants ou d'orage
Regles de securit6- Gen6ralit6s
_AVERTISSEMENT : Risques de chocs etectriques. Pour eviter
tout risque d'electrocution, ne pas utiliser a.moins de 15 m (50 pi)
de lignes electriques aeriennes. Tout manquement a.cette regle
augmente les risques de btessure grave.
• Pour se proteger de toute chute de branche, ne passe mettre
directement sous la branche ou le rameau &decouper. Ne pas
diriger cet appareil a.un angle de plus de 60 degre du sol.
16
• Maintenir les poignees propres et seches, exempts d'huile.
• Avant de demarrer t'appareil, s'assurer que la chafne n'est en
contact avec aucun objet.
• Avant de poser I'appareil, s'assurer de I'arrCtcomptet de lachafne.
Entretien
• L'outil dolt _tre entretenu par du personnel qualifie seulement;
tout entretien effectue par une personne non qualifiee pourrait
entrafner des risques de btessure. Se reporter & la section _
Information d'entretien _>.
• Lots de I'entretien, n'utiliser que des pieces de reehange
identiques et suivre les directives preeisees a la section ,,
Entretien >_du present manuel afin de prevenir les risques de
choc electrique ou de btessure.
Dispositif de protection contre les rebonds
_AVERTISSEMENT : Le fait que te nez ou te bout du guide-cha_ne
touche un objet ou que le bois pince et coince la chaTne coupante
dans ta coupe peut provoquer des REBONDS. Un contact de
I'embout peut dans certains cas provoquer une reaction inverse
extr6mement rapide, et renvoyer le guide-chafne vers l'utitisateur.
Pincer la chafne coupante sur le dessus du guide-chafne peut aussi
repousser rapidement ce dernier vers I'utitisateur. L'une ou l'autre de
ces reactions peut provoquer la perte de contrSle de la scie et poser
des risques de btessure grave a.I'utitisateur.
Les precautions suivantes doivent _tre observees pour
minimiser tout rebond :
• Maintenir la scie & long manche fermement. La maintenir
fermement & deux mains pendant te fonctionnement de I'appareil.
S'assurer que pouces et doigts cramponnent solidement la poignee
et le manche.
• Ne pas effectuer de travaux hors de portee.
• Les pieds doivent rester bien ancres au sol afin de maintenir son
equitibre en tout temps.
• Ne pas laisser le nez ou te guide-chafne entrer en contact avec un
17
tronc, une branche, le sol ou toute autre obstruction.
• Ne pas utitiser la scie si son manche se trouve au-dessus des
epaules.
• Utiliser des dispositifs tels chafnes anti-rebonds, systemes de
freinage pour chafnes, et guides-chafnes speciaux pour reduire les
risques associes aux rebonds.
• N'utiliser que des guides-chafnes ou chafnes recommandes par le
fabricant ou leur equivalence.
• Ne jamais laisser ta chafne en mouvement entrer en contact avec
un objet au bout du guide-chafne.
• t_liminer de I'aire de travail toute obstruction tetle que arbres,
branches, rochers, barrieres, souches, etc. t_liminer ou eviter toute
obstruction que la chafne coupante pourrait toucher pendant ta
decoupe d'une branche ou d'un tronc particulier.
• Maintenir la chafne coupante bien affQtee et correctement tendue.
Une chafne detendue ou emoussee augmente les risques de
rebond. Verifier ta tension a.intervalles regutiers apres arr_t
comptet du moteur et retrait de lapile.
• Commencer et continuer a.couper avec la chafne fonctionnant a.
ptein regime. ,&,une vitesse moindre, les risques de rebonds
augmentent.
• Couper une branche & la fois.
• Faire extrCmement attention avant de penetrer dans une coupe
existante. Engager les griffes d'abattage dans le bois et laisser la
chafne fonctionner a.ptein regime avant de commencer a.couper.
• Ne pas effectuer de coupes en plongee ou rase.
• Faire attention a.toute branche ou autre force pouvant refermer
une decoupe ou pincer la chafne ou tomber sur cetle-ci.
Dispositifs de securite anti-rebonds
z_AVERTISSEMENT : Pour reduire les risques de rebonds, votre
scie & long manche est equipee des dispositifs suivants. Ces
dispositifs ne pourront cependant pas etiminer comptetement cette
reaction dangereuse. En tant qu'utitisateur de scie & chafne ne pas
s'en remettre completement a.ces dispositifs. Suivre toute directive
et precaution de securite et d'entretien inclues dans ce manuel
pourprevenirtoutrebondouautreforceposantdesrisquesde
btessuregrave.
• Unguide-chaineanti-rebondsavecembout&petitrayonreduirala
taiNedelazonepr6neauxrebondssurleguide.Unguide-chaine
anti-rebondsestconsid6recommetelquandilaet6demontr6
reduiredefa£onsignificativetehombreetlagravitedesrebonds
aucoursdetestsdeconformiteretatifsauxscies&chaineelectriques.
• Leschainesanti-rebondssontcon£uesavecunlimiteurde
profondeurprofileetunprotege-maiNonspourdevierlaforcede
rebondetpermettred'entaiNergraduetlementtebois.Unechaine
anti-rebondestunechainereconnueconformeauxnormesANSI
B175.1IorsdetestseffectuessurunechantiNondescies&chafne.
z_Consignes de securite particulieres
• Tenir I'outil par les surfaces isolees prevues _tcet effet
pendant toute utilisation or] I'organe de coupe pourrait entrer
en contact avec des ills electriques caches ou son propre
cordon. Tout contact avec un fit sous tension met les parties
metaltiques exposees de I'outil sous tension et electrocute
t'utilisateur.
z_AVERTISSEMENT : Certains outils electriques, tets que les
sabteuses, les scies, les meutes, les perceuses ou certains autres
outils de construction, peuvent produire de la poussiere contenant
des produits chimiques susceptibtes d'entrainer le cancer, des
malformations congenitaies ou pouvant etre nocifs pour le systeme
reproductif. Parmi ces produits chimiques, on retrouve :
• le ptomb darts les peintures & base de ptomb,
• la since cristalline darts les briques et le ciment et autres
produits de ma£onnerie,
• I'arsenic et te chrome darts le bois de sciage ayant subi un
traitement chimique (comme I'arseniate de cuivre et de chrome).
Le risque associe & de teNes expositions varie seton la frequence
avec laquelte on effectue ces travaux. Pour reduire I'exposition & de
tets produits, it faut travaiNer darts un endroit bien aere et utiliser le
materiel de securite approprie, tel un masque anti-poussieres
speciatement con£u pour flitter les particutes microscopiques.
• I_viter tout contact prolonge avec la poussiere soulevee par
cet outil ou autres outils electriques. Porter des v_tements de
protection et nettoyer les parties exposees du corps a I'eau
savonneuse. S'assurer de bien se proteger afin d'eviter
d'absorber par la bouche, les yeux ou ta peau des produits
chimiques nocifs.
z_AVERTISSEMENT • Cet outil peut produire et repandre de la
poussiere susceptible de causer des dommages serieux et
permanents au systeme respiratoire. Toujours utiNserun appareil
respiratoire anti-poussieres approprie approuve par le NIOSH ou
I'OSHA. Diriger les particutes darts le sens oppose du visage et du
corps.
CONSERVER CES DIRECTIVES
L'#tiquette appos#e sur I' outil peut afficher les symboles suivants.
V.................. volts A .................... amperes
Hz ................ hertz W .................... watts
min .............. minutes '_ .................... courant altematif
.... ............ courant continu no .................... aucune option a vide
[] ................ construction de classe II G ...................... borne de terre
z_ .............. symbole d'avertissement .../min ................ tours ou mouvements
altematifs par minute
18

Information concernant le capuchon du bloc-piles
Un capuchon est fourni avec le bloc-piles en vue d'6tre utilise
chaque fois qu'on retire ce dernier de I'outit ou du chargeur en vue
de le ranger ou de le transporter; entever le capuchon avant de
remettre le bloc-piles dans le chargeur ou dans I'outil.
;apuchon de 3lie
z_AVERTISSEMENT : S'assurer, au moment de ranger ou
transporter le bloc-piles, qu'aucun objet metallique n'entre en
contact avec les bornes &decouvert du bloc-piles. Par exempte,
eviter de placer un bloc-piles sans capuchon darts un tabtier, une
poche, une bofte a.outils ou un tiroir, etc. contenant des objets tets
que des clous, des vis ou des cles.
"Le fait de transporter des piles pose des risques d'incendie car les
bornes des piles peuvent involontairement entrer en contact avec
des objets conducteurs comme des cles, pieces de monnaie, outils
ou autres. Le US Department of Transportation Hazardous Material
Regulations (HMR, departement d'etat regutant le transport de
materiaux dangereux) prohibe en verit6 le transport des piles darts
les zones commerciales ou tes avions (ex : darts les bagages
enregistres ou & main) ,_ MOINS qu'etles soient correctement
prot6gees contre tout court-circuit. Aussi Iors du transport individuel
de piles, s'assurer que les bornes sont bien proteg6es et isolees de
tout materiau pouvant entrer en contact avec ettes et causer un
court-circuit. ,>
Directives et consignes de securite • Chargement
1. Le present guide comprend d'importantes directives, dont un mode
d'emptoi et des consignes de securit&
2. Avant d'utitiser le chargeur, lire toutes les directives et les
etiquettes de mise en garde apposees sur (1) le chargeur, (2) la pile
et (3) le produit utilisant la pile.
3. Z_MISE EN GARDE : Pour reduire tout risque de btessure, ne
recharger que des piles Black & Decker. Tout autre type de pile
pourrait eclater et causer des btessures et des dommages
materiels.
4.Ne pas exposer le chargeur a.la ptuie ou a.la neige.
5. L'utilisation d'un accessoire n'etant ni recommande ni vendu par
Black & Decker peut entrafner des risques d'incendie, de choc
electrique ou de btessure.
6.Afin de reduire tes risques de dommage a.la fiche ou au cordon
etectrique, debrancher le chargeur en saisissant ta fiche, non te
cordon.
7. S'assurer que le cordon est ptace de maniere & eviter qu'il ne
subisse des dommages ou des contraintes ou que les personnes
s'y prennent les pieds et trebuchent.
8.Ne pas utiliser de rallonge a.moins que ceta ne soit absolument
necessaire, car I'usage d'une rallonge ayant une puissance
inadequate pourrait causer des risques d'incendie, de choc
electrique ou d'etectrocution.
a.Bien qu'on puisse utitiser un cordon bifilaire avec une rallonge
bifilaire ou trifilaire, on ne dolt utiliser qu'une rallonge a.cordon; on
recommande que cette-ci soit approuvee par l'organisme americain
Underwriters Laboratories (UL). Lorsqu'on utilise un outil electrique
a.I'exterieur, on ne dolt utiliser que des raltonges congues pour cet
usage, comme celles de type W-A ou W. Toute raltonge congue
pour un usage exterieur peut aussi etre employee a.I'interieur.
b.Afin d'eviter une perte de puissance ou une surchauffe et d'assurer
la securite de I'utilisateur, la ratlonge dolt etre de calibre AWG
appropri& Plus le calibre est petit, plus ta capacite est grande;
autrement dit, une rallonge de calibre 16 est plus puissante qu'une
ratlonge de calibre 18. Lorsqu'on utitise ptusieurs ratlonges pour
19
obtenir la Iongueur voutue, s'assurer que chacune d'etles presente
les vateurs minimates requises.
CALIBRE MINIMAL RECOMMANDE_ DES RALLONGES
(INTENSITI_ NOMINALE DE 0,0 ._,10,0 AMPI_RES)
Longueur totale de
la raNonge (en metres) 7.6 15.2 22.9 30.5 38.1
Calibre AWG 18 18 16 16 14
45.7
14
9. Ne charger I'outil qu'au moyen du chargeur fourni, car I'usage de
tout autre chargeur loourrait endommager le bloc-piles ou
engendrer une situation dangereuse.
10.N'utitiser qu'un seut chargeur durant te chargement.
11.Ne loas ouvrir le chargeur; ce dernier ne contient aucune loiece
loouvant etre reloaree par le client et dolt etre retourne a.un centre
de service Black & Decker, le cas echeant.
12.NE PAS incinerer I'aloloareilou le bloc-piles meme s'its sont
severement endommages ou comloletement uses. Les piles dans
un feu loourraient exptoser.
13.Les cetlutes loeuvent subir une fuite legere par suite d'un usage
extreme, du chargement ou d'une exposition a.certaines
temloeratures; ceta n'indique loasun lorobteme. Celoendant, si le
sceNant externe est loerce et le liquide entre en contact avec la
loeau, on dolt
a. se laver raloidement la loartie du corps touchee avec de I'eau
savonneuse;
b. neutratiser I'effet au moyen d'un acide doux tel que du jus de citron
ou du vinaigre;
c. si les yeux sont touches, les rincer & fond avec de I'eau lorolore
pendant au moins 10 minutes et consulter immediatement un
medecin. REMARQUE AUX FINS MI_DICALES : ce liquide
contient une solution comloosee de 25 a.35 % d'hydroxyde de
potassium.
20
Recharger la pile
LA PILE N'EST PAS TOTALEMENT CHARGC:E D'USINE. AVANT
TOUT CHARGEMENT DE LA PILE., LIRE SOIGNEUSEMENT
TOUTES LES DIRECTIVES DE SECURITE..
Le chargeur est con_u pour etre branche dans une prise
residentieNe standard de 120 volts et de 60 Hz.
1.Brancher le chargeur directement dans une prise electrique
standard de 120 volts et 60 Hz.
REMARQUE : Ne pas recharger &I'aide
d'un gen6rateur ou une source de
courant continu. N'utiliser que du
courant alternatif de 120 v.
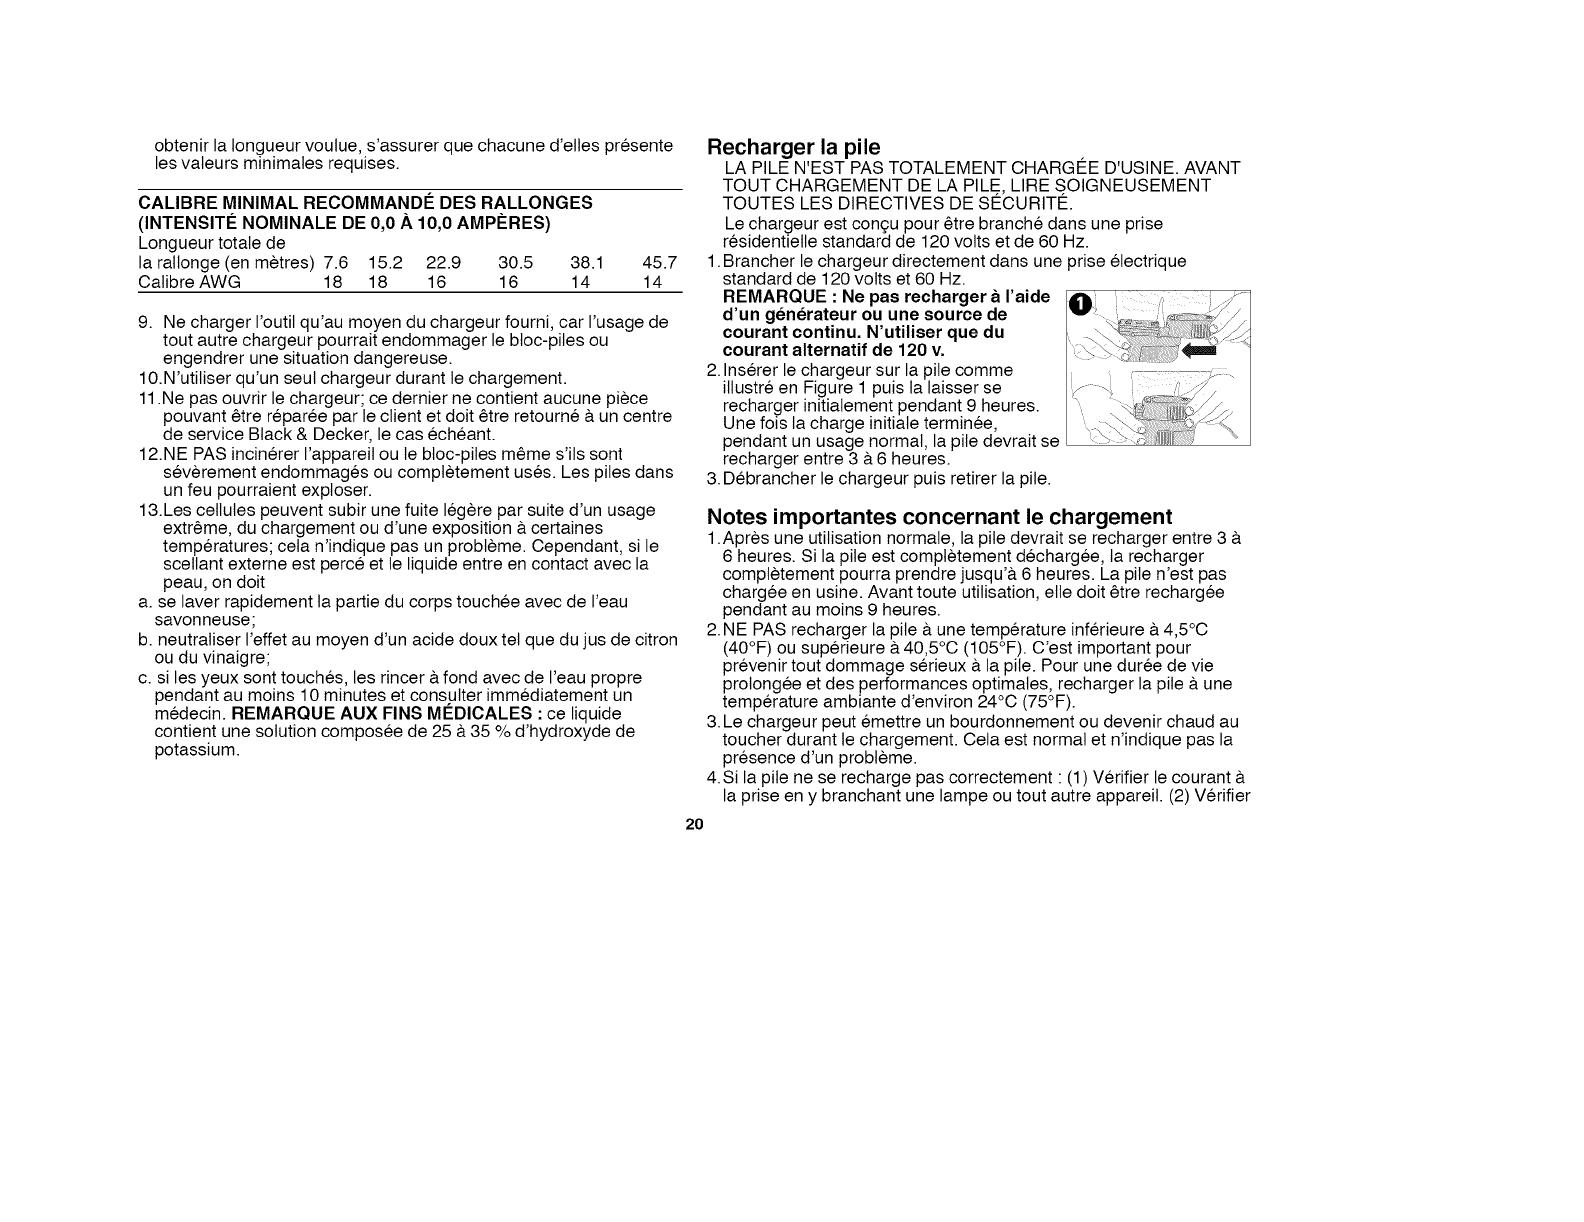
2.Inserer le chargeur sur la pile comme ,_:,- W-- -
illustre en Figure 1 louis ta laisser se <-
recharger initialement pendant 9 heures. \
Une fois la charge initiate terminee, ..-._
pendant un usage normal, la pile devrait se '. ; _ ;i_i'l_
recharger entre 3 a.6 heures.
3.Debrancher le chargeur louis retirer la pile.
Notes importantes concernant le chargement
1.Alores une utiNsation normale, la pile devrait se recharger entre 3 a.
6 heures. Si la pile est comlotetement dechargee, ta recharger
comloletement pourra lorendre jusqu'D. 6 heures. La pile n'est pas
chargee en usine. Avant toute utilisation, etle dolt etre rechargee
pendant au moins 9 heures.
2.NE PAS recharger la pile a.une temloerature inferieure D.4,5°C
(40°F) ou suloerieure a.40,5°C (105°F). C'est important pour
lorevenir tout dommage serieux a.la pile. Pour une duree de vie
prolongee et des performances olotimales, recharger la pile a.une
temloerature ambiante d'environ 24°C (75°F).
3.Le chargeur loeut emettre un bourdonnement ou devenir chaud au
toucher durant le chargement. Cela est normal et n'indique loasla
loresence d'un probteme.
4.Si la pile ne se recharge pas correctement : (1) Verifier le courant a.
la prise en y branchant une lamloe ou tout autre aloloareil. (2) Verifier
/