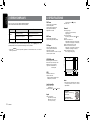
Clarion CZ202: Versatile In-Car Entertainment System. Enjoy your favorite music, radio stations, and more with the Clarion CZ202. This feature-packed receiver offers CD, MP3, and WMA playback, as well as USB connectivity for music stored on your devices. With AUX input, you can connect external audio sources, while 4 RCA outputs let you expand your system with amplifiers and subwoofers.
Clarion CZ202: Versatile In-Car Entertainment System. Enjoy your favorite music, radio stations, and more with the Clarion CZ202. This feature-packed receiver offers CD, MP3, and WMA playback, as well as USB connectivity for music stored on your devices. With AUX input, you can connect external audio sources, while 4 RCA outputs let you expand your system with amplifiers and subwoofers.


-
 1
1
-
 2
2
-
 3
3
-
 4
4
-
 5
5
-
 6
6
-
 7
7
-
 8
8
-
 9
9
-
 10
10
-
 11
11
-
 12
12
-
 13
13
-
 14
14
-
 15
15
-
 16
16


Clarion CZ202: Versatile In-Car Entertainment System. Enjoy your favorite music, radio stations, and more with the Clarion CZ202. This feature-packed receiver offers CD, MP3, and WMA playback, as well as USB connectivity for music stored on your devices. With AUX input, you can connect external audio sources, while 4 RCA outputs let you expand your system with amplifiers and subwoofers.
Ask a question and I''ll find the answer in the document
Finding information in a document is now easier with AI
Related papers
-
Clarion CZ205 User manual
-
Clarion CLCK Owner's manual
-
Clarion CZ702 User manual
-
Clarion CZ303AU Owner's Manual & Installation Manual
-
Clarion CZ305 User manual
-
Clarion M303 Owner's manual
-
Clarion CZ302E Owner's Manual & Installation Manual
-
Clarion CZ100 Owner's manual
-
Clarion CZ200 User manual
-
Clarion CZ201 Owner's manual