Asus P527 Quick start guide

Category
Mobile phones
Type
Quick start guide
Quick Start Guide
P527
2
Check your P527 package for the following items:
P ASUS P527 device P Protection case
P Battery P Getting Started CD
P AC Adapter P User Manual
P Mini-USB cable P Quick Start Guide
P Headset P Warranty Card
P Stylus P microSD*
P Car cell phone charger* P Bonus CD*
P Car Kit (PDA holder and
windshield suction pedestal)*
P Navigation CD & manual*
*Optional, depend on the area
NOTE:
• The Protection case is only for protective usage and not a body-worn accessory.
• If any of the above items is damaged or missing, contact your retailer.
CAUTION:
• To reduce risk of re, use only correct battery type. Refer to “Installing the SIM card and battery” section for details.
• Do not attempt to disassemble or service the battery pack.
• Dispose of used batteries properly. Inquire from local authorities for proper disposal of battery.
Package contents
3
Layout
Bottom features
Top features
Left side features
Front features
1
2
3
Right side features
Rear features
MicroSD Reset
30
28
23
25
26
27
29
24
31
32
4
6
10
5
8 9
11
13
16
14
15
7
12
17
18
21
19
20
22
Getting to know your P527
4
Device components description
No. Item Description
1 Power button Press once to set suspend mode or to wake device from sleep mode.
Press and hold to turn the power ON or OFF.
2 Jog dial This three-direction jog dial allows you to conveniently navigate
through menus without necessarily using the stylus.
3 OK button Press to conrm a command or press to close/exit an open
application.
Press and hold to adjust the voice volume.
4 Notication LED This multi-color LED noties the following:
Green - Phone fully charged.
Flashing green - Network detected.
Red - Phone is charging.
Flashing red - Event notication.
Flashing blue - Bluetooth
®
,WiFi, or GPS is ON.
5 Earpiece receiver Allows you to listen to incoming/outgoing calls.
6 LCD touch screen This 2.6-inch, 65,536-color, 240 x 320-resolution, touchscreen TFT
LCD allows you to write, draw, or make selections using the stylus.
7 Call key Press to receive an incoming call or to make a call.
8 Left Soft key Performs the command indicated above the button.
9 Start button Press to launch the Start menu.
10 Navigation key This ve-direction navigation key allows you to navigate through
menus. Press down to conrm a command.
11 OK button Press to conrm a command or press to close/exit an open
application.
12 Right Soft key Performs the command indicated above the button.
13 End key Press to end a call or a GPRS connection.
5
No. Item Description
14 Location courier key Long press to launch Location courier key.
15 Clear key Press to clear enter character to the left.
16 Travelog button Press to launch Travelog application.
17 Alphanumeric keypad Allows you to input text and numbers.
18 Bluetooth button Allows you to enable or disable Bluetooth feature.
19 FM keypad Press to launch FM radio application.
20 Message button Press to check Messages.
21 Mode Switcher button Allows you to switch applications.
22 Voice Commander/Record
button
Press to launch the Voice Commander application.
Press and hold to launch voice recording.
23 Camera lens 2-mega pixel xed lens for taking pictures.
24 Stereo speaker Allows you to listen audio media and phone calls.
25 Battery compartment Contains the battery that supplies power to the device.
26 Hold button Slide to enable or disable all keys including the LCD touch screen.
27 Reset button Using the stylus, press reset button to soft-reset your device.
28 Camera button Press and hold over three seconds to launch the camera. In camera
mode, press to take a picture. In video mode, press to start recording
video and press again to stop.
29 Micro-SD slot Insert a Micro-SD storage card into this slot.
30 Stylus Use the stylus to write, draw, or select items on the touch screen.
31 Earphone port Plug headset accessory to this port
32 Mini-USB connector Use this connector to synchronize your data or to charge the battery.
6
Before you can start using your device, you need to install a Subscriber Identity Mode (SIM) card
and a charged battery. A SIM card contains your phone number, subscriber details, phone book,
and additional phone memory.
Installing the SIM card and battery
1. Remove the battery compartment cover then remove battery.
NOTE: To prevent data loss, the device automatically shuts down after you open the battery compartment.
2. Insert the SIM card with its gold contacts facing down and the notched corner oriented to
the upper left corner of the slot.
3. Replace the battery into the compartment with its copper contacts properly aligned to the
copper conductor on the device.
4. Replace battery compartment cover.
CAUTION: Use only an ASUS qualied battery for this device.
Getting your device ready
Charging the battery
The bundled battery pack is shipped only partially charged. Make sure to charge the battery at
least four hours before using it for the rst time.
To charge the battery:
1. Connect the AC adapter plug to the mini-USB connector at the bottom of the device.
2. Connect the AC power plug to a grounded wall socket or power strip.
NOTE:
The notication LED turns red and the battery icon appears on the status bar while the battery is charging.
If your battery gets totally discharged, recharge it for at least twenty minutes before you can turn it back on.
7
Powering your device
After charging the battery, you are now ready to use your device.
To power on your device:
1. Press and hold the power button to turn ON the device.
2. Follow the succeeding screen instructions to setup your Windows Mobile-based device.
The Today screen
The Today screen displays information useful to you.
Tap to open the Start menu
Tap to setup date, time, and alarm.
Displays the current network
provider and connection status
Tap to input owner information
Tap to open messages
Tap to setup prole
Tap to read or make appointments
Tap to launch Live search engine
Tap to setup tasks
Tap to display ASUS Launcher
Indicates the battery status
Tap to adjust volume
Displays the signal status.
(The icon shows no SIM card and no signal
When no SIM card is installed.)
Tap to view connectivity status
Tap to display system device
storage, USB setting, LCD
brightness, battery, memory,
and MicroSD status
Tap to set Call Filter
Tap to launch Contacts list
Tap to change screen
orientation
Displays the Bluetooth
®
/ WiFi
connection status
Status bar
Tap to sign in Windows Live
8
ASUS Status icon
The ASUS status icon allows you to easily check and see the current status of the following
device components: CPU, USB, LCD brightness, Battery power, Memory, MicroSD card, and
device storage.
To check the status of these components, tap the ASUS Status icon on the Today screen.
USB: Allows you to set the USB connection mode.
Brightness: Tap to adjust the LCD brightness on
battery power or external power.
Power: Displays the remaining battery power and
allows you to set advanced power saving features.
Program Memory: Displays the total, currently
used, and remaining memory available.
Storage memory: Displays the total, currently
used, and remaining memory available.
MicroSD card: Tap to display the contents of the
MicroSD card installed. This item appears only
when a MicroSD card is installed
Settings: Allows you to select the items to display
in this ASUS Status pop-up menu.
9
ASUS Launcher
ASUS Launcher is an alternative program that allows you to conveniently and quickly launch
applications, perform tasks, and change device settings.
You can run the Program from Start > Programs > ASUS Launcher, or tap ASUS Launcher
at the lower left corner of the Today screen.
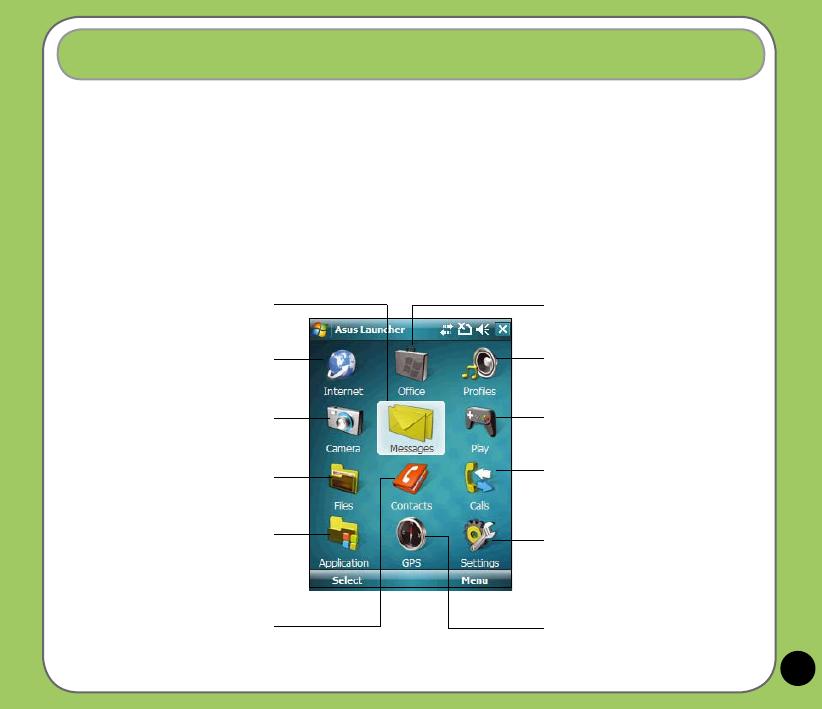
Using the ASUS Launcher
Tap to access MS Ofce, list tasks, set
appointments, or jot notes.
Tap to modify your device prole. You
can also adjust the device audio and
sound.
Tap to launch games and applications
menu.
Tap to launch Internet Explorer,
Messenger, and Windows Live.
Tap to display your call history list. You
can also make a call, send a message,
delete call history, and check or reset
call timer from this section.
Tap to access submenus and modify
the Audio, Personal, System, and
Connection settings. You can also
display your device information or
restore the default settings of your
device from this option.
Tap to access messaging tools
that allows you to write/read e-
mail, MMS, or text messages.
Tap to launch camera.
Tap to launch File Explorer and view
pictures/video, or search for les.
Tap to launch applications.
Tap to display the Contacts list.
Tap to display items of GPS related
applications.
10
Entering information
Using the Input panel
The Input panel comes with various input methods:
Block Recognizer, Keyboard, Letter Recognizer,
XT9, and Transcriber.
Tap the Input panel icon to select input method.
Block Recognizer
Input panel methods
Letter Recognizer
Transcriber
Keyboard
Input panel icon
XT9
11
You can make a phone call using the phone pad. You can also make calls directly from the
Contacts, Call History, Speed Dial, or Voice Commander.
Using the alphanumeric keypad
To make a call using the alphanumeric keypad:
1. Ensure the device is not on hold.
2. Enter the number of the party you want to
call then press Call key.
If you pressed the wrong number, press Clear
key to erase number to the left.
3. Talk to the called party when connected.
4. When nished, press End key to end the call.
Making a call
Press to
end call
Press to call
dialled number
Press to
clear input to
the left
Alphanumeric
keypad
12
Receiving a call
To answer or reject an incoming call:
To answer a call tap
Answer, or press Call key.
To reject an incoming call, tap
Ignore, or press End key.
TIP:
Press and hold Call key to switch receiver to speakerphone mode.
To terminate a call:
Tap
End or press End key to terminate an incoming or
outgoing call.
The following pop-up screen appears during an incoming call:
Tap
Answer to receive call or
Tap
Ignore to dismiss call.
Call key End key
Using ASUS CallFilter
After installing the necessary les, tap to launch the ASUS CallFilter shortcut menu. The
shortcut menu allows you to conveniently activate either the Accept or Reject list.
From the shortcut menu, do any of the following:
Tap Accept List to activate Accept list and receive only incoming calls whose
numbers are in the Accept list.
Tap
Reject List to activate Reject list and reject all incoming calls whose numbers are
in the Reject list.
Tap
Edit to open the CallFilter utility screen.
Tap
Close to deactivate CallFilter.
13
Sending a message
Your device allows you to send and receive email, SMS, MMS, and Email messages when
connected to a network. The following describes how to compose and send a message.
Composing and sending a message
1. Tap Start > Messaging.
2. From the Messaging screen, tap item to select an
account:
• Text Messages
• MMS
• Email
3. Tap Menu > New.
4. Input the email address or phone number of one or
more recipients, separating them with a
semi-colon. To launch Contacts list, tap To.
5. Key in your message.
6. Tap
Send.
Messages
14
Before you can synchronize your device with an Exchange Server, install the Microsoft
®
ActiveSync™ to your computer using the bundled P527 Getting Started CD. Activesync™ is the
software that synchronizes your P527 with a Windows
®
powered computer. Your P527 comes
with a preinstalled ActiveSync™. To synchronize your device with Exchange Server:
Synchronizing with Exchange Server
1. From the ActiveSync menu, tap
Menu > Add Server Source.
2. In the Server Address eld, input
the name of the server running
Exchange Server then tap Next.
3. Input your name, password, and
domain then tap Next.
4. Tap the check boxes to select the data
items that you want to synchronize
with Exchange Server. To change the
available synchronization settings,
select a data item then tap Settings.
Tap Finish when done.
5. Start the sync process.
NOTE: Refer to the User Manual for details on changing
the synchronization schedule.
15
You can customize the look and feel of your device according to your desired settings.
Customizing the Start menu
To customize the Start menu:
1. Tap
Start > Settings > Personal tab.
2. Tap the
Menus icon.
3. Check the items that you want to appear on the menu.
4. Tap
when done.
Entering owner information
To update the owner information:
1. Tap
Start > Settings > Personal tab then tap the
Owner Information icon or tap the icon on the Today
screen.
2. Key in information.
3. Tap
when done.
Personalizing your device
Tap to set owner information
16
Setting phone sounds
(ring type, ring tone, and keypad sound)
To setup your phone sounds:
1. Tap
Start > Settings > Personal tab.
2. Tap the
Phone icon.
3. From the Phone screen, tap
Ring type box to
select desired ring type.
Tap
Ring tone box to select desired ring type.
Tap Keypad box to select keypad sound.
4. Tap
when done.
Setting theme
To setup theme:
1. Tap
Start > Settings > Personal tab > Today.
2. Select a theme from the list.
Tap the
Use this picture as the background
check box if you want to use this picture as device
screen background.
3. Tap
when nished.
17
Setting Date and Time
You can launch the Date and Time screen directly from the Today screen.
To edit date and time:
1. Tap the clock
icon on the Today screen.
2. Select the correct time zone and
change the date or time.
NOTE:
During synchronization, the date and time on your
device is updated with the date and time on your
computer.
Setting Prole
To change your device prole:
1. Tap
Start > Settings > Personal tab then
tap Prole icon.
2. Adjust current Sound and Notications
settings.
18
Wireless features
Using Bluetooth™ - Connecting with other Bluetooth-
enabled devices
1. Ensure that Bluetooth is enabled on
the device you want to add and the
device is set as Discoverable.
2. Tap
Start > Settings > Connections
tab then tap Bluetooth icon.
3. Tap
Add new device... to search
for available Bluetooth devices. The
search may take a while.
4. Select the device you want to
connect with then tap Next or press
the Right Soft key.
19
6. Enter the display name for this
connection.
5. Enter the alphanumeric passcode of
the device you want to connect then
tap Next or press the Right Soft key.
You can nd the passcode in the
documentation that came with the
other device.
7. Repeat steps 3 - 6 to connect to
more devices.
20
Using Wi-Fi
®
Adding a wireless network
To add a wireless network:
1. To launch the Wi-Fi settings page, you can either:
Tap Settings after selecting a wireless network to connect your device to.
Tap Start > Settings > Connections tab > Wi-Fi.
Tap
Wireless > Add New....
2. Enter a name for the network and select an item from the
Connects to: drop-down
menu. Then tap Next.
3. Set authentication, data encryption, and network key. Ask your network administrator
for these information. Then tap Next.
4. If you need to change the EAP type, check the adapter box and then change the EAP
type.
5. Tap
Finish when done.
Turning on Wi-Fi
Use the Wireless Manager to enable or disable Wi-Fi in your device. You can access the
Wireless Manager by performing any of the following:
1. Launch the Wireless Manager. To do this, you can either:
• Tap
Start > Settings > Connections tab > Wireless Manager.
• Tap the Wireless Manager icon from the Today screen.
2. From the Wireless Manager screen, tap Wi-Fi.
  • Page 1 1
  • Page 2 2
  • Page 3 3
  • Page 4 4
  • Page 5 5
  • Page 6 6
  • Page 7 7
  • Page 8 8
  • Page 9 9
  • Page 10 10
  • Page 11 11
  • Page 12 12
  • Page 13 13
  • Page 14 14
  • Page 15 15
  • Page 16 16
  • Page 17 17
  • Page 18 18
  • Page 19 19
  • Page 20 20
  • Page 21 21
  • Page 22 22
  • Page 23 23
  • Page 24 24
  • Page 25 25
  • Page 26 26
  • Page 27 27
  • Page 28 28
  • Page 29 29
  • Page 30 30
  • Page 31 31
  • Page 32 32
  • Page 33 33
  • Page 34 34
  • Page 35 35
  • Page 36 36
  • Page 37 37
  • Page 38 38

Asus P527 Quick start guide

Category
Mobile phones
Type
Quick start guide

Ask a question and I''ll find the answer in the document

Finding information in a document is now easier with AI