Page is loading ...

IMPORTANT NOTES:
For proper electrical connections, check local building codes. Unit must
be installed by a qualified licensed electrician.
This appliance is designed to be used in commercial areas (in
accordance with Clause 26.1 of EN 60335-2-23)
Warm air hand dryer is intended for use in an indoor environment by non-
expert users.
This appliance can be used by children aged from 8 years and above
and persons with reduced physical, sensory or mental capabilities or
lack of experience and knowledge if they have been given supervision or
instruction concerning use of the appliance in a safe way and understand
the hazards involved. Children shall not play with the appliance. Cleaning
and user maintenance shall not be made by children without supervision.
Electronic automatic dryer sensor will pick up movement within 100mm
(4") of the air outlet opening.
WARNING: In the fixed wiring must be incorporated a disconnection
device. Dryer must be grounded (earthed).
SAFETY WARNING
Installation and wiring must conform to current local
regulations and building codes. Unit must be installed by a
qualified electrician. Turn off electrical power supply before
making electrical connections. If the unit fails or malfunctions,
it should be disconnected from the power supply and a
qualified electrician should be called. To avoid potential injury,
the building owner or maintenance personnel should remove
the unit from service if the dryer cover is missing or damaged.
INSTRUCTIONS FOR INSTALLATION AND MAINTENANCE
Recessed and Surface-Mounted
Paper Towel Dispenser with Automatic Hand Dryer and Waste Bin
(3-in-1 Unit)
Recessed
B-38030 115V, 4" (102 mm)
B-38030 230V, 4" (102 mm)
B-38031 115V, 8" (203 mm)
B-38031 230V, 8" (203 mm)
Surface-Mounted
B-380309 115V, 4" (102 mm)
B-380309 230V, 4" (102 mm)

Form No. 38030-269 Issued 2/14/20 © 2020 by Bobrick Washroom Equipment, Inc. Printed in U.S.A.
INSTALLATION OF CABINET:
B-38030 115V: 115V AC, 8.0 Amp, 920 Watts, 50/60 Hz, Single Phase, cUL Listed.
B-38030 230V: 208–240V AC, 3.6-4.0 Amp, 750-950 Watts, 50/60 Hz, Single Phase, CE Marked, cUL Listed.
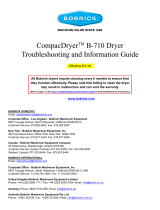
Provide framed rough wall opening 362mm (14-1/4") wide x 1412mm (55-9/16") high. Minimum recessed depth required
to finish face of wall is 100mm (4"). Allow clearance for construction features that may protrude into rough wall opening
from opposite wall. Coordinate with mechanical engineer to avoid pipes, vents and conduits. If unit projects above top of
wainscot, provide channel or other filler to eliminate gap between cabinet flange and finish face of wall. Mount unit in wall
opening with shims between framing and cabinet at all points indicated by an “S” in Figure 1, then secure unit with 4.2 x
32mm (#8 x 1-1/4") sheet-metal screws (not furnished). Provide electrical service from nearest distribution panel to dryer
mounting base in conformance with local electrical codes
Figure 1
Recommended Mounting Height Where Operable
Parts Need to be 40" to 48" (1015 to 1220mm)
Maximum Off the Floor
10" (254mm)
Recommended Mounting Height Off Floor
for Australian DDA standards, AS1428.1-2009
1667 to 1774mm 65-5/8" to 69-13/16"
Recommended Mounting Height Off Floor
for United Kingdom BS8300:2009
1567 to 1674mm 61-11/16" to 65-7/8"
55-1/16"
1399mm
Finish Face of Floor
8-5/8"
219mm
15-5/8"
396mm
3-15/16"
342mm
8"
203mm
5/8"
16mm
1-7/8"
48mm
3-7/16"
87mm
11-1/2"
292mm
5-1/4"
133mm
16"
406mm
28-9/16"
751mm
57-1/16"
1449mm
Removable
Waste Bin
Paper
Tow e l
Dispenser
S
SS
.88"
22mm
Diameter
Hole for
Between-Wall
Wiring
Lock
& Key
Dryer
Outlets
Dryer
Sensor
Finish Face of Wall
.88"
22mm
Diameter
Hole for
Between-Wall
Wiring

Form No. 38030-269 Issued 2/14/20 © 2020 by Bobrick Washroom Equipment, Inc. Printed in U.S.A.
INSTALLATION OF CABINET:
B-380309 115V: 115V AC, 8.0 Amp, 920 Watts, 50/60 Hz, Single Phase, cUL Listed.
B-380309 230V: 208–240V AC, 3.6-4.0 Amp, 750-950 Watts, 50/60 Hz, Single Phase, CE Marked, cUL Listed.
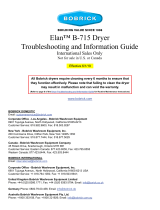
Mount unit on wall with six 4.2 x 32mm (#8 x 1-1/4") sheet-metal screws and washers (not furnished) at points
indicated by “S” in Figure 2. For plaster or dry wall construction, provide concealed backing to comply with local
building codes, then secure unit with sheet-metal screws. For other wall surfaces, provide fiber plugs or expansion
shields for use with sheet metal screws, or provide 3mm (1/8” ) toggle bolts or expansion bolts. If unit projects above
wainscot, provide aluminum channel or other filler to eliminate gap between skirt and finish face of wall. Provide
electrical service from nearest distribution panel to dryer mounting base in conformance with local electrical codes
Figure 2
Recommended Mounting Height Where Operable
Parts Need to be 41" to 49" (1015 to 1220mm)
Maximum Off the Floor
11" (279mm)
Recommended Mounting Height Off Floor
for Australian DDA standards, AS1428.1-2009
1692 to 1799mm 65-5/8" to 70-13/16"
Recommended Mounting Height Off Floor
for United Kingdom BS8300:2009
1592 to 1699mm 62-11/16" to 66-7/8"
57"
1448mm
Finish Face of Floor
15-5/8"
396mm
4-11/16"
120mm
11-1/2"
292mm
5-1/4"
133mm
16"
406mm
28-9/16"
751mm
57-1/16"
1449mm
Removable
Waste Bin
Paper
Tow e l
Dispenser
.88"
22mm
Diameter
Hole for
Between-Wall
Wiring
Lock
& Key
Dryer
Outlets
Dryer
Sensor
Finish Face of Wall
S
S
S
S
S
S
S
S
S
S
S
15"
381mm
1/32"
1mm
1-1/2"
38mm
15-5/8"
396mm
2"
50mm
2"
50mm

Form No. 38030-269 Issued 2/14/20 © 2020 by Bobrick Washroom Equipment, Inc. Printed in U.S.A.
INSTALLATION OF CABINET:
B-38031 115V: 115V AC, 8.0 Amp, 920 Watts, 50/60 Hz, Single Phase, cUL Listed.
B-38031 230V: 208–240V AC, 3.6-4.0 Amp, 750-950 Watts, 50/60 Hz, Single Phase, CE Marked, cUL Listed.
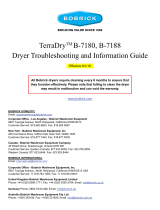
Provide framed rough wall opening 362mm (14-1/4") wide x 1412mm (55-9/16") high. Minimum recessed depth
required to finish face of wall is 200mm (8"). Allow clearance for construction features that may protrude into rough
wall opening from opposite wall. Coordinate with mechanical engineer to avoid pipes, vents and conduits. If unit
projects above top of wainscot, provide channel or other filler to eliminate gap between cabinet flange and finish face
of wall. Mount unit in wall opening with shims between framing and cabinet at all points indicated by an “S” in Figure
3, then secure unit with 4.2 x 32mm (#8 x 1-1/4") sheet-metal screws (not furnished). Provide electrical service from
nearest distribution panel to dryer mounting base in conformance with local electrical codes
Figure 3
Recommended Mounting Height Where Operable
Parts Need to be 40" to 48" (1015 to 1220mm)
Maximum Off the Floor
10" (254mm)
Recommended Mounting Height Off Floor
for Australian DDA standards, AS1428.1-2009
1667 to 1774mm 65-5/8" to 69-13/16"
Recommended Mounting Height Off Floor
for United Kingdom BS8300:2009
1567 to 1674mm 61-11/16" to 65-7/8"
55-1/16"
1399mm
Finish Face of Floor
8-5/8"
219mm
15-5/8"
396mm
7-15/16"
202mm
8"
203mm
5/8"
16mm
1-7/8"
48mm
3-7/16"
87mm
11-1/2"
292mm
5-1/4"
133mm
16"
406mm
28-9/16"
751mm
57-1/16"
1449mm
Removable
Waste Bin
Paper
Tow e l
Dispenser
S
SS
.88"
22mm
Diameter
Hole for
Between-Wall
Wiring
Lock
& Key
Dryer
Outlets
Dryer
Sensor
Finish Face of Wall
.88"
22mm
Diameter
Hole for
Between-Wall
Wiring

Form No. 38030-269 Issued 2/14/20 © 2020 by Bobrick Washroom Equipment, Inc. Printed in U.S.A.
ELECTRICAL CONNECTION OF HAND DRYER:
Electrical supply entry holes are located in the rear of the cabinet at lower
right corner of the dryer mounting base and at the right side of the cabinet.
Supply cable with supplementary insulation into one of these locations in
the unit cabinet. Cabinet should be fitted with a conduit connection. Plastic
grommet supplied to use as necessary.
1. Connect dryer to nearest distribution panel. Use wire as required
by local electrical code, 3.31mm² dia. (No. 12) wire or larger.
2. Wiring Instructions:
a. This appliance is intended for connection to fixed wiring.
b. A fused means for disconnection in all poles must be provided
in the fixed wiring in accordance with the wiring rules.
c. Check that the electrical rating shown on the dryer (rating
label) is compatible with the electrical supply.
d. WARNING: THIS PRODUCT MUST BE GROUNDED
(EARTHED).
e. Installation and wiring must conform to current IEE
Regulations (UK), local or appropriate regulation (other
countries).
f. For 115-Volt dryers: Connect ground wire to ground terminal
marked , the black or hot wire to terminal marked L1, and neutral or
white wire to terminal marked N
For 208–240 Volt dryers: Connect ground/earth supply the terminal marked and the 208-240 Volt wires to terminals
marked L (L1) and N (L2).
3. Secure electrical wire in strain relief clamp provided on mounting base.
CHECK DRYER OPERATION:
1. Turn electrical power supply on.
2. Position hands under air outlet, within 100mm (4") of air outlet opening.
3. Dryer should turn on. Warm air should blow from air outlet.
4. Remove hands from under air outlet and dryer should stop (within 2 seconds).
GENERAL OPERATING CONDITIONS:
The following minimum machine operating environmental parameters must be met in order to allow proper dryer operation:
1. The equipment will operate correctly in its intended ambient operating temperature range, at a minimum, between
+5°C (41°F) and +40°C (104°F).
2. The equipment will operate correctly within a relative humidity environment at 50%RH, +40°C (104°F). Higher RH may
be allowed at lower temperatures. Measures shall be taken by the Purchaser to avoid the harmful effects of occasional
condensation.
3. The equipment will operate correctly up to 2000m (6,560ft) above mean sea level.
4. The equipment will operate in a normal office type Pollution Degree 2 environment.
5. The mains supplies in this equipment are designed to work at +/-10% voltage fluctuation of the marked rating.
MAINTENANCE:
WARNING: Motor laminations are live. Turn electrical power supply
off before doing any maintenance or service to dryer. Electrical power
supply must be off unless dryer cover is secured.
1. Turn electrical power supply on.
Figure 4
To remove dryer cover, remove two
screws from the bottom of the Dryer and
two from the sides, as shown in Figure 4.

Form No. 38030-269 Issued 2/14/20 © 2020 by Bobrick Washroom Equipment, Inc. Printed in U.S.A.
In Europe: BOBRICK WASHROOM EQUIPMENT, LTD.
2 The Hangar, Perseverance Works, 38 Kingsland Road, London, E2 8DD, UK
• Tel: +44 (0)20 8366 1771 • Fax: +44 (0)20 8363 5794
In the U.S.A.: BOBRICK WASHROOM EQUIPMENT, INC.
6901 Tujunga Avenue, North Hollywood, California 91605-6213
• Tel: (818) 764-10000 • FAX: 818-503-9941 or email [email protected]
2. Position hands under air outlet, within 100mm (4'') of air outlet
opening.
3. If a fault develops, disconnect the electrical supply; a qualified
electrician should be called.
4. There are no serviceable parts on the dryer. Return faulty dryer to
manufacturer.
NOTE: If dryer is installed where there is a lot of dust and dirt in the air,
the interior of the dryer should be cleaned out frequently.
Spare Parts List:
38030-202 Door Assembly
38030-175 TowelMate® Support Rod
38030-29 Waste Bin for 4” Deep Cabinet)
38030-291 Waste Bin for 8” Deep Cabinet)
38030-20 Lock & Key (Cat 74)
38030-23 Lock Mounting Plate Assembly with Tape
38030-236 Dryer Assembly 230V
38030-292 Dryer Assembly 115V
38030-255 Activation Sensor Assembly
38030-98 Skirt (for 4” deep cabinet)
/