H3C S5120-SI Series Configuration manual
- Category
- Networking
- Type
- Configuration manual

H3C S5120-SI Switch Series
Layer 2 - LAN Switching Configuration Guide
Hangzhou H3C Technologies Co., Ltd.
http://www.h3c.com
Software version: Release 1515
Document version: 6W100-20150906

Copyright © 2015, Hangzhou H3C Technologies Co., Ltd. and its licensors
All rights reserved
No part of this manual may be reproduced or transmitted in any form or by any means without prior
written consent of Hangzhou H3C Technologies Co., Ltd.
Trademarks
H3C, , H3CS, H3CIE, H3CNE, Aolynk, , H
3
Care, , IRF, NetPilot, Netflow,
SecEngine, SecPath, SecCenter, SecBlade, Comware, ITCMM and HUASAN are trademarks of
Hangzhou H3C Technologies Co., Ltd.
All other trademarks that may be mentioned in this manual are the property of their respective owners
Notice
The information in this document is subject to change without notice. Every effort has been made in the
preparation of this document to ensure accuracy of the contents, but all statements, information, and
recommendations in this document do not constitute the warranty of any kind, express or implied.

Preface
This configuration guide describes Layer 2 technologies and features used on a LAN switched network,
such as VLAN technology, port isolation, spanning tree. You can use these features to divide broadcast
domains, remove Layer 2 loops, isolate users within a VLAN, transmit customer network packets through
the public network, and so on.
This preface includes the following topics about the documentation:
• Audience.
• Conventions.
• About the H3C S5120-SI documentation set.
• Obtaining documentation.
• Technical support.
• Documentation feedback.
Audience
This documentation is intended for:
• Network planners.
• Field technical support and servicing engineers.
• Network administrators working with the S5120-SI switch series.
Conventions
This section describes the conventions used in the documentation.
Command conventions
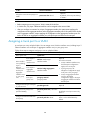
Convention Descri
p
tion
Boldface Bold text represents commands and keywords that you enter literally as shown.
Italic Italic text represents arguments that you replace with actual values.
[ ] Square brackets enclose syntax choices (keywords or arguments) that are optional.
{ x | y | ... }
Braces enclose a set of required syntax choices separated by vertical bars, from which
you select one.
[ x | y | ... ]
Square brackets enclose a set of optional syntax choices separated by vertical bars, from
which you select one or none.
{ x | y | ... } *
Asterisk marked braces enclose a set of required syntax choices separated by vertical
bars, from which you select at least one.
[ x | y | ... ] *
Asterisk marked square brackets enclose optional syntax choices separated by vertical
bars, from which you select one choice, multiple choices, or none.

Convention Descri
p
tion
&<1-n>
The argument or keyword and argument combination before the ampersand (&) sign can
be entered 1 to n times.
# A line that starts with a pound (#) sign is comments.
GUI conventions
Convention Descri
p
tion
Boldface
Window names, button names, field names, and menu items are in Boldface. For
example, the New User window appears; click OK.
> Multi-level menus are separated by angle brackets. For example, File > Create > Folder.
Symbols
Convention Descri
p
tion
WARNING
An alert that calls attention to important information that if not understood or followed can
result in personal injury.
CAUTION
An alert that calls attention to important information that if not understood or followed can
result in data loss, data corruption, or damage to hardware or software.
IMPORTANT
An alert that calls attention to essential information.
NOTE
An alert that contains additional or supplementary information.
TIP
An alert that provides helpful information.
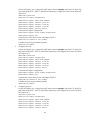
Network topology icons
Represents a generic network device, such as a router, switch, or firewall.
Represents a routing-capable device, such as a router or Layer 3 switch.
Represents a generic switch, such as a Layer 2 or Layer 3 switch, or a router that supports
Layer 2 forwarding and other Layer 2 features.
Represents an access controller, a unified wired-WLAN module, or the access controller
engine on a unified wired-WLAN switch.
Represents an access point.
Represents a mesh access point.
Represents omnidirectional signals.
Represents directional signals.

Represents a security product, such as a firewall, UTM, multiservice security gateway, or
load balancing device.
Represents a security card, such as a firewall, load balancing, NetStream, SSL VPN, IPS,
or ACG card.
Port numbering in examples
The port numbers in the documentation are for illustration only and might be unavailable on your device.
About the H3C S5120-SI documentation set
The H3C S5120-SI documentation set includes the following categories of documents:
Cate
g
or
y
Documents
Pur
p
oses
Product description and
specifications
Marketing brochures Describe product specifications and benefits.
RPS Ordering Information
Provides the RPS and switch compatibility matrix and
RPS cable specifications.
Hardware specifications
and installation
Quick Start Guide
Guides you through initial installation and setup
procedures to help you quickly set up and use your
device with the minimum configuration.
Installation Manual
Provides a complete guide to hardware installation
and hardware specifications.
H3C Pluggable SFP
[SFP+][XFP] Transceiver
Modules Installation
Guide
Guides you through installing SFP/SFP+/XFP
transceiver modules.
H3C Transceiver Modules
User Guide
Describes the hot-swappable modules available for
the H3C network products, their external views, and
specifications.
Software configuration
Configuration guides
Describe software features and configuration
procedures.
Command references
Provide a quick reference to all available
commands.
Operations and
maintenance
Release notes
Provide information about the product release,
including the version history, hardware and software
compatibility matrix, version upgrade information,
technical support information, and software
upgrading.
Obtaining documentation
Access the most up-to-date H3C product documentation on the World Wide Web
at http://www.h3c.com
.
Click the following links to obtain different categories of product documentation:

[Technical Documents]—Provides hardware installation, software upgrading, and software feature
configuration and maintenance documentation.
[Products & Solutions]
—Provides information about products and technologies, as well as solutions.
[Software Download]
—Provides the documentation released with the software version.
Technical support
servic[email protected]
http://www.h3c.com
Documentation feedback
You can e-mail your comments about product documentation to info@h3c.com.
We appreciate your comments.

i
Contents
Ethernet interface configuration ·································································································································· 1
Ethernet interface naming conventions ··························································································································· 1
Configuring basic settings of an Ethernet interface ······································································································· 1
Configuring duplex mode and speed on an Ethernet interface ·········································································· 1
Setting speed options for auto negotiation on an Ethernet interface ·································································· 2
Configuring flow control on an Ethernet interface ································································································ 3
Configuring link down suppression on an Ethernet interface ·············································································· 4
Configuring loopback testing on an Ethernet interface ························································································ 4
Configuring a port group ········································································································································ 5
Enabling the auto power-down function on an Ethernet interface ······································································ 6
Configuring traffic storm protection ························································································································ 6
Setting the statistics polling interval ························································································································ 8
Configuring jumbo frame support ·························································································································· 9
Enabling loopback detection on an Ethernet interface ························································································ 9
Setting the MDI mode of an Ethernet interface ·································································································· 12
Enabling bridging on an Ethernet interface ······································································································· 13
Testing the cable connection of an Ethernet interface ······················································································· 13
Displaying and maintaining an Ethernet interface ····································································································· 14
Loopback and null interface configuration ··············································································································· 15
Loopback interface ························································································································································· 15
Introduction to loopback interface ······················································································································· 15
Configuring a loopback interface ······················································································································· 16
Null interface ·································································································································································· 16
Introduction to null interface ································································································································· 16
Configuring null 0 interface ································································································································· 16
Displaying and maintaining loopback and null interfaces ························································································ 17
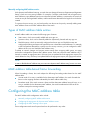
MAC address table configuration ···························································································································· 18
Overview ········································································································································································· 18
How a MAC address table entry is created ······································································································· 18
Types of MAC address table entries ··················································································································· 19
MAC address table-based frame forwarding ···································································································· 19
Configuring the MAC address table ···························································································································· 19
Manually configuring MAC address table entries ····························································································· 20
Configuring the aging timer for dynamic MAC address entries ······································································ 20
Configuring the MAC learning limit on ports ····································································································· 21
Displaying and maintaining MAC address tables ····································································································· 21
MAC address table configuration example ················································································································ 22
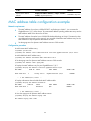
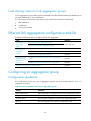
Ethernet link aggregation configuration ··················································································································· 23
Overview ········································································································································································· 23
Basic concepts ······················································································································································· 23
Aggregating links in static mode ························································································································· 26
Aggregating links in dynamic mode ··················································································································· 28
Load sharing criteria for link aggregation groups ····························································································· 30
Ethernet link aggregation configuration task list ········································································································· 30
Configuring an aggregation group ····························································································································· 30
Configuration guidelines ······································································································································ 30
Configuring a static aggregation group ············································································································· 31

ii
Configuring a dynamic aggregation group ······································································································· 31
Configuring an aggregate interface ···························································································································· 32
Configuring the description of an aggregate interface ····················································································· 33
Enabling link state traps for an aggregate interface ························································································· 33
Shutting down an aggregate interface ··············································································································· 33
Configuring load sharing for link aggregation groups ······························································································ 34
Configuring load sharing criteria for link aggregation groups ········································································ 34
Enabling local-first load sharing for link aggregation ······················································································· 35
Enabling link-aggregation traffic redirection ··············································································································· 35
Displaying and maintaining Ethernet link aggregation ····························································································· 36
Ethernet link aggregation configuration examples ····································································································· 37
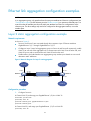
Layer 2 static aggregation configuration example ···························································································· 37
Layer 2 dynamic aggregation configuration example ······················································································ 39
Port isolation configuration ········································································································································ 42
Introduction to port isolation ········································································································································· 42
Configuring an isolation group ···································································································································· 42
Displaying and maintaining isolation groups ············································································································· 43
Port isolation configuration example···························································································································· 43
Spanning tree configuration ······································································································································ 45
STP ··················································································································································································· 45
STP protocol packets ············································································································································· 45
Basic concepts in STP ············································································································································ 46
Calculation process of the STP algorithm ··········································································································· 47
RSTP ················································································································································································· 53
PVST ················································································································································································· 53
MSTP ················································································································································································ 53
STP, RSTP, and PVST limitations ·························································································································· 53
MSTP features ························································································································································ 54
MSTP basic concepts ············································································································································ 54
How MSTP works ·················································································································································· 58
Implementation of MSTP on devices ···················································································································· 58
Protocols and standards ················································································································································ 58
Spanning tree configuration task lists ·························································································································· 59
STP configuration task list ····································································································································· 59
RSTP configuration task list ··································································································································· 60
PVST configuration task list··································································································································· 61
MSTP configuration task list ································································································································· 62
Configuring the spanning tree ······································································································································ 63
Setting the spanning tree mode ··························································································································· 63
Configuring an MST region ································································································································· 64
Configuring the root bridge or a secondary root bridge ·················································································· 65
Configuring the device priority ···························································································································· 66
Configuring the maximum hops of an MST region ··························································································· 67
Configuring the network diameter of a switched network ················································································ 67
Configuring spanning tree timers ························································································································ 67
Configuring the timeout factor ····························································································································· 69
Configuring the maximum port rate ···················································································································· 69
Configuring edge ports ········································································································································· 70
Configuring path costs of ports ···························································································································· 71
Configuring the port priority ································································································································ 73
Configuring the port link type ······························································································································ 74
Configuring the mode a port uses to recognize/send MSTP packets ····························································· 74
Enabling the output of port state transition information ···················································································· 75

iii
Enabling the spanning tree feature ····················································································································· 76
Performing mCheck ··············································································································································· 77
Configuring the VLAN Ignore feature ················································································································· 78
Configuring Digest Snooping ······························································································································· 79
Configuring No Agreement Check······················································································································ 81
Configuring protection functions ·························································································································· 83
Enabling SNMP notifications for PVST topology changes ················································································ 87
Displaying and maintaining the spanning tree ··········································································································· 87
Spanning tree configuration examples ························································································································ 88
MSTP configuration example ······························································································································· 88
PVST configuration example ································································································································ 92
VLAN configuration ··················································································································································· 95
Introduction to VLAN ····················································································································································· 95
VLAN overview ······················································································································································ 95
VLAN fundamentals··············································································································································· 96
Types of VLAN ······················································································································································· 97
Configuring basic VLAN settings·································································································································· 97
Configuring basic settings of a VLAN interface ········································································································· 98
Port-based VLAN configuration ···································································································································· 99
Introduction to port-based VLAN ························································································································· 99
Assigning an access port to a VLAN ················································································································ 101
Assigning a trunk port to a VLAN······················································································································ 102
Assigning a hybrid port to a VLAN ··················································································································· 103
Port-based VLAN configuration example ·········································································································· 104
MAC-based VLAN configuration ································································································································ 106
Introduction to MAC-based VLAN ····················································································································· 106
Configuring MAC-based VLAN ························································································································· 108
MAC-based VLAN configuration example ······································································································· 110
Protocol-based VLAN configuration ··························································································································· 113
Introduction to protocol-based VLAN ················································································································ 113
Configuring a protocol-based VLAN ················································································································· 113
Protocol-based VLAN configuration example ··································································································· 115
Displaying and maintaining VLAN ···························································································································· 117
Voice VLAN configuration ······································································································································ 119
Overview ······································································································································································· 119
Methods of identifying IP phones ······························································································································· 119
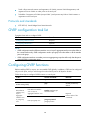
OUI addresses ····················································································································································· 119
Automatically identifying IP phones through LLDP ··························································································· 120
How a device advertises voice VLAN information ··································································································· 120
Voice VLAN assignment modes ·································································································································· 120
Security mode and normal mode of voice VLANs ··································································································· 123
Configuring a voice VLAN ·········································································································································· 124
Configuration prerequisites ································································································································ 124
Configuring QoS priority settings for voice traffic on an interface ································································ 124
Configuring a port to operate in automatic voice VLAN assignment mode ················································· 125
Configuring a port to operate in manual voice VLAN assignment mode ····················································· 126
Enabling LLDP to automatically discover IP phones ·································································································· 126
Configuration prerequisites ································································································································ 127
Configuration procedure ···································································································································· 127
Displaying and maintaining voice VLAN ·················································································································· 127
Voice VLAN configuration examples ························································································································· 127
Automatic voice VLAN mode configuration example ····················································································· 127
Manual voice VLAN assignment mode configuration example ····································································· 129

iv
GVRP configuration ················································································································································· 132
Introduction to GVRP ···················································································································································· 132
GARP ···································································································································································· 132
GVRP ····································································································································································· 135
Protocols and standards ····································································································································· 136
GVRP configuration task list ········································································································································ 136
Configuring GVRP functions ········································································································································ 136
Configuring GARP timers ············································································································································ 137
Displaying and maintaining GVRP ····························································································································· 138
GVRP configuration examples ···································································································································· 139
GVRP normal registration mode configuration example ················································································· 139
GVRP fixed registration mode configuration example ···················································································· 140
GVRP forbidden registration mode configuration example ············································································ 142
QinQ configuration················································································································································· 144
Introduction to QinQ ···················································································································································· 144
Background and benefits ···································································································································· 144
How QinQ works ················································································································································ 144
QinQ frame structure ·········································································································································· 145
Implementations of QinQ ··································································································································· 146
Modifying the TPID in a VLAN tag ···················································································································· 146
Protocols and standards ····································································································································· 147
QinQ configuration task list ········································································································································ 147
Configuring basic QinQ ············································································································································· 148
Configuring selective QinQ ········································································································································ 148
Configuring the TPID value in VLAN tags ·················································································································· 149
QinQ configuration examples ···································································································································· 149
Basic QinQ configuration example ··················································································································· 149
Selective QinQ configuration example ············································································································· 151
LLDP configuration ··················································································································································· 154
Overview ······································································································································································· 154
Background ·························································································································································· 154
Basic concepts ····················································································································································· 154
How LLDP works ·················································································································································· 158
Protocols and standards ····································································································································· 159
LLDP configuration task list ·········································································································································· 159
Performing basic LLDP configuration ·························································································································· 160
Enabling LLDP ······················································································································································ 160
Setting the LLDP operating mode ······················································································································· 160
Setting the LLDP re-initialization delay ·············································································································· 161
Enabling LLDP polling·········································································································································· 161
Configuring the advertisable TLVs ····················································································································· 161
Configuring the management address and its encoding format ···································································· 162
Setting other LLDP parameters ···························································································································· 163
Setting an encapsulation format for LLDPDUs ·································································································· 164
Configuring CDP compatibility ··································································································································· 164
Configuration prerequisites ································································································································ 165
Configuring CDP compatibility ·························································································································· 165
Configuring LLDP trapping ·········································································································································· 165
Displaying and maintaining LLDP ······························································································································· 166
LLDP configuration examples ······································································································································ 166
Basic LLDP configuration example ····················································································································· 166
CDP-compatible LLDP configuration example ··································································································· 169


1
Ethernet interface configuration
This chapter includes these sections:
• Ethernet interface naming conventions
• Configuring basic settings of an Ethernet interface
• Displaying and maintaining an Ethernet interface
Ethernet interface naming conventions
The Ethernet interfaces on the S5120-SI Switch Series are numbered in the format of interface-type
A/B/C:
• A represents the ID of the switch in an IRF virtual device. If the switch is not assigned to any IRF
virtual device, A takes 1.
• B represents a slot number on the switch. It takes 0.
• C represents the number of a port on a slot.
Configuring basic settings of an Ethernet interface
Configuring duplex mode and speed on an Ethernet interface
You can set an Ethernet interface to operate in one of the following duplex modes:
• Full-duplex mode (full). Interfaces operating in this mode can send and receive packets
simultaneously.
• Half-duplex mode (half). Interfaces operating in this mode cannot send and receive simultaneously.
• Auto-negotiation mode (auto). Interfaces operating in this mode negotiate a duplex mode with their
peers.
Similarly, you can set the speed of an Ethernet interface or enable it to automatically negotiate a speed
with its peer. For a 1000-Mbps Layer 2 Ethernet interface, you can also set speed options for auto
negotiation. The two ends can pick a speed only from the available options. For more information, see
"Setting speed options for auto negotiation on an Ethernet interface."
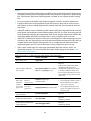
Follow these steps to set duplex mode and speed on an Ethernet interface:
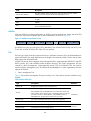
To do… Use the command… Remarks
Enter system view system-view —
Enter Ethernet interface view
interface interface-type
interface-number
—

2
To do… Use the command… Remarks
Change the description of the
interface
description text
Optional
By default, the description of an
interface is the interface name
followed by the "Interface" string,
GigabitEthernet1/0/1 Interface for
example.
Set the duplex mode duplex { auto | full | half }
Optional
The optical port of an SFP port and the
electrical port of an Ethernet port
whose port rate is configured as
1000 Mbps do not support the half
keyword
The default duplex mode of a port is
auto negotiation.
Set the interface speed speed { 10 | 100 | 1000 | auto }
Optional
The optical port of an SFP port does
not support the 10 and 100 keyword.
auto by default
Shut down the Ethernet interface shutdown
Optional
By default, an Ethernet interface is in
up state.
To bring up an Ethernet interface, use
the undo shutdown command.
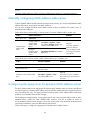
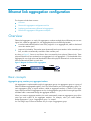
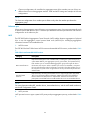
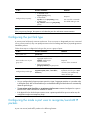
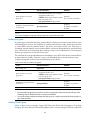
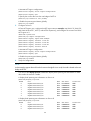
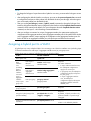
Setting speed options for auto negotiation on an Ethernet
interface
Speed auto negotiation enables an Ethernet interface to negotiate with its peer for the highest speed
supported by both ends by default. If the highest speed is not desirable, you can narrow down the speed
option list for negotiation.

3
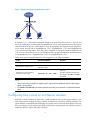
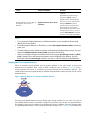
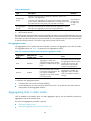
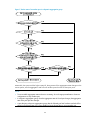
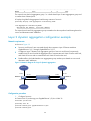
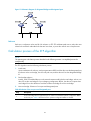
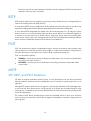
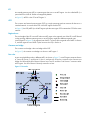
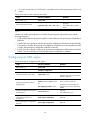
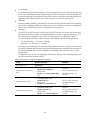
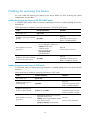
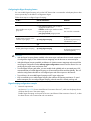
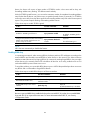
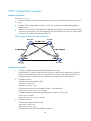
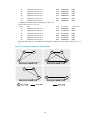
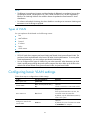
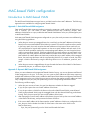
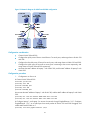
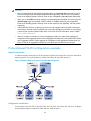
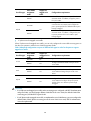
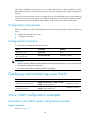
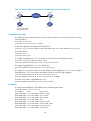
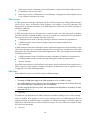
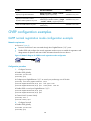
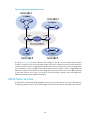
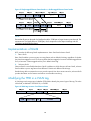
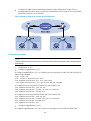
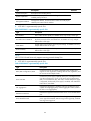
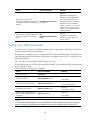
Figure 1 Speed auto negotiation application scenario
As shown in Figure 1, the network card speed of each server in the server cluster (Server 1, Server 2, and
Server 3) is 1000 Mbps, and the speed of GigabitEthernet 1/0/4, which provides access to the external
network for the server group, is 1000 Mbps too. If you do not specify speed options for auto negotiation
on the switch, the total rate of GigabitEthernet 1/0/1, GigabitEthernet 1/0/2 and GigabitEthernet
1/0/3 will exceed 1000 Mbps, which may cause congestion on the egress interface GigabitEthernet
1/0/4. To solve the problem, you can set 100 Mbps as the only option available for speed negotiation
on GigabitEthernet 1/0/1, GigabitEthernet 1/0/2, and GigabitEthernet 1/0/3.
Follow these steps to set speed options for auto negotiation on an Ethernet interface:
To do… Use the command… Remarks
Enter system view system-view —
Enter Ethernet interface view
interface interface-type
interface-number
—
Configure the auto-negotiation
transmission rate range
speed auto { 10 | 100 | 1000 } *
Optional
The auto-negotiation transmission
rate range is 10, 100, and 1000
by default.
NOTE:
• This function is only available for Gigabit Layer-2 copper (electrical) Ethernet interfaces that support
speed auto negotiation.
• The speed and speed auto commands supersede each other, and whichever is configured last takes
effect.
Configuring flow control on an Ethernet interface
When flow control is enabled on both sides, if traffic congestion occurs at the ingress interface, it will
send a Pause frame notifying the egress interface to temporarily suspend the sending of packets. The
egress interface is expected to stop sending any new packet when it receives the Pause frame. In this way,
flow control helps to avoid dropping of packets. Note that this will be possible only after flow control is
enabled on both the ingress and egress interfaces.
GE1/0/1
GE1/0/2
GE1/0/3

4
Follow these steps to enable flow control on an interface:
To do… Use the command… Remarks
Enter system view system-view —
Enter Ethernet interface view
interface interface-type
interface-number
—
Enable flow control flow-control
Required
By default, receive flow control is
disabled on an interface.
Configuring link down suppression on an Ethernet interface
The physical link state of an Ethernet interface is either up or down. Each time the physical link of a port
goes up or comes down, the physical layer reports the change to the upper layers, and the upper layers
handle the change, resulting in increased overhead.
To prevent physical link flapping from affecting system performance, configure link down suppression to
delay the reporting of link down events. The physical layer reports the link down events only when the
delay expires.
Follow these steps to configure link down suppression on an Ethernet interface:
To do… Use the command… Remarks
Enter system view system-view —
Enter Ethernet interface view
interface interface-type
interface-number
—
Set a link down suppression
interval
link-delay delay-time
Required
Link down suppression is disabled
by default.
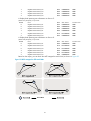
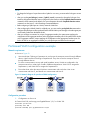
Configuring loopback testing on an Ethernet interface
You can perform loopback testing on an Ethernet interface to check whether the interface functions
properly. Note that the Ethernet interface cannot forward data packets during the testing. Loopback
testing falls into the following two categories:
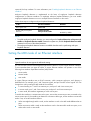
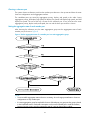
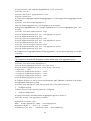
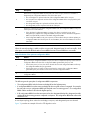
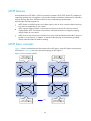
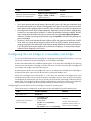
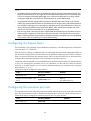
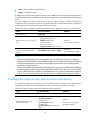
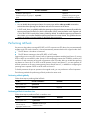
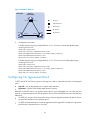
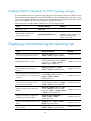
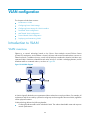
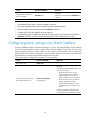
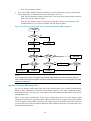
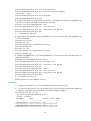
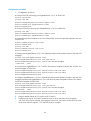
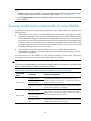
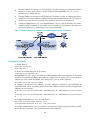
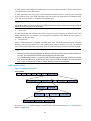
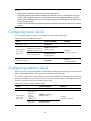
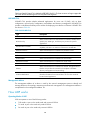
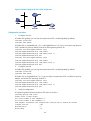
• Internal loopback testing, which tests all on-chip functions related to Ethernet interfaces. As shown
in Figure 2, in
ternal loopback testing is performed on Port 1. During the internal loopback testing,
the port sends out a certain number of test packets, which are looped back to the port over the
self-loop created on the switching chip.

5
Figure 2 Internal loopback testing
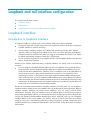
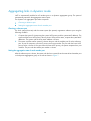
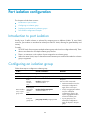
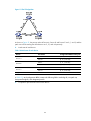
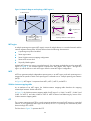
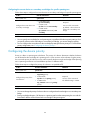
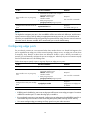
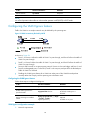
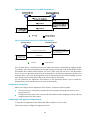
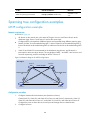
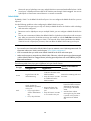
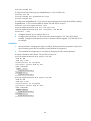
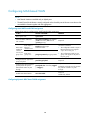
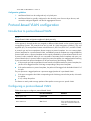
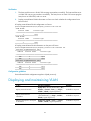
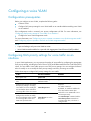
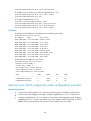
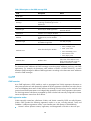
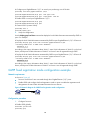
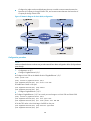
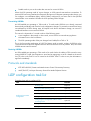
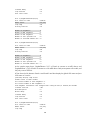
• External loopback testing, which tests the hardware of Ethernet interfaces. As shown in Figure 3,
external loopback testing is performed on Port 1. To perform external loopback testing on an
Ethernet interface, insert a loopback plug into the port. During the external loopback testing, the
port sends out a certain number of test packets, which are looped over the plug and back to the
interface. If the interface fails to receive any test packet, the hardware of the interface is faulty.
Figure 3 External loopback testing
Follow these steps to enable Ethernet interface loopback testing:
To do… Use the command… Remarks
Enter system view system-view —
Enter Ethernet interface view
interface interface-type
interface-number
—
Perform loopback testing
loopback { external | internal }
Optional
Disabled by default.
NOTE:
• On an interface administratively shut down (in the state ADM DOWN), you can perform neither internal
nor external loopback testing.
• The speed, duplex, mdi, and shutdown commands are unavailable on an interface with loopback
testing enabled.
• Durin
g
loopback testin
g
, an Ethernet interface works in full duplex mode. When you disable loopbac
k
testing, the duplex configuration of the interface is restored.
• Loopback testing is a one-time operation, and is not recorded in the configuration file.
Configuring a port group
Some interfaces on your device may use the same set of settings. To configure these interfaces in bulk
rather than one by one, you can assign them to a port group.
Port 1
Port 2
Switching chip
Switch
Loopback
plug
Test packets
Looped packets

6
You create port groups manually. All settings made for a port group apply to all the member ports of the
group. For example, you can configure a traffic suppression threshold (see "Configuring Storm
Suppr
ession on an Ethernet Interface") for multiple interfaces in bulk by assigning these interfaces to a
port group.
Note that even though the settings are made on the port group, they are saved on an interface basis
rather than on a port group basis. Thus, you can only view the settings in the view of each interface by
use the display current-configuration or display this command.
Follow these steps to configure a port group:
To do… Use the command… Remarks
Enter system view system-view —
Create a port group and enter
manual port group view
port-group manual
port-group-name
Required
Assign Ethernet interfaces to the
port group
group-member interface-list Required
Enabling the auto power-down function on an Ethernet
interface
To save power, enable the auto power-down function on Ethernet interfaces. With this function, an
interface enters the power save mode if it has not received any packet for a certain period of time (this
interval depends on the specifications of the chip, and is not configurable). When a packet arrives later,
the interface enters its normal state.
Follow these steps to enable auto power-down on an Ethernet interface:
To do… Use the command… Remarks
Enter system view system-view —
Enter Ethernet
interface view
or port group
view
Enter Ethernet
interface view
interface interface-type
interface-number
Use either command.
To enable auto power-down on an
Ethernet interface, enter Ethernet
interface view.
To enable auto power-down on a
group of Ethernet interfaces, enter
port group view.
Enter port
group view
port-group manual
port-group-name
Enable auto power-down on an
Ethernet interface
port auto-power-down
Required
Disabled by default
Configuring traffic storm protection
A traffic storm occurs when a large amount of broadcast, multicast, or unknown unicast packets congest
a network. The S5120-SI switches provide two storm protection approaches:
• Storm suppression, which enables you to limit the size of monitored traffic passing through an
Ethernet interface by setting a traffic threshold. When the traffic threshold is exceeded, the interface
discards all exceeding traffic.

7
• Storm control, which enables you to shut down Ethernet interfaces or block traffic when monitored
traffic exceeds the traffic threshold. It also enables an interface to send trap or log messages when
monitored traffic reaches a certain traffic threshold, depending on your configuration.
For a particular type of traffic, configure either storm suppression or storm control, but not both. If both of
them are configured, you may fail to achieve the expected storm control effect.
Configuring Storm Suppression on an Ethernet Interface
You can set one suppression threshold for broadcast, multicast, and unknown unicast traffic separately on
an Ethernet interface:
• Set the threshold as a percentage of the interface transmission capability.
• Set the threshold in kbps, limiting the number of kilobits of monitored traffic passing through the
interface per second.
• Set the threshold in pps, limiting the number of monitored packets passing through the interface per
second.
Follow these steps to configure storm suppression on an Ethernet interface:
To do… Use the command… Remarks
Enter system view system-view —
Enter Ethernet
interface view
or port group
view
Enter Ethernet
interface view
interface interface-type
interface-number
Use either command.
To configure storm suppression
on one Ethernet interface, enter
Ethernet interface view.
To configure storm suppression
on a group of Ethernet interfaces,
enter port group view.
Enter port
group view
port-group manual port-group-name
Set a broadcast suppression
threshold
broadcast-suppression { ratio | pps
max-pps | kbps max-bps }
Optional
By default, all broadcast traffic
can pass through.
Set a multicast suppression
threshold
multicast-suppression { ratio | pps
max-pps | kbps max-bps }
Optional
By default, all multicast traffic
can pass through.
Set a unicast suppression
threshold
unicast-suppression { ratio | pps
max-pps | kbps max-bps }
Optional
By default, all unknown unicast
traffic can pass through.
NOTE:
If you set a storm suppression threshold in both Ethernet interface view and port group view, the one
configured last takes effect.
Configuring Storm Control on an Ethernet Interface
Storm control compares broadcast, multicast, and unknown unicast traffic regularly with their respective
traffic thresholds on an Ethernet interface. For each type of traffic, storm control provides a lower
threshold and a higher threshold.
For management purposes, you can configure the interface to send threshold event traps and log
messages when monitored traffic exceeds the upper threshold or falls below the lower threshold from the
upper threshold.

8
When the traffic exceeds its higher threshold, the interface does either of the following, depending on
your configuration:
• Blocks the particular type of traffic, while forwarding other types of traffic. Even though the interface
does not forward the blocked traffic, it still counts the traffic. When the blocked traffic is detected
dropping below the threshold, the interface begins to forward the traffic.
• Shuts down automatically. The interface shuts down automatically and stops forwarding any traffic.
To bring up the interface, perform the undo shutdown command or disable the storm constrain
function.
Follow these steps to configure the storm constrain function on an Ethernet interface:
To do… Use the command…
Remarks
Enter system view system-view —
Set the traffic polling interval of the
storm control module
storm-constrain interval seconds
Optional
10 seconds by default.
Enter Ethernet interface view
interface interface-type
interface-number
—
Enable storm control, and set the
lower and upper thresholds for
broadcast, multicast, or unknown
unicast traffic
storm-constrain { broadcast |
multicast | unicast } pps
max-pps-values min-pps-values
Required
Disabled by default.
Set the control action to take when
monitored traffic exceeds the
upper threshold
storm-constrain control { block |
shutdown }
Optional
Disabled by default.
Enable the interface to send storm
control threshold event traps.
storm-constrain enable trap
Optional
By default, the interface sends
traps when monitored traffic
exceeds the upper threshold or
drops below the lower threshold
from the upper threshold.
Enable the interface to log storm
control threshold events.
storm-constrain enable log
Optional
By default, the interface outputs log
messages when monitored traffic
exceeds the upper threshold or
falls below the lower threshold
from the upper threshold.
NOTE:
• For network stability, use the default or set a higher traffic polling interval.
• Storm control uses a complete pollin
g
cycle to collect traffic data, and analyzes the data in the next cycle.
Thus, it takes an interface at least one pollin
g
interval and at most two pollin
g
interval to take a storm
control action.
• The storm control function allows you set the upper and lower thresholds for all three types of packets
respectively under the same interface.
Setting the statistics polling interval
Follow these steps to set the statistics polling interval on an Ethernet interface:

9
To do… Use the command… Remarks
Enter system view system-view —
Enter Ethernet interface view
interface interface-type
interface-number
—
Set the statistics polling interval on
the Ethernet interface
flow-interval interval
Optional
The default interface statistics
polling interval is 300 seconds.
To display the interface statistics collected in the last polling interval, use the display interface command.
To clear interface statistics, use the reset counters interface command.
Configuring jumbo frame support
Ethernet frames longer than the standard Ethernet frame size (1518 bytes) are called jumbo frames, which
are typical of file transfer.
• If you set an Ethernet interface to accept jumbo frames, it allows frames up to 10240 bytes to pass
through.
• If you disable an Ethernet interface to accept jumbo frames, it allows frames up to 1518 bytes to
pass through.
You can execute the command in system view, and the configuration takes effect on all Layer 2 Ethernet
interfaces.
Follow these steps to configure jumbo frame support in system view:
To do… Use the command… Remarks
Enter system view system-view —
Configure jumbo frame support jumboframe enable
Optional
By default, an Ethernet interface accepts
jumbo frames (up to 10240 bytes).
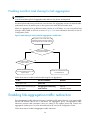
Enabling loopback detection on an Ethernet interface
Enabling Single-Port Loopback Detection on an Ethernet Interface
If an interface receives a packet that it sent out, a loop occurs. Loops may cause broadcast storms. The
purpose of loopback detection is to detect loops on an interface. When loopback detection is enabled
on an Ethernet interface, the device periodically checks for loops on the interface. If a loop is detected
on the interface, depending on whether a protective action is configured, the switch takes the actions
in Table 1 to
alleviate the impact of the loop condition.
Page is loading ...
Page is loading ...
Page is loading ...
Page is loading ...
Page is loading ...
Page is loading ...
Page is loading ...
Page is loading ...
Page is loading ...
Page is loading ...
Page is loading ...
Page is loading ...
Page is loading ...
Page is loading ...
Page is loading ...
Page is loading ...
Page is loading ...
Page is loading ...
Page is loading ...
Page is loading ...
Page is loading ...
Page is loading ...
Page is loading ...
Page is loading ...
Page is loading ...
Page is loading ...
Page is loading ...
Page is loading ...
Page is loading ...
Page is loading ...
Page is loading ...
Page is loading ...
Page is loading ...
Page is loading ...
Page is loading ...
Page is loading ...
Page is loading ...
Page is loading ...
Page is loading ...
Page is loading ...
Page is loading ...
Page is loading ...
Page is loading ...
Page is loading ...
Page is loading ...
Page is loading ...
Page is loading ...
Page is loading ...
Page is loading ...
Page is loading ...
Page is loading ...
Page is loading ...
Page is loading ...
Page is loading ...
Page is loading ...
Page is loading ...
Page is loading ...
Page is loading ...
Page is loading ...
Page is loading ...
Page is loading ...
Page is loading ...
Page is loading ...
Page is loading ...
Page is loading ...
Page is loading ...
Page is loading ...
Page is loading ...
Page is loading ...
Page is loading ...
Page is loading ...
Page is loading ...
Page is loading ...
Page is loading ...
Page is loading ...
Page is loading ...
Page is loading ...
Page is loading ...
Page is loading ...
Page is loading ...
Page is loading ...
Page is loading ...
Page is loading ...
Page is loading ...
Page is loading ...
Page is loading ...
Page is loading ...
Page is loading ...
Page is loading ...
Page is loading ...
Page is loading ...
Page is loading ...
Page is loading ...
Page is loading ...
Page is loading ...
Page is loading ...
Page is loading ...
Page is loading ...
Page is loading ...
Page is loading ...
Page is loading ...
Page is loading ...
Page is loading ...
Page is loading ...
Page is loading ...
Page is loading ...
Page is loading ...
Page is loading ...
Page is loading ...
Page is loading ...
Page is loading ...
Page is loading ...
Page is loading ...
Page is loading ...
Page is loading ...
Page is loading ...
Page is loading ...
Page is loading ...
Page is loading ...
Page is loading ...
Page is loading ...
Page is loading ...
Page is loading ...
Page is loading ...
Page is loading ...
Page is loading ...
Page is loading ...
Page is loading ...
Page is loading ...
Page is loading ...
Page is loading ...
Page is loading ...
Page is loading ...
Page is loading ...
Page is loading ...
Page is loading ...
Page is loading ...
Page is loading ...
Page is loading ...
Page is loading ...
Page is loading ...
Page is loading ...
Page is loading ...
Page is loading ...
Page is loading ...
Page is loading ...
Page is loading ...
Page is loading ...
Page is loading ...
Page is loading ...
Page is loading ...
Page is loading ...
Page is loading ...
Page is loading ...
Page is loading ...
Page is loading ...
Page is loading ...
Page is loading ...
Page is loading ...
Page is loading ...
Page is loading ...
Page is loading ...
Page is loading ...
-
 1
1
-
 2
2
-
 3
3
-
 4
4
-
 5
5
-
 6
6
-
 7
7
-
 8
8
-
 9
9
-
 10
10
-
 11
11
-
 12
12
-
 13
13
-
 14
14
-
 15
15
-
 16
16
-
 17
17
-
 18
18
-
 19
19
-
 20
20
-
 21
21
-
 22
22
-
 23
23
-
 24
24
-
 25
25
-
 26
26
-
 27
27
-
 28
28
-
 29
29
-
 30
30
-
 31
31
-
 32
32
-
 33
33
-
 34
34
-
 35
35
-
 36
36
-
 37
37
-
 38
38
-
 39
39
-
 40
40
-
 41
41
-
 42
42
-
 43
43
-
 44
44
-
 45
45
-
 46
46
-
 47
47
-
 48
48
-
 49
49
-
 50
50
-
 51
51
-
 52
52
-
 53
53
-
 54
54
-
 55
55
-
 56
56
-
 57
57
-
 58
58
-
 59
59
-
 60
60
-
 61
61
-
 62
62
-
 63
63
-
 64
64
-
 65
65
-
 66
66
-
 67
67
-
 68
68
-
 69
69
-
 70
70
-
 71
71
-
 72
72
-
 73
73
-
 74
74
-
 75
75
-
 76
76
-
 77
77
-
 78
78
-
 79
79
-
 80
80
-
 81
81
-
 82
82
-
 83
83
-
 84
84
-
 85
85
-
 86
86
-
 87
87
-
 88
88
-
 89
89
-
 90
90
-
 91
91
-
 92
92
-
 93
93
-
 94
94
-
 95
95
-
 96
96
-
 97
97
-
 98
98
-
 99
99
-
 100
100
-
 101
101
-
 102
102
-
 103
103
-
 104
104
-
 105
105
-
 106
106
-
 107
107
-
 108
108
-
 109
109
-
 110
110
-
 111
111
-
 112
112
-
 113
113
-
 114
114
-
 115
115
-
 116
116
-
 117
117
-
 118
118
-
 119
119
-
 120
120
-
 121
121
-
 122
122
-
 123
123
-
 124
124
-
 125
125
-
 126
126
-
 127
127
-
 128
128
-
 129
129
-
 130
130
-
 131
131
-
 132
132
-
 133
133
-
 134
134
-
 135
135
-
 136
136
-
 137
137
-
 138
138
-
 139
139
-
 140
140
-
 141
141
-
 142
142
-
 143
143
-
 144
144
-
 145
145
-
 146
146
-
 147
147
-
 148
148
-
 149
149
-
 150
150
-
 151
151
-
 152
152
-
 153
153
-
 154
154
-
 155
155
-
 156
156
-
 157
157
-
 158
158
-
 159
159
-
 160
160
-
 161
161
-
 162
162
-
 163
163
-
 164
164
-
 165
165
-
 166
166
-
 167
167
-
 168
168
-
 169
169
-
 170
170
-
 171
171
-
 172
172
-
 173
173
-
 174
174
-
 175
175
-
 176
176
-
 177
177
-
 178
178
-
 179
179
-
 180
180
-
 181
181
-
 182
182
-
 183
183


H3C S5120-SI Series Configuration manual
- Category
- Networking
- Type
- Configuration manual
Ask a question and I''ll find the answer in the document
Finding information in a document is now easier with AI
Related papers
-
H3C S5120-EI Series Configuration manual
-
-
-
-
-
-
-
-
H3C S7500 Series Operating instructions
-
Other documents
-
Aruba R9Y19A Configuration Guide
-
HPE FlexNetwork 5130 HI SERIES Configuration manual
-
HP 5900 Command Reference Manual
-
3com 4210G NT Configuration manual
-
-
Aruba JH398A Configuration Guide
-
-
ZyXEL MGS3750-28F User guide
-
-
Sixnet EL Series Management User manual