Page is loading ...

Service Manual
Digital Minilabs
Preinstallation
Order number DD+18060A192D0
Edition 2005-05-01
Version English, 04100_01
d-lab.2:
8060/260,
8060/803, 8060/804,
8060/270, 8060/272,
8060/157 + 8060/255
d-lab.2plus:
8060/261
8060/813, 8060/814
8060/271, 8060/273
8060/158 + 8060/255
netlab.2plus:
8060/505

Modification History
Version Edition Modifications
04100_00 2004-10-01
Combination of the Service Manuals – Preinstallation
for the machines d-lab.2, d-lab.2plus, and
netlab.2plus;
Additions and update for the order aid
04100_01 2005-05-01 Migration AgfaPhoto
© 2005 AgfaPhoto GmbH. Alle Rechte vorbehalten.
No part of these instructions may be reproduced, copied, or transmitted in any
form or by any means without prior written permission by AgfaPhoto GmbH.
AgfaPhoto is used under license of Agfa-Gevaert AG

d-lab.2, d-lab.2plus, netlab.2plus: Preinstallation Contents
AgfaPhoto 2005-05-01 / PN 04100_01 i
Contents
1
General ................................................................................................................................1
1.1 Validity of this documentation ....................................................................................................................................1
1.2 Preparation by the Customer........................................................................................................................................1
1.3 Measures by the AgfaPhoto Technician ...................................................................................................................1
2 Machine Dimensions and Weight...........................................................................................2
2.1 Machine Dimensions and Weight, Packed..............................................................................................................2
2.2 Machine Dimensions, Unpacked.................................................................................................................................3
2.3 Weight, Unpacked.............................................................................................................................................................6
3 Transport..............................................................................................................................7
4 Operation Site ......................................................................................................................7
4.1 Separation of the Food Section ...................................................................................................................................7
4.2 Room Requirements.........................................................................................................................................................7
4.3 Required Space for Operation, Maintenance, and Service................................................................................8
4.4 Room Lighting....................................................................................................................................................................9
4.5 Water Connection, Cleaning Sink...............................................................................................................................9
4.6 Chemicals..........................................................................................................................................................................10
4.6.1 Legal Regulations.......................................................................................................................................10
4.6.2 Safety Notes .................................................................................................................................................10
4.7 Emissions during Operation ....................................................................................................................................... 11
4.8 Air Conditioning.............................................................................................................................................................. 11
4.8.1 Air Conditioning System.......................................................................................................................... 11
4.8.2 Room ventilation........................................................................................................................................11
4.8.3 Connection of an Exhaust on the Laser Exhaust Duct
(only for machines with gaslaser) ........................................................................................................12
4.9 Operating Conditions.................................................................................................................................................... 13
4.10 Conditions for Storage and Transport..................................................................................................................... 13
4.11 Network Connection .....................................................................................................................................................13
5 Power Supply......................................................................................................................14
5.1 On-Site Connections..................................................................................................................................................... 14
5.2 Connection Values, Connection Voltages, Connection Types ......................................................................15
5.3 Fuse Protection ...............................................................................................................................................................16
5.4 Grounding / Earth Connection..................................................................................................................................16
6 Checklist ............................................................................................................................17
6.1 Machine .............................................................................................................................................................................17
6.2 Delivery and Transport .................................................................................................................................................17
6.3 Supply Facilities..............................................................................................................................................................18
6.4 Training ..............................................................................................................................................................................20
6.5 Consumables....................................................................................................................................................................21
6.6 Accessories / Hardware / Software ........................................................................................................................21
6.7 Preinstallation – Customer ........................................................................................................................................ 23
6.7.1 Supply systems – contractors ...............................................................................................................23
6.7.2 Ordered consumables ...............................................................................................................................24
6.7.3 Additional parts / hardware / software, ordered ........................................................................... 24
6.7.4 Scheduled installation date....................................................................................................................24
7 Ordering Aid .......................................................................................................................25
7.1 Ordering Aid d-lab.2/d-lab.2plus – Features and Accessories for 'basic' and 'select' Models........ 25
7.2 Ordering Aid d-lab.2 ......................................................................................................................................................26

Contents d-lab.2, d-lab.2plus, netlab.2plus: Preinstallation
ii 2005-05-01 / PN 04100_01 AgfaPhoto
7.3 Ordering Aid d-lab.2plus.............................................................................................................................................. 30
7.4 Order Aid d-lab.2 & d-lab.2plus special version for 70mm film .................................................................. 34
7.5 Ordering Aid netlab.2plus basic ............................................................................................................................... 35
7.6 Ordering Aid for Network-Connected Image Processing Systems on the Minilab with
Remote Service............................................................................................................................................................... 36
7.7 Operation Manuals........................................................................................................................................................ 37
7.8 Consumables ................................................................................................................................................................... 37
8 Technical Data.................................................................................................................... 41
8.1 Machine versions........................................................................................................................................................... 41
8.2 Complete System........................................................................................................................................................... 41
8.3 Main Computer............................................................................................................................................................... 45
8.4 Prescanner / Scanner
Applies only to d-lab.2/2plus......................................................................................................................................... 46
8.5 Printer................................................................................................................................................................................. 47
8.6 Paper Processor .............................................................................................................................................................. 48
8.7 Heat Emission.................................................................................................................................................................. 49
8.8 Other Data ........................................................................................................................................................................ 49
9 Index.................................................................................................................................. 50
■

d-lab.2, d-lab.2plus, netlab.2plus: Preinstallation General
AgfaPhoto 2005-05-01 / PN 04100_01 1
1 General
1.1 Validity of this documentation
The Service Manual Preinstallation applies to the following machines:
Machines with gas laser:
d-lab.2 type 8060/260
d-lab.2plus type 8060/261
Machines with solid state laser:
d-lab.2 select type 8060/803 and type 8060/804
d-lab.2 basic type 8060/270 and type 8060/272
d-lab.2 (70mm) type 8060/157 + 8060/255
d-lab.2plus select type 8060/813 and type 8060/814
d-lab.2plus basic type 8060/271 and type 8060/273
d-lab.2plus (70mm) type 8060/158 + 8060/255
netlab.2plus basic type 8060/505
1.2 Preparation by the Customer
The preinstallation is under the responsibility of the customer as well as of an authorized
local electrician. They must provide for a smooth installation by carrying out the following
preliminary jobs in the given order:
– Preinstallation jobs carried out with care and completely terminated.
– All connections and facilities checked.
– Checklist (see further back) fully completed and returned to the AgfaPhoto Service
about two weeks before the installation.
1.3 Measures by the AgfaPhoto Technician
The AgfaPhoto Technician performs the following assignments at the agreed time:
– Installation of the machine
– Mixing and filling in the chemistry (in collaboration with the customer and/or
operator).
– Mechanical and electrical functional tests of the machine.
– Production check
– Brief introduction of the handling for the customer or operator. Explanation of the
measures required in case of problems.

Machine Dimensions and Weight d-lab.2, d-lab.2plus, netlab.2plus: Preinstallation
2 2005-05-01 / PN 04100_01 AgfaPhoto
2 Machine Dimensions and Weight
2.1 Machine Dimensions and Weight, Packed
The shipment comprises of several boxes:
Applies to d-lab.2
Length Width Height Weight
Printer 1,560 mm 1,130 mm 1,840 mm 614 kg
Paper Processor 1,870 mm 1,170 mm 1,710 mm 544 kg
Accessory Box: 1,200 mm 800 mm 1,000 mm approx. 50 kg
Applies to d-lab.2plus
Length Width Height Weight
Printer 1,560 mm 1,130 mm 1,840 mm 637 kg
Paper Processor 1,870 mm 1,170 mm 1,710 mm 544 kg
Accessory Box: 1,200 mm 800 mm 1,000 mm approx. 50 kg
Applies to netlab.2plus
Length Width Height Weight
Printer 1,560 mm 1,130 mm 1,840 mm 540 kg
Paper Processor 1,870 mm 1,170 mm 1,710 mm 540 kg
Accessory Box: 1,200 mm 800 mm 1,000 mm approx. 50 kg

d-lab.2, d-lab.2plus, netlab.2plus: Preinstallation Machine Dimensions and Weight
AgfaPhoto 2005-05-01 / PN 04100_01 3
2.2 Machine Dimensions, Unpacked
Applies to d-lab.2
Printer
– Length: 1,280 mm
– Width: Applies to d-lab.2 with gas laser (Printer type 8060/150)
770 mm without table
870 mm with mounted table
1,010 mm with film collecting box and laser exhaust
Applies to d-lab.2 with solid state laser (Printer type 8060/155 and 8060/157)
770 mm without table
870 mm with mounted table
920 mm with film collecting box
– Height: 1,530 mm
Paper Processor
– Length: 1,160 mm (incl. sorter 1560 mm)
– Width: 880 mm
– Height: 1,450 mm (opened 1,860 mm)
G_GG201
Complete machine
– Length: 2,840 mm (incl. Sorter)
+ 350 mm optional working table
– Width: Applies to d-lab.2 with gas laser (type 8060/260)
1,010 mm with film collecting box and laser exhaust
Applies to d-lab.2 with solid state laser
(Type 8060/803, 8060/804, 8060/270, 8060/272 and 8060/157+8060/255)
920 mm with film collecting box
– Height: 1,530 mm

Machine Dimensions and Weight d-lab.2, d-lab.2plus, netlab.2plus: Preinstallation
4 2005-05-01 / PN 04100_01 AgfaPhoto
Applies to d-lab.2plus
Printer
– Length: 1,280 mm
– Width: Applies to d-lab.2plus with gas laser (Printer type 8060/151)
770 mm without table
870 mm with mounted table
1,010 mm with film collecting box and laser exhaust
Applies to d-lab.2plus with solid state laser (Printer type 8060/156 and 8060/158)
770 mm without table
870 mm with mounted table
920 mm with film collecting box
– Height: 1,530 mm
Paper Processor
– Length: 1,160 mm (incl. sorter 1560 mm)
– Width: 880 mm
– Height: 1,450 mm (opened 1,860 mm)
G_GG101
Complete machine
– Length: 2,840 mm (incl. Sorter)
+ 350 mm optional working table
– Width: Applies to d-lab.2plus with gas laser (type 8060/261)
1,010 mm with film collecting box and laser exhaust
Applies to d-lab.2plus with solid state laser
(type 8060/813, 8060/814, 8060/271, 8060/273 and 8060/158+8060/255)
920 mm with film collecting box
– Height: 1,530 mm

d-lab.2, d-lab.2plus, netlab.2plus: Preinstallation Machine Dimensions and Weight
AgfaPhoto 2005-05-01 / PN 04100_01 5
Applies to netlab.2plus
Printer
– Length: 1,280 mm
– Width: 770 mm without table
870 mm with mounted table
– Height: 1,450 mm mm (with Monitor 1500mm)
Paper Processor
– Length: 1,160 mm (incl. sorter 1560 mm)
– Width: 880 mm
– Height: 1,450 mm (opened 1,860 mm)
G_GG101b
Complete machine
– Length: 2,840 mm (incl. Sorter)
+ 350 mm optional working table
– Width: 770 mm without table
870 mm with mounted table
1060 mm at the sorter
– Height: 1,500 mm (with monitor)

Machine Dimensions and Weight d-lab.2, d-lab.2plus, netlab.2plus: Preinstallation
6 2005-05-01 / PN 04100_01 AgfaPhoto
2.3 Weight, Unpacked
Applies to d-lab.2
Complete machine: empty: approx. 910 kg
filled: approx. 1,055 kg
Printer part: approx. 500 kg
Paper Processor part: empty approx. 410 kg
filled approx. 555 kg
Applies to d-lab.2plus
Complete machine: empty: approx. 922 kg
filled: approx. 1,067 kg
Printer part: approx. 512 kg
Paper Processor part: empty approx. 410 kg
filled approx. 555 kg
Applies to netlab.2plus
Complete machine: empty: approx. 855 kg
filled: approx. 1,000 kg
Printer part: approx. 445 kg
Paper Processor part: empty approx. 410 kg
filled approx. 555 kg

d-lab.2, d-lab.2plus, netlab.2plus: Preinstallation Transport
AgfaPhoto 2005-05-01 / PN 04100_01 7
3 Transport
Printer and Paper Processor are supplied separately and can be pushed separately to the
installation site. The following prerequisites must be checked and satisfied prior to
delivery:
– Doors at least 0.95 m wide and 1.85 m high
4 Operation Site
4.1 Separation of the Food Section
CAUTION!
Food must not be contaminated by photo-chemicals, or the waste or the
emissions thereof (risk of poisoning).
The operation site of the Minilab must be kept separate from the sales and stock
area for foods and snacks, e.g. by a separating wall or facilities having a similar
effect.
4.2 Room Requirements
– Room height at least 2.15 m (for removal of racks)
– Minimum floor load capacity 500 kg/m²
– The floor and the walls should be easy to clean
– Floor conditions:
– preferably waterproof concrete
– resistant to water and photo-chemicals
– even (no inclination, uneven spots, etc.)

Operation Site d-lab.2, d-lab.2plus, netlab.2plus: Preinstallation
8 2005-05-01 / PN 04100_01 AgfaPhoto
4.3 Required Space for Operation, Maintenance, and Service
320 cm 60 cm110 cm
77 cm
15 cm
87 cm
90 cm
A
B
G_GG129
A Hot air extraction (for laser exhaust = 220 m³/h
(only machines with Gaslaser:
d-lab.2 Type 8060/260
d-lab.2plus Type 8060/261)
B Power connection
The following free space must be reserved for operation, maintenance, and service:
– Complete floor space: 4.90 m x 1.82 m, approx. 9 m²
– Free space around the machine (for operation):
– Left: 110 cm
– Right: 60 cm
– Front: 90 cm
– Rear: 15 cm
Note
Installation and Service require a distance from the wall of approx. 60 cm.
Note
The power connection for the machine is located on the Paper Processor (B).
Furthermore storage space is required for photo-paper and photo-chemicals. Storage
conditions:
– All photographic papers must always be stored in a cool and dry place. An ideal
storage temperature is between +2 °C and +10 °C. Storage at 20 °C is possible for a
few days without any problems. Storage temperatures above 30 ºC should be avoided
as they will cause visible changes after only a few days.
– Opened packages have to be stored at a relative humidity of 50-60%.
Loading the paper in paper magazines requires a darkroom or a comparable facility (e.g.
dark-tent).

d-lab.2, d-lab.2plus, netlab.2plus: Preinstallation Operation Site
AgfaPhoto 2005-05-01 / PN 04100_01 9
4.4 Room Lighting
The room must be sufficiently illuminated and – if there is no daylight available – a light
source comparable to daylight must be provided to be able to evaluate the color
rendering in the prints.
The use of daylight fluorescent lamps is recommended (400-1,000 Lux).
Direct sunlight must be avoided.
The maximum illumination of 10,000 Lux must not be exceeded.
4.5 Water Connection, Cleaning Sink
Water connection and cleaning sink on the operation site are required for mixing the
chemical solutions and for cleaning routines. We also recommend to provide for a warm
water connection (approx. 30 °C), however, this is not a must.
The Minilab does not need a direct water connection, but this option is an available
accessory (order number see
Ordering Aid / Optional Accessories
).

Operation Site d-lab.2, d-lab.2plus, netlab.2plus: Preinstallation
10 2005-05-01 / PN 04100_01 AgfaPhoto
4.6 Chemicals
4.6.1 Legal Regulations
The machine is subject to the legal regulations for water. Make sure that the following
conditions can be satisfied:
– Chemicals must not be drained into the public sewage system.
– Check whether residual substances can be avoided, reduced or recycled.
– All photographic solutions, chemical filter cartridges, as well as plastic containers with
harmful residues are considered hazardous waste and must be disposed of in
compliance with legal regulations.
– Keep exhausted chemicals in suitable containers until their final disposal.
– When storing exhausted processing solutions, ensure that no waters are polluted, e.g.
by unintentional leakage.
Note
The regulations for handling and correct disposal of chemicals vary from country to
country. Information about the regulations in force can be obtained from:
– the country’s authorities in charge;
– the nearest AgfaPhoto subsidiary.
4.6.2 Safety Notes
CAUTION!
In the working area of the machine there are some slightly poisonous, irritating
and caustic substances. The owner (employer)
– has to elaborate operation instructions for the handling of dangerous substances and
– provides for the instruction of his staff at least once a year;
– ensures sufficient ventilation: The air in industrial workrooms should be exchanged at
least eight to ten times per hour.

d-lab.2, d-lab.2plus, netlab.2plus: Preinstallation Operation Site
AgfaPhoto 2005-05-01 / PN 04100_01 11
4.7 Emissions during Operation
Photochemical solutions may discharge gases into the air. Some gases have a very low
odor level. In unfavorable cases this may result in bad odor although the maximum
working site concentration (max. value) has not yet been reached. Bad odors may be
avoided by sufficient room ventilation and/or air conditioning.
4.8 Air Conditioning
4.8.1 Air Conditioning System
During operation the minilab produces heat (details see
Technical data)
Machines with gas laser:
d-lab.2 Type 8060/260
d-lab.2plus Type 8060/261
appr. 5.500 kcal/h
Machines with solid state laser:
d-lab.2 select Type 8060/803 and Type 8060/804
d-lab.2 basic Type 8060/270 and Type 8060/272
d-lab.2 (70mm) Type 8060/157 + 8060/255
d-lab.2plus select Type 8060/813 and Type 8060/814
d-lab.2plus basic Type 8060/271 and Type 8060/273
d-lab.2plus (70mm) Type 8060/158 + 8060/255
netlab.2plus basic Type 8060/505
appr. 4.640 kcal/h
Therefore we recommend to install air conditioning, which guarantees for the required
room climate (room temperature and humidity) (see sections
Room ventilation
and
Operating conditions
).
The laser exhaust (only d-lab.2 with gas laser, Type 8060/260, and d-lab.2plus with gas
laser, Type 8060/261) can be extracted separately (see
Connection of an exhaust on
the laser exhaust duct
)
Regular exchange of the air volume in the work rooms is necessary.
Note
The wet section of the Paper Processor is sealed. The exhaust air generated here is
negligible. Hence, the connection of an air exhaust is not necessary in this area.
4.8.2 Room ventilation
Ventilation should be sufficient so that the maximum working site concentration is not
exceeded.
Observe national regulations!

Operation Site d-lab.2, d-lab.2plus, netlab.2plus: Preinstallation
12 2005-05-01 / PN 04100_01 AgfaPhoto
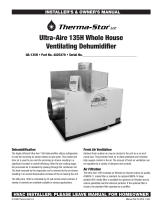
4.8.3 Connection of an Exhaust on the Laser Exhaust Duct
(only for machines with gaslaser)
Applies only to d-lab.2 type 8060/260 and d-lab.2plus type 8060/261
not applicable for machines with solid state laser
(d-lab.2 type 8060/803, 8060/804, 8060/270, 8060/272 und 8060/157+8060/255,
d-lab.2plus type 8060/813, 8060/814, 8060/271, 8060/273 und 8060/158+8060/255)
netlab.2plus type 8060/505)
5
3
3
4
6
2
1
7
G_GG402
1 Air supply for Printer power supply
2 Exhaust laser and Printer power supply
3 Air supply laser
4 Air supply Printer
5 Exhaust laser
6 Exhaust Printer
7 Exhaust Paper Processor
Pos. 3 and 5 are omitted in machines with solid state
lasers
The fan of the laser power supply generates an air stream of 220 m³/h.
An exhaust hose can be connected on rectangular connection piece (5) located on the
Printer rear panel.
An adapter for the connection to an air exhaust hose with a diameter of 125 mm is
available:
Type 8060/350, order number (ABC-Code) 5GVP2.
CAUTION!
Never use an exhaust hose smaller than 125 mm in diameter. This would cause
heat accumulation resulting in a reduced life span of the laser!
Note
The wet section of the Paper Processor is sealed. The exhaust air generated here is
negligible. Hence, the connection of an air exhaust is not necessary in this area.

d-lab.2, d-lab.2plus, netlab.2plus: Preinstallation Operation Site
AgfaPhoto 2005-05-01 / PN 04100_01 13
4.9 Operating Conditions
The following conditions must be met for operation of the Minilab:
Room temperature: +15 °C to +30 °C
Relative humidity: 15% to 85%
Noise level: < 70 dB(A)
Maximum ambient light:
Printer + Paper Processor: 10,000 Lux
Paper magazines: 20,000 Lux
CAUTION!
This machine is a Class A equipment according to EN 55022. This equipment may
cause radio interference in residential areas. In this case the user may be required
to initiate respective measures and pay for those.
4.10 Conditions for Storage and Transport
The following conditions must be met for storage and transport of the Minilab:
Temperature range: -50 °C to +60 °C
Relative humidity: 15% to 90%
4.11 Network Connection
The Minilab can be connected to one Workstation in the lab. For communication it uses
the Software d-workflow / d-bridge, which must be installed in the Workstation. A
Workstation with this installation provides printable, externally created orders, which
were sent to the d-workflow / d-bridge, for collection by the Minilab.
And vice versa the Minilab can send image files to a workstation and save the files there.
Network setup is the responsibility of the customer. AgfaPhoto supplies the required
software (see
Ordering aid for network-connected image processing systems
).

Power Supply d-lab.2, d-lab.2plus, netlab.2plus: Preinstallation
14 2005-05-01 / PN 04100_01 AgfaPhoto
5 Power Supply
5.1 On-Site Connections
CAUTION!
The permanent on-site connection must be made by an authorized electrician
who is also responsible for this job.
The connections for the machine must be installed by a local electrician according to the
data listed in the following sections. Thereby the following facts should be considered:
– The power connecting cable must be run up to the Minilab.
– Plan for a circuit breaker to cut the machine off the mains.
– If you want to use the integrated strain-relief consider the outer diameter of the power
cable. This must be within a range of at least 13 mm to maximum 18 mm.
– For the connection of the PE conductor, a cable lug with a hole diameter of about
6 mm must be used or, if solid conductors (wires) are used, an appropriate lug must be
bent.

d-lab.2, d-lab.2plus, netlab.2plus: Preinstallation Power Supply
AgfaPhoto 2005-05-01 / PN 04100_01 15
5.2 Connection Values, Connection Voltages, Connection Types
We recommend a 3-phase operation, single-phase operation is possible.
CAUTION!
Make sure that the line section of the on-site installation and the connecting
cable is sufficient!
In case of an insufficient cable cross-section the cable get hot: risk of fire.
Connection
type
Pictograph Nominal supply
voltage
Nominal
frequency
Nominal current Site connection,
fuse protection
3W + N + PE
220/380 V
230/400 V
240/415 V
50/60 Hz 16 A 3 x 16 A
3W + PE
200 V
210 V
220 V
230 V
240 V
50/60 Hz 25 A 3 x 25 A
2W + PE
1W + N + PE
200 V
210 V
220 V
230 V
240 V
50/60 Hz 32 A 1 x 32 A
CAUTION!
Only the values listed in the table above may be applied between phase and
neutral, or if there is no neutral, between phase and phase.
CAUTION!
For operation with 50 Hz mains: single-phase connection is only permitted for
industrial networks. If the machine is connected to a public low-voltage network
the connection must always be a 3-phase connection (as required by IEC 61000-
3-3).

Power Supply d-lab.2, d-lab.2plus, netlab.2plus: Preinstallation
16 2005-05-01 / PN 04100_01 AgfaPhoto
5.3 Fuse Protection
Fuse protection for the on-site connection: see table on previous page.
Note
Due to induction the intensity of the current flowing at the moment of switch-on is a
multiple of the normal current. The magnetizing current (rush effect) of the transformer
rises considerably and may trigger the lab fuse. We recommend to use a safety circuit
breaker with slow trigger characteristics.
5.4 Grounding / Earth Connection
The Minilabmust be earthed directly and correctly.
HOHER ABLEITSTROM
Vor Inbetriebnahme
Erdverbindung herstellen!
HIGH LEAKAGE CURRENT
Earth connection before
connecting supply !
/