OWNER’S MANUAL 1186527 REV 6 (8/14)
PAGE
5
OF 21
INFRARED/RADIANT COMPACT BROILER
NOTICE
Proper ventilation is the owner’s responsibility. Any problem due to improper ventilation will not be covered by the
warranty.
Be sure to inspect and clean the ventilation system according to the ventilation equipment manufacturer’s instructions.
Canopies are set over ranges, ovens, etc., for ventilation purposes. It is recommended that a canopy extend 6” past the
appliance and the bottom edge be located 78” above the oor. Filters should be installed at an angle of 45° or more from
the horizontal. This position prevents dripping grease and facilitates collecting the run-off grease in a drip pan, usually
installed with a lter.
A strong exhaust fan tends to create a vacuum in the room and may interfere with burner performance or may extinguish
pilot ames. Fresh air openings approximately equal to the fan area will relieve such a vacuum.
The exhaust fan should be installed at least 2” above the vent opening at the top of the broiler.
If the broiler is connected directly to an outside ue, a CSA design-certied down draft diverter must be installed.
SPECIFICATIONS
NOTICE
Due to the variety of problems encountered by outside weather conditions, venting by canopies or wall fans is
preferred over any type of direct venting.
If the unit is connected directly to an outside ue, a CSA design certied down draft diverter must be installed.
In case of unsatisfactory performance on any appliance, check the appliance with the exhaust fan turned OFF. Do this
only long enough to check whether doing so corrects any problems with equipment performance. Then turn the exhaust
fan back on and let it run to remove any exhaust that may have accumulated during the test.
GAS SUPPLY
The broiler is design-certied for operation on natural gas or propane. The broiler is shipped congured and adjusted for
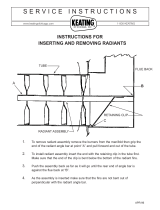
the type of gas specied by the purchaser, which is indicated on the serial plate (see Figure 1). Connect the broiler ONLY
to the type of gas for which it is congured and adjusted.
Sectional range (eld mount), wall mount, or countertop broilers will be supplied with the appropriate regulator and will
require eld piping. Restaurant range mounted broilers will connect to the existing regulator on the restaurant range oven
base.
A model that mounts on the ue riser of a range will have a 3/8” rear gas connection (with a 3/8” male NPT connector)
extending through the rear of the ue riser (see Figure 2 on page 7).
Wall-mount and countertop models will have a 3/8” rear gas connection (with a 3/8” male NPT connector). The gas
connection can extend directly out the rear of the broiler (near the bottom right-rear corner).
Minimum supply pressure is 7” W.C. for natural gas, 11” W.C. for propane. If using a exible-hose gas connection, the
I.D. of the hose must not be smaller than the connector on the broiler, and must comply with ANSI Z21.69. Provide an
adequate means of restraint to prevent undue strain on the gas connection.
If applicable, the vent line from the gas appliance pressure regulator must be installed to the outdoors in accordance with
local codes, or in the absence of local codes, with the National Fuel Gas Code, ANSI Z223.1, Natural Gas Installation
Code, CAN/CGA-B149.1, or the Propane Installation Code CAN/CGA-B149.2, as applicable.
An adequate gas supply is imperative. Undersized or low pressure lines will restrict the volume of gas required for
satisfactory performance. A 1/8” pressure tap is located on the manifold to measure the manifold pressure.
Purge the supply line to clean out dust, dirt, or other foreign matter before connecting the line to the broiler.
All pipe joints and connections must be tested thoroughly for gas leaks. Use only soapy water for testing on all gases.
NEVER use an open ame to check for gas leaks. All connections must be checked for leaks after the range has been put
into operation. Test pressure should not exceed 14” W.C. (3.47 kPa).