daltile M04858LRMMS1PLP Installation guide

Type
Installation guide
Photo Features Xpress Mosaix
Coastal Marble Linear Mosaic Tile
INSTALLATION INSTRUCTIONS | GROUTLESS MOSAICS | PAGE 1 OF 6
Installation of
GROUTLESS
MOSAICS
PRESS MOSAIX
BY
STEP 1: SURFACE PREPARATION STEP 2: MEASURE
CONTINUED ON NEXT PAGE
Tile may be installed over most
structurally sound substrates.
• Make sure the surface is clean,
smooth, dry and free of wax,
soap scum and grease.
• Any damaged, loose or uneven
areas must be repaired, patched
and leveled.
• Remove any moldings, trim,
appliances or anything that could
interfere with installation.
• Start by measuring the square
footage of the wall you are
planning to tile, making sure to
account for any switches and
outlets.
• Find the center point of the wall,
using a level to draw a plumb line
along the wall’s center.
• Lay out a row of loose tiles across the
bottom of the wall from the center line
leaving uniform joints between tiles.
• Once you have this initial row of loose
tiles laid out, measure to determine
what cuts need to be made so that all
tiles fit into the working area.
Photo Features Xpress Mosaix
Coastal Marble Linear Mosaic Tile
INSTALLATION INSTRUCTIONS | GROUTLESS MOSAICS | PAGE 2 OF 6
Installation of
GROUTLESS
MOSAICS
PRESS MOSAIX
BY
• It is recommended to use a
diamond blade, as blades designed
for ceramic tile will chip the stone
and/or glass.
• Wet cutting methods are
recommended to avoid inhalation of
silica dust.
NOTE: Cut edges should be placed in
corners where they can be hidden.
• If drilling a hole in the tile is
necessary, it is recommended to use
a drill bit that is specially designed
for glass, metal and stone.
NOTE: The tile must be securely
clamped into place to prevent
movement of the tile during the
drilling process.
• When drilling the hole, keep the bit
and hole lubricated to prevent
chipping.
• Drill from both sides of the tile,
starting with the back and drilling half
of the depth of the tile.
Turn the tile over and complete the
hole. This will prevent the glass,
metal and stone from chipping as
the drill bit exits the tile.
CONTINUED ON NEXT PAGE
STEP 3: CUTTING STEP 4: DRILLING
Photo Features Xpress Mosaix
Coastal Marble Linear Mosaic Tile
INSTALLATION INSTRUCTIONS | GROUTLESS MOSAICS | PAGE 3 OF 6
Installation of
GROUTLESS
MOSAICS
PRESS MOSAIX
BY
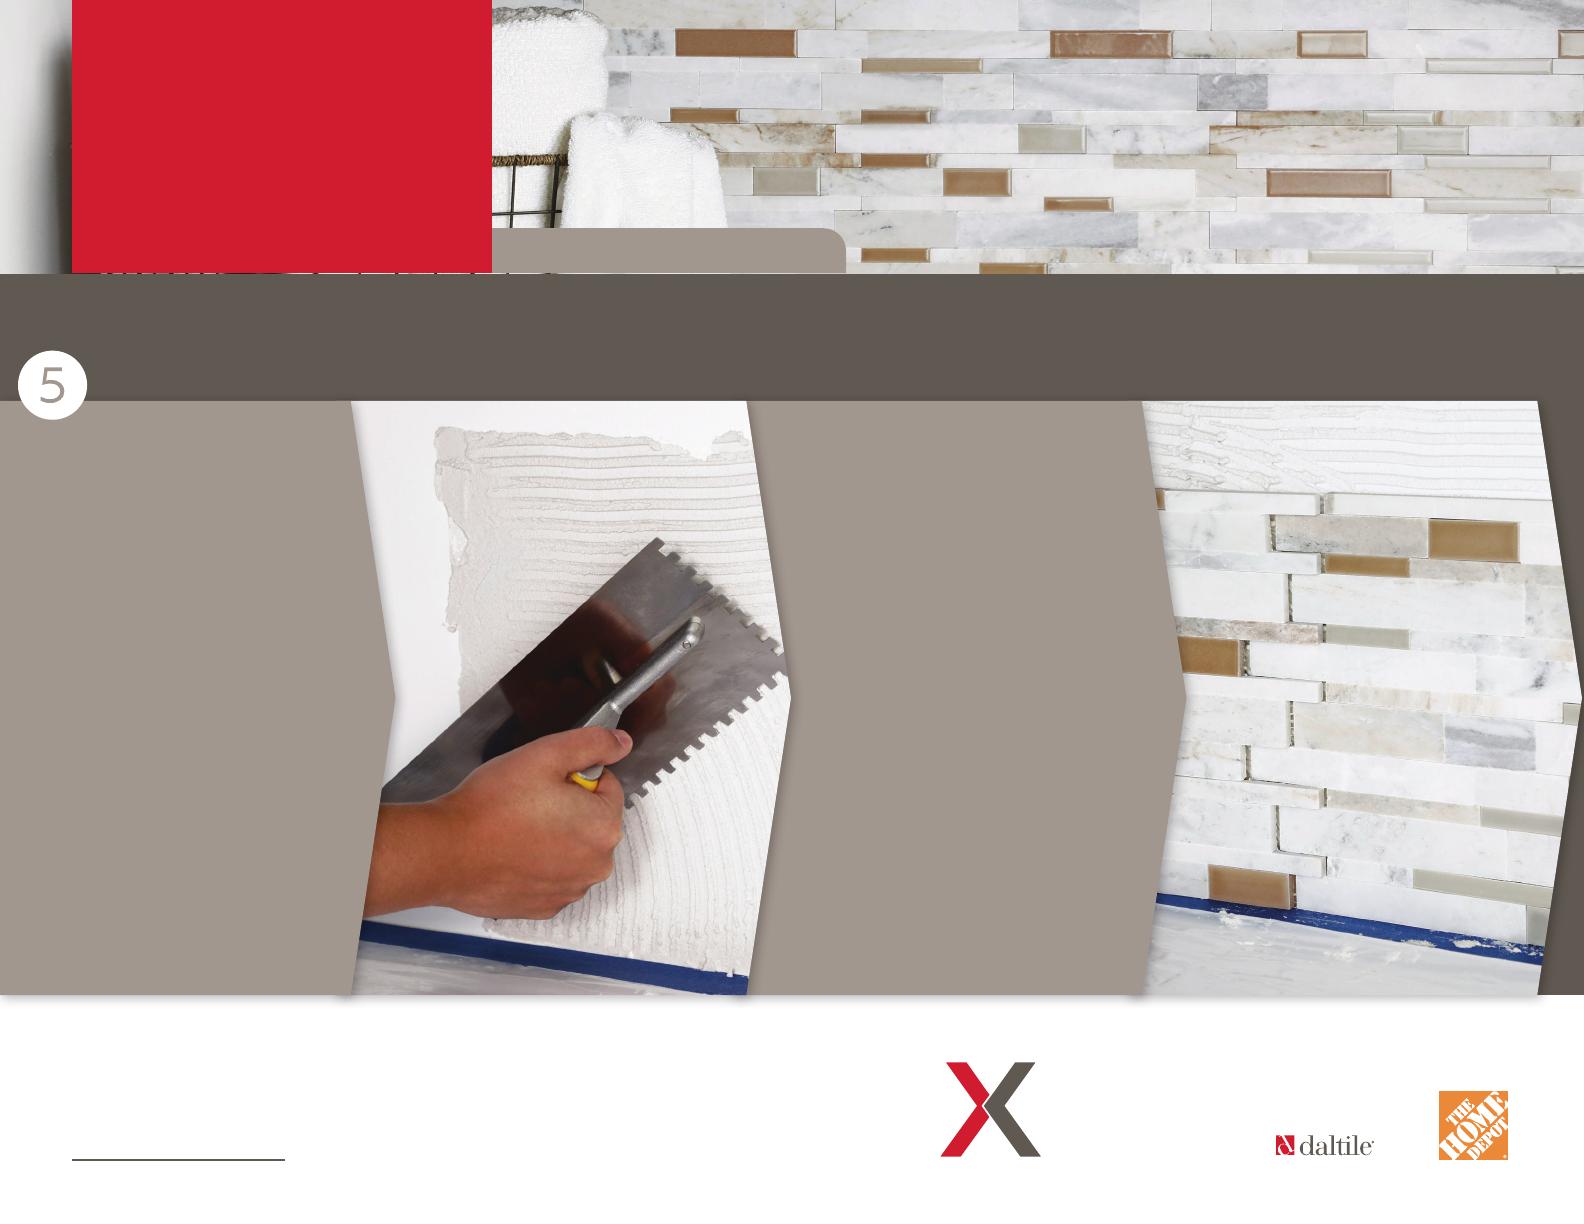
• It is recommended to use a white
thin-set mortar with a flexible
acrylic additive or a white polymer
fortified thin-set mortar.
• Apply this mixture with the
manufacturer’s recommendations of
a notch trowel (typically 3/16 in. x
3/16 in. V-notch).
• Knock down the trowel ridges with the
flat edge of the trowel to achieve an
even layer of the thin-set mortar.
• Spread only enough thin-set to install
a few sheets at a time. Back-butter
each sheet with the flat edge on the
back of the tile.
• Press your mosaic into the thin-
set, leaving even spaces in
between tiles. A grout float can be
used to tap the tiles into place.
• Grouting is not required. If you are
satisfied with the final look after
pressing the mosaic into place, you
can move on to Steps 6 - 8; however,
grouting can be used to cover gaps or
chips in between sheets. If grouting is
desired, please be sure to seal the
mosaic prior to grouting before
continuing on to Steps 6 – 8.
NOTE: To prevent scratching, use an
un-sanded grout after the
adhesive has had proper time to
cure according to the manufacture’s
recommendations.
CONTINUED ON NEXT PAGE
STEP 5: INSTALLATION
Photo Features Xpress Mosaix
Coastal Marble Linear Mosaic Tile
INSTALLATION INSTRUCTIONS | GROUTLESS MOSAICS | PAGE 4 OF 6
Installation of
GROUTLESS
MOSAICS
PRESS MOSAIX
BY
Use a grout float to firmly press
against the mosaic sheets,
securing them into place.
• It is recommended to use a non-
abrasive cleaner to prevent
scratching of the tile. Tiles that
have been scratched prior to or
during installation are the
customers responsibility.
NOTE: Natural stones may darken
when wet or when in contact with
humidity.
CONTINUED ON NEXT PAGE
STEP 6: SECURING STEP 7: CLEANING
Photo Features Xpress Mosaix
Coastal Marble Linear Mosaic Tile
INSTALLATION INSTRUCTIONS | GROUTLESS MOSAICS | PAGE 5 OF 6
Installation of
GROUTLESS
MOSAICS
PRESS MOSAIX
BY
• Penetrating/impregnating stone sealers are a no-sheen, natural-look sealer that
can be water-based or solvent-based.
• A premium, natural-look, penetrating/impregnating sealer is the best choice when
you are wanting to maintain the natural color of the stone. A stone-enhancer
sealer is often used when a darker, enriched, or highlighted character is desired.
• Make sure the brand you have chosen is formulated to provide
maximum stain protection for stone products.
• Stone products should be tested periodically to ensure that the sealer is working
eectively.
STEP 8: SEALING STONE TILE ONLY
CONTINUED ON NEXT PAGE
Photo Features Xpress Mosaix
Coastal Marble Linear Mosaic Tile
INSTALLATION INSTRUCTIONS | GROUTLESS MOSAICS | PAGE 6 OF 6
Installation of
GROUTLESS
MOSAICS
PRESS MOSAIX
BY
Back-butter is the spreading of a bond coat to the back of a tile before
placing the tile to ensure a strong bond with the thin-set mortar.
Balanced cuts are perimeter tile cuts of equal size that are installed on opposite
sides of the working area or on either side of a miter.
A butt joint is the thin joint created when tiles are installed side by side without the
use of spacers or gout.
The grout is a mix used for filling tile joints-most commonly created from a cement
base.
The mortar is a mixture of cement paste and fine aggregate used to bond masonry
together.
Plumb means perpendicular to true level.
The substrate is the underlying support or base of the tile installation.
ATTENTION / ATENCIÓN / ATTENTION
Do not dry cut using motorized equipment due to the potential for exposure
to harmful silica dust. Use a wet saw or a score and snap tool when cutting
is necessary during the installation process.
No corte en seco usando equipo motorizado debido a la posibilidad de
exposición a polvo dañino de sílice. En caso de que sea necesario cortar
durante el proceso de instalación, usar una sierra de corte en húmedo o
una herramienta cortadora manual.
Ne pas couper à sec à l’aide d’un équipement motorisé en raison du
risque d’exposition à la poussière de silice nuisible. Utiliser une scie à eau
ou un outil à inciser et rompre lorsqu’il faut couper pendant le processus
d’installation.
GLOSSARY OF TERMS LEGAL
  • Page 1 1
  • Page 2 2
  • Page 3 3
  • Page 4 4
  • Page 5 5
  • Page 6 6

daltile M04858LRMMS1PLP Installation guide

Type
Installation guide

Ask a question and I''ll find the answer in the document

Finding information in a document is now easier with AI

in other languages