Page is loading ...

1
Riser
Tube
Fo
r Flexible Line
Faucet
Shank
Main Water
Supply
Shut-off
Valve
Riser
Tube
For Solid Line
Faucet
Shank
Needle
Valve
Needle
Valve
Main Water
Supply
Shut-off
Valve
Sink
Sink
Needle Valve:
To open needle valve: Turn needle handle counter-clockwise.
To close needle valve: Turn needle handle clockwise.
Test for leaks at this point: Close the Needle Valve. (turn needle handle clockwise all the way in to close) Turn ON the
cold water supply to the sink faucet. If the Needle Valve or the Adaptor leaks, check the connection and try applying more
Teflon tape or tighten the brass nut some more to stop the leak.
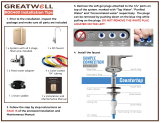
Needle Valve Installation (See Fig. 1A): Attach the needle valve (C) to water supply adapter (A). Please apply
5-6 wraps of teflon tape to needle valve prior to connecting it to the water supply adapter (A).
If your pipe has a 1/2” Connection (See Fig. 1B): By attaching the 1/2” x 3/8” converter (B) to the Male
end of the water supply adapter (A), you now have a 1/2” Male and Female water supply adapter.
If your pipe has a 3/8” Connection (See Fig. 1C): By attaching the 1/2” x 3/8” converter (B) to the Female
end of the water supply adapter (A), you now have a 3/8” Male and Female water supply adapter.
Fig. 1A
Fig. 1B
Fig. 1C
1/2” Connection
3/8” Connection
Recommend Connection For Flex Line Riser (See Fig. 2A): Loosen nut and separate cold water riser
tube from faucet shank. Gently bend riser tube so that the Feed Water Adapter fits onto the faucet shank. Connect
the riser tube, the feed water adapter, and faucet shank together and tighten.
For Solid Copper Riser (See Fig. 2B): Follow the same procedure as for flex line. If the copper riser can-
not bend, then it’s best to replace it with a flex line riser. Then fit the feed water adaptor the same way as described
above.
Fig. 2A Fig. 2B
Fig. 2C
SADDLE-FEED & SADDLE-DRAIN Installation Instruction

2
©2019 APEC Water Systems. All rights reserved. v.2019.1 www.FreeDrinkingWater.com
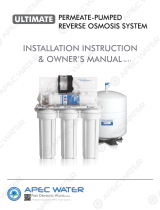
Drain Saddle Installation
Important: DO NOT REMOVE the black drain tubing from the RO system system! If you
need to extend the drain tubing please use a union connector to connect
additional length of tubing.
Note: To avoid possible drainage noise, mount drain line as low as possible on the
vertical tailpiece, or on horizontal tailpiece.
There is constant water pressure “packed” inside the RO system which blocks the drain water from
backing-up into the system. So the drain water is “forced-drained”, not “gravity-drained”.
MOUNT DRAIN
SADDLE AT
EITHER
LOCATION
2. Select the location of the hole and drill a 1/4’’ hole through one side of the drain pipe then put the
self-adhesive black sponge around the hole location (See Fig. 4A and 4B).
Next, align and install the drain saddle clip with the tubing connection port onto the black sponge.
This will cushion any gap between the saddle and the pipe. Make sure the hole on the sponge is
thoroughly punched out, and is aligned to the hole on the saddle to complete the installation (See
Fig. 4C)
Fig. 3
Fig. 4A Fig. 4B Fig. 4C
Fig. 5
3. See Fig. 4C, 5. Make sure to align the drain saddle hole to the drilled hole perfectly.
Mis-aligning these two holes will block the drain water and cause membrane damage.
Attach the drain saddle to the drain pipe and tighten the two screws evenly.
4. Once the drain saddle is secured, push 1/4” black drain tubing into the Quick Connect fitting on the
saddle. DO NOT use a “Insert” on the drain tubing.
1. See Fig. 3. The drain saddle assembly should be
installed above the trap and on the vertical or
horizontal tailpiece. To reduce the drainage noise,
mount the drain line as low as possible above the
trap, or on the horizontal tailpiece.
/