
2
1
#534-1846
#534-1831
#534-1847 #534-1860
#534-1857
#534-1858
UL: #037-5895
UK: #037-5896
EC: #037-5897
AS: #037-5899
#533-8827
#534-1848
4
A
B
C
2
Service & Research Address for USA
CATEYE Service and Research Center
1705 14th St. 115 Boulder, CO 80302
Phone : 303.443.4595
Toll Free: 800.5CATEYE
Fax : 303.473.0006
URL : http://www.cateye.com
CO
.,LTD.
2-8-25, Kuwazu, Higashi Sumiyoshi-ku,
Osaka 546-0041 Japan
Attn: CATEYE Customer Service Section
Phone : (06)6719-6863
Fax : (06)6719-6033
URL : http://www.cateye.co.jp
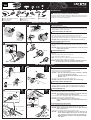
Switching on/off
Use the switch to switch between Hi and Low beams.
NOTE: The switch becomes hot while using the light unit. This is normal.
How to Charge Battery unit
Important!
• If the battery unit is wet, wipe dry with a dry cloth before charging the batteries.
• Be sure to use only the supplied battery charger. This charger can accept 100-240
volts.
• If the charging indicator flashes green, there is a short somewhere in the circuit.
Unplug the charger and remove the cause.
• If the charging indicator turns green a few minutes after charging begins or if the
indicator continues a fast green flashing, stop charging, unplug the charger from
the outlet, and do steps 1 and 2.
If the same result occurs repeatedly, the batteries may be deteriorated.
• The standard charging time and run time are guideline values and depend on the
operating environment.
• If the battery unit repeatedly does not meet the proper run time even though it is
fully charged, it might be at the end of its operating life. Replace the old battery
unit with a new one. The used battery unit should be disposed of properly accord-
ing to local regulations.
1. Plug the battery charger to an AC outlet.
NOTE: Check that the charging indicator flashes red three times as the power lamp
turns red.
2. Connect the plug of the battery charger to the plug of the battery unit.
NOTE: • Charge the batteries with the plug locked.
• When charging is complete, the indicator light changes from flashing red
to green.
3. After charging is complete, make sure to unplug the charger from the AC outlet.
A
B
C
How to Adjust Beam Angle
Adjust the beam angle to avoid dazzling oncoming traffic by slightly loosening the dial
of the bracket.
NOTE: • Do not loosen the dial too much, or the bracket strap may come off. Loosen
the dial just enough to allow the bracket to move slightly. Securely tighten the
dial after adjusting the strap.
• It can also be adjusted 10 degrees to the left and right.
Remaining battery
The color of the battery indicator built into the switch shows how much battery is left.
NOTE: When the battery indication becomes red, charge the batteries as soon as possible.
Green : More than 50% left
Yellow : 50 to 20% left
Red : Less than 20%. Charge the battery unit.
* The battery indicator is only an estimation of the remaining battery run-time, and varies
with the environment or conditions of use.
Guigeline for the battery indicator
Red light / Blinking green light : Charge error
Red light / Red light : Charging
Red light / Green light : Charging is completed
Charging indicator state Standard charging time
Approx. 3 hours
Press: Hi Low Hi
Long press: Turn off
Switch
Approx. 2 hours (Hi mode)
* The run time varies with the environment or conditions in which it is used.
Run time
FOR SAFE OPERATION
• Never short-circuit the terminals of the battery unit or the battery charger. It may
cause the unit to overheat, resulting in fire or damage to the component.
• The battery unit uses lithium batteries. If liquid leaks from the batteries, do not
touch them with bare hands and do not bring them close to fire. Dispose of
properly according to local regulations.
• Securely connect the plug and fasten the strap. Otherwise, they may come off
while riding, causing the light to turn off, or you could topple over if the cord
gets caught in the wheel.
• Never use damaged components (e.g., cables, etc.). Send any damaged
components to our customer service department for repair.
• Do not stare at the light when it is on. Doing so may damage your eyesight.
• The light unit, including the switch, becomes very hot when on or immediately
after being turned off. Please use with caution to avoid burns.
• Do not place it within children’s reach.
• Never disassemble the light unit, battery unit, or battery charger.
• If the lamp body or parts become dirty with mud, etc., clean with a soft cloth
which is moistened with mild soap. Never apply paint thinner, benzine or
alcohol; damage will result.
• If the connecting plug is dirty, clean it with the plug locked.
• This product is water-resistant under normal daily use and can be used in the
rain. However, do not intentionally submerge it in water.
• We recommend carrying a flashlight or spare battery unit with you in case the
main battery dies.
• Place the swich at least 20 cm away from any wireless meter, as transmitting
and receiving performance may be adversely affected.
Before Initial Use
The battery is shipped with a small charge, that is used to test the unit at the
factory. It is necessary to charge the battery before initial use. (Refer to the
“How to Charge” section in this manual.)
Switch
Charging Indicator
To AC Power Outlet
Ring
LOCK
HOW TO USE
LIMITED WARRANTY
2-year Warranty :
Light Unit, Battery Unit, Battery Charger (Excluding degradation of the battery unit)
If trouble or damage occurs during normal use, the product will be repaired or replaced free of charge. Type your name,
address, date of purchase and the situation of trouble clearly on the warranty certificate, and send it back to the appropri-
ate service center together with the product. Insurance, handling and transportation charges shall be borne by the
customer. After being repaired or replaced, the product will be shipped back to the customer.
SPARE PARTS
SPECIFICATIONS
Light source ----------------- Two High-Power White LEDs
Battery unit ------------------ Rechargeable lithium-ion battery/7.4V, 2300mAh
Battery charger ------------- CHR-2300/4600mAh Li-ion (AC100V-240V 50/60Hz)
Operating time -------------- Approx. 2 hours (in the case of Hi)
Approx. 4 hours (in the case of Low)
Standard charging time --- Approx. 3 hours
Temperature range --------- Charging : 41° F – 104°F (5°C – 40°C) Operating: 5° F – 113°F (-15°C – 45°C)
Recharge/discharge number of times
-------------------------------- About 300 times (until the rated capacity drops to 70%)
* The specifications and design are subject to change without notice.
#534-1846 Light unit
#534-1858 Battery unit (lithium-ion
batteries 2300mAh)
#534-1857 Battery unit (lithium-ion
batteries 4600mAh)
#533-8827 H34 Bracket
#534-1831 Bracket for the helmet
UL:#037-5895 / UK:#037-5896 /
EC:#037-5897 / AS:#037-5899
Lithium-ion battery
charger
#534-1848 Battery clip
#534-1847 Extension cable
#534-1860 Battery fixing strap
CAUTION!: Use only genuine spare
parts from CATEYE.


 1
1
 2
2


Cateye EC-2300 User manual
Cateye Sumo 2 [Hl-EL920RC] User manual
