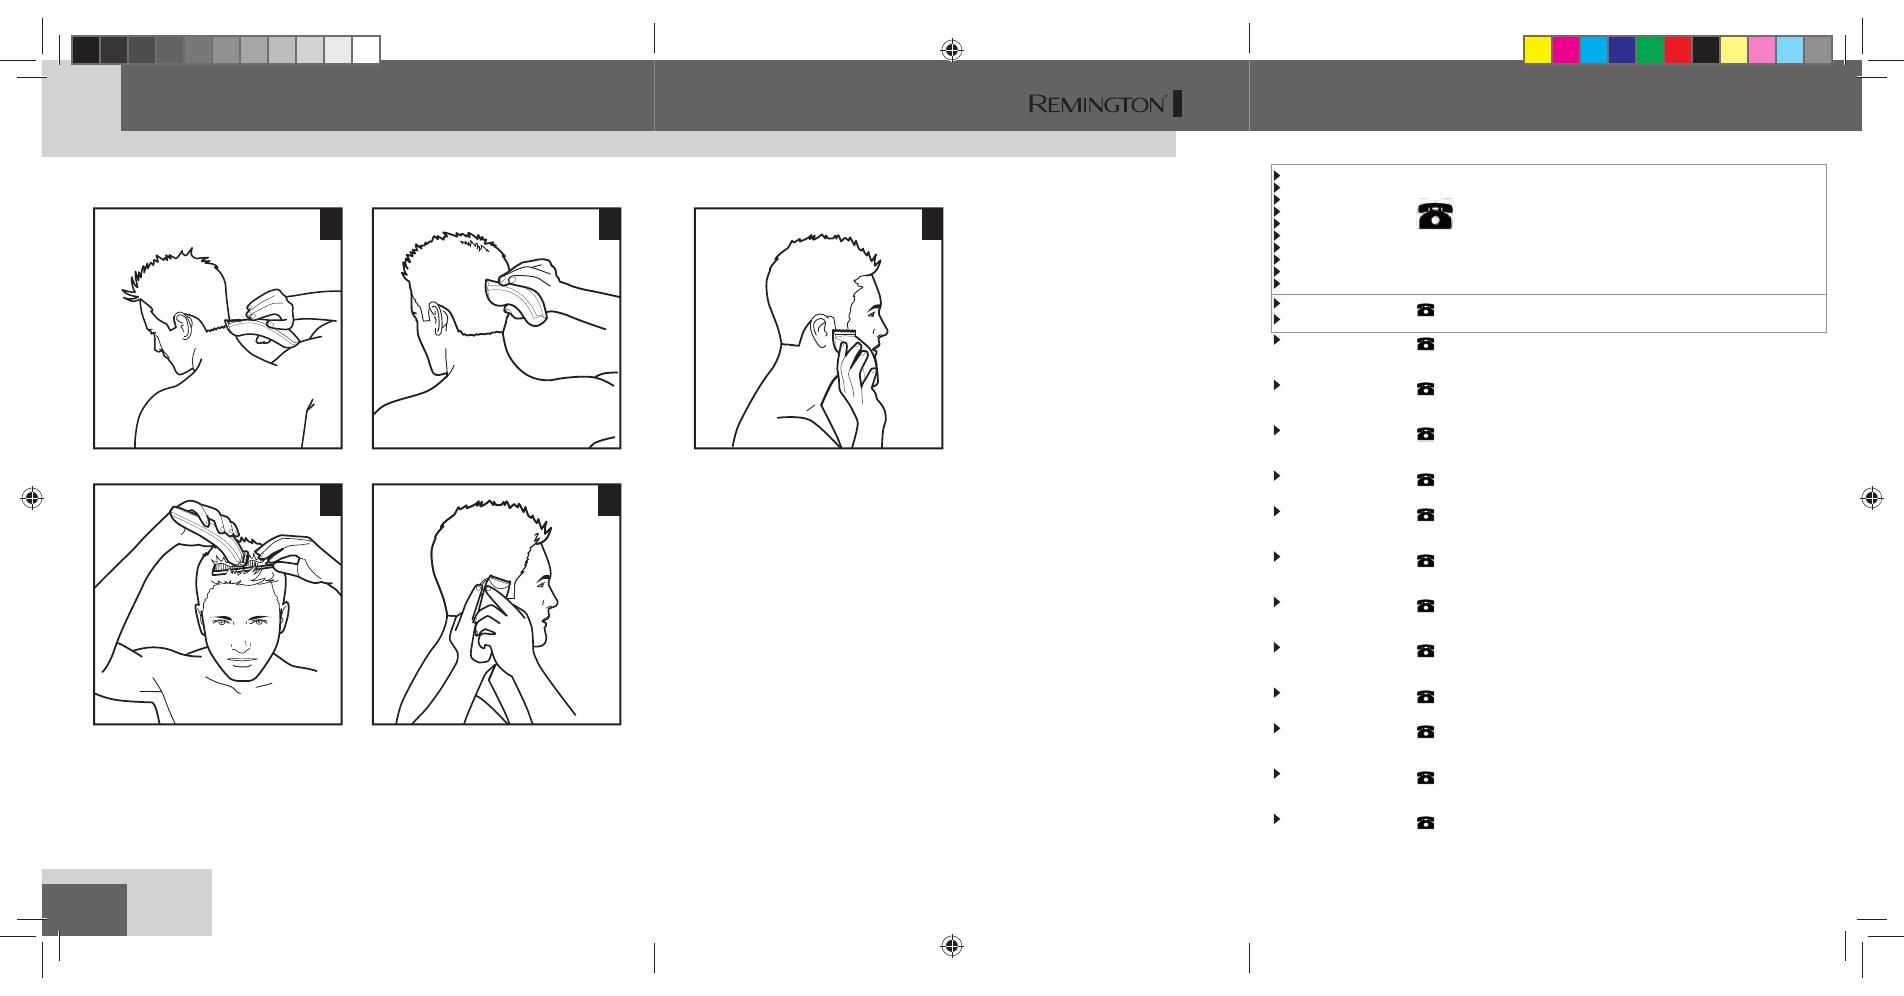
Remington HC5150 Owner's manual

Category
Hair trimmers & clippers
Type
Owner's manual
All technical modifications reserved. 03/10. TSC 10.0156
10/INT/HC5150 Version 0 /10 Part No. T22-29490
REMINGTON
®
is a Registered Trade Mark of
Spectrum Brands, Inc., or one of its subsidiaries
VARTA Consumer Batteries GmbH & Co. KGaA
Alfred-Krupp-Str.9
73479 Ellwangen
Germany
www.remington-europe.com
©
2010 SBI
Model No. HC5150
Уважаемый покупатель! Приобретаемый вами продукт Remington
®
прошел
необходимую сертификацию в соответствии с требованиями российского
законодательства. Подробную информацию о номере сертификата и сроке
его действия вы сможете найти на сайте www.remington-products.ru.
PRO POWER
HAIR CLIPPER
HC5150
3.
5.
2.
1.
4.
100156_REM_IFU_HC5150_Cover.indd Druckbogen 1 von 2 - Seiten (1, 2, 3)100156_REM_IFU_HC5150_Cover.indd Druckbogen 1 von 2 - Seiten (1, 2, 3) 29.03.10 15:3529.03.10 15:35
5
1. 2.
5.4.
3.
INTERNATIONAL SERVICE CENTRE
GERMANY
BENELUX
FRANCE
DENMARK
ITALY
SCANDINAVIA
AUSTRIA
SWITZERLAND
PORTUGAL
GREECE
Central Europe
00800 / 821 700 821
Mo.-Fr. 9 a.m. – 5 p.m. Central European Time (free call)
E-Mail: service@remington-europe.com
www.remington-europe.com
SPAIN
MALTA
Tel. 00800 821 700 82 (free call)
UNITED KINGDOM
Tel. +44 0800 212 438 (free call)
Rayovac Europe Ltd, Watermans House, Kingsbury Crescent, The Causeway,
Staines, Middlesex, TW18 3BA, UNITED KINGDOM, www.remington.co.uk
ČESKÁ REPUBLIKA
Tel. +420 487 754 605
VARTA Baterie spol. s r. o., Jindřicha z Lipé 108, 470 01 Česká Lípa,
ČESKÁ REPUBLIKA, www.cz.remington-europe.com
IRELAND
Tel. +353 (0) 1 460 4711
Remington Consumer Products, Unit 7C, Riverview Business Park,
New Nangor Road, Dublin 22, IRELAND, www.remington.co.uk
MAGYARORSZÁG
Tel / fax 06 1 3300 404
Remington Szervizközpont, 1138 Budapest, Váci út 136/a, www.remington.hu
POLSKA
Tel. +48 22 328 11 50
Varta Baterie Sp. z o.o., ul. Fabryczna 5, 00-446 Warszawa, POLSKA,
Fax +48 22 328 11 61, www.pl.remington-europe.com
РОССИЯ
: Тел. +7 495 741 4652
ООО «Компания «ПрофСервис». Россия.
121355. Москва. Ул. Ивана Франко. д.4
TÜRKIYE
Tel. +90 212 659 01 24
Varta Pilleri Ticaret Ltd. Şti., İstoç 28.Ada No:1 34217, Mahmutbey/İstanbul,
TÜRKİYE, Fax +90 212 659 48 40, www.tr.remington-europe.com
U.A.E.
Tel. +9714 355 5474
VARTA Consumer Batteries, Khalid Bin Waleed Street, Al Jawhara Bldg 504, Dubai,
U.A.E., www.remington-europe.com
HRVATSKI JEZIK /
SRPSKI JEZIK
Tel. +385 12481111
Alca Zagreb d.o.o., Zitnjak bb, 10000 Zagreb, Croatia, www.remington-europe.com
CYPRUS
Tel. +357 24-532220
Thetaco Traders Ltd, Eletherias Ave 75, 7100 Aradippou, Cyprus,
www.remington-europe.com
ROMANIA
Tel. +40 21 411 92 23
TKFexpert SRL , 4th, Drumul Taberei St., sector 6, Bucharest, Romania,
www.remington-europe.com
SLOVENIA
Tel. +386 (0) 1 568 00 00
VRR d.o.o., Tržaška cesta 132, 1000 LJUBLJANA,
www.remington-europe.com
Int_ServiceCentre_22L.indd 1 23.03.10 20:43
100156_REM_IFU_HC5150_Cover.indd Druckbogen 2 von 2 - Seiten (4, 5, 6)100156_REM_IFU_HC5150_Cover.indd Druckbogen 2 von 2 - Seiten (4, 5, 6) 29.03.10 15:3529.03.10 15:35
1
GBDNLFEIDKSFINPSKCZPL
HUN
RUTRROGRSLAE
HR/
SRB
GB
Thank you for choosing Remington
®
. Our products are designed to meet the highest
standard of quality, functionality and design. We hope you enjoy using your new
Remington
®
appliance. Please read the instructions for use carefully
and keep in a safe place for future reference.
CAUTION
Use this appliance only for its intended use as described in this manual. Do not use
attachments not recommended by Remington
®
.
Do not use this product if it is not working correctly, if it has been dropped or damaged, or
dropped into water.
DESCRIPTION
1. On/Off Switch
2. Blade set
3. 2 attachment guide combs
4. Charging indicator light
5. Charging adaptor
GETTING STARTED
CHARGING YOUR HAIRCLIPPER
Before using your hair clipper for the first time, charge for 14-16 hours.
Ensure the product is switched off.
Connect the charging adaptor to the product and then to the mains.
When the cord is connected to the mains, the charging indicator light will light up.
Your hair clipper cannot be overcharged. However, if the product is not going to be used for
an extended period time (2-3 months), unplug it from the mains and store. Fully recharge
your hair clipper when you would like to use it again.
To preserve the life of your batteries, let them run out every six months then recharge for
14-16 hours
1
ENGLISH
100156_REM_IFU_HC5150_21L.indd GB_1100156_REM_IFU_HC5150_21L.indd GB_1 29.03.10 15:3429.03.10 15:34
2
CORDED USE
Connect the charging adaptor to the product and then to the mains.
When the cord is connected to the mains, the charging indicator light will light up.
CAUTION: Extended mains only use will result in the reduction of the battery life.
CORDLESS USE
When the unit is switched on and fully charged, the product will provide you with a usage time
of 30 minutes which will decrease during usage.
HOW TO USE
BEFORE STARTING THE CUT
1.
Inspect the clipper making sure that it is free from hair and dirt.
2.
Seat the person so that their head is approximately at your eye level.
3.
Before cutting, always comb the hair so it is tangle free and dry.
TO ATTACH A COMB
Hold the comb with its teeth upward.
Slide it onto and along the track of left and right side of the housing unit, the front of the
combs firmly sits against the clipper blade.
Comb position Short comb Long comb
1 3 mm 24 mm
2
6
mm 2
7 mm
3 9 mm 30 mm
4 12 mm 33 mm
5 15 mm 36 mm
6 18 mm 39 mm
7 21 mm 42 mm
1mm length is achieved without any combs.
TO REMOVE THE COMB
Holding the clipper with the blades facing away from you, firmly push the comb upward and
away from the blades.
The comb attachment is marked accordingly on its outside middle surface.
(3-21mm & 24-42mm)
ENGLISH
100156_REM_IFU_HC5150_21L.indd GB_2100156_REM_IFU_HC5150_21L.indd GB_2 29.03.10 15:3429.03.10 15:34
3
GBDNLFEIDKSFINPSKCZPL
HUN
RUTRROGRSLAE
HR/
SRB
GB
INSTRUCTIONS FOR HAIR CUTTING
NOTE: For even cutting, allow the comb attachment/blade to cut its way through the
hair. Do not force it through quickly. If you are cutting for the first time, start with the maximum
comp attachment.
STEP 1 – Nape of the neck – PICTURE 1
Set the comb attachment to 3mm or 6mm.
Hold the clipper with the blade teeth pointing upwards. Begin starting at the centre of the
head at the base of the neck.
Slowly lift the clipper, working upwards and outwards through the hair, trimming just a little
at a time.
STEP 2 – Back of the head – PICTURE 2
With the comb attachment set on 12mm or 18mm, cut the hair at the back of the head.
STEP 3 – Side of the head – PICTURE 3
Set the comb attachment to 3mm or 6mm guide to trim sideburns. Then change the setting to
9mm and continue to cut to the top of the head.
STEP 4 – Top of the head – PICTURE 4
Use the longer length comb attachment and set it to 24mm or 27mm then cut hair on top of
the head against the direction in which the hair normally grows.
For longer hair on top, use the longer length comb attachment (24-42mm) to achieve desired
style.
Always work from the back of the head.
STEP 5 – The finishing touches – PICTURE 5
Use the clipper without an attachment comb for close trimming around the base and sides of
the neck. Use the ear comb guides to get a clean line around each ear. For the required ear
comb guide, angle the clipper and lightly stroke around each ear to the back of the neck.
To produce a clean straight line at the sideburns, reverse the hair clipper. Place the reversed
clipper at right angles to the head, tips of the blades lightly touching the skin and then work
downwards.
SHORT TAPERED STYLES – “FLAT TOPS” & SHORT CUTS
Starting with the longest comb attached (24mm-42mm ), cut from the back of the neck to the
crown. Hold the guide comb flat against the head and slowly move the clipper through the
hair, as shown. (PICTURE 1)
Use the same procedure from the lower side to the upper side of the head, as illustrated.
Then cut the hair against the direction in which it grows and level with the sides. (PICTURE 3)
To give a “flat top” look, the hair on top of the head must be cut over the top of a flat comb.
Use a closer guide comb to taper the hair down to the neckline as desired.
ENGLISH
100156_REM_IFU_HC5150_21L.indd GB_3100156_REM_IFU_HC5150_21L.indd GB_3 29.03.10 15:3429.03.10 15:34
4
CARE FOR YOUR HAIRCLIPPER
Your clipper is fitted with high quality blades. To ensure long lasting performance of your clipper,
clean the blades and unit regularly. Always keep the attachement guide comb on the trimmer
blade.
AFTER EACH USE
Ensure the clipper is switched off and disconnected from the mains.
Brush the accumulated hair from the blades. Do not submerge the clipper in water.
To clean the unit, wipe with a damp cloth and dry immediately.
Gently brush the remaining hairs away from the trimmer comb and trimmer blade.
Do not rinse the cutter assembly under water.
NOTE: Ensure that the clipper is turned off when cleaning.
CLEANING CAUTIONS
Only the adjustable trimmer comb and cutter assembly may be removed from the trimmer
for cleaning.
Cleaning should only be done with a soft brush, such as the brush supplied with the product.
Only use the light-grade oil supplied or sewing machine oil on the blades.
Do not use harsh or corrosive cleaners on the units or their cutters.
Do not apply pressure or hard objects to cutters.
Do not disassemble cutter assembly.
Do not submerge in water as damage will occur.
NOTE: Ensure that the hair clipper is turned off when cleaning.
EVERY SIX MONTHS
At regular intervals the Blade Set should be removed and cleaned.
Remove the 2 screws retaining the fixed blade with a screwdriver. Do not remove bladeset.
Brush out hairs from between the blades with soft cleaning brush. Do not remove the
lubricating grease from the blades. It is not necessary to remove the small moving blade from
the unit.
If the moving blade has been removed this can be re-fitted by slotting the coated blade holder
over the pin in the centre of the interior product head. The groove on the coated blade, just
below the teeth, rests on a metal plate at the opposite side to the screw holes. The fixed
blade is fitted with the raised profile pointing outwards and fixed with the 2 screws.
Note that if the blades are not correctly aligned then cutting efficiency will be impaired.
Place a few drops of cutter or sewing machine oil onto the blades. Wipe off excess oil.
ENGLISH
100156_REM_IFU_HC5150_21L.indd GB_4100156_REM_IFU_HC5150_21L.indd GB_4 29.03.10 15:3429.03.10 15:34
5
GBDNLFEIDKSFINPSKCZPL
HUN
RUTRROGRSLAE
HR/
SRB
GB
CAUTION:
Do not use liquid cleaners on the blades or harsh or corrosive chemicals on the bladecasing.
Always use a soft brush to remove the accumulated hairs.
Unplug the charge adaptor from the power outlet when fitting or removing attachments, or
while cleaning the product.
Always store this appliance and cord in a moisture-free area.
Do not wrap the cord of the charging adaptor around the appliance.
IMPORTANT SAFETY INSTRUCTIONS
WARNING – TO REDUCE THE RISK OF BURNS, ELECTROCUTION, FIRE, OR
INJURY TO PERSONS:
An appliance should never be left unattended when plugged into a power outlet.
Keep the power plug and cord away from heated surfaces.
Make sure the power plug and cord do not get wet.
Do not unplug the product with wet hands.
Do not use the product with a damaged cord. A replacement can be obtained via the nearest
Remington
®
Service Centre.
Charge, use and store the product at a temperature between 15°C and 35°C.
Always unplug from the mains when cleaning.
Only use the parts supplied with the appliance.
The trimmer is not washable. If it falls into water, ensure the power outlet is switched off
before removing.
Keep this product out of reach of children. The use of this appliance by persons with reduced
physical, sensory or mental capabilities or lack of experience and knowledge can give cause to
hazards. Persons responsible for their safety should give explicit instructions or supervise the
use of the appliance.
ENGLISH
100156_REM_IFU_HC5150_21L.indd GB_5100156_REM_IFU_HC5150_21L.indd GB_5 29.03.10 15:3429.03.10 15:34
6
PROTECT THE ENVIRONMENT
The product contains a Nickel Metal Hydride cell unit. Do not dispose of the trimmer in
household waste at the end of its useful life. Disposal can take place at our service centres or
appropriate collection sites.
CAUTION:
Do not put in fire or mutilate your battery packs as they may burst or release toxic materials.
For further information on recycling see www.remington-europe.com
BATTERY REMOVAL
The battery must be removed from the appliance before it is scrapped.
The appliance must be disconnected from the supply mains when removing the battery.
Ensure the clipper is discharged of all power and disconnected from the mains.
Lift or pry the screw cover and unscrew 1 screw located on the back housing of the clipper.
Life or pry the clipper halves apart, exposing the battery on the printed circuit board.
Cut the tabs on both ends of the battery and remove it from the printed circuit board.
The battery is to be disposed of safety.
ENGLISH
100156_REM_IFU_HC5150_21L.indd GB_6100156_REM_IFU_HC5150_21L.indd GB_6 29.03.10 15:3429.03.10 15:34
7
GBDNLFEIDKSFINPSKCZPL
HUN
RUTRROGRSLAE
HR/
SRB
GB
SERVICE AND WARRANTY
This product has been checked and is free of defects. We warrant this product against any
defects that are due to faulty material or workmanship for a year period from the original
date of consumer purchase. If the product should become defective within the warranty
period, we will repair any such defect or elect to replace the product or any part of it without
charge provided there is proof of purchase. This does not mean an extension of the warranty
period.
In the case of a warranty simply call the REMINGTON
®
Service Center in your region.
This warranty is offered over and above your normal statutory rights.
The warranty shall apply in all countries in which our product was sold via an authorised
dealer.
This warranty does not include cutters which are consumable parts. Also not covered
is damage to the product by accident or misuse, abuse, alteration to the product or use
inconsistent with the technical and/or safety instructions required. This warranty shall
not apply if the product has been dismantled or repaired by a person not authorised by us.
ENGLISH
100156_REM_IFU_HC5150_21L.indd GB_7100156_REM_IFU_HC5150_21L.indd GB_7 29.03.10 15:3429.03.10 15:34
3
1 / 1

Remington HC5150 Owner's manual

Category
Hair trimmers & clippers
Type
Owner's manual

Ask a question and I''ll find the answer in the document

Finding information in a document is now easier with AI

Ask the document