Page is loading ...

Via Lago di Vico, 44
36015 Schio (VI)
Tel.naz. 0445 696511
Tel.int. +39 0445 696533
Fax 0445 696522
Internet: www.bft.it
E-mail: [email protected]
ISTRUZIONI D’USO E DI INSTALLAZIONE
INSTALLATION AND USER’S MANUAL
INSTRUCTIONS D’UTILISATION ET D’INSTALLATION
INSTALLATIONS-UND GEBRAUCHSANLEITUNG
INSTRUCCIONES DE USO Y DE INSTALACION
INSTRUÇÕES DE USO E DE INSTALAÇÃO
D811324 ver.06 22-09-08
I
SISTEMA RADIOCOMANDO ROLLING-CODE CON CLONAZIONE
ROLLING-CODE WITH CLONING RADIO CONTROL SYSTEM
SYSTÈME RADIOCOMMANDE ROLLING-CODE AVEC CLONAGE
FERNSTEUERUNGSSYSTEM ROLLING-CODE MIT KLONIEREN
SISTEMA DE RADIOMANDO ROLLING-CODE CON CLONACIóN
SISTEMA RADIOCOMANDO ROLLING-CODE COM CLONAçãO
CLONIX1-2
MITTO 2-4 433MHz

8 - CLONIX/MITTO - Ver. 06
D811324_06
INSTALLATION MANUAL
ENGLISH
Thank you for buying this product, our company is sure that you
will be more than satised with the product’s performance. The
product is supplied with a “Warnings” leaet and an “Instruction
booklet”. These should both be read carefully as they provide
important information about safety, installation, operation and
maintenance. This product complies with the recognised technical
standards and safety regulations. We declare that this product is
in conformity with the following European Directives: 2004/108/
EEC and 73/23/EEC (and subsequent amendments).
GENERAL SAFETY
WARNING! An incorrect installation or improper use of the
product can cause damage to persons, animals or things.
• The “Warnings” leaet and “Instruction booklet” supplied with
this product should be read carefully as they provide important
information about safety, installation, use and maintenance.
• Scrap packing materials (plastic, cardboard, polystyrene etc)
according to the provisions set out by current standards. Keep
nylon or polystyrene bags out of children’s reach.
• Keep the instructions together with the technical brochure for
future reference.
• This product was exclusively designed and manufactured for
the use specied in the present documentation. Any other use
not specied in this documentation could damage the product
and be dangerous.
• The Company declines all responsibility for any consequen-
ces resulting from improper use of the product, or use which
is different from that expected and specied in the present
documentation.
• Do not install the product in explosive atmosphere.
• The construction components of this product must comply
with the following European Directives:It complies with
the 2004/108/EEC, 1999/5/CEE, European Directive and
subsequent amendments. As for all non-EEC countries, the
above-mentioned standards as well as the current national
standards should be respected in order to achieve a good
safety level.
• The Company declines all responsibility for any consequences
resulting from failure to observe Good Technical Practice when
constructing closing structures (door, gates etc.), as well as
from any deformation which might occur during use.
• The installation must comply with the provisions set out by the
following European Directives:It complies with the 2004/108/
EEC, 1999/5/CEE, European Directive and subsequent
amendments.
• Disconnect the electrical power supply before carrying out any
work on the installation. Also disconnect any buffer batteries,
if tted.
• The Company declines all responsibility with respect to the
automation safety and correct operation when other manu-
facturers’ components are used.
• Only use original parts for any maintenance or repair opera-
tion.
• Do not modify the automation components, unless explicitly
authorised by the company.
• Instruct the product user about the control systems provided
and the manual opening operation in case of emergency.
• Keep radio control or other control devices out of children’s
reach, in order to avoid unintentional automation activation.
• The user must avoid any attempt to carry out work or repair
on the automation system, and always request the assistance
of qualied personnel.
• Anything which is not expressly provided for in the present
instructions, is not allowed.
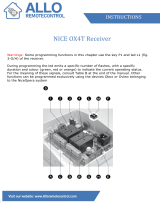
1) GENERAL OUTLINE
The Clonix receiver combines the characteristics of utmost safety
in copying variable code (rolling code) coding with the convenien-
ce of carrying out transmitter “cloning” operations thanks to an
exclusive system.
Cloning a transmitter means creating a transmitter which can be
included automatically within the list of the transmitters memo-
rised in the receiver, either as an addition or as a replacement of
a particular transmitter.
Therefore it will be possible to remotely program a large number of
additional transmitters, or for example, replacement transmitters
for those which have been lost, without making changes directly
to the receiver. Cloning by replacement is used to create a new
transmitter which takes the place of the one previously memorised
in the receiver; in this way the lost transmitter is removed from the
memory and will no longer be usable
When coding safety is not a decisive factor, the Clonix receiver
allows you to carry out xed code additional cloning, which
although abandoning the variable code, provides a high number
of coding combinations.
Using clones when there is more than one receiver (as in the case
of communal buildings),
and especially when a distinction is to be made between clones to
be added to or replaced in individual or collective receivers, could
turn out to be rather difcult. The Clonix receiver cloning system for
communal buildings makes it particularly easy to solve the problem
of clone storage for up to 250 individual receivers.
2) RECEIVER TECHNICAL SPECIFICATIONS
Power supply : range 12 to 28V= range 16 to 28V~
Antenna impedance : 50 Ohms (RG58)
Relay contact : 1A - 33V~, 1A - 24V=
Max. n° of radio transmitters that can be memorized:
Receiver version N° of radio
transmitters
CLONIX single-channel 128 128
CLONIX twin-channel 128 128
CLONIX twin-channel 2048 2048
CLONIX EXTERNAL twin-channel 128 128
CLONIX EXTERNAL twin-channel 2048 2048
2.1) TECHNICAL SPECIFICATIONS OF MITTO RECEIVER:
Frequency : 433.92MHz
Operating temperature range : -20 / +55°C
Code by means of : Rolling-code algorithm
N° of combinations : 4 billion
Dimensions : see g.1
Power supply : 12V Alkaline battery 23A
Range : 50/100 metres
Transmitter versions : Twin-channel, 4-channel
3) ANTENNA INSTALLATION
Use an antenna tuned to 433MHz.
For Antenna-Receiver connection, use RG8 coaxial cable.
The presence of metallic masses next to the antenna can in-
terfere with radio reception. In case of insufcient transmitter
range, move the antenna to a more suitable position.
4) PROGRAMMING
Transmitter storage can be carried out in manual mode, or by
means of the Universal palmtop programmer which allows
you to create installations in the “collective receivers” mode,

CLONIX/MITTO - Ver. 06 - 9
D811324_06
INSTALLATION MANUAL
ENGLISH
as well as manage the complete installation database using the
EEdbase software.
5) MANUAL PROGRAMMING
In the case of standard installations where no advanced functions
are required, it is possible to proceed to manual storage of the
transmitters, making reference to programming table A and to the
example for basic programming in Fig.2.
1) If you wish the transmitter to activate output 1, press pushbutton
SW1, otherwise if you wish the transmitter to activate output
2, press pushbutton SW2.
2) If you wish to obtain functions other than monostable activation,
refer to table A – output activation.
3) When LED DL1 starts blinking, press hidden key P1 on the
transmitter, LED DL1 will remain continuously lit.
Note: Hidden key P1 appears differently depending on the
transmitter model.
4) Press the key of the transmitter to be memorized, LED DL1
will ash quickly to indicate that it has been memorized suc-
cessfully. Flashing as normal will then be resumed.
5) To memorize another transmitter, repeat steps 3) and 4).
6) To exit memorizing mode, wait for the LED to go off comple-
tely or press the key of a remote control that has just been
memorized.
IMPORTANT NOTE: ATTACH THE ADHESIVE KEY LABEL TO
THE FIRST MEMORISED TRANSMITTER (MASTER).
In the case of manual programming, the rst transmitter assigns
the key code to the receiver; this code is necessary in order to
carry out subsequent cloning of the radio transmitters.
5.1) Transmitter storage via radio in self-learning mode
(DIP1 ON)
This mode is used to copy the keys of a transmitter already stored
in the receiver memory, without accessing the receiver.
The rst transmitter is to be memorised in manual mode (see
paragraph 5).
a) Press hidden key P1(g.4) on the transmitter already memo-
rised.
b) Press key T on the transmitter already memorised, which is
also to be attributed to the new transmitter.
c) Within 10 sec., press key P1 on the new transmitter to be
memorised.
d) Press key T to be attributed to the new transmitter.
e) To memorise another transmitter, repeat the procedure from
step (c) within a maximum time of 10 seconds, otherwise the
receiver exits the programming mode.
f) To copy another key, repeat from step (a), having waited for the
receiver to exit the programming mode (or after disconnecting
the receiver from the power supply).
Note: with DIP1 ON/OFF, storage can also be carried out in
manual mode.
WARNING: Maximum protection from storage of foreign
codes is obtained by having the DIP1 OFF and programming
in MANUAL mode or by means of the Universal palmtop
programmer (Fig. 3).
6) RADIO-TRANSMITTER CLONING
Rolling-code cloning (DIP2 OFF)/ Fixed-code cloning (DIP2
ON).
Make reference to the Universal palmtop programmer Instructions
and the CLONIX Programming Guide.
7) ADVANCED PROGRAMMING: COLLECTIVE RECEIVERS
Make reference to the Universal palmtop programmer Instructions
and the CLONIX Programming Guide.
8) MAINTENANCE
The maintenance of the system should only be carried out by
qualied personnel regularly. MITTO transmitters are powered
by a single 12V lithium battery (23A type).
Any reduction in the transmitter capacity may be due to the batteries
getting at. When the led of the transmitter ashes, it means that
the batteries are at and must be replaced.
9) DISPOSAL
ATTENTION: disposal should only be carried out by qualied
personnel.
Materials must be disposed of in conformity with the current
regulations.
In case of disposal, the system components do not entail any
particular risks or danger. In case of recovered materials, these
should be sorted out by type (electrical components, copper,
aluminium, plastic etc.).
For battery disposal, refer to the current regulations.
The descriptions and illustrations contained in the present
manual are not binding. The Company reserves the right to
make any alterations deemed appropriate for the technical,
manufacturing and commercial improvement of the product,
while leaving its essential features unchanged, at any time and
without undertaking to update the present publication.

10 - CLONIX/MITTO - Ver. 06
D811324_06
SW2 for CH2 output chanel
1
1
SW1
for CH1output chanel
2 blinks followed by a
pause of about 1 second.
1
1
3 blinks followed by a
pause of about 1 second.
4 blinks followed by a
pause of about1 second.
5 blinks followed by a
pause of about1 second.
6 blinks followed by a pause
of about 1 second.
1
1
NUMBER OF LED DL1 BLINKING SIGNALS
1
1
1
1
When pressing the key SW1 (for channel 1) or SW2 (for channel 2) for the first time, the receiver sets to the programming
mode. Every time the key SW is pressed after that, the receiver switches to the configuration for the subsequent function, that
is indicated by the number of flashings (see table).
For example, if SW2 is pressed for 4 consecutive times, the receiver stores the second channel as timer output
(4 flashings/pause/4 flashings/pause/...).
At this stage, after selecting the channel (SW1 or SW2) and the desired function, the key T (T1-T2-T3 or T4) of the transmitter
will be stored in the memory of the receiver as indicated in the table for programming.
Programming
and
Impulse output
Press the hidden key (Fig.4) on the transmitter until the
LED remains lit, then press the T key (1-2-3 or 4) on
the transmitter until it starts flashing again, wait for the
LED to go off or switch off the power. The transmitter's
T key is now memorized.
TABLE A
LEGEND
Constant blinking.
Automatic memory
storage only
TRC2/MITTO2 with
impulse output
The key T1 of the transmitter is automatically stored on the output
CH1 while the key T2 on CH2. Do not store the TRC1 with this
function (key T2 is not available).
Press the hidden key (Fig.4) on the transmitter until the
LED remains lit, then press key T1 on the transmitter (if
other keys are pressed, they are ignored) until it starts
flashing again, wait for the LED to go off (10 sec) or
transmit a key to exit. T1 and T2 are now automatically
memorized on CH1 and CH2.
Standard Programming
Step-by-step
output
The combined output relay changes its status each time the
transmitter key is pressed.
Press the hidden key P1 (Fig.4) on the transmitter until
the Led remains on, then press the key T (1-2-3 or 4)
on the transmitter until flashing is resumed, wait for the
Led to switch off (15secs.) or disconnect the power
supply. Now the key T of the transmitter is stored with
step-by-step mode.
Timer output
Each time the transmitter key is pressed, the output relay remains
picked up for 90 seconds. If the key is pressed during the counting
cycle, counting is restarted for further 90 seconds.
Press the hidden key P1 (Fig.4) on the transmitter until
the Led remains on, then press the key T (1-2-3 or 4)
on the transmitter until flashing is resumed, wait for the
Led to switch off (15secs.) or disconnect the power
supply. Now the key T of the transmitter is stored with
timer functioning mode.
Advanced Programming
Code elimination
Cancellation of
the entire
receiver memory
WARNING! This operation deletes all of the radiocontrols stored
on channel 1 and channel 2 from the memory of the receiver.
While the LED is flashing, keep buttons SW1 and SW2
on the receiver held down together for longer than 10
sec. The LED flashes very quickly.
By the time the LED goes off, all the transmitters are
deleted and you exit programming mode.
FUNCTION
FUNCTION DESCRIPTION
PROGRAMMING PROCEDURE
N.D.
The associated output relay stays attracted for 1 second.
You will exit programming mode if no memorizing is performed
for 10 seconds.
Non-associated function
Latch

CLONIX/MITTO - Ver. 06 - 23
D811324_06
Fig. 1
Fig. 2
T1 T2
T4 T3
T1 T2
64
64
41
16
41
16
Premere una volta il tasto SW1.
Press the key SW1 once.
Appuyer une fois sur la touche SW1.
Einmal die Taste SW1 drücken.
Presione una vez la tecla SW1.
Pressionar uma vez a tecla SW1.
1
Premere una volta il tasto SW2.
Press the SW2 once.
Appuyer une fois sur la touche SW2.
Die Taste SW2 einmal drücken.
Presione una vez la tecla SW2.
Pressionar uma vez a tecla SW2.
6
Il led comincia a lampeggiare.
The led begins to flash.
La led commence à clignoter.
Die Led beginnt zu blinken.
El led empieza a parpadear.
O led começa a piscar.
Premere il tasto nascosto fino a che il led del ricevitore resta acceso.
Press the hidden key until the led of the receiver stays on.
Appuyer sur la touche cachée jusqu'à ce que la led du récepteur reste allumée.
Die versteckte taste drücken, bis die Led des Empfängers eingeschaltet bleibt.
Presione la tecla oculta hasta que el led del receptor se encienda.
Pressionar a tecla escondida até que o Led do receptor fica aceso.
2
Attendere che il led si spenga.
Wait for the led to switch off.
Attendre que la led s'éteint.
Warten, bis die Led erlischt.
Espere a que el led se apague.
Aguardar que o led se apague.
5
3
Premere il tasto T1, il led lampeggerà velocemente indicando l’avvenuta
memorizzazione. In seguito riprenderà il lampeggio normale.
Press the key T1, LED will flash quickly to indicate that it has been memorized
successfully. Flashing as normal will then be resumed.
Appuyer sur la touche T1, la Del se met à clignoter rapidement pour signaler que
la mémorisation est accomplie. Elle reprend ensuite son clignotement normal.
Die Taste T1 drücken, die LED blinkt schnell auf und zeigt die erfolgte Abspeicherung
an. Anschließend blinkt sie normal weiter.
Presione la tecla T1, el led DL1 parpadeará rápidamente indicando que la
memorización ha sido realizada. Luego volverá a parpadear normalmente.
Pressionar a tecla T1,o led DL1 irá piscar rapidamente indicando que a memorização
foi bem sucedida. Sucessivamente recomeçará o piscar normal.
4
Attendere che il led si spenga.
Wait for the led to switch off.
Attendre que la led s'éteint.
Warten, bis die Led erlischt.
Espere a que el led se apague.
Aguardar que o led se apague.
10
Premere il tasto T2, il led lampeggerà velocemente indicando l’avvenuta
memorizzazione. In seguito riprenderà il lampeggio normale.
Press the key T2, LED will flash quickly to indicate that it has been memorized
successfully. Flashing as normal will then be resumed.
Appuyer sur la touche T2, la Del se met à clignoter rapidement pour signaler que
la mémorisation est accomplie. Elle reprend ensuite son clignotement normal.
Die Taste T2 drücken, die LED blinkt schnell auf und zeigt die erfolgte Abspeicherung
an. Anschließend blinkt sie normal weiter.
Presione la tecla T2,el led DL1 parpadeará rápidamente indicando que la
memorización ha sido realizada. Luego volverá a parpadear normalmente.
Pressionar a tecla T2 até o led DL1 irá piscar rapidamente indicando que a
memorização foi bem sucedida. Sucessivamente recomeçará o piscar normal.
9
PROGRAMMAZIONE BASE CLONIX 2
Uscita impulsiva 1 e 2 (per comandare ad esempio lo start di
una centrale di comando e l'apertura pedonale della stessa)
BASIC PROGRAMMING OF CLONIX 2
Impulsive output 1 and 2 (to activate, for example, a control
unit and its pedestrian opening)
PROGRAMMATION DE BASE CLONIX 2
Sortie impulsive 1 et 2 (pour commander par exemple le start
d'une unité de commande et l'ouverture piétonne de l'unité)
BASIS-PROGRAMMIERUNG CLONIX 2
Impuls-Ausgang 1 und 2 (um zum Beispiel den Start einer
Steuerzentrale und deren Fußgängeröffnung zu befehligen)
PROGRAMACIÓN BASE CLONIX 2
Salida impulsiva 1 y 2 (para activar, por ejemplo, el start de una
central de mando y la apertura peatonal de la misma)
PROGRAMAÇÃO BASE CLONIX 2
Saída impulsiva 1 e 2 (para comandar por exemplo o start de uma
central de comando e a função abertura do postigo da mesma)
Premere il tasto nascosto fino a che il led del ricevitore resta acceso.
Press the hidden key until the led of the receiver stays on.
Appuyer sur la touche cachée jusqu'à ce que la led du récepteur reste allumée.
Die Versteckte Taste drücken, bis die Led des Empfängers eingeschaltet bleibt.
Presione la tecla oculta hasta que el led del receptor se encienda.
Pressionar a tecla escondida até que o Led do receptor fica aceso.
8
Il led comincia a lampeggiare.
The led begins to flash.
La led commence à clignoter.
Die Led beginnt zu blinken.
El led empieza a parpadear.
O led começa a piscar.
7
GB

Fig. 4
Fig. 4
Fig. 3
UNIMITTO
UNIDA
UNIFLAT
CLONIX 1-2
SW2
SW1
LED DL1
SW2
DIP2
DIP1
UNIFLAT
Contatti
Contacts
Contacts
Kontakte
Contactos
Contatos
UNIMITTO
Contatti
Contacts
Contacts
Kontakte
Contactos
Contatos
PROXIMA
ON
1
2
/