Page is loading ...

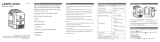
Charging
1 Remove the DB-79A battery holder by turning battery holder knob to "OPEN" side.
2 Connect the AD-17B/C/D/E into the charge port of the battery pack BT-79Q.
3 Plug the AD-17B/C/D/E into the wall outlet.
When charging starts, the LED is solid red. The LED is off when charging finished.
4
Unplug the AD-17B/C/D/E from the battery pack BT-79Q and disconnect the AD-
17B/C/D/E power plug from the wall outlet.
RL-H5A
RL-H5A
Note: In manual mode
• Self-leveling function is not active.
• Height alert function is not active.
• Setting slope function is not active.
On-Grade
Index
LASER SAFETY INFORMATION
NOMENCLATURE AND FUNCTIONS
HOW TO STORE
LS-100D
After using the instrument, store it as shown below.
(LS-80A/80B/90)
PRECAUTIONS
POWER SOURCE
• If the instrument is dirty, carefully wipe it with a soft, dry cloth. To clean the instru-
ment or the carrying case, lightly moisten a soft cloth in a mild detergent solution.
Wring out excess water until the cloth is slightly damp, then carefully wipe the sur-
face of the unit. Do not use any alkaline cleaning solutions, alcohol, or any other
organic solvents on the instrument.
Exporting this product (Relating EAR)
This product is equipped with the parts/units, and contains software/technology,
which are subject to the EAR (Export Administration Regulations). Depending on
countries you wish to export or bring the product to, a US export license may be
required. In such a case, it is your responsibility to obtain the license. The countries
requiring the license as of Aug. 2017 are shown below. Please consult the Export
Administration Regulations as they are subject to change.
North Korea, Iran, Syria, Sudan, Cuba
URL for the EAR of the US: http://www.bis.doc.gov/policiesandregulations/ear/index.htm
EXCEPTIONS FROM RESPONSIBILITY
• The manufacturer, or its representatives, assumes no responsibility for any dam-
age, or loss of profits (change of data, loss of data, loss of profits, an interruption of
business etc.) caused by use of the product or an unusable product.
• The manufacturer, or its representatives, assumes no responsibility for any dam-
age, or loss of profits caused by usage different to that explained in this manual.
• The manufacturer, or its representatives, assumes no responsibility for consequen-
tial damage, or loss of profits due to heavy rain, strong wind, high-temperature and
humidity, or storing or use of the product under unusual conditions.
• Product failures caused by rebuilding are out of warranty.
• Cautions and warnings included in this manual do not cover all the possible events.
INSTRUCTION MANUAL
ROTATING LASER
Class 3R Laser Product
Thank you for selecting our products.
• Please read this Instruction manual carefully, when using
this product.
• The specifications and general appearance of the instru-
ment, and the content of this manual are subject to change
without notice.
• Some of the diagrams shown in this manual may be simpli-
fied for easier understanding.
• Always keep this manual in a convenient location and read
it when necessary.
• Please read the Instruction manual of the paired instrument
in conjunction with this manual.
RL-H5A
AD-17B/C/D/E
AA-size dry cell
batteries
D-size dry cell
batteries
(LS-B10/B10W)
Level Sensor Holder
Model-110
Battery power lamp (Red)
Blinking:
The power is low, but laser is still usable.
(Blinking continues for one minute.)
Solid:
Dead batteries. Replace the batteries with
new ones. (The lamp is solid for five
minutes, then turned off automatically.)
Manual mode ON key
ON: Push twice continuously.
OFF: Push once.
Height alert OFF key
OFF: Push twice continuously.
ON: Push once.
Height alert function (Refer to the
description on the back page.)
Height alert OFF lamp (Red)
Height alert function is not active.
Manual mode ON lamp (Red)
Self-leveling does not function.
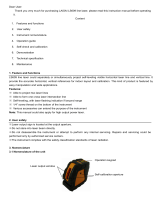
Self-leveling function
When the power is turned on, the laser beam is automatically
positioned within the accuracy range by the self-leveling function.
Protective glass
Rotary head
Laser beam emits from here.
Handle
Battery holder
Battery holder knob
Power switch
Turn the instrument ON or OFF.
Power lamp/Self-leveling lamp (Green)
Blinking quickly : Self-leveling is in process.
Blinking slowly : Self-leveling is almost complete.
Solid : Self-leveling is complete.
Self-leveling function (Refer to the description below.)
Slope lamp (Green)
Aligning Direction of Slope
(Refer to thedescription on the back page.)
Slope key
Tilts beam plane in direction of arrow.
This key does not function during self-leveling
and in the “Manual” mode.
Aligning Direction of Slope
(Refer to the description on the back page.)
Sight
Control panel
LS-80L
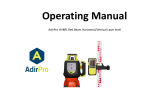
(Level Sensor)
Beam receiving window
Turn the beam receiving window side towards RL-
H5A to detect the laser beam.
Indicator
The indicators are located on front and back sides of
the instrument.
LS-80L Indicator (Refer to the description on the
back page.)
On-Grade precision switch
Two on-grade precision options are available,
normal precision (±2mm) and high precision (±1mm).
By pressing this switch, the precision options are
switched alternately. Confirm the precision choice by
the indicator. (Normal precision is the default setting
each time the sensor is turned on.)
Power switch
The power switch turns ON or OFF by pressing.
Buzzer sound switch
Volume of the sensor buzzer can be alternately
switched to LOW/LOUD/OFF by pressing the switch.
Buzzer speaker
Auto-cut off function
The power will be turned off automatically if no
laser beam is detected for approximately 30
minutes. (To turn on the level sensor, press the
power switch again.)
RL-H5A (Using the dry cell batteries)
Replacing the dry cell batteries
1 Remove the DB-79A battery holder by turning battery holder knob to
“OPEN” side.
2 Install the new 4xD size dry cell batteries (alkaline) referring to the
illustration on the battery holder.*1), 2), 3)
3 Install the battery holder. Tighten the battery cover knob to “LOCK”
side.
*1 Replace all 4 batteries with new ones at the same time. Do not mix
used and new batteries, and do not mix different types of batteries
together.
*2 Use alkaline dry cells.
Nickel hydrogen dry cells and nickel cadmium dry cells can be used
too, but the operating time is different from the time of alkaline dry
cells.
*3 Generally, performances of dry cell deteriorate temporarily in low
temperature, but recover in normal temperature.
• It is possible to remove the dry cell batteries from the DB-79A battery
holder and use the battery pack BT-79Q.
LS-80L
Replacing the dry cell batteries
1 Keep pushing the battery cover in 1 direction, and then try to slide
the cover in 2 direction.The cover does not move but it will be open.
2 Take out the batteries and place new ones (2xAA size alkaline dry
cell batteries) into the battery box.
3 Press the lid down and click to close.
RL-H5A (Using the rechargeable battery)
Be sure to charge the battery fully before using it for the first time or after not using it for long periods.
BT-79Q
DB-79A
• The charger will become rather hot during use. This is normal.
• Do not use batteries other than those designated.
• For longer battery life, conform to the suggested charging time to the extent possible.
• Be sure to charge stored battery source every 3 or 6 months and store in a place at 30°C or below. If you allow the battery to become completely
discharged, it will have an effect on future charging.
• Batteries generate power using a chemical reaction and as a result have a limited lifetime. Even when in storage and not used for long periods, battery
capacity deteriorates with the passage of time. This may result in the operating time of the battery shortening despite having been charged correctly.
In this event, a new battery is required.
DB-79A
Charging Battery
• Be sure to charge the battery within the charging temperature range.
Charging temperature range: 10 to 40°C
• Use only the specified battery or the battery charger. Failures caused by
using other batteries or battery chargers are out of warranty including the
main unit.
Warranty policy for Battery
• Battery is an expendable item. The decline in retained capacity depending on
the repeated charging/discharging cycle is out of warranty.
Other precautions
• Before starting work or during operation, check that the instrument is function-
ing correctly and performance is normal.
• Protect the instrument from heavy shocks or vibration.
• Remove batteries before storing when the instrument will not be used for peri-
ods on 1 month or more. Batteries may leak fluid when left inside the instru-
ment causing malfunction.
Maintenance
• Always clean the instrument before returning it to the case.
• Wipe off moisture completely if the instrument gets wet during survey work.
• Store the instrument in a dry room where the temperature remains fairly con-
stant.
CAUTION
• Perform checks at start of work and periodic checks and adjust-
ments with the laser beam emitted under normal conditions.
• When the instrument is not being used, turn off the power.
• When disposing of the instrument, destroy the battery connector
so that the laser beam cannot be emitted.
• Avoid setting the instrument at heights at which the path of the
laser may strike pedestrians or drivers at head height. Operate
the instrument with due caution to avoid injuries that may be
caused by the laser beam unintentionally striking a person in the
eye.
• Only those who have received training as per the following items
shall use this product.
• Read this manual for usage procedures for this product.
• Hazardous protection procedures (read "LASER SAFETY
INFORMATION")
• Requisite protective gear (read "LASER SAFETY INFOR-
MATION")
• Accident reporting procedures (stipulate procedures before-
hand for transporting the injured and contacting physicians
in case there are laser-induced injuries).
• Persons working within the range of the laser beam are advised
to wear eye protection which corresponds to the laser wavelength
of the instrument being used.(OD2)
• Areas in which the laser is used should be posted with a standard
laser warning sign.
The RL-H5A is classified as a Class 3R Laser Product according to IEC
Standard Publication 60825-1 Ed.3.0: 2014 and United States Government
Code of Federal Regulation FDA CDRH 21CFR Part1040.10 and 1040.11
(Complies with FDA performance standards for laser products except for
deviations pursuant to Laser Notice No.50, dated June 24, 2007.)
WARNING
• Use of controls or adjustments or performance of procedures other than those
specified herein may result in hazardous radiation exposure.
• Never intentionally point the laser beam at another person. The laser beam is
injurious to the eyes and skin. If an eye injury is caused by exposure to the laser
beam, seek immediate medical attention from a licensed ophthalmologist.
• Do not look directly into the laser beam. Doing so could cause permanent eye
damage.
• Do not stare at the laser beam. Doing so could cause permanent eye damage.
• Never look at the laser beam through a telescope, binoculars or other optical
instruments. Doing so could cause permanent eye damage.
Beam aperture
• It is possible to remove the battery pack BT-79Q from the DB-79A
battery holder and use the dry cell batteries.
Grasp the specified place on the battery holder, which is shown
on the right, and remove the battery pack.
The LED of BT-79Q indicates the charging status:
Red ON : Charging.
OFF : Charging completed.
Red blinking slowly : Ni-MH BT-79Q battery pack protection feature is working automatically.
Let the battery pack fall within its designated charging temperature range (10 to 40°C), unplug the AD-17B/C/D/E from
the battery pack and then check the LED status. Solid red LED indicates charging has started again. Slow blinking red
LED indicates the Ni-MH battery is still out of the charging temperature range. Wait for a while, unplug the AD-17B/C/D/E
and then check the LED again.
The instrument has a protection feature which works when the batteries are under a high or low temperature state. In such a case, charging will
stop automatically to protect nickel hydride batteries.
Red blinking quickly: The battery is not charged properly. Please contact your local dealer.
DB-79A
1020986-02-A
• LS-70 cannot be stored.
• For LS-100D and Holder Model-110, refer to the instruction manual of LS-
100D.
Level Sensor Holder
Model-6
LS-80L
Installing
1 Insert the battery pack BT-79Q into the DB-79A battery holder.
2 Install the battery holder. Tighten the battery cover knob to “LOCK” side.
AD-17B/C/D/E
LED
BT-79Q
DB-79A
Plug

OPERATION
CHECKS AND ADJUSTMENTS
[2. Setting slope]
Operating procedure
(Setting slope)
Key
operation
Lamp display
(Refer to the right illustration)
1 Press Power switch ON.
You can set the slope after self-leveling is
completed.
Power switch During self-leveling: Lamp B blinks.
After self-leveling is completed.: Lamp B lights.
2 Press one of Slope keys once. The laser
beam keeps sloping in the direction of the
pressed key.
After self-leveling
is completed.
Slope key
Lamp E blinks quickly.
3 Press the Slope key again. The laser beam
stops sloping.
(Unless you press the Slope key again, the
laser beam is set horizontally.)
Slope key Lamp E lights.
4 Press the Slope key to adjust the slope.
How long you press the Slope key can
change the laser beam sloping speed. The
blinking speed of the lamp provides a visual
indication of the beam movement speed.
Slope key When Slope key is not pressed: Lamp E lights.
Slope key Lamp E Beam movement
Press for a shorter time Blinks slowly Moves slowly
↓ ↓ ↓
Press for a longer time Blinks quickly Moves quickly
5 Press Power switch OFF to cancel the
slope setting.
Power switch All lamps are OFF.
How To Operate
1 Set the instrument to the tripod or
smooth surface. Make sure
instrument is roughly level.
2 Press power switch (ON).
3 Press power switch on level
sensor (ON).
4 Select the precision mode by
pressing the On-Grade
precision switch.
5 Locate the on-grade position
“---” by moving the level
sensor up and down.
6 Mark the position of On-Grade index.
(Top of the level sensor is 40mm [1 9/16”]
from index for offset marking.)
LS-80L Indicator
Detective Range
Height Alert Function
When the instrument system detects a shock, this function informs the
operator of it.
• When the instrument’s installation status (height) is sharply changed
by the contact of the operator or the like, this function stops self-
leveling to keep the operation accuracy and informs the operator of the
situation. The three lamps blink at the same time as shown at the right.
• After 1 minute has passed since the self-leveling function was
activated and the laser beam was emitted, this function works.
• The height alert function does not work in the “Manual” mode.
Shock is given to the instrument.
The three lamps blink at the same time
and the rotary head rotates at low speed.
Height alert status
[How to reset]
1 Turn off the power switch.
2 Check whether the instrument is installed
correctly.
3 Turn on the power switch. Self-leveling starts
again. After self-leveling is finished, the laser
beam is emitted.
4 Make sure that the laser beam is set at the
correct height. Then, restart the operation.
Higher than datum position
(Buzzer sound: High frequent beep sound)
Move the sensor downward.
High precision mode
Normal precision mode
Datum position
(Buzzer sound: Continuous beep sound)
Lower than datum position
(Buzzer sound: Low frequent beep sound)
Move the sensor upward.
Battery remaining display
Height alert warning of rotating laser*1
A flash and a buzzer sound signifies
that the height alert function of rotating
laser is operating.
Rotating laser battery warning*2
A flash shows that the rotating laser
power is low.
Note: The warning displays *1 and *2 are the functions that the level sensor
detects alarm signal from the rotating laser.
The level sensor can be canceled the alarm detection from the rotating laser.
To be canceled the detection; Press the power switch while pressing the
buzzer sound switch when powering on.
(1) Battery is sufficient.
(2) The power is low, but
laser is still usable.
(3) Dead battery.
Replace the dry battery
with new one.
Aligning Direction of Slope
It is possible to set slope only in the X axis direction (refer to “CHECKS
AND ADJUSTMENTS”).
[1. Installation of the instrument]
When using the laser to set the slope, the laser must be properly
aligned so the slope axis of the laser beam is parallel to the desired
direction of slope.
The sight on top of the instrument is calibrated to the slope axis of the
laser beam. Follow the steps below to align the laser to the desired
direction of slope:
1 Establish a target line parallel to desired direction of slope.
2 Set up the laser over this line (drop a plumb bob from the tripod
mounting screw).
3 Rough align the instrument to the direction of slope. Make sure it is
properly oriented for the slope to be set.
4 Using the sight, position the instrument so the sight is centered on
the target. (see illustration below)
Lamp Position
• When you set the “Manual” mode to ON after setting
the slope, the beam is fixed at the set slope position.
At this time the Slope key does not function.
For information about Manual mode ON/OFF, refer to
“NOMENCLATURE AND FUNCTIONS”.
• Check the beam often during slope use for slope
accuracy. Check instrument calibration periodically.
X1
X2
Y1
Checking and adjusting calibration
Checking cone error
Horizontal calibration of the laser beam can be checked by the user.
[Checking]
1 Set up a tripod approx. 50m (160ft) from a wall. Mount the
instrument on the tripod, facing the X1 side toward the wall.
2 Turn the instrument on and allow self-leveling to complete.
3 Put the level sensor in fine detection mode by pressing the On-
Grade precision switch.
4 By using the level sensor, mark the center position of laser beam
on the wall. (X1)
5 Turn off the instrument.
Loosen the tripod screw, rotate the instrument 180 degrees and
re-secure it on the tripod. The X2 side of the instrument faces
toward the wall.
When rotating the instrument, avoid changing the height.
6 Turn the unit on again and allow self-leveling to complete.
7 By using the level sensor, mark the center position of laser beam
on the wall. (X2)
8 If the difference value of marked two laser beam heights
(difference value of X1 and X2) are less than 5mm, adjustments
are not needed.
The difference value is greater than 5mm, adjust the instrument
as described in right.*
9 Check the Y side as the same way.
To discontinue calibration the instrument, press the Power switch.
Perform the following check after completing horizontal calibration procedure.
[Checking]
1 Set up the laser centered between two walls approximately 40m (131ft) apart. Orient the instrument so one axis, either X or Y, is facing the walls.
2 Locate and mark the position of the rotating laser beam on both walls using the level sensor.
3 Turn off the instrument and move the instrument closer to wall A (1m to 2m /3 ft to 6 ft). Do not change the axis orientation of the instrument. Turn the instrument on.
4 Again locate and mark the position of the rotating laser beam on both walls using the level sensor.
5 Measure the distance between the first and second marks on each wall. If the difference between each set of marks is less than 4mm (5/32 of an inch), no error exists.
* If the difference value is greater than 4mm (5/32 inch), contact your local dealer.
Approx. 50m
level sensor
Wall
X1
X2
X1
X2 Laser beam
X1 Laser beam
Approx. 50m
* If the difference value is greater than 40mm (±90”), it exceeds the
adjustment range. Please contact your local dealer.
Wall A
Wall B
Wall A
Wall B
Approx. 40m
Control panel
Handle
Datum
position
Cone error
Use the table below to determine operation errors indicated by blinking lamps on the control panel.
(For the lamp indication, refer to “Lamp position”.)
If corrective action listed does not correct error, please contact your local dealer.
Lamp Indication Error Code Corrective Action
Lamp B, C and D blink in turn Self-leveling range error Correct tilt of the instrument until it less than 5 degrees.
Lamp A lights Battery power error Replace the four alkaline dry cell batteries with new ones
at a time or charge the battery pack.
Lamp B, C and D blink
simultaneously
Height alert error Turn power off, rough level the instrument, then turn
power on again. Check height of laser beam as it may
have changed.
Lamp D blinks quickly Calibration error Repeat calibration procedure. If error repeats contact
your local dealer.
Lamp E lights
Lamp B, C and D blink in turn
Checking and adjusting
calibration error
Push the slope key of the opposite side, and align slope.
Lamp A, B, C and D blink
simultaneously
Internal error Turn power off, then on again in stable locations. If error
repeats contact your local dealer.
RL-H5A
Laser source: Laser diode (Visible, 635 nm)
CDRH (FDA) Class IIIa, IEC Class 3R
Laser output: 2.4 mW
Self-leveling range: ±5°
Accuracy: ±10”
Manual slope settable range: ±5° (When the instrument is installed on the 0° surface)
The slope range is increased or decreased
according to the tilt of the surface on which the
instrument is installed.
Rotational speeds: 600 r.p.m
Operating range: Diameter Approx. 2 to 800 m (When using LS-80L)
Power source/Operating time at 20°C (68°F):
4xD size dry cell batteries (alkaline) /100 hours
Ni-MH battery pack BT-79Q (7000mAh) /60 hours
Charging time: about 13 hours (Using with AD-17B/C/D/E)
Charging temperature range: 10 to 40°C (50 to 104°F)
Dust and water resistance: IP66 (IEC60529: 2001)
Operating temperature: -20 to 50°C (-4 to 122°F)
Storable temperature range: -30 to 60°C (-22 to 140°F)
Remote warning display: RL-H5A height alert warning(Warning is displayed
on the indicator of LS-80L.)
RL-H5A battery warning (Warning is displayed on
the indicator of LS-80L.)
Size: 172 (L) x 211 (W) x 205 (H) mm
Laser beam height: 171.8 mm (Height from the instrument’s bottom
surface to the center point of laser beam)
Weight
Dry battery type: 2.3 kg (5.1 lbs) (with dry cell batteries)
Rechargeable battery type: 2.5 kg (5.5 lbs) (with BT-79Q)
Tripod screw: 5”/8X11 threads for surveying instrument
If the height alert OFF lamp blinks quickly and the power is not automatically turned off when pressing the height alert OFF key to
memorize the height, the height exceeds the adjustment range. Please contact your local dealer.
[To calibrate the X axis]
1 Face the X1 side of the instrument toward a wall, press the Power switch while pressing the height alert OFF key. Then the
height alert OFF lamp will light, and manual mode ON lamp will blink. (X axis is selected.)
2 Press the height alert OFF key to calibrate the X axis. The manual mode ON lamp will light. When self-leveling finishes, the
laser beam will emit.
3 Using the level sensor, mark the on-grade height of laser beam on a wall.
4 Rotate the instrument 180 degrees to face X2 side toward a wall.
5 In the same way as step 3, mark the on-grade height of laser beam on a wall.
6 Press the slope key to make adjustment so that the laser beam height may be at the center between the positions of Step 3 and Step 5.
7 Press the height alert OFF key to memorize the new laser beam calibration. The height alert OFF lamp will blink. Power will
shut off automatically when the calibration memorization is complete.
The X axis adjustment is completed now.
[To calibrate the Y axis]
1 Face the Y1 side of the instrument (Control panel side) toward a wall, press the Power switch while pressing the height alert
OFF key. Then the height alert OFF lamp will light, and manual mode ON lamp will blink. (X axis is selected.)
2 Press the right Slope key once again. The self-leveling lamp will blink. (Y axis is selected.)
3 Press the height alert OFF key to calibrate the Y axis. The self-leveling lamp will light.
4 Using the level sensor, mark the on-grade height of laser beam on a wall.
5 Rotate the instrument 180 degrees to face Y2 side toward a wall.
6 In the same way as step 4, mark the on-grade height of laser beam on a wall.
7 Press the slope key to make adjustment so that the laser beam height may be at the center between the positions of Step 4 and Step 6.
8 Press the height alert OFF key to memorize the new laser beam calibration. The height alert OFF lamp will blink. Power will
shut off automatically when the calibration memorization is complete.
The Y axis adjustment is completed now.
How to set the slope before the power is OFF again
1 To set the slope before the power is OFF again, turn on
the Power switch as pressing either right or left of the
Slope keys. The slope is kept and you can adjust the
slope in the same way as Step 4.
(When the Power switch is ON without the Slope key
pressed, the laser beam will return to level.)
Target
ERROR CODE
© 2017 TOPCON CORPORATION
ALL RIGHTS RESERVED
BT-79Q (Ni-MH rechargeable battery)
Nominal voltage: 4.8V
Capacity: 7,000mAh
Size: 104(W) x 127(D) x 37(H) mm
Weight: 690 g
AD-17B/C/D/E
Input voltage: 100 to 240 V AC, 50 to 60 Hz, 0.6 A
Output voltage: DC 9 V/2.0 MAX 18 W
Charging time: about 13 hours
Charging temperature range: 10 to 40°C (50 to 104°F)
Storage temperature range: -20 to 70°C (-4 to 158°F)
Size (excluding cable)/ Weight
AD-17B: 45(W) x 83(D) x 54(H) mm /133 g
AD-17C: 45(W) x 83(D) x 70(H) mm /137 g
AD-17D: 45(W) x 83(D) x 59(H) mm /135 g
AD-17E: 45(W) x 83(D) x 62(H) mm /140 g
SPECIFICATIONS
LS-80L
Beam detection width: 50 mm (2.0 in)
On-Grade precision: High: ±1 mm (±0.04 in)
Normal: ±2 mm (±0.08 in)
Beam detection indication: Liquid crystal (both sides) and buzzer
Power source: 2xAA size dry cell batteries
Operating time (at 20°C): about 120 hours (Using alkaline
manganese dry cell batteries)
Automatic shutoff: after 30 minutes (without beam
detection)
Dust and water resistance: IP66 (IEC60529: 2001)
Operating temperature: -20 to 50°C (-4 to 122°F)
Storage temperature: -30 to 60°C (-22 to 140°F)
Size: 146(L)x76(W)x26(H) mm
Weight: 0.19 kg (0.41 lbs) (with dry cell batteries)
A: Battery power
lamp
B: Power lamp /
Self-leveling lamp
C: Manual mode ON
lamp
E: Slope lamp
Slope key
Power switch
Manual mode ON key
Height alert
OFF key
D: Height alert OFF
lamp
http://www.topcon.co.jp
GLOBAL GATEWAY http://global.topcon.com/
Please see the following website for contact addresses.
Laser point of X1
Y2
Laser point of X2
• After setting the slope, the self-leveling does not function in the X axis direction.
/