Fusion MS-CRGBWRC Operating instructions

Type
Operating instructions

This manual is also suitable for

Fusion MS-CRGBWRC enhances your marine audio experience with wireless control over a spectrum of LED colors, giving you the power to customize the ambiance on your boat. With a user-friendly remote, you can effortlessly switch between 25 dynamic display modes and adjust the brightness of RGB, cool white, and warm white LEDs.

Fusion MS-CRGBWRC enhances your marine audio experience with wireless control over a spectrum of LED colors, giving you the power to customize the ambiance on your boat. With a user-friendly remote, you can effortlessly switch between 25 dynamic display modes and adjust the brightness of RGB, cool white, and warm white LEDs.

®
Wireless CRGBW LED Remote Control
Instructions
Important Safety Information
WARNING
Failure to follow these warnings and cautions could result in
personal injury, damage to the vessel, or poor product
performance.
See the Important Safety and Product Information guide in the
stereo box for product warnings and other important information.
This device must be installed according to these instructions.
Disconnect the vessel's power supply before beginning to install
this product.
CAUTION
Always wear safety goggles, ear protection, and a dust mask
when drilling, cutting, or sanding.
NOTICE
When drilling or cutting, always check what is on the opposite
side of the surface to avoid damaging the vessel.
You must read all installation instructions before beginning the
installation. If you experience difficulty during the installation,
contact Fusion
®
Product Support.
Supplies and Tools Needed
2-conductor 22 AWG (0.33 mm
2
) wire to connect the remote
control receiver to the power source
6-conductor 22 AWG (0.33 mm
2
) wire (or equivalent
combination of 2- to 4-conductor wire) to connect the receiver
to the LED speakers
Cable ties or adhesive for mounting the receiver
4 gauge (3 mm) countersunk stainless-steel screws for
mounting the remote cradle (optional)
3 mm flat screwdriver
Wire cutters
Drill and drill bits for mounting the remote cradle (optional)
Mounting and Connection Considerations
When selecting a location for the remote control receiver and
making the wiring connections, observe these considerations.
The receiver housing is not weather proof, and you must
install the receiver in a location that is not exposed to the
elements.
You can connect a single receiver to up to 10 LED speakers
with RGB, cool white, and warm white functionality (5 pair).
You must use an additional receiver and remote control (sold
separately) to connect to additional LED speakers.
You cannot use a single remote control with more than one
receiver.
Connecting the Remote Control Receiver
You can connect up to 10 (5 pair) of CRGBW LED speakers to
one remote control receiver.
1
Route a power wire (not included) from a 12 Vdc power
source to the location of the receiver .
2
Install the included 7.5 A fuse on the power wire.
3
Route 6-conductor wire or equivalent (not included) from
the receiver to the speakers you want to control, joining the
wire where needed to connect up to 4 speakers.
NOTE: To avoid interference, you must not route the LED
wires near and parallel to any RCA, power, or speaker audio
cables. You should also avoid routing this cable near any
other electronic cabling on the vessel.
4
Connect the 6-conductor wire or equivalent to the CRGBW
connectors on the speakers according to the installation
instructions provided with the speakers.
5
Loosen the wire terminal screws on the bottom of the
receiver using a 3 mm flat screwdriver.
6
Connect the power and RGB speaker wires to the wire
terminals on the sides of the receiver.
Letter on receiver label Wire color or function
INPUT +12V DC (left
side)
12 Vdc negative (-)
INPUT -12V DC (left
side)
12 Vdc positive (+)
V+ (BLACK) (right side) CRGBW 12 Vdc positive (+) (common)
wire
NOTE: Two V+ connectors are provided
on the right side for convenience. You
should connect the common wire from
the speakers to only one of these
connectors.
WARM WHITE
(YELLOW)
CRGBW warm white wire
COOL WHITE
(TURQUOISE)
CRGBW cool white wire
V+ (BLACK) (right side) CRGBW 12 Vdc positive (+) (common)
wire
NOTE: Two V+ connectors are provided
on the right side for convenience. You
should connect the common wire from
the speakers to only one of these
connectors.
RED CRGBW red wire
GREEN CRGBW green wire
BLUE CRGBW blue wire
7
Tighten the wire terminal screws on the bottom of the
receiver.
8
Secure the receiver to the mounting location using cable ties
or adhesive (not included).
Installing the Remote Control Cradle
You can install the included remote cradle to store the remote
when not in use. Mounting hardware for the cradle is not
included.
NOTICE
Because the remote control is not weatherproof, you must install
the cradle in a location that is not exposed to the elements.
1
Using the cradle as a template, mark the two pilot holes.
2
Remove the cradle from the mounting surface and drill the
pilot holes.
GUID-80736249-84A1-4457-B3FC-9231AA6112DC v1August 2020
NOTICE
Do not drill through the cradle when drilling the pilot holes.
This may damage the cradle.
3
Secure the cradle to the mounting surface using two 4 gauge
(3 mm) countersunk stainless-steel screws.
Installing the Batteries
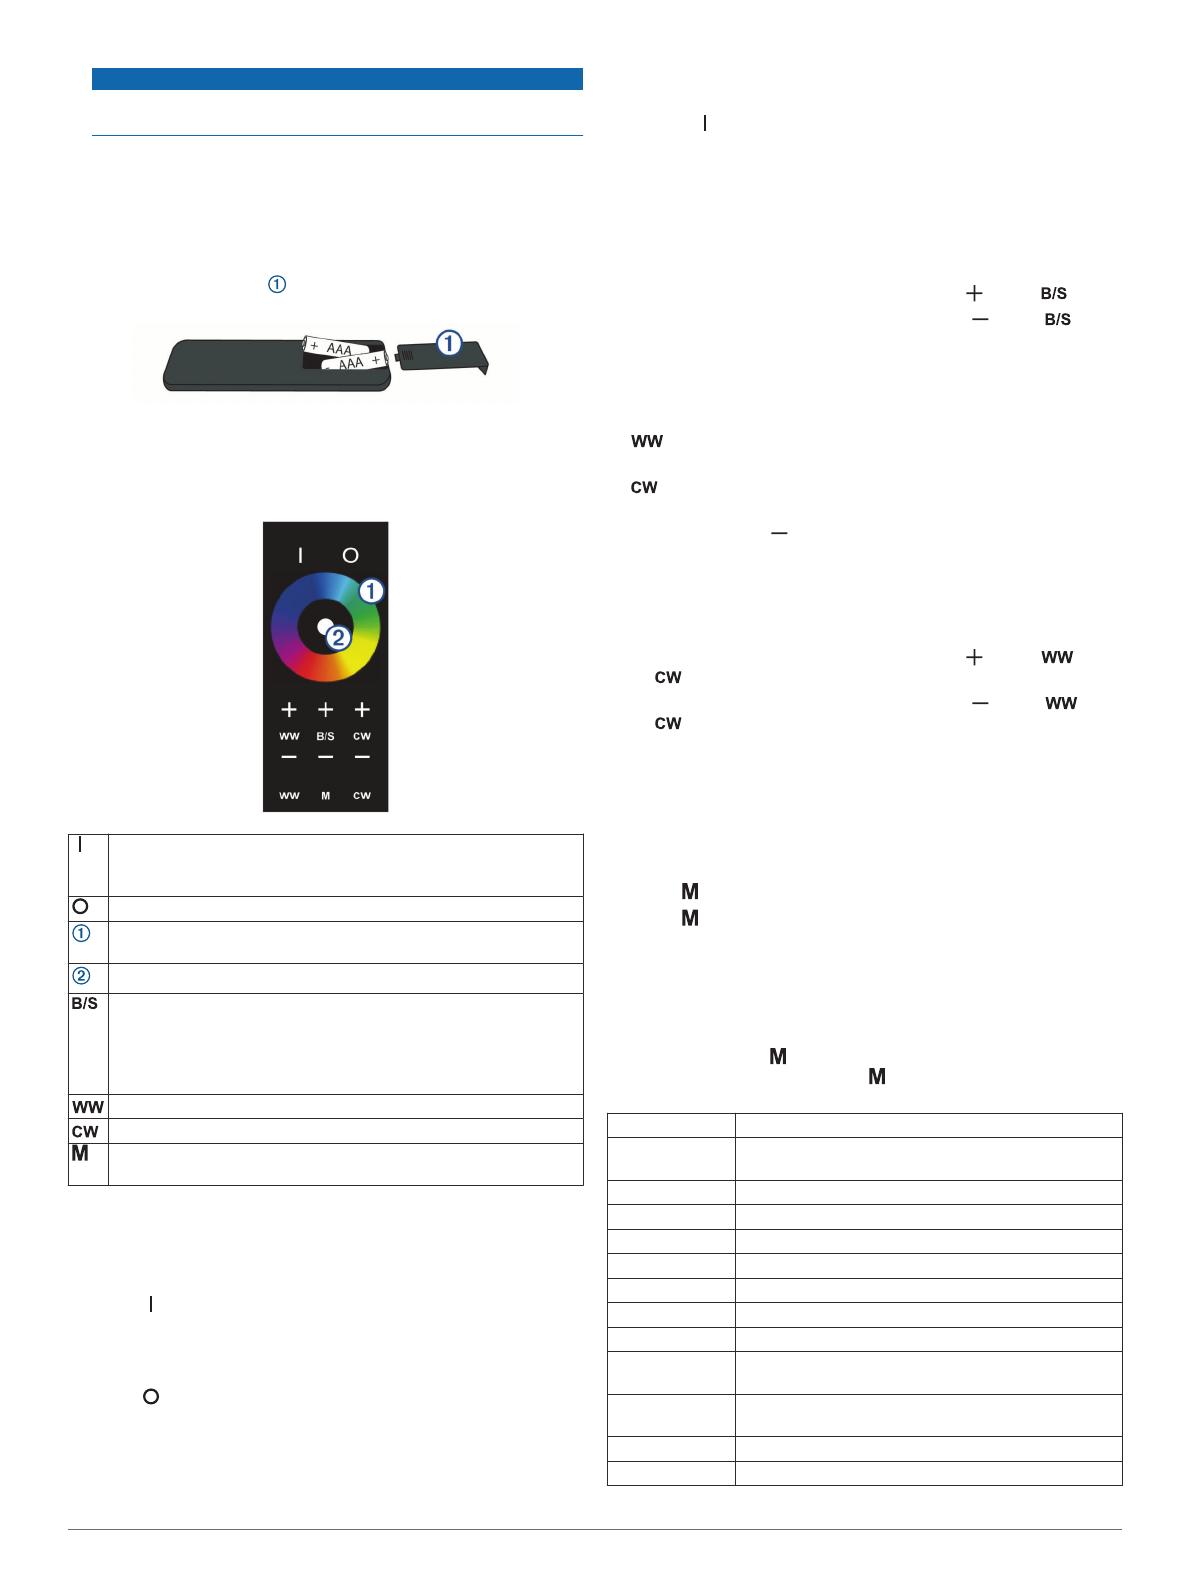
You must install AAA alkaline batteries (not included) in the
remote control.
1
Slide the battery door to the back of the remote, and pull
up to open it.
2
Insert two AAA batteries, observing polarity.
3
Slide the battery door back onto the remote to close it.
Remote Control Operation
LED power on (Turning the LEDs On and Off, page 2)
Hold to turn off all color LEDs and turn on the warm and cool
white LEDs.
LED power off
LED color-selection wheel (Changing the Color of the LEDs,
page 2)
Light: activates when the remote sends a signal to the receiver
LED brightness or speed
Static color: changes the brightness (Changing the Brightness of
the RGB LEDs, page 2)
Dynamic mode: changes the speed between color changes
(Changing the Speed of a Display Mode Pattern, page 3)
Warm white LEDs (Using Cool or Warm White LEDs, page 2)
Cool white LEDs (Using Cool or Warm White LEDs, page 2)
LED dynamic mode (Changing the Display Mode of the LEDs,
page 2)
Turning the LEDs On and Off
After you connect the remote control receiver to the speaker
LEDs, you must use the remote control to turn the LEDs on and
off.
1
Press .
The LEDs connected to the receiver turn on with the same
color and mode settings applied before the last time you
turned them off.
2
Press to turn off the LEDs connected to the receiver.
Changing the Color of the LEDs
1
If necessary, turn on the LEDs for the speakers you want to
change.
2
Select an option:
Touch the color wheel to select a new color, and slide
your finger to fine-tune it.
Hold to change the LED color to white.
NOTE: This turns off all color LEDs and turns on the cool
white and warm white LEDs.
Changing the Brightness of the RGB LEDs
1
If necessary, turn on the LEDs for the speakers you want to
change, and select a color.
2
Select an option:
To increase the LED brightness, press above .
To decrease the LED brightness, press below .
Using Cool or Warm White LEDs
You can use the remote control to add cool or warm white to any
color, or on their own.
To add or remove warm white LEDs to or from a color, press
.
To add or remove cool white LEDs to or from a color, press
.
To turn off all color LEDs and turn on the warm and cool
white LEDs, hold
Changing the Brightness of the Warm or Cool White LEDs
1
If necessary, turn on the warm or cool white LEDs for the
speakers you want to change.
2
Select an option:
To increase the LED brightness, press above or
.
To decrease the LED brightness, press below or
.
Changing the Display Mode of the LEDs
You can cycle through a pre-defined set of LED flashing,
breathing, or color-changing effects (Display Mode Options,
page 2).
1
If necessary, turn on the LEDs for the speakers you want to
change.
2
Press .
3
Press to change to the next mode in the sequence.
4
Touch a color on the color wheel to stop the display mode
and return to a solid color.
Display Mode Options
You can select among 25 different color and transition patterns.
When you reach the end of the cycle of display modes by
continually pressing , the patterns stop, and the LEDs are a
static full white. When you press again, the cycle starts at the
beginning.
Display mode 1 Red, green, and blue fade in and out
Display mode 2 Red, green, blue, yellow, teal, magenta, and full
white fade in and out
Display mode 3 Full white fade in and out
Display mode 4 Cool white fade in and out
Display mode 5 Warm white fade in and out
Display mode 6 Cool white and warm white fade in and out
Display mode 7 Red, cool white, and warm white fade in and out
Display mode 8 Green, cool white, and warm white fade in and out
Display mode 9 Blue, cool white, and warm white fade in and out
Display mode 10 Red, green, blue, cool white, and warm white fade in
and out
Display mode 11 Red, green, blue, yellow, teal, magenta, full white,
cool white, and warm white fade in and out
Display mode 12 Full white, cool white, and warm white fade in and out
Display mode 13 Red, green, and blue strobe
2 Wireless CRGBW LED Remote Control Instructions
Display mode 14 Red, green, blue, yellow, teal, magenta, and full
white strobe
Display mode 15 Full white flash
Display mode 16 Cool white flash
Display mode 17 Warm white flash
Display mode 18 Cool white and warm white flash
Display mode 19 Red, cool white, and warm white flash
Display mode 20 Green, cool white, and warm white flash
Display mode 21 Blue, cool white, and warm white flash
Display mode 22 Red, green, blue, cool white, and warm white flash
Display mode 23 Red, green, blue, yellow, teal, magenta, full white,
cool white, and warm white flash
Display mode 24 Full white, cool white, and warm white flash
Display mode 25 Automatically cycles all 24 display modes
Changing the Speed of a Display Mode Pattern
You can adjust the speed of the effects when using a display-
mode pattern.
1
If necessary, turn on the LEDs for the speakers.
2
If necessary, select a the display mode (Changing the
Display Mode of the LEDs, page 2).
3
Select an option:
To increase the speed of the display-mode-pattern effect,
press above .
To decrease the speed of the display-mode-pattern effect,
press below .
Unpairing a Remote Control from the Wireless
Receiver
You can unpair a remote control from the wireless receiver if you
are planning to replace it.
1
If necessary, install the wireless receiver, and connect it to
the speaker LEDs (Connecting the Remote Control Receiver,
page 1).
2
If necessary, install batteries in the replacement remote
control (Installing the Batteries, page 2).
3
Disconnect the power from the wireless receiver.
4
Hold on the remote control, and connect the wireless
receiver to power.
The LEDs flash nine times to indicate that the remote control
is unpaired from the wireless receiver.
NOTE: After the remote control is unpaired from the wireless
receiver, the connected LEDs fade in and out through a red,
green, and blue cycle until you pair a new remote control with
the wireless receiver (Pairing a Remote Control with the
Wireless Receiver, page 3).
Pairing a Remote Control with the Wireless Receiver
If you replace a lost or damaged remote control with a new
remote control, you can use the replacement remote control with
an existing wireless receiver.
1
If necessary, install the wireless receiver and connect it to the
speaker LEDs (Connecting the Remote Control Receiver,
page 1).
2
If necessary, install batteries in the replacement remote
control (Installing the Batteries, page 2).
3
Disconnect the power from the wireless receiver.
4
Hold on the remote control, and connect the wireless
receiver to power.
The LEDs flash three times to indicate that the remote control
is paired to the wireless receiver.
Specifications
Input voltage 10.8 to 16 Vdc
Fuse 7.5 A
Max. capacity Up to 10 CRGBW LED speakers (5 pair)
Operating temperature From 0 to 50°C (32 to 122°F)
Storage temperature From -20 to 70°C (-4 to 158°F)
Battery type 2 AAA (not included)
Radio frequency 2.4 GHz @ 10 dBm nominal
Range Up to 10 m (30 ft.)
Water rating Remote control receiver and remote control are
not water or dust resistant.
Registering Your Wireless CRGBW LED Remote
Control
Help us better support you by registering the product online.
Go to www.fusionentertainment.com.
Keep the sales receipt, or a copy, in a safe place.
© 2020 Garmin Ltd. or its subsidiaries
Garmin
®
, the Garmin logo, Fusion
®
, and the Fusion logo, are trademarks of Garmin Ltd.
or its subsidiaries, registered in the USA and other countries. These trademarks may not
be used without the express permission of Garmin.
Wireless CRGBW LED Remote Control Instructions 3
© 2020 Garmin Ltd. or its subsidiaries www.fusionentertainment.com
  • Page 1 1
  • Page 2 2
  • Page 3 3
  • Page 4 4

Fusion MS-CRGBWRC Operating instructions

Type
Operating instructions
This manual is also suitable for

Fusion MS-CRGBWRC enhances your marine audio experience with wireless control over a spectrum of LED colors, giving you the power to customize the ambiance on your boat. With a user-friendly remote, you can effortlessly switch between 25 dynamic display modes and adjust the brightness of RGB, cool white, and warm white LEDs.

Ask a question and I''ll find the answer in the document

Finding information in a document is now easier with AI