Olivetti ECR 6700 Owner's manual

Category
Cash registers
Type
Owner's manual
ECR 6700ECR 6700
ECR 6700ECR 6700
ECR 6700
Cash Register
USER'S GUIDE
PUBLICATION ISSUED BY:
Olivetti S.p.A.
www.olivetti.com
Copyright © 2006, Olivetti
All rights reserved
Your attention is drawn to the following actions that could compromise
the characteristics of the product:
incorrect electrical supply;
incorrect installation; incorrect or improper use, or, in any case, not in
accordance with the warnings given in the User Manual supplied with
the product;
replacement of original components or accessories with others of a
type not approved by the manufacturer, or carried out by unauthorized
personnel.
Nous attirons votre attention sur les actions suivantes qui peuvent
compromettre la conformité attestée ci-dessus et les caractéristiques du
produit:
Alimentation électrique erronée;
Installation ou utilisation erronée ou non conforme aux indications
exposées dans le manuel d'utilisation fourni avec le produit;
Replacement de composants ou d'accessoires originaux par des
pièces non approuvées par le constructeur, ou effectué par du personnel
non autorisé.
Wir möchten Sie darauf hinweisen, daß folgende Aktionen die oben
bescheinigte Konformität und die Eigenschaften des Produkts
beeinträchtigen können:
Falsche Stromversorgung;
Installations- oder Bedienungsfehler bzw. Nichtbeachtung der Hinweise
in der Bedienungsanleitung, die mit dem Produkt geliefert wurde;
Das Auswechseln von Bauteilen oder Originalzubehör durch Unbefugte
oder das Ersetzen durch Teile, die nicht vom Hersteller anerkannt
werden.
Prestar mucha atención a las siguientes acciones que pueden
comprometer la conformidad arriba certificada y, obviamente, las
características del producto:
Alimentación eléctrica errónea;
Installación o uso erróneos, improprios o no conformes con las
advertencias detalladas en el manual de uso suministrado con el
producto;
Sustitución de componentes o accesorios originales con otros no
aprovados por el fabricante o bien efectuada por parte personal no
autorizado.
Het is belangrijk te weten dat de volgende acties nadelige gevolgen kunnen
hebben voor de goede werking van het product:
het verkeerd aansluiten van een stroombron;
onjuiste installatie; onjuist of oneigenlijk gebruik, of handelingen die
worden uitgevoerd zonder inachtneming van de waarschuwingen in
de handleiding bij het product;
vervanging van originele onderdelen of accessoires door onderdelen
of accessoires van een type dat niet is goedgekeurd door de fabrikant,
of vervanging die wordt uitgevoerd door onbevoegd personeel.
Chamamos a sua atenção para as seguintes acções que podem
comprometer o desempenho do produto:
abastecimento de corrente não adequado;
instalação incorrecta, utilização incorrecta ou indevida, ou não
respeitando os avisos descritos no Manual do Utilizador que é fornecido
com o produto;
substituição de componentes originais ou acessórios por outros de
tipo não aprovado pelo fabricante, ou substituição realizada por
pessoal não autorizado.
Vær opmærksom på, at følgende handlinger kan beskadige
produktet:
Forkert strømforsyning.
Forkert installation, ukorrekt eller forkert brug eller, som under alle
omstændigheder, ikke er i overensstemmelse med advarslerne i den
medfølgende Brugervejledning.
Udskiftning af originale dele eller tilbehør med andre typer, som ikke
er godkendt af fabrikanten, eller foretaget af uautoriseret personer.
Vi önskar fästa din uppmärksamhet på verksamheterna
som anges nedan, eftersom dessa kan kompromittera produktens
egenskaper:
oriktig strömförsörjning;
oriktig installation; oriktig eller olämplig användning, eller som i alla
falli inte överensstämmer med de varningar som ges i
användarhandboken som levereras tillsammans med produkten;
byte av originalkomponenter eller tillbehör mot annan typ
som ej godkänts av tillverkaren, eller som utförts av obehörig
personal.
START UP - START UP
START UP - START UP
START UP - START UP
START UP - START UP
1. Plug the cash register into a electrical outlet and insert the batteries.
2. Load the paper.
3. Proceed with Quick Start Programming.
4. Perform basic sales transactions.
5. Get to know your cash register in depth.
HOW DO I PROCEED?
COMMENT JE DOIT PROCEDER?
VORGEHENSWEISE
¿QUÉ DEBO HACER A CONTINUACIÓN?
HOE GA IK TE WERK?
O QUE DEVO FAZER?
FREMGANGSMÅDE?
HUR GÅR JAG VIDARE?
1. Enchufe la caja registradora en una toma eléctrica e inserte las baterías.
2. Cargue el papel.
3. Continúe con la programación de la puesta en servicio rápida.
4. Realice transacciones de venta básicas.
5. Conozca más en detalle la caja registradora.
1. Brancher la caisse enregistreuse à la prise électrique et insérer les batteries.
2. Charger le papier.
3. Procéder avec la fonction Vite Démarre de Programmation.
4. Exécuter les transactions de ventes basiques.
5. Prendre confiance avec la caisse enregistreuse.
1. Die Kasse an eine Netzsteckdose anschließen und die Batterien einsetzen.
2. Papier laden.
3. Die Quick Start Programmierung durchführen.
4. Einfache Verkaufsvorgänge ausführen.
5. Sich mit allen Funktionen der Kasse vertraut machen.
1. Sluit het kasregister aan op een stopcontact en plaats de batterijen.
2. Plaats het papier.
3. Voer de snelstart-programmering uit.
4. Voer basis-verkooptransacties uit.
5. Leer uw kasregister grondig kennen.
1. Ligue a caixa registadora a uma tomada eléctrica e insira as pilhas.
2. Coloque o papel.
3. Continue com a Programação de Iniciação Rápida.
4. Realize transacções básicas de vendas.
5. Familiarize-se com a sua caixa registadora.
1. Tilslut kasseapparatet til elnettet og sæt batterierne i.
2. Sæt papir i.
3. Gå frem med Hurtig Start Programmering.
4. Indret basis salgstransaktioner.
5. Lær Deres kasseapparat at kende.
1. Sätt in kassaregistersladden i ett vägguttag och sätt i batterierna.
2. Ladda pappret
3. Gå vidare med programmeringen för snabbstart.
4. Utför grundläggande försäljningstransaktioner.
5. Fördjupa kännedomen om kassaregistret.
LOADING THERMAL PAPER
INSTALLATION DU PAPIER THERMIQUE
EINLEGEN VON THERMOPAPIER
CARGA DEL PAPEL TÉRMICO
THERMISCH PAPIER PLAATSEN
COLOCAR PAPEL TÉRMICO
ISÆTNING AF TERMOPAPIR
LADDA VÄRMEKÄNSLIGT PAPPER
1
ENGLISH
Contents
Major Features
14 departments and up to 400 Price Look-Up (PLU)
settings;
8 clerk numbers to monitor the sales of individual
employees;
Electronic journal with a maximum capacity of up to 3,000
transaction lines for storing all transaction data; signalling
of EJ memory full and nearly full conditions;
10-digit operator and client Liquid Cristal Displays (LCD);
Quantity entries using the decimal point;
Training mode facility with related password;
Receipt on/off, and duplicate receipt features;
Possibility of activating a Clerk Security System
consisting of a three-digit security code;
Possibility of assigning a name to each Clerk for rapid
identification;
Z management report mode password definition;
Customer sales receipt header personalization and
receipt footer definition;
Special rounding capabilities for Swiss, Danish and
Swedish currencies;
Customer receipt and management report printing in
English, French, German, Spanish, Dutch, Portoguese,
Danish or Swedish;
Department programming (positive and negative sales)
4 foreign currency exchange rates with related currency
descriptors;
Cash, check, charge and card tender media keys, with
change tendered on all payments;
4 different VAT rates;
Possibility of programming the cash register to print a
range of VAT totals on the sales receipt;
Time display at the press of a key;
Battery back-up protection for the records and pro-
gramming data.
Cash Register Components
With reference to figure 2:
1. Customer Display
2. Operator Display
3. Control lock
4. Keypad
5. Cash Drawer
6. Cash Drawer Lock
7. Item deposit drawer
8. Power Cord
9. Customer Receipt Output Window
10. Printer Compartment Cover
Removable Cash Drawer with Lock
With reference to figure 4, the cash drawer has slots for
banknotes and for coins.
Open the drawer by pressing or by sliding the hidden
emergency button underneath the register.
The cash drawer can be completely removed from the
register by lifting up on the open drawer and pulling towards
yourself.
Major Features 1
Cash Register Components 1
Removable Cash Drawer with Lock 1
Keypad Functions 2
The Control Lock and Key 2
Operator and Customer Displays 3
Error Conditions 3
Error Codes 3
Clearing an Error 3
Cash Register Reset Operations 3
Electronic Journal 4
Quick Start 5
Quick Start Programming 5
Cash Register Programming and
Features 6
Making Changes to Cash Register
Programming 6
Caption Programming using the
Alphanumeric Keypad and Character Table 6
Receipt Header and Footer 7
Department Names 8
PLU Item Names 8
Percent Discount (-%) or Add On (+%) 8
Foreign Currency Exchange Rates 9
Foreign Currency Descriptors 9
Rounding Option for Swiss, Danish and Swedish
Currencies 9
Fraction Rounding for VAT Calculation 10
Printing VAT Information on Customer
Receipts 10
Calculator Mode 10
Clerk System 11
Clerk Names 12
Manager Password 12
Using the Cash Register in a
Password Protected Mode 12
Training Mode 12
System Options 13
Consecutive Receipt Number 15
Z1 Counter Setting 15
Z2 Counter Setting 15
Grand Total Setting 15
Management Reports 15
X and Z Reports 15
Clerk Report 16
PLU Sales Report 16
Department Programming Report 16
PLU Programming Report 16
Cash Register Programming Report 17
Training Report 17
Electronic Journal Reports 17
Sales Transactions 18
2
Keypad Functions
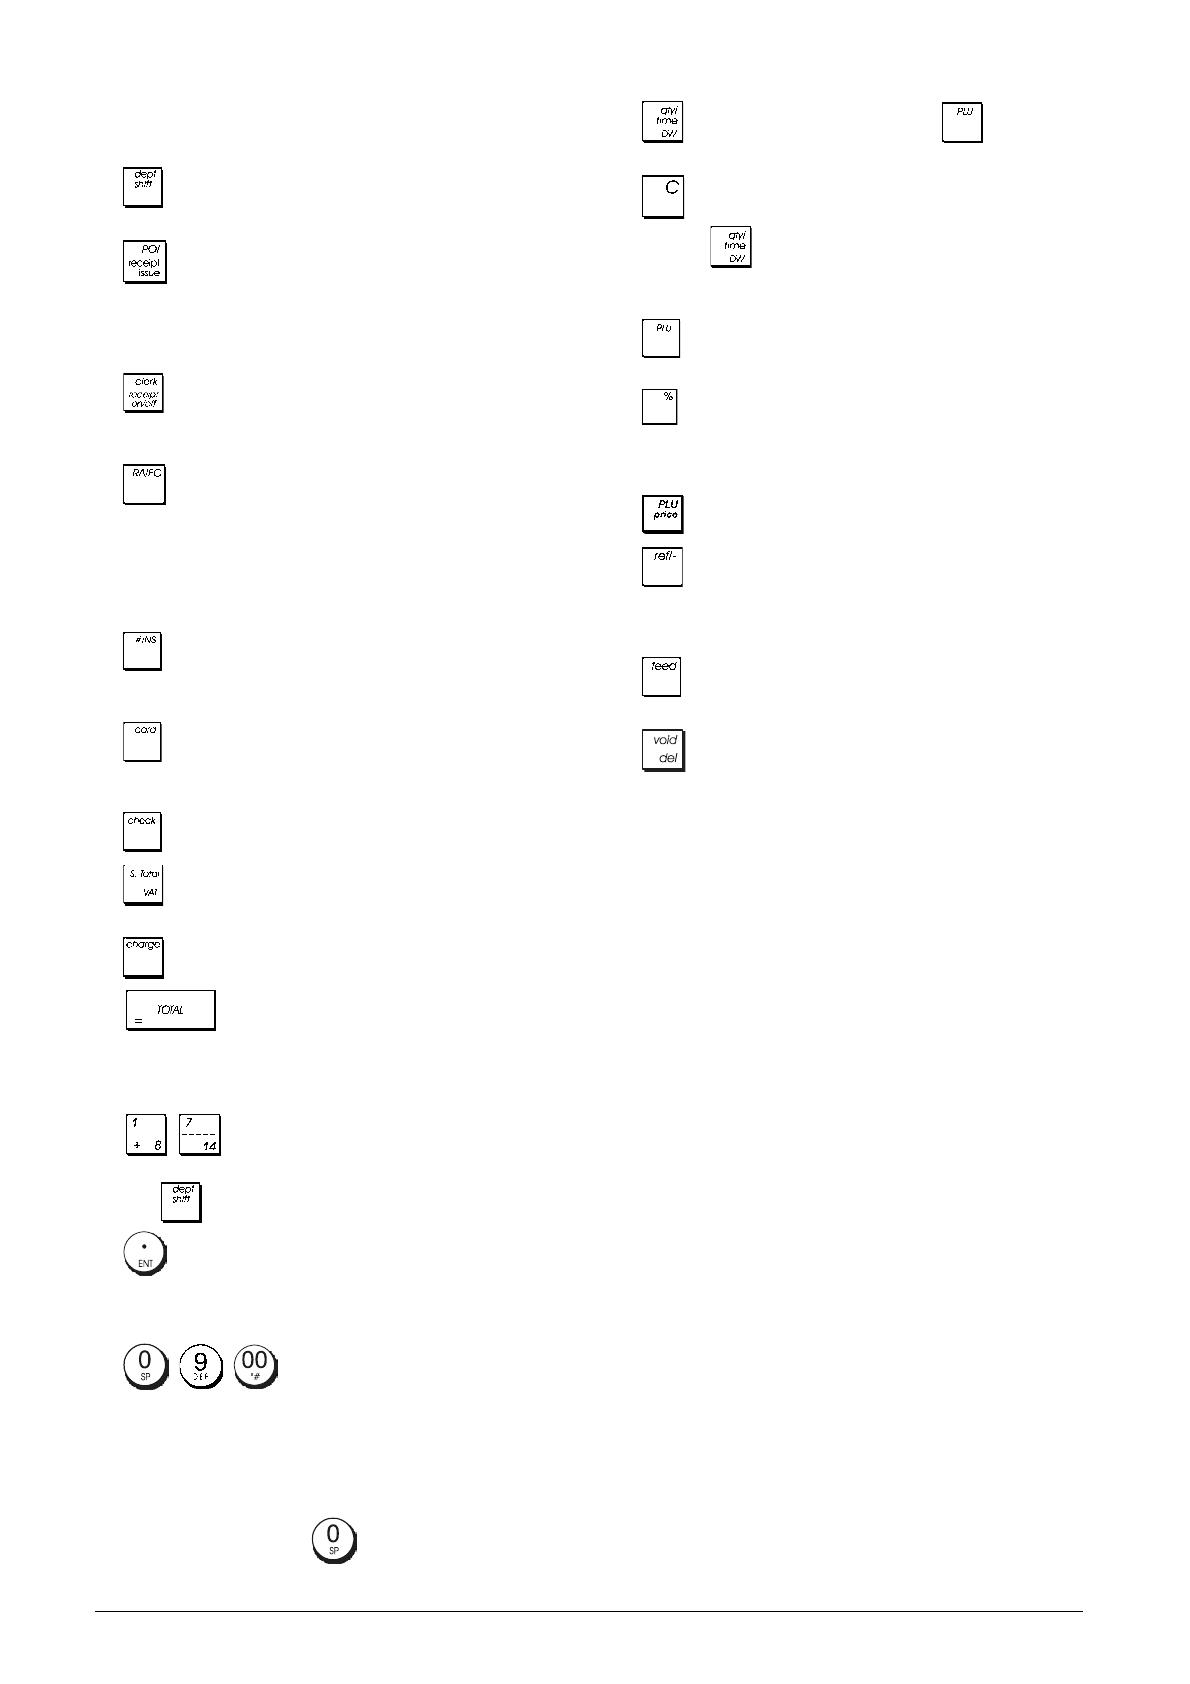
With reference to figure 5:
1.
- Allows price entries for departments 8-14. Press
this key before entering applicable department keys.
2.
- Registers any money taken out of the cash
drawer that is not part of a sale. When pressed in the
REG mode, prints one or more copies of the last sales
transaction recorded (overrides the Receipt Off mode
set with the related key).
3.
- Confirms an entered clerk number and three-digit
security code. In the REG mode, toggles the cash
register between printing and not printing the sales receipt.
4.
- When used as the RA key, registers any money
received on account that is not part of a sale; for example,
the start-up money put in the drawer at the start of each
business day can be registered as an RA. As the
Currency Conversion key, it is used to automatically
calculate and display the value in foreign currency of the
subtotal of a sale or of a particular amount registered.
5.
- Opens the cash drawer without registering any
amount or when changing cash for a non-sales
transaction.
6.
- Registers sales that are put on credit, such as a
debit card, or on a credit card that is alternative to the one
used for Charge tenders.
7.
- Registers sales paid by check.
8. - Subtotals a sale, and used for the programming of
VAT rates.
9.
- Registers sales that are charged.
10.
- Totals exact cash transactions, computes
change and totals transactions that are split tendered
with check or credit card and cash together. This key is
also used to enter into the calculator mode. In the calculator
mode, it is used as the "equal" (=) key.
11.
- - Departments 1 through 7, to enter single or
multiple item sales to a particular department. When pressed
after
, registers to Departments 8 through 14.
12.
- Enters a decimal point for defining quantities with
decimals during sales transactions. During caption
programming, confirms the entry of the selected character
when the same key is repeated.
13.
- / - Input amounts, indicate how many
times a particular item repeats, add and subtract
percentage rates and input department code numbers.
Used to input the characters indicated on the related key
and indicated in the Character Table when defining clerk
names, receipt header, receipt footer, department names,
PLU product names and currency identifiers. During
caption programming,
adds a space between
characters.
14.
- Multiplies [DEPARTMENT] or entries and
displays the current time in the REG and JRNL modes.
15.
- Clears an entry made from the numeric keypad
or with
before finalizing a transaction with a
Department or function key. Also used to clear error
conditions.
16.
- Registers a preset price of an individual item to the
appropriate department.
17. - Used to add or subtract a percentage rate from an
individual item or an entire sale. The rate can be a pre-
programmed percentage rate or any other manually
entered percentage rate.
18. - Used to manually enter a price for a PLU article.
19.
- When used as the coupon key, subtracts an amount
from an item or the sales total, such as a coupon deduction.
When used as the Refund key, subtracts an item that is
returned for refund.
20.
- Advances the receipt or journal paper one line
feed; advances the paper continuously when held down.
21.
- Deletes the last item entered, and used for
correcting a particular entry after it is processed and
printed.
During caption programming, cancels from right
to left the characters that have been entered.
The Control Lock and Key
This control lock key must be properly positioned to operate
the cash register, to set the programs and to print or reset the
totals for the management report. With reference to figure 3:
1. Turn the control key to the required position indicated
below.
PRG Used to set and change program settings.
OFF The cash register is turned off and cannot be
used.
REG (On/Customer Receipt) - The cash register is set
for standard sales transactions. A customer
receipt is printed for each transaction.
JRNL (On/Journal Tape) - The cash register is set for
standard sales transactions. A journal record is
printed for each transaction. The key-activated
Receipt On/Off function does not work in this
mode (transaction always printed).
X1/X2 Prints the X management (mid-day) report.
Z1/Z2 Prints the Z management (end-of-day) report and
resets totals (except the grand total) to zero.
3
ENGLISH
Operator and Customer Displays
Your cash register is equipped with two 10-digit alphanumeric
Liquid Crystal Displays (LCD). With reference to figure 6, the
display is read from left to right as follows:
C1...C8 (1) - With the Clerk System active,
indicates the clerk number entered
before working in the REG or JRNL
mode, or when
is pressed.
Department (2) - A set of digits indicating the
department key pressed for each entry.
Repeat/Multiply (3) - A number displayed when repeat-
ing or multiplying items to indicate the
number of items entered at one price.
Amount (4) - Indicates entry amounts and sales
totals.
Special Symbol Indicators
Special symbols appear at the far left-hand side of the displays
during cash register operation:
C (Change) Indicates that the displayed amount is the
change due to the customer.
E (Error) Indicates when an error is made during
operation or when programming the cash
register. An error tone sounds to alert the
operator.
ST (Sub-total)
Indicates that the amount shown is the subtotal
of a transaction, including sales tax if
applicable.
- (Minus) Displays a negative entry. Also displays if
subtotal or cash tendered total is a negative
number due to a return or refund.
_ (Line) Indicates, from left-to-right on the bottom of
the display, the calculator mode, receipt off
mode, training mode and an electronic journal
nearly full condition (less than 700 transaction
lines available).
Displayed when is pressed to indicate
that the amount is displayed in foreign currency.
CA (Cash) Indicates a sales transaction paid by cash.
Ch (Check) Indicates a sales transaction paid by check.
Cr (Charge) Indicates a sales transaction paid by credit
card.
These symbols clear automatically when you start the next
entry or press
.
Error Conditions
Error Codes
The following error codes can be displayed:
E1 Operation error
E2 Sales amount exceeded
E3 Zero-price entry error
E4 Incorrect full-void entry
E5 Clerk number and password requested
E6 Manager password requested
Clearing an Error
Press to clear an error. The tone ends, the displays
clear and the keypad unlocks, allowing you to continue with
the transaction or restart the program.
If an error condition cannot be cleared by pressing ,
reset the cash register by performing one of the cash register
reset operations.
Cash Register Reset Operations
If the cash register does not function, for example while
programming and the error signal cannot be stopped by
pressing , reset the cash register.
There are four reset operations; be very careful when choosing
the one to perform since you could unnecessarily cancel
report data and cash register programming data.
Partial Reset
A Partial Reset operation just clears the cash register's
working memory.
1. Turn the control key to the OFF position.
2. Press
for about 2 seconds and then press
.
If the cash register still remains in an error condition, proceed
with the Full Reset - Reports operation.
Full Reset Reports
A Full Reset - Reports operation erases the cash register's
working memory, and all totals and counters (all report data).
1. Turn the control key to the OFF position.
2. Press
for about 2 seconds and then press
.
If the cash register still remains in an error condition, proceed
with the Full Reset - New Language Entry Excluded operation.
4
Full Reset - New Language Entry Excluded
A Full Reset - New Language Entry Excluded, erases the
cash register's working memory, all totals and counters
(all report data) and cancels all cash register
programming data with the exclusion of the language-
specific captions programmed. Be extremely careful
when using this reset operation.
1. Turn the control key to the OFF position.
2. Press
for about 2 seconds and then press
.
3. Reprogram the cash register.
If the cash register still remains in an error condition, proceed
with the Full Reset - All Data operation.
Full Reset - All Data
A Full Reset - All Data operation erases the cash register's
working memory, all totals and counters (all report data)
and cancels all cash register programming data. Be
extremely careful when using this reset operation. Use
this method as last resort only.
1. Turn the control key to the OFF position.
2. Press
for about 2 seconds and then press
.
3. Reprogram the cash register.
Electronic Journal
The cash register is equipped with a dynamic Electronic
Journal (EJ) memory that by default contains up to 3,000
lines of sales data. During transactions, the sales data are
continuously recorded in this memory so that you are
constantly kept up-to-date with the latest 3,000 lines of
effective sales information.
You can, however, program the cash register for standard
electronic journal opertion. In this case you program the
memory to hold a maximum of 3,000 sales data lines before
being promped to clear the memory. The electronic journal
stores all the sales receipts recorded in the REG and JRNL
mode, thus allowing you to print this record at any time or
when memory reaches the nearly full or full condition.
To program the cash register for standard electronic journal
operation:
1. Control key position: PRG.
2. Press
.
NOTE: You can also personalize other electronic journal
features, by programming System Options 4, 5, 6 and 7. See
"System Options" for details.
When the electronic journal reaches a nearly full condition,
there are less than 700 lines remaining in journal memory. A
warning beep will sound at the beginning and end of each
transaction performed.
When the journal reaches a full condition, less than 300
lines are remaining in memory. A message is displayed
indicating that the journal memory is full along with a warning
beep at the beginning of a transaction; press
to
continue with further transactions; remember, however, that
the transaction data will NOT be stored in memory and the
consecutive receipt counter will not increase. If you
want to terminate the sales transaction, press
.
To know how many lines are remaining in the electronic
journal, press in the REG mode
and outside of a sales transaction.
Printing and Clearing the Contents of the
Electronic Journal
Make sure that plenty of paper is loaded in the printer.
1. Control key position: Z1/Z2.
2. Press
.
To interrupt report printing, press
. To resume printing,
press
again. To stop report printing, press .
When the contents of the electronic journal are printed, a
message is displayed along with a beep to indicate that the
EJ memory capacity has been restored to its maximum
programmed line capacity.
NOTE: You can also print the contents of the electronic
journal with the control key in the X position; doing so,
however, will not clear the electronic memory.
Clearing Electronic Journal Memory Without
Printing the Contents
The electronic journal memory contents are cleared and not
printed:
1. Control key position: Z1/Z2.
2. Press
.
5
ENGLISH
Quick Start
This section allows you to program basic cash register
features so that you can start to work right away with your
new product. Programs and transaction information for
management reports are stored in the memory of the cash
register which is protected by back-up batteries.
Before beginning to program the cash register or to
perform sales transactions, insert the batteries to save
this information if a power failure occurs or if the cash
register is unplugged from the electrical outlet.
Quick Start Programming
1. Set your Language
NOTE: After you set your language the cash register will
automatically perform a reset and cancel all the programming
and transaction data stored.
1. Control key position: PRG.
2. Press
.
3. Press your language identifier:
for Spanish,
for French, for German, for Dutch,
for Portuguese, for Danish, for Swedish,
or
for English.
4. Press .
Example: Program the cash register to print in French.
Type/Press:
2. Set the Date
1. Control key position: PRG.
2. Type the current date in the DDMMYY format.
3. Press
.
Example: Set a date of May 25, 2006.
Type/Press:
3. Set the Time
1. Control key position: PRG.
2. Type the current time in the HH:MM, 24-hour format.
3. Press .
Example: Set the time at 3:30 PM.
Type/Press:
Language identifier
Day
Month Year
4. Set a Fixed VAT Rate
1. Control key position: PRG.
2. Type the [number] that represents the VAT (1 for VAT1,
2 for VAT2, 3 for VAT3 and 4 for VAT4).
3. Press
.
4. Type the VAT rate. Five digits can be used and you
MUST enter three digits after the desired decimal place.
5. Press .
Example: Set a VAT1 rate of 5.50%.
Type/Press:
NOTE: Before changing a VAT rate, print a Z Financial
report. See "X1 and Z1 Financial Reports".
See sections "Fraction Rounding for VAT Calculation" and
"Printing VAT Information on Receipt" for other VAT-related
features.
5. Link a multiple/single item sale, tax status
and Item Price to a Department
A total of 14 departments are available on your cash register.
Programming a department consists of assigning a multiple/
single item positive or negative sale and a previously pro-
grammed tax status to it. You can then optionally assign a
preset price to the department.
A 3-digit department status can be programmed by using the
following options:
Multiple/Single Item Sales Tax Status
0 = Multiple, positive item sales 00 = Non taxable
1 = Single, positive item sales 01 = Taxable with
2 = Multiple, negative item sales VAT 1
3 = Single, negative item sales 02 = Taxable with
VAT 2
03 = Taxable with
VAT 3
04 = Taxable with
VAT 4
1. Control key position: PRG.
2. Type the [Multiple/Single Item Sales] and [Tax Status]
options by referring to the previous table. A 3-digit status
code must be entered.
3. Press
.
4. Type a [unit price] to assign to a specific item and then
assign it to a department by pressing the related
department
to key. Use for departments
from 8 to 14.
Hour
Minutes
VAT number
50
5
6
Example: Program a multiple positive item sale, VAT 2 and
a price of £2.50 to an item in Department 2.
Type/Press:
After you have programmed your departments, you can print
a report that indicates the programmed values. See section
"Department Programming Report" for details.
6. Program a Fixed Price Look-Up (PLU)
Up to 400 PLUs can be programmed.
1. Control key position: PRG
2. Press
, type the [PLU number (between 1 and
400)] and then press
.
3. Type the [unit price] that you wish to assign to the PLU.
4. Press the related department
to key
to assign the PLU to a Department from 1 to 14. If tax is
required for a particular PLU item, be sure to link the PLU
number related to the item to a department that is
programmed for tax. To program a department for tax,
refer to the section Link a Multiple/Single Item Sale, Tax
Status and Item Price to a Department.
5. Press
.
Example: Create PLU 1 with a unit price of £2.69
assigned to Department 3.
Type/Press:
After you have programmed your PLU items, you can print a
report that indicates the programmed values. See section
"PLU Programming Report" for details.
Multiple positive
item sales
Tax status
Unit price
Department
PLU number
PLU price
Department
Cash Register Programming and
Features
Programs and transaction information for management reports
are stored in the memory of the cash register which is
protected by back-up batteries.
Before beginning to program the cash register or to
perform sales transactions, insert the batteries to save
this information if a power failure occurs or if you
unplug the cash register from the power outlet.
Making Changes to Cash Register
Programming
If you wish to make a change to your initial programming
(such as an update to VAT rates, PLUs or exchange rates):
Turn the control key to the PRG position.
Re-do the program in question and confirm as explained
in the next sections
Turn the control key to another operating mode.
A new program entry will automatically overwrite a previous
entry for the same program.
Caption Programming using the
Alphanumeric Keypad and Character
Table
To program customer receipt headers and courtesy
messages, PLU product names, department names, clerk
names and foreign currency descriptors you can use just the
alphanumeric part of the keypad to enter non-accented
capital letters and the Character Table to enter small letters,
accented capital and small letters, special characters or
symbols. The following captions can be programmed:
Up to 400 PLU item names of a maximum 12 characters
each
Up to 14 department names of a maximum 12 characters
each
Up to 8 clerk names of a maximum 12 characters each
Receipt headers of up to 6 lines of a maximum 24 characters
each
Receipt footers of up to 4 lines of a maximum 24 characters
each
Up to 4 foreign currency identifiers of a maximum 10
characters each.
Using the Keypad
To use the alphanumeric keypad to enter capital caption
letters, locate the letter wanted and press its associated
alphanumeric key the number of times needed to display it
(the letter will be displayed on the far right-hand side of the
display).
If the same alphanumeric key has to be used for successive
letters of a caption, press
between the two letters.
Press
if you want to add spaces.
Any incorrect letter can be canceled by pressing
that provides the typcal backspace function available in
the PC environment.
Confirm your final caption by pressing .
7
ENGLISH
Example: Enter the word BOOKS.
Type/Press:
Using the Character Table
The Character Table provides all the letters and symbols that
your cash register is capable of printing.
To use this table, with reference to figure 7:
First look for the letter or symbol wanted and then identify
its corresponding alphanumeric key listed in the first
column on the left.
Press the alphanumeric key on the keypad the number of
times needed to select the character by reading the
number on the row on the top of the table.
Confirm your final caption by pressing
.
NOTE: Special accented national letters are not displayed.
Example: Select the letters L and Ü.
Type/Press:
Receipt Header and Footer
By default your cash register prints a header on all customer
receipts when the control key is in the REG position. It can
also print a personalized footer, if you program one.
The receipt header can consist of up to 6 lines of 24
characters each, the footer up to 4 lines of 24 characters
each. You can change the cash register's default header or
the programmed footer by using the numeric keypad and/or
Character Table to enter the characters.
1. Control key position: PRG.
2. Press
repeatedly until displaying the message
"HD1" indicating the first line of the receipt header, or
"FT1" indicating the first line of the receipt footer.
3. Press repeatedly until displaying the line number of
the header or footer line you want to personalize, on the
left-hand side of the operator display.
4. Enter the letters or characters of the string you wish to
define and then press
.
5. Repeat steps 3 and 4 if you wish to program the remaining
programmable header or footer lines.
6. Press
to exit.
Example: Change the third line of the default header to
PLEASE COME AGAIN using the Character Table.
Type/Press:
B
O
O
K S
L
Ü
Ü
Switch to Recipt header
definition mode
Confirm entered
header
Exit
Receipt header line selection
P
L
E
A
S E
C
O M
E
I N
A
GA
8
Department Names
You can assign a name of up to 12 characters long to each
of the 14 departments available.
The department names that you define will be printed on the
customer receipts, journal reports and on all management
reports.
1. Control key position: PRG.
2. Press
repeatedly until displaying the message
"DP01" indicating the first customizable department.
3. Press repeatedly until displaying the desired
department number on the left-hand side of the operator
display.
4. Enter the letters or characters of the string you wish to
define and then press
.
5. Repeat steps 3 and 4 for all desired department names.
6. Press to exit
Example: Name department 3 "BOOKS" by using the
alphanumeric keypad.
Type/Press:
PLU Item Names
After associating a price to a PLU code, you can name the
PLU to identify the product that it represents. The name that
you can associate to the PLU code must be up to 12
characters long.
The PLU names that you define will be printed on the
customer receipts, journal reports and on the PLU
management reports.
1. Control key position: PRG.
2. Press
to display the message "PL001" indicating
the first PLU.
3. Press
repeatedly until displaying the desired PLU
number on the left-hand side of the operator display.
4. Enter the name to assign to the PLU and then press
.
5. Repeat steps 3 and 4 for all desired PLU names.
6. Press to exit.
Example: Name PLU 2 "COFFEE" by using the
alphanumeric keypad.
Type/Press:
Percent Discount (-%) or Add On (+%)
Setting this option automatically calculates the preset discount
or add on rate each time
key is pressed. The percentage
rate can be discounted from, or added on to, an individual
item or sales transaction total.
1. Control key position: PRG.
2. Type the [numbers] representing the desired percentage
rate. Up to four digits ranging from 0 to 99.99 can be used.
Two digits must be placed before the decimal point and
two must be placed after.
3. Define whether the percentage rate is a discount or an
add on by pressing the related code indicated below:
0 = Percent add on
1 = Percent discount
3. Press
to store the rate.
Example: Program a standard 5.50% discount rate.
Type/Press:
Switch to Department
name definition mode
Confirm entered
department name
Exit
Department number
selection
Confirm entered
PLU name
Exit
Switch to PLU Name
definition mode
PLU number selection
Units Decimals
Sign
9
ENGLISH
Foreign Currency Exchange Rates
You can program up to four different foreign currency
exchange rates. The foreign currency value is displayed
whenever
is pressed during a sales transaction.
1. Control key position: PRG.
2. Type the identification number to
corresponding to the foreign currency exchange rate that
you wish to define and then press
.
3. Type the [decimal point position] of the exchange rate
(0-8 digits after the decimal point).
4. Type the [decimal point position] of the converted
amount (0-3 digits after the decimal point).
5. Type the [exchange rate] using up to six digits without
specifying any decimal point.
6. Press
.
Example: Program the first exchange rate as:
1 GBP = 1.471 EURO.
Type/Press:
When the Foreign currency conversion calculation system
option 15 is set to Divide, the converted amount is
calculated as follows:
Conversion Amount = Subt / FC rate
When the Foreign currency conversion calculation is set to
Multiply, the converted amount is calculated as follows:
Conversion Amount = Subt x FC rate.
Foreign Currency Descriptors
You can define a currency descriptor of up to 10 characters
long for each of the four exchange rates programmed. The
descriptor of the foreign currency used will be printed on the
customer receipt during sales transactions that are finalized
with payment in foreign currency, and on the management
reports.
1. Control key position: PRG.
2. Press
until displaying the message "FC1" indicating
the first of the four possible foreign currency exchange
rates.
3. Press
repeatedly until displaying the desired
exchange rate identification number on the left-hand side
of the operator display.
4. Enter the descriptor to assign to the selected foreign
currency and then press
.
5. Repeat steps 3 and 4 if you wish to assign a descriptor
to the remaining foreign currencies, if defined.
6. Press
to exit.
Example: Name foreign currency 1 "EURO" by using the
alphanumeric keypad.
Type/Press:
Rounding Option for Swiss, Danish and
Swedish Currencies
For the Swiss franc, Danish krone and Swedish krona
currencies, you can program the machine to so that the
amount of a transaction is automatically rounded accordingly
whenever the
, or a [tender] key is pressed.
The rounded result will be displayed on the operator and
client displays, printed on the customer receipt and journal
report. The total adjustments are indicated on the financial
reports.
Setting the Rounding Option
With reference to the section "System Options", by setting
Machine Condition 14 to the related value (1, 2 or 3), you can
program the machine to round off the subtotal or tender
values of the related currency.
Switch to foreign currency
definition mode
Confirm entered
foreign currency
descriptor
Exit
Exchange rate
ID number
Dec. point position of
exchange rate
Dec. point position of
converted amount
Exchange rate (1.471 Euro)
10
Fraction Rounding for VAT Calculation
Fraction rounding is used to round figures with decimals up
or down to the nearest whole numbers and is used for
percent tax calculations.
Choose from the following three options to select the rounding
as needed:
Status Number Fraction Rounding
0 a fraction of a pence is rounded down
one pence
1 a fraction under one-half pence is
rounded down one pence, a fraction
above one-half pence is rounded up
one pence (default setting)
2 a fraction of a pence is rounded up
one pence
1. Control key position: PRG.
2. Type system option
followed by the status
number[0, 1 or 2] to select the desired fraction rounding.
3. Press
to store the new setting.
Example: Program the rounding code so that a fraction
under one-half pence is rounded down one pence, a
fraction above one-half pence is rounded up one pence.
Type/Press:
Printing VAT Information on Customer
Receipts
You can program the cash register to print VAT information
on the customer receipt according to your business' or
country's requirements.
Programming the Cash Register to Print the
Required VAT Information
With reference to the section "System Options", by setting
machine conditions 37, 38, 39, 40 and 41 you program the
cash register to print the VAT information that you need.
1. Control key position: PRG.
2. Type the [machine condition number] followed by
status number , then press .
3. Slide the control key to the OFF position.
Receipt With Sum of all VAT Amounts Calculated
(TOTAL VAT) - Machine Condition 37
Sum of the
individual VAT
totals
Receipt With Taxed Sales Totals Split per Rate
(AMT VAT INCL) - Machine Condition 38
Receipt With Sum of the Taxed Sales Totals
(TOTAL INCL VAT) - Machine Condition 39
Receipt with Taxable Sales Totals without VAT per each
Rate (AMT VAT EXCL) - Machine Condition 40
Receipt With the Sum of the Taxable Sales Totals without
VAT (TOT EXCL VAT) - Machine Condition 41
Calculator Mode
The calculator mode is a non-print mode that can only be
accessed in the REG or JRNL position.
The following keys can be used in the calculator mode:
Key
to
VAT totals
per pro-
grammed rate
Programmed
VAT rates
Programmed
VAT rates
VAT totals
per pro-
grammed rate
Taxed sales
totals per rate
Programmed
VAT rates
VAT totals
per pro-
grammed rate
Taxable sales
totals without
VAT per each
rate
VAT totals
per pro-
grammed rate
Programmed
VAT rates
Sum of taxed
sales totals
Programmed
VAT rates
Sum of the
taxable sales
totals without
VAT
VAT totals per
programmed
rate
11
ENGLISH
Entering the Calculator Mode
1. Control key position: REG or JRNL.
2. Type the [four-digit password] and press
.
3. A line will appear on the far left-hand side of the display
indicating that the calculator mode is in operation.
Exiting the Calculator Mode
1. Control key position: REG or JRNL.
2. Press
.
3. The line will disappear from the display indicating that you
are now back into the normal register mode.
Programming a Calculator Mode Password
1. Control key position: PRG.
2. Press
.
3. Type the [4-digit password] and press
.
NOTE: The 4-digit password cannot be 0000.
Example: Define calculator mode password 1962.
Type/Press:
Clerk System
The Clerk System is a security feature that enables you to
control access to the cash register and monitor the number
of transactions and the sales of up to 8 Clerks.
Your cash register is configured at the factory with the
Clerk System deactivated. You can activate the Clerk
System for a degree of protection and sales monitoring or
deactivate it again so that the cash register can be used
freely without restrictions.
NOTE:If the Clerk System is deactivated, the cash register
is used without needing to enter a Clerk number only or a
Clerk number and its related 3-digit security code.
You can also program other clerk-related features. See
"System Options", Machine conditions 9 and 10 for details.
Activating the Clerk System
1. Control key position: PRG.
2. Press .
Deactivating the Clerk System
1. Control key position: PRG.
2. Press
.
Programming a Secret Code Linked to a Clerk
Number
With the Clerk System active:
1. Control key position: PRG.
2. Type a number from
to to identify the clerk
which the secret code will be linked.
3. Press
.
4. Define if the clerk is a normal or training clerk by typing
the related code indicated below:
1 = Training clerk
0 = Normal clerk
5. Press
.
6. Define a three-digit secret code by typing three [numeric
keys].
7. Press
.
Example: Assign secret code 106 to a normal Clerk 1.
Type/Press:
Entering a Clerk Number/Secret Code Before
Cash Register Operations
1. Control key position: REG or JRNL.
2. Type a Clerk number
to and press .
3. Type the corresponding three-digit code (if programmed)
and press
.
The clerk number is displayed (C1 .....C8) to identify the clerk
that is in use and that it is now possible to carry out
transactions. The clerk number is printed on the sales receipt
and on the management reports.
Calculator password defined
Confirm
password
Switch to Calculator mode
password definition
Secret code
Clerk number
12
Clerk Names
You can program a clerk name or identifier of up to 12
characters long by using the alphanumeric keypad or the
Character Table. It will be automatically printed on all receipts,
journal records and management reports.
1. Control key position: PRG.
2. Switch the cash register to the Clerk name definition
mode by pressing
repeatedly until displaying the
message "CL1" indicating the first Clerk number.
3. Select the Clerk number corresponding to the Clerk
whose name you wish to define by pressing
repeatedly until displaying the number on the right hand
side of the operator display.
4. Using the alphanumeric keypad and Character Table,
enter the clerk name then press . The name entered
will be automatically printed.
5. Press to exit.
Example: Program Alex as the name for Clerk number 2
using the Character Table.
Type/Press:
Manager Password
You can define a manager password to prevent unauthorized
access to the machine's Z mode. Since the management
report taken in the Z mode resets transaction totals to zero,
a management password prevents the accidental resetting
of these totals by unauthorized personnel.
Defining a Z Mode Manager Password
1. Control key position: PRG.
2. Press
3. Type your 4-digit manager password and press .
NOTE: If you define a manager password of 0000, the
password security protection feature will not work.
Example: Define manager password 9876 for the Z mode.
Type/Press:
Clearing the Z Mode Manager Password
1. Control key position: PRG.
2. Press
.
3. Press
.
Using the Cash Register in a Password
Protected Mode
If a manager password was defined to protect unauthorized
access to the Z mode, proceed as follows to enter the specific
password so that you can print the Z management report:
1. Control key position: Z1/Z2.
2. Type the specific 4-digit password.
3. Press
.
Training Mode
The training mode allows you to use the cash register to
perform true sales transactions for learning purposes. All
transactions performed in this mode are not recorded in the
management financial reports and the sales receipts are not
numbered consecutively.
When the cash register is switched to the training mode, all
training transactions are performed in the REG or JRNL
mode. You can also print a detailed training report to keep
track of the transactions performed in this mode. See "Training
Report" for details.
To switch the cash register to the training mode:
1. Control key postion: PRG.
2. Press
.
A line appears on the display to indicate that the cash
register is in the Training Mode.
3. Slide the control key to REGor JRNL to perform training
sales transactions.
To exit the training mode:
1. Control key position: PRG.
2. Press
.
To switch the cash register to the training mode when a
training mode password has been defined:
1. Control key position: REG or JRNL.
2. Type your [4-digit password] and press
.
A line appears on the display to indicate that the cash register
is in the Training Mode.
Confirm entered Clerk name
Exit
Switch to Clerk Name
definition mode
Clerk number selection
A
l
e
x
Manager password defined
Confirm entered
Manager password
Switch to Z mode password definition
13
ENGLISH
To exit the training mode when a password has been defined:
1. Control key position: REG or JRNL.
2. Type your [4-digit password] and press .
Programming a Training Mode Password
A training mode password prevents unauthorized access to
the training mode and allows training to be performed in the
REG or JRNL mode.
1. Control key position: PRG.
2. Press
.
3. Type your [4-digit password] and press
.
NOTE: Do not assign a password 0000.
Example: Define training mode password 9876.
Type/Press:
System Options
Your cash register's system options programming feature
includes a number of options for the operation of the cash
register. Each of the functions described in this section is
already set upon delivery of the cash register to meet the
most frequent requirements.
The cash register's factory default settings, which you can
reprogram at any time, are indicated in bold print in the table
below. At any time you can print a report indicating how your
cash register is programmed. See " Cash Register
Programming Report" for details.
1 Date display/print format
0 = Date in “day - month - year” format
1 = Date in “month - day - year” format
2 Time indication
0 = 24Hour indication
1 = 12Hour indication
3 0 = Decimal point position – n
1 = Decimal point position – n.n
2 = Decimal point position – n.nn
3 = Decimal point position – n.nnn
4 Electronic Journal
0 = Dynamic electronic journal operation
1 = Standard electronic journal operation
5 Electronic Journal storage selection
0 = Stores sales receipt only on electronic journal
1 = Full registration on electronic journal
6 Sound warning beep for EJ memory nearly full
condition at the start of the transaction
0 = Do not sound
1 = Sound
Training Mode password
defined
Confirm entered
password
Switch to Training
Mode password
definition mode
7 Sound warning beep for EJ memory nearly full
condition at the end of the transaction
0 = Do not sound
1 = Sound
8 Clerk System status
0 = Clerk system inactive
1 = Clerk system active
9 Clerk security code entry
0 = Clerk security code entry not required
1 = Clerk security code entry
10 Clerk number entry
0 = Clerk number entry not required at each
transaction
1 = Clerk number entry required at each
transaction
11 Zero price registration activity
0 = Active
1 = Inactive
12 VAT calculation
0 = Reserved
1 = Add-on TAX
2 = VAT calculation
13 Fraction Rounding Mode
0 = Round down
1 = Round off 5/4
2 = Round up
14 European rounding selection
0 = No European rounding
1 = European rounding selection - Swiss
0.01 – 0.02 = amount rounded to 0.00
0.03 – 0.07 = amount rounded to 0.05
0.08 – 0.09 = amount rounded to 0.10
2 = European rounding selection - Swedish
0.00 – 0.24 = amount rounded to 0.00
0.25 – 0.74 = amount rounded to 0.50
0.75 – 0.99 = amount rounded to 1.00
3 = European rounding selection - Danish
0.00 – 0.12 = amount rounded to 0.00
0.13 – 0.37 = amount rounded to 0.25
0.38 – 0.62 = amount rounded to 0.50
0.63 – 0.87 = amount rounded to 0.75
0.88 – 0.99 = amount rounded to 1.00
15 Foreign currency conversion calculation
0 = Divide
1 = Multiply
16 Multiple receipt issue
0 = Issue multiple receipts
1 = Do not issue multiple receipts
17 Drawer open during NO SALE transaction enable/
disable
0 = open
1 = Do not open
18 Update consecutive number on NO SALE transaction
receipt enable/disable
0 = Update consecutive number on receipt
1 = Do not update consecutive number on receipt
19 Zero skip
0 = Zero skip on financial reports
1 = No zero skips on financial reports
14
20 Consecutive receipt number reset
0 = Do not reset consecutive receipt number after
Z1 report
1 = Reset consecutive receipt number after Z1
report
21 Grand Total reset
0 = Do not reset Grand Total after Z1 report
1 = Reset Grand Total after Z1 report
22 Z1/Z2 counter reset
0 = Do not reset Z1 and Z2 counter after Z report
1 = Reset Z1 and Z2 counter after Z report
23 Receipt line spacing selection
0 = 0.500mm
1 = 0.667mm
2 = 0.833mm
3 = 1.000mm
4 = 1.167mm
5 = 1.333mm
6 = 1.500mm
7 = 1.667mm
8 = 1.833mm
9 = 2.000mm
24 Printing Font Size
0 = Normal Size
1 = Small Size
25 EJ report compressed printing enable/disable
0 = Disable compressed report printing
1 = Enable compressed report printing
26 Consecutive receipt number Update
0 = Update consecutive receipt number after Z1
report
1 = Do not update consecutive receipt number after
Z1 report
27-29 Reserved
30 Date printing enable/disable
0 = Enable date printing
1 = Disable date printing
31 Time printing enable/disable
0 = Enable time printing
1 = Disable time printing
32 Consecutive receipt number printing enable/disable
0 = Enable consecutive number printing
1 = Disable consecutive number printing
33 Subtotal printing enable/disable
0 = Print Subtotal when
is pressed
1 = Do not print Subtotal when
is pressed
34 Tax symbol at right hand side of amount printing
enable/disable
0 = Print tax symbol at right side of amount
1 = Do not print tax symbol at right side of amount
35 VAT details print position
0 = Print VAT details after tender amount (sales
receipt)
1 = Print VAT details before total amount (sales
receipt)
36 VAT amount split per rate printing enable/disable
0 = Print VAT amount split per rate
1 = Do not print VAT amount split per rate
37 Total VAT amount printing enable/disable
0 = Print total VAT amount
1 = Do not print total VAT amount
38 Taxable amount split per rate printing enable/disable
0 = Print taxable amount split per rate
1 = Do not print taxable amount split per rate
39 Total taxable amount printing enable/disable
0 = Print total taxable amount
1 = Do not print total taxable amount
40 Taxable amount out of VAT split per rate printing
enable/disable
0 = Print taxable amount out of VAT split per rate
1 = Do not print taxable amount out of VAT split
per rate
41 Total taxable amount out of VAT printing
enable/disable
0 = Print total taxable amount out of VAT
1 = Do not print total taxable amount
out of VAT
42 NO SALE receipt printing enable/disable
0 = Print total NO SALE Receipt
1 = Do not print NO SALE Receipt
43 X/Z report header printing enable/disable
0 = Print header on X/Z report
1 = Do not print header on X/Z report
44 Z1/Z2 counter printing enable/disable
0 = Print Z1/Z2 counter
1 = Do not print Z1/Z2 counter
45 Grand Total printing enable/disable
0 = Print GT
1 = Do not print GT
46 PAYMENT MEDIA counter on Z1/Z2 report printing
enable/disable
0 = Print Payement Media counter
1 = Do not print Payement Media counter
47 NO SALE counter on Z1/Z2 report printing enable/
disable
0 = Print NO SALE counter
1 = Do not print NO SALE counter
48 VOID TOTAL counter on Z1/Z2 report printing enable/
disable
0 = Print VOID TOTAL counter
1 = Do not print VOID TOTAL counter
49 REFUND TOTAL counter on Z1/Z2 report printing
enable/disable
0 = Print REFUND TOTAL counter
1 = Do not print REFUND TOTAL counter
50-89 Reserved
90 Language selection
0 = Select English
1 = Select Spanish
2 = Select French
3 = Select German
4 = Select Dutch
5 = Select Portuguese
6 = Select Danish
7 = Select Swedish
15
ENGLISH
Changing the Cash Register's Standard Settings
1. Control key position: PRG.
2. Type the [number] of the machine condition.
(1 to 90 as indicated in the table) that you wish to change.
3. Type the [number] of the required setting.
4. Press
.
Example: Set the date to the Month/Day/Year format.
Consecutive Receipt Number
By default the cash register prints a consecutive receipt
number of up to 4 digits on each sales receipt and
management report. You can change this number according
your business needs. The newly entered receipt number will
be printed.
1. Control key position: PRG.
2. Type
and press .
3. Type your [4-digit consecutive receipt number] and
press .
Z1 Counter Setting
You can set the Z1 counter according to your business
needs. The newly set Z1 counter will be printed.
1. Control key position: PRG.
2. Type and your [4-digit Z1 counter] and
press
.
Z2 Counter Setting
You can set the set Z2 counter according to your business
needs. The newly set Z2 counter will not be printed.
1. Control key position: PRG.
2. Type
and your [4-digit Z2 counter] and
press
.
Grand Total Setting
You can program the transaction grand total value printed on
the management reports.
1. Control key position: PRG.
2. Type
and press .
3. Type your [10-digit max Grand Total] and
press .
Management Reports
Transaction data is maintained in the memory of the cash
register as long as the battery back-up system is in effect.
This data can be printed as a report for management review.
The Management Report can be printed from either the
X1/X2 or Z1/Z2 position.
X and Z Reports
Turning the control key to the X1/X2 position prints the
accumulated transaction information and RETAINS ALL
TOTALS IN MEMORY. Take this report any time of the day
to print periodic reading of the transactions performed (some
users call the X report a mid-day report). X reports include
the PLU Report, Clerk Report, and the X1 and X2 Financial
Reports.
Turning the control key to the Z1/Z2 position prints the same
information as the X report. The only difference is that after
a Z report printout ALL TRANSACTION TOTALS ARE
RESET TO ZERO, except for the grand total unless
programmed otherwise in the system options programming
mode. This report is usually taken at the end of the day so that
all the transaction totals are cleared to start from zero the
following day.
NOTE:To prevent the accidental printing of the Z report,
assign a Z mode manager password as explained in the
section entitled "Defining a Z Mode Manager Password".
AnX2 report is called a period-to-date financial report which
is usually taken on a weekly basis. It accumulates all the
transaction totals. A Z2 report is the same as an X2 report
with the exception that all the transaction totals are reset to
zero after it is taken. It is usually taken as a monthly sales
report to view end-of-month sales totals for each department.
X1 and Z1 Financial Reports
NOTE: Once a "Z" report is taken, it cannot be duplicated so
be sure to have plenty of paper in the cash register.
1. Control key position: X1/X2 or Z1/Z2 (bear in mind that a
Z2 printout resets all totals to zero).
2. If a Z-mode manager password was defined, type the
[4-digit password] and press
.
3. Type
.
Machine
condition
Setting
Confirm setting
16
X2 and Z2 Financial Reports
1. Control key position: X1/X2 or Z1/Z2 (bear in mind that
a Z2 printout resets all totals to zero).
2. If a Z-mode manager password was defined, type the
[4-digit password] and press
.
3. Type
and press .
Clerk Report
1. Control key position: X1/X2 or Z1/Z2 (bear in mind that
a Z Clerk Report resets all totals).
2. Press
.
Department Programming Report
This report provides a printout showing how your
departments are programmed. It provides the status,
associated VAT and associated price for each department.
1. Control key position: PRG
2. Press
.
PLU Programming Report
This report provides a printout showing how the PLUs are
programmed. Their number, associated price, VAT rate (if
applicable), item descriptor and associated department are
reported on this receipt.
1. Control key position: PRG.
2. Press
.
Percent minus
total
PLU Sales Report
1. Turn the control key to the X1/X2 or Z1/Z2 position (bear
in mind that a Z PLU Report resets all PLU totals to
zero).
2. Press
.
PLU number
or assigned
name
X report
identifier
PLU sales
total
Date
All PLU
sales total
PLU quantity
sold
X report
identifier
Sales
total of
clerk 1
Sales
total of
clerk 2
Activity counter
for Clerk 1
Clerk 1 number
or assigned
name
Time
Activity counter
for Clerk 2
Sales total of all
clerks
Z report identifier
Department 1
activity counter
Z counter
Department 1
sales total
Department number
or assigned name
Total amount VAT
1, 2, 3 and 4
Coupon amount
total
Refund total
Gross sales total
Cash sales total
Check sales total
Charge sales total
Received on
account total
Paid out total
Cash in drawer
total
Check in drawer
total
Net sales total in
local currency
Cash sales counter
Void total
Charge sales
counter
Check sales counter
Consecutive
receipt number
Paid out counter
Received on
account counter
Credit in drawer total
Date
Sales total for all
departments
Grand total
Card sales counter
Card sales total
Card in drawer total
Foreign currency
total
  • Page 1 1
  • Page 2 2
  • Page 3 3
  • Page 4 4
  • Page 5 5
  • Page 6 6
  • Page 7 7
  • Page 8 8
  • Page 9 9
  • Page 10 10
  • Page 11 11
  • Page 12 12
  • Page 13 13
  • Page 14 14
  • Page 15 15
  • Page 16 16
  • Page 17 17
  • Page 18 18
  • Page 19 19
  • Page 20 20
  • Page 21 21
  • Page 22 22
  • Page 23 23
  • Page 24 24
  • Page 25 25
  • Page 26 26
  • Page 27 27
  • Page 28 28
  • Page 29 29
  • Page 30 30
  • Page 31 31
  • Page 32 32
  • Page 33 33
  • Page 34 34
  • Page 35 35
  • Page 36 36

Olivetti ECR 6700 Owner's manual

Category
Cash registers
Type
Owner's manual

Ask a question and I''ll find the answer in the document

Finding information in a document is now easier with AI