Noctua NM-TR5-SP6 User manual

Type
User manual

Noctua NM-TR5-SP6 is a high-quality mounting system designed specifically for TR5/SP6 platforms, ensuring a secure and efficient installation of Noctua coolers on compatible motherboards. Crafted with precision engineering, it allows for flexible offsetting of the cooler by 3 or 6mm, providing increased clearance towards the I/O panel or PCIe components. The NM-TR5-SP6 features a simple and user-friendly installation process, ensuring a hassle-free experience for novice and experienced builders alike.

Noctua NM-TR5-SP6 is a high-quality mounting system designed specifically for TR5/SP6 platforms, ensuring a secure and efficient installation of Noctua coolers on compatible motherboards. Crafted with precision engineering, it allows for flexible offsetting of the cooler by 3 or 6mm, providing increased clearance towards the I/O panel or PCIe components. The NM-TR5-SP6 features a simple and user-friendly installation process, ensuring a hassle-free experience for novice and experienced builders alike.

Scan this code to display
multilingual manuals on
your phone.
NOCTUA NM-TR5-SP6
INSTALLATION MANUAL
This manual will guide you through the installation process
of the SecuFirm2™ mounting system step by step.
Prior to installing the cooler, please consult the compatibility
centre on our website (ncc.noctua.at) and verify that the
cooler is fully compatible with your motherboard.
Please also make sure that your PC case offers sufficient
clearance for the cooler and that there are no compatibility
issues with any other components (e.g. tall RAM modules).
Double check that the heatsink and fan clips do not make
contact with the VGA card, other PCIe cards, motherboard
heatsinks or any other components.
Noctua cannot be held responsible for any damage or
losses caused by compatibility issues.
Should you encounter any difficulties, please check the
FAQs on our website (faqs.noctua.at) and don’t hesitate
to contact our support team at suppor[email protected].
Dear customer,
Thank you very much for choosing a Noctua cooler
for your TR5/SP6 system. This manual will guide you
through the installation process step by step using an
NH-U14S DX-3647 heatsink as an example. Please note
that the installation procedure is identical for all models.
Enjoy your Noctua cooler on NM-TR5/SP6!
Yours sincerely,
Roland Mossig, Noctua CEO
Offsetting the cooler
2
The SecuFirm2™ mounting for TR5/SP6 makes it possible
to offset the cooler by 3 or 6mm. On motherboards with
east-to-west socket orientation, this can be used to offset
the compatible NH-U14S, NH-U12S and NH-U9 series
coolers towards the right, increasing clearance towards the
I/O panel. On boards that use a north-to-south orientation
of the CPU socket(s), this allows offsetting the cooler
towards the upper edge of the motherboard in order to
increase PCIe clearance.
Required mounting parts:
NM-AFB11 fastening brackets NM-SMT4 mounting tool
Caution: Gently tighten the screws until they stop, but do
not use excessive force (max. torque 0.6 Nm).
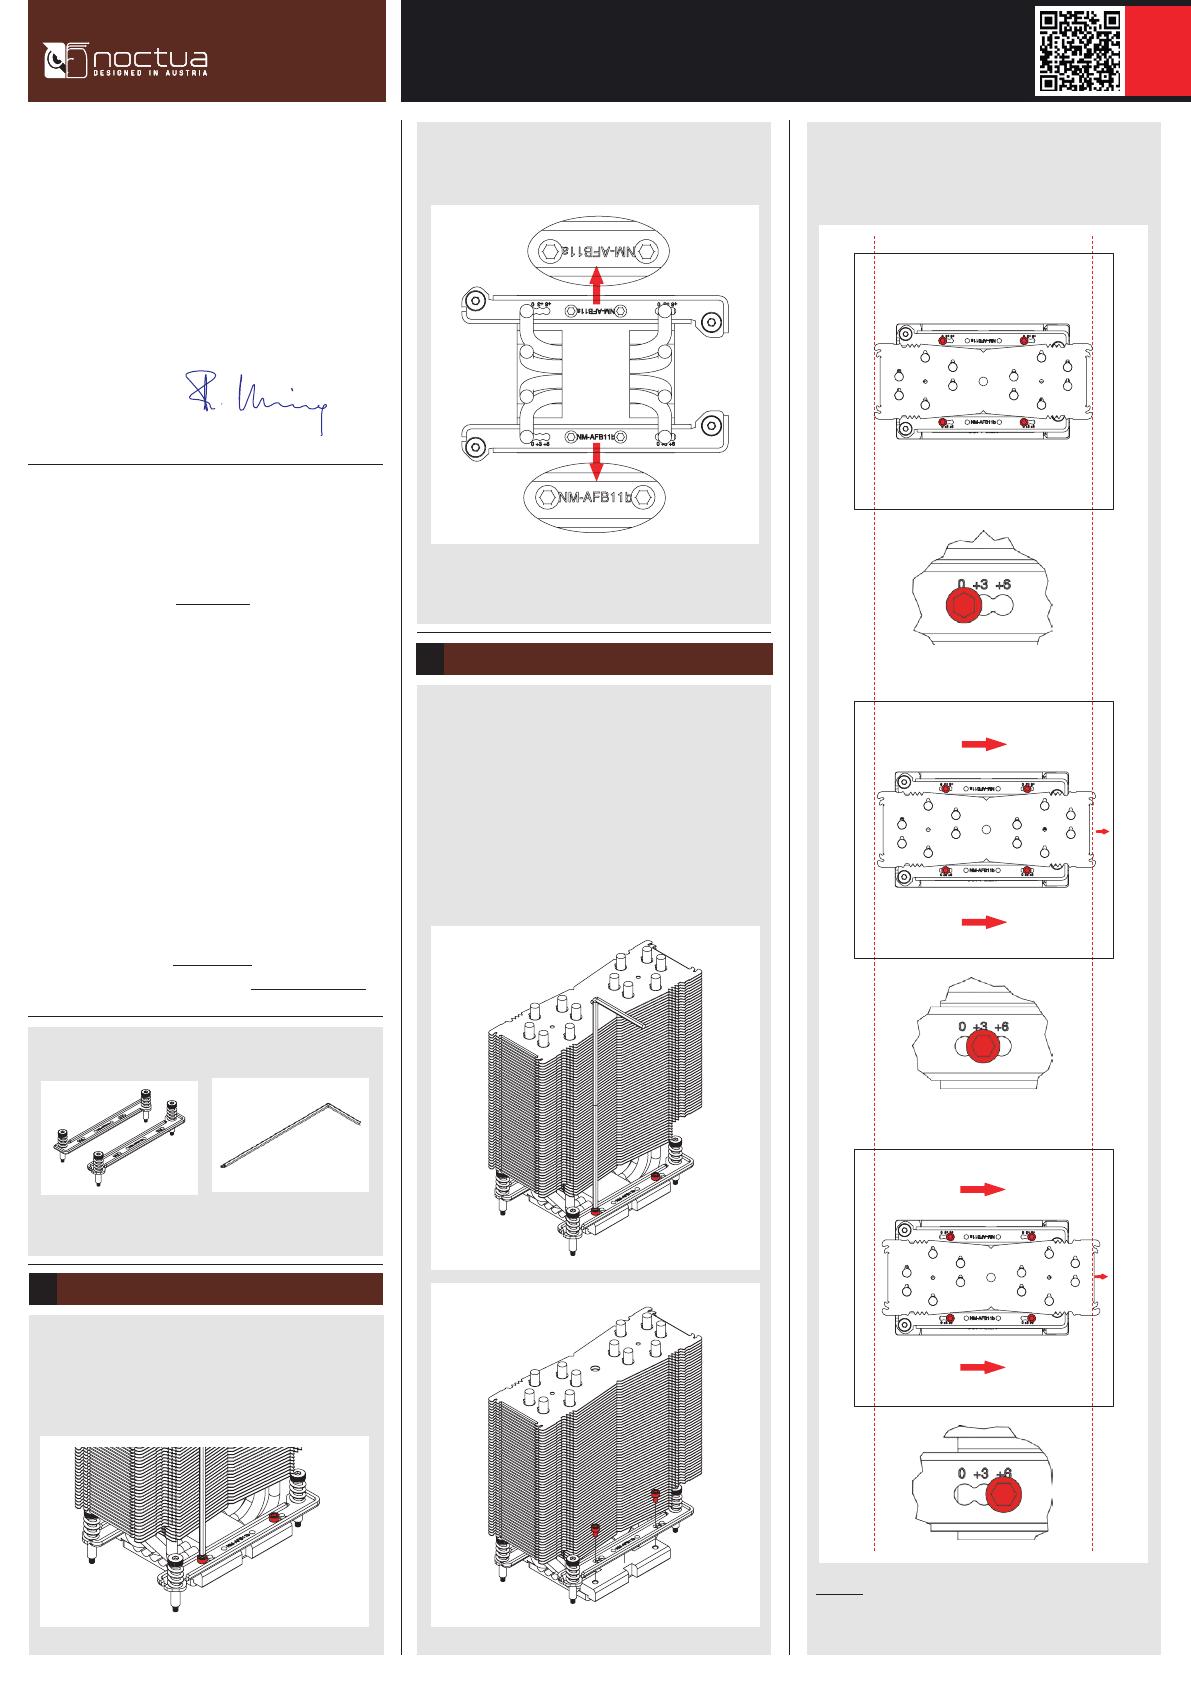
3
In order to offset the cooler, please unscrew the NM-AFB11
fastening brackets and reinstall them in the +3 (3mm
offset) or +6 (6mm offset) position.
Caution: Gently tighten the screws until they stop, but don’t
use excessive force (max. torque 0.6 Nm).
+ 0mm offset
+ 3mm offset
+ 6mm offset
Installing/replacing the mounting brackets
1
Take the fan(s) off the cooler. If the original mounting
brackets are already installed on the cooler, please take
them off first. Then install the NM-AFB11 brackets for
TR5/SP6.
Ensure that the name of the mounting bars is oriented
towards the CPU, as shown in the image above.
Scan this code to display
multilingual manuals on
your phone.
NOCTUA NM-TR5-SP6
INSTALLATION MANUAL
Transporting your system
Fastening the heatsink to the CPU
3
If you are using a new heatsink, first remove the plastic
protection cover from the base of the heatsink.
If your heatsink has thermal compound pre-applied, be
careful not to damage the layer of paste.
If you are not using the heatsink for the first time or it
doesn’t have thermal compound pre-applied, you need to
apply a thin layer of thermal compound to the CPU yourself
as shown below.
If there are residual traces of previous thermal paste or
thermal pads on your CPU or on the heatsink, please clean
them off first.
Caution: Gently tighten the screws until they stop, but don’t
use excessive force (max. torque 0.6 Nm).
Note that you can tilt the mounting tool for reaching the
screws in case they are blocked by the heatsink fins.
Transporting your system
!
As it is not possible to reliably calculate or control the forces
that act upon a system during transport (e.g. in shipping),
we generally recommend, for safety reasons, taking the
cooler off.
Noctua cannot be held responsible for any damage that
may arise due to excessive stress during transport if you
keep the heatsink installed.
Warranty, support and FAQs!
Even with high-grade products and strict quality control,
the possibility of defects cannot be eliminated entirely.
Therefore, we aim at providing the highest possible level
of reliability and convenience by offering a warranty
period of 6 years and direct, fast and straightforward
RMA service.
Should you encounter any problems with your NM-TR5-
SP6, please don’t hesitate to contact our support team at
Please also consult the FAQ section on our website:
faqs.noctua.at
Installing the fans
4
Connect the fan(s) to the motherboard’s CPU fan header(s).
If necessary, use the supplied NA-YC1 splitter cable to
connect both fans to one fan header.
Reattach the fans to the heatsink using the supplied fan
clips:
  • Page 1 1
  • Page 2 2

Noctua NM-TR5-SP6 User manual

Type
User manual

Noctua NM-TR5-SP6 is a high-quality mounting system designed specifically for TR5/SP6 platforms, ensuring a secure and efficient installation of Noctua coolers on compatible motherboards. Crafted with precision engineering, it allows for flexible offsetting of the cooler by 3 or 6mm, providing increased clearance towards the I/O panel or PCIe components. The NM-TR5-SP6 features a simple and user-friendly installation process, ensuring a hassle-free experience for novice and experienced builders alike.

Ask a question and I''ll find the answer in the document

Finding information in a document is now easier with AI