Page is loading ...

1.651.209.0050 | 1.877.783.1520 | team@aqcind.com | www.aqcind
.com
Installation Videos | www.aqcind
.com
Installation
Instructions

1.651.209.0050 | 1.877.783.1520 | team@aqcind.com | www.aqcind
.com
2
BDIM012919
1717
CONTENTS
General……………………………..page 2
Important…………………………...page 2
Site Condition and Preparation…..page 2
Excavation………………………….page 2
Tools- Contractor Provided……….page 3
Tools- AQC Provided……………...page 3
Sealant Application……………...…page 3
Connecting Flanged Duct……...….page 3
Connecting Non-flanged Duct…….page 4
Saddle……………………………….page 4
Boot Extension……………………………….….page 5
Linear Diffuser Assembly…………………….…page 5
Plenum………………………………………..…..page 6
Connecting Plenum Adapter to a Linear Plenum or
Diffuser Adapter…………………………….…...page 6
Leak Testing……………………………….…….page 6
Backfill……………………………………………page 7
Backfill Detail (Less than 48" diameter)………page 8
Backfill Detail (48" diameter)…………………...page 8
Warranty………………………………………….page 9
CODE COMPLIANCE
This document, along with the IAPMO REPORT 0261 and/or ICC-ES LISTING PMG-1023 should be printed and
readily available at the installation site. The BlueDuct
®
is a user-friendly system that will save installation time and
labor.
Installation videos, code documentation and this guide are provided on our website, www.aqcind.com.
This document is to be used in conjunction with AQC Industries’ installation training offered via webinar on a
regular basis. Onsite installation training is offered. Consult your BlueDuct distributor or representative to arrange.
IMPORTANT
1.
AQC Industries highly recommends all installing contractors complete AQC’s provided training prior to
installing The BlueDuct.
2. Strictly adhere to the following instructions.
3. The BlueDuct sealant, clamp and Maxseal gasket material must be used as directed. The use of non-
approved sealant or gasket will void the warranty.
4. For best results and ease of installation, store the clamps, gaskets and caulk at between 50° and 80°F.
For installing in high ambient temperatures above 90°F consult AQC Industries for special installation
instructions.
SITE CONDITION AND PREPARATION
It is not prudent practice to install underground duct work where ground water is present. If ground water is
present or anticipated, a drain tile and pumping system is recommended before installation.
EXCAVATION
Coordination: Excavation work and trench elevations should be closely coordinated with the certified BlueDuct
installer on site. It is recommended to share this information with the on-site general contractor and excavation
crew.
Soil Type: If non-porous soil (i.e. clay, shale, solid rock) is present a sump pumping or drainage system is
recommended to ensure the water is re-directed.
Width: For non-flanged duct, the trench width should be 1 1/2 times the duct diameter. For flanged duct, the
trench width should be 1 1/2 times the duct diameter. Where multiple ducts are installed side by side, the minimum
separation must allow for reasonable access for proper installation.
Bedding: After the excavation has been made, special bedding is not required for The BlueDuct. The BlueDuct
can rest on the foam trench blocks provided by AQC, once assembled the duct can rest directly on the ground, in
sand, or on light aggregate.

3
1.651.209.0050 | 1.877.783.1520 | [email protected]m | www.aqcind
.com
BDIM012919
TOOLS- Contractor Provided
1. Circular saw, reciprocating saw, or jig saw
2. Adjustable clutch drill with 1/4" and 5/16" hex
driver and 7/16"-deep socket
3.
Drills (impact and clutch)
4. Torque Wrench
5. 7/16" wrench (to install flanged duct)
6.
Crescent wrench (to install 48” duct only)
7. Utility Knife
8.
Hammer
9. Caulk gun- manual
10. Caulk gun- battery operated
11. Safety glasses
12. Gloves (recommended for sealant application)
13.
Shop rags
14.
Black permanent marker
TOOLS- AQC Provided* (Specifically designed to install flanged BlueDuct)
1. Circular saw with cutting jig
2. Drilling jig (20”, 24”, 30”, 36”, 48”)
3. Alignment straps (20”-24”, 30”-36”, 48”)
4. Alignment pins (4/box)
*Contact your BlueDuct distributor or representative to obtain tools
SEALANT APPLICATION
1. Apply 3/8” bead of sealant.
2. Run finger around the perimeter to ensure a proper seal.
3. Sealant should be visibly seeping out. Apply additional sealant as needed.
4. Cover screw heads and bolts with sealant using hand held caulk gun.
CONNECTING FLANGED DUCT
For best results in connecting and sealing flanged duct, cut in the middle of a rib, keeping both sides even
throughout the entire circumference of the duct. (The supplied circular saw with cutting jig will assist this
operation)
1. Put two beads of The BlueDuct sealant on each of the connecting flanged pieces.
2. Use alignment straps and alignment pins to help keep the duct in place. Alignment straps are available for
20" to 48"-diameter ducts. Contact your representative to obtain The BlueDuct tools.
3. Once connected, apply The BlueDuct sealant to the flange, ensuring that there is no area void of sealant.
4. Apply a bead of The BlueDuct sealant on the interior of the connection in addition to the exterior of the
flange.
5. Use an adjustable clutch-drill to tighten bolts with the torque set between 25 and 30 in. lbs. of torque. An
impact-drill is not acceptable, as it will not allow for uniform tightening of the bolts.
6. After bolts are tightened, caulk over both sides of the bolts with The BlueDuct sealant.
7.
When the duct needs to be cut between the flanges, use a clamp and gasket to connect the ducts.

4
1.651.209.0050 | 1.877.783.1520 | [email protected]m | www.aqcind
.com
BDIM012919
CONNECTING NON-FLANGED DUCT
The BlueDuct round duct can be easily cut with a circular saw. Trim all edges as necessary. To ensure a proper
connection, all cuts made should not exceed 4°.
Required items:
- Clamp with factory installed screws
- Maxseal gasket material
- Drill
- 8" and 10" clamps include three 3" threaded stainless screws
- 12", 14", 16" and 18" clamps include four 3" threaded stainless-steel screws for each half clamp
1. Place two sections of duct end to end with the clamp on one of the ducts (maximum of ½” gap at its
widest point).
2. Wrap the gasket around the duct and apply pressure to overlap.
3. Place the clamp around the gasket, lining up the clamp with the gasket.
4. Tighten the clamp screws with the adjustable clutch drill.
Note: Moving of pre-assembled non-flanged duct is not recommended. All non-flanged connections should
be made in the trench.
Caution:
- Tightening the screws too fast may cause galling.
- Over-tightening the screws may cause damage to the clamp.
- The two ends of the clamps do not have to meet each other to be airtight.
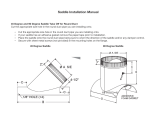
SADDLE
1. Center the saddle on top of the round duct at the desired air supply register location. Trace around the
saddle with a black permanent marker.
2. Use the outline created as a template. Draw another line 1-1/2" inside the first outline. Cut on the inner
template line and remove any loose material from inside the round duct.
3. Apply a 3/8" bead of The BlueDuct sealant on the underside of the saddle and the straight duct surfaces.
4. Place the saddle on the round duct plumb and level.
5. Place the 1.25" saddle screws in the pre-marked locations on the saddle. All of the screws must be used
to create a good seal. Screws must be installed such that they do not break the saddle surface.
6. Caulk around the saddle with The BlueDuct sealant after the screws have been installed and cover screw
heads with sealant.
7. Once the concrete has been poured, cut off the protruding caps and install the floor register.
Peel off gasket backing
Tack gasket halfway
around duct
Tack gasket down and
apply pressure
Slide clamp over gasket
and tighten screws

5
1.651.209.0050 | 1.877.783.1520 | [email protected]m | www.aqcind
.com
BDIM012919
Draw outside line Cut along inside line Cut square edges Remove Cut Panel
BOOT EXTENSION
The offset footer boot allows The BlueDuct
underground system to connect wall registers to floor registers.
The wall registers may be cut as high as 8" above the floor.
1. Find the desired register location.
2. Place the offset footer boot plumb and level. Connect it to the round duct using a clamp and gasket.
3.
Refer to “Connecting Non-flanged Duct” on page 4 of this guide.
LINEAR DIFFUSER ASSEMBLY
This process is similar to cutting in and attaching a BlueDuct saddle.
1. Set the diffuser box on a flat surface with the cooling hole facing up.
2. Set the linear diffuser adaptor, flared end down, on the diffuser box.
3. With a marker, trace the outside perimeter of the linear diffuser adaptor on the diffuser box.
4. Draw another line 1 ½” inside the first outline.
5. Cut out along the inner template line. Remove any tailings or loose material along or inside the diffuser
box.
6. Caulk and join per “Sealant Application” section on page 3.
7. Mount plenum adaptor to the desired location on the outer face of the LDA. Refer to “Connecting Plenum
Adapter” instructions on page 6.
Continuous 3/8”
sealant bead.
Continuous 3/8”
sealant bead.
Secure both ends and drill screws
into pre-marked locations and cover
screw heads with sealant.

6
1.651.209.0050 | 1.877.783.1520 | [email protected]m | www.aqcind
.com
BDIM012919
Note: In instances where the diffuser box is wider than the linear diffuser adaptor, the diffuser box does not
need to be centered on the linear diffuser adaptor. This will allow the installer some flexibility towards
achieving the desired placement of the diffuser box.
PLENUM
The BlueDuct plenum is a complete unit designed to transition the underground duct to the above-ground duct or
equipment. The plenum should extend 2”-8” inches above the slab.
1. Place the plenum in the desired location and insert the plenum.
2. Mark the take-off location and cut the hole at the desired elevation.
3. Each diffuser boot is a legal clean-out. Mark the furnace opening, above-ground duct or other equipment and
cut the plenum or use a template for a quick
and easy guide for cutting the plenum.
CONNECTING PLENUM ADAPTER TO A LINEAR PLENUM OR DIFFUSER ADAPTER
1. Hold the plenum adapter up to the plenum at the desired location and trace around the inside and outside
with a black permanent marker.
2. Use a jigsaw or reciprocating saw to cut out the smaller circle to fit the plenum adapter.
3. Apply a 3/8" bead of The BlueDuct sealant to both surfaces.
4. Secure with 2.25" plenum adapter screws (secure with 1.25” saddle screws for 6” and 8” plenum
adapters) and caulk around the plenum with sealant (refer to the “Sealant Application” section on pg. 3).
All screws must be used to ensure the plenum adapter has been
sealed. The images below illustrate how to create and use a template marked area.
LEAK TESTING
To best ensure a quality installation, the dynamic (“duct blaster”) equipment and test method per SMACNA
guideline is recommended. Consult your engineer, general contractor or owner for acceptable leak test standards.
1. Allow 24 hours for The BlueDuct sealant to cure before performing the leak test. In high ambient
temperature conditions, additional curing time may be required.
2. Wait a minimum of 24 hours after the last caulked connection has been made to perform a leak test.

7
1.651.209.0050 | 1.877.783.1520 | [email protected]m | www.aqcind
.com
BDIM012919
3. Test the duct up to 2" w.c. for five minutes.
4. If testing at a higher pressure and/or longer duration is required, consult AQC.
Note: Additional cure time may be required.
BACKFILL
Pea gravel or dry silica sand is required. Generally pea gravel does not need further compaction. However, if
additional compaction is required it should never be done directly on top of the BlueDuct, but rather off to the
sides. Additionally, backfill should never be dumped directly on top of the BlueDuct, but should be applied by
raking in from the sides. Consult your Project Structural Engineer for these needs.
1. Spread the backfill material evenly around the duct, in no more than 1ft. lift increments, and ensure there
are no gaps. Cement is not required to fill in around the duct since the self-compacting fill holds the duct
in place.
2. If compaction is going to take place, use extreme care not to damage the BlueDuct. AQC does not
recommend the use of heavy mechanical equipment. If a gentle compaction technique is used, a
manually operated walk behind 2’ by 2’ plate tamper is recommended. The use of “jumping jacks”,
“rammers” and machinery equipment are prohibited.
If heavy rain or increasing water table is likely to occur prior to backfilling, it is recommended that the duct be
anchored. Contact AQC Industries for anchoring recommendations.
Important: Allow a minimum of 24 hours for the sealant to sufficiently cure before backfilling. It is strongly
encouraged to backfill 24 to 48 hours after installation to protect the open trench from filling with water during a
heavy rain. If the duct is fully assembled, sealed and not yet backfilled, protect the duct from extreme heat and
direct sunlight to prevent the air trapped inside the duct from reaching an elevated temperature.
Light Equipment Only Crossover (5,000 lbs. maximum): For high cross over traffic with light equipment, a
1,000 lb. per square foot (minimum 4” deep) slurry cap should be placed on top of pea gravel. When backfilling or
grading, care should be taken to not push heavy loads directly on the duct. Running heavy equipment over the
duct should be avoided. The BlueDuct can be crushed under careless abuse.
As with all underground systems, The BlueDuct is never intended to be driven over before concrete is poured.
Use extreme caution once installed.

8
1.651.209.0050 | 1.877.783.1520 | [email protected]m | www.aqcind
.com
BDIM012919
BACKFILL DETAIL (LESS THAN 48")
BACKFILL DETAIL (48
"
)

9
1.651.209.0050 | 1.877.783.1520 | [email protected]m | www.aqcind
.com
BDIM012919
© 2019 AQC Industries, LLC. All rights reserved.
WARRANTY
AQC Industries Limited Warranty in General
AQC Industries (AQC) warrants The BlueDuct Products sold either directly or through its resellers (representatives and
distributors) in accordance with the limited warranty set forth in this document (the Limited Warranty). Except as
expressly provided in the L imited Warranty, AQC makes no representation or warranty of any kind, express or
implied, with respect to The BlueDuct Product, whether as to merchantability, fitness for a particular purpose,
warranties arising from course of dealing or usage or trade or any other matter.
AQC does not install The BlueDuct Products and has no responsibility or obligation with respect to installation. AQC
DISCLAIMS ALL WARRANTIES RELATED TO INSTALLATION OF THE BlueDuct PRODUCTS. AQC offers webinar
based BlueDuct Installation Training Certification to installing contractors at no charge, and recommends this training
prior to installing The BlueDuct
Product.
AQC Industries Limited Warranty
AQC Industries (AQC) warrants that in normal and contemplated use and service, The BlueDuct
Products shall be free
from defects in manufacturing materials and workmanship for a period of ten (10) years from the date of manufacture
set forth on each of The BlueDuct Products (the Limited Warranty). The Limited Warranty shall only be applicable if
AQC is given prompt written notice specifying the nature of the warranty claim within the applicable warranty period.
Upon confirmation by AQC that a BlueDuct
Product proves to be defective in manufacturing, materials or workmanship,
the exclusive remedy shall be for AQC to, at its option, repair or replace the defective BlueDuct Product or issue a credit
or refund. The Limited Warranty does not extend to any BlueDuct product subjected to misuse, accident, or alteration.
This Limited Warranty does not extend to improper installation.
This Limited Warranty does not cover any loss caused by accidents or careless handling of a BlueDuct Product. This
Limited Warranty does not apply to any BlueDuct Product which has been damaged in transit, abused, altered,
modified, used in a manner not originally intended, or used. This Limited Warranty does not cover any BlueDuct
Product that has been installed in a manner not consistent with The BlueDuct Product instructions.
The Limited Warranty set forth above is the only warranty AQC makes for The BlueDuct Products and is in lieu of all
warranties express, implied or statutory, including, without limitation, warranties of merchantability, fitness for a
particular purpose and infringement, and warranties arising from course of dealing, usage of trade or otherwise. THE
REMEDIES SET FORTH IN THIS LIMITED WARRANTY ARE THE ONLY REMEDIES AVAILABLE TO ANY PERSON
CLAIMING FOR BREACH OF WARRANTY OR FOR ANY DAMAGES OF ANY KIND OR NATURE. AQC SHALL NOT
HAVE ANY OTHER LIABILITY OF ANY DESCRRIPTION,WHETHER ARISING OUT OF WARRANTY (INCLUDING
ANY IMPLIED WARRANTIES) OR ANY OTHER CONTRACT, NEGLIGENCE, TORT OR OTHERWISE, INCLUDING,
BUT NOT LIMITED TO, COST FOR REMOVAL OF DEFECTIVE PRODUCT, COST FOR INSTALLATION OF ANY
REPLACEMENT PRODUCT, COMMERCIAL LOSS FROM ANY CAUSE, BUSINESS INTERRUPTION OF ANY
NATURE, LOSS OF PROFITS OR ANY OTHER CONSEQUENTIAL LOSS OR DAMAGE, EVEN IF AQC SHALL HAVE
BEEN ADVISED OF THE POSSIBILITY OF SUCH LOSS OR DAMAGE.
In the event any implied warranties (including, but not limited to the implied warranties of merchantability and fitness for
a particular purpose) are found to exist, such warranties are limited (i) in duration to the period of the limited warranties
set forth in this Limited Warranty, and (ii) in amount to the total amount paid to AQC for the product in question.
2920 Centre Pointe Drive
Roseville, MN 55113
+1 651.209.0050
1.877.783.1520
team@aqcind.com
Installation Videos
www.
aqcind.com
/