RAB Lighting JBSHARK-G2 Operating instructions
- Type
- Operating instructions

INSTRUCTIONS
JBSHARK-G2 INSTALLATION
RAB Lighting is committed to creating high-quality, aordable, well-designed and energy-ecient LED lighting and controls that make it easy for electricians to install
and end users to save energy. We’d love to hear your comments. Please call the Marketing Department at 888-RAB-1000 or email: [email protected]
IMPORTANT
READ CAREFULLY BEFORE INSTALLING FIXTURE. RETAIN THESE INSTRUCTIONS FOR FUTURE REFERENCE.
RAB xtures must be wired in accordance with the National Electrical Code and all applicable local codes. Proper grounding
is required for safety. THIS PRODUCT MUST BE INSTALLED IN ACCORDANCE WITH THE APPLICABLE INSTALLATION CODE BY A
PERSON FAMILIAR WITH THE CONSTRUCTION AND OPERATION OF THE PRODUCT AND THE HAZARDS INVOLVED.
WARNING: Make certain power is OFF before installing or maintaining xture. No user serviceable parts inside.
CAUTION: For proper weatherproof function all gaskets must be seated properly and all screws inserted and tightened
rmly. Apply weatherproof silicone sealant around the edge of the ceiling mounting box and/or junction box. This is
especially important with an uneven ceiling surface. Silicone all plugs and unused conduit entries.
FOLLOW ALL SHARK® (sold separately) INSTALLATION INSTRUCTIONS.
INSTALLATION
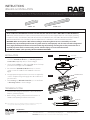
1. Use appropriate mounting hardware (not supplied) to
secure the JBSHARK-G2 Bracket (1) to Mounting Surface or
Junction Box (supplied by other) as shown in Fig. 1.
2. Check that the Gasket (1) is fully seated (Fig. 2). Use Cord Grip
provided to feed supply wires into xture.
3. Recommended JBSHARK-G2 Bracket distance center to
center is 6 3/4” for SHARK 2ft and SHARK 4ft as shown in
Fig. 3.
4. 4. Use appropriate UL approved wire connectors as required by Use appropriate UL approved wire connectors as required by
code to complete wiring with supply wires. Be careful not to code to complete wiring with supply wires. Be careful not to
pinch the wirespinch the wires.
5. Push Housing into JBSHARK-G2 Bracket (1) to secure xture
to Mounting Surface as shown in Fig. 1. 1..
Fig: 1
Fig: 2
Mounting Surface
Junction Box
JBSHARK-G2 Bracket
Housing
RAB WARRANTY: RAB’s warranty is subject to all terms and conditions found at rablighting.com/warranty.
JBSHARK-G2 IN 0520
TROUBLESHOOTING
1. Check that line voltage at the xture is correct. Be sure the
xture is grounded properly.
2. Refer to wiring, cleaning and maintenance directions on
SHARK® (sold separately) Installation Instructions.
Note: These instructions do not cover all details or variations in equipment nor do they provide
for every possible situation during installation, operation or maintenance.
JBSHARK-G2 Bracket
Gasket
Housing
Fig: 3
JBSHARK-G2
6 3/4” on center
6 3/4” on center
2ft
4ft
SHARK - 2FT SHARK - 4FT
Easy Answers
rablighting.com
Visit our website for product info
Tech Help Line
Call our experts: 888 722-1000
e-mail
Answered promptly - [email protected]
Free Lighting Layouts
Answered online or by request
© 2020 RAB LIGHTING Inc.
Northvale, New Jersey 07647 USA
73677-RAB
-
 1
1

RAB Lighting JBSHARK-G2 Operating instructions
- Type
- Operating instructions
Ask a question and I''ll find the answer in the document
Finding information in a document is now easier with AI
Related papers
-
RAB Lighting SHARK2-18W/D10 Operating instructions
-
RAB Lighting SHARK4M-50W/D10/LC Operating instructions
-
-
RAB Lighting SHARK2-25YNW/480/D10 Operating instructions
-
-
RAB Lighting SK12XL12RYN Operating instructions
-
-
RAB Lighting GUS4-36NW/D10/WS MOD1 Operating instructions
-
-