Brother PT-D800W Quick setup guide

Category
Print & Scan
Type
Quick setup guide

Brother PT-D800W is an intuitive and feature-rich P-touch labeling system that produces professionally designed, high-quality labels. It's ideal for creating labels for various applications, including files, folders, cables, and more. With its built-in features and optional accessories, you can create customized labels with ease.

Brother PT-D800W is an intuitive and feature-rich P-touch labeling system that produces professionally designed, high-quality labels. It's ideal for creating labels for various applications, including files, folders, cables, and more. With its built-in features and optional accessories, you can create customized labels with ease.

Available Manuals
Product Safety Guide
This guide provides safety information; read it before you use your P-touch
labeling system.
Quick Setup Guide (this guide)
This guide provides basic information about using your P-touch labeling
system, along with detailed troubleshooting tips.
User’s Guide
When you download the installer from www.brother.com/inst and install it, the
“Brother Manual” folder is created on your computer’s desktop and this
manual is stored in this folder.
This guide provides additional information about your P-touch labeling
system’s settings and operations, troubleshooting tips, and maintenance
instructions.
In addition, you can download individual manuals that you need from the
Brother support website.
Visit the Brother support website at support.brother.com
and click Manuals
on your model page to download the other manuals.
Before using your P-touch labeling system, check that the package contains
the following items:
To download and install printer drivers and software, visit our website.
www.brother.com/inst
For more information on installing the driver and software, see the Create
a Label using a Computer section in this guide.
Unpacking Your P-touch Labeling system
P-touch Labeling
system
Keyboard LCD unit Keyboard LCD unit
cable
Product Safety Guide Quick Setup Guide AC adapter
Power supply cord USB cable Tape cassette
Coin cell battery
English
Thank you for purchasing the P-touch labeling system model PT-D800W.
Your new PT-D800W is an intuitive, easy to operate and feature-rich P-touch
labeling system that produces professionally looking, high-quality labels.
This manual contains basic procedures for using your P-touch labeling system.
Read the whole guide before using your product and keep it for later reference.
The available options and supplies may vary depending on the country.
PT-D800W
Quick Setup Guide
D01JFE001A
ELECTRONIC LABELING SYSTEM
General Description
Front
Back
1 Handle
2 Cover open button
3 Top cover
4 Tape exit slot
5 (Label) indicator
6 (Battery) indicator
7 (Power) button
8 (Feed and Cut) button
9 (Wi-Fi) button
10 Keyboard LCD unit
11 Keyboard LCD unit interface
outlet
12 Cable holder (holder for the
keyboard LCD unit cable)
13 USB port
14 AC adapter outlet
Inside
1 Accessory storage
compartment
Use this space to store TZe tape
cassettes and the AC adapter.
2 Coin cell battery holder
3 Tape cassette compartment
4 Print head
5 Tape cutter unit
6 Tape exit slot
IMPORTANT
Before using the P-touch labeling system, make sure you remove the
protective material according to the following procedure.
1 Press the cover open button to
open the top cover.
2 Pull the tape to remove the
tape together with the
protective material.
1
2
3
4
5
6
7
8
9
10
13
12
11
14
1
2
6
3
4
5
1. Slide the cover on the bottom of the keyboard LCD unit to remove it, and
then connect the keyboard LCD unit cable.
Install the cover.
2. Connect the USB cable on the keyboard LCD unit to the outlet on the
side of the P-touch labeling system.
A coin cell battery is used as a backup power supply to maintain the settings
for the internal clock of the keyboard LCD unit. The battery will be consumed
even if the P-touch labeling system is not used for a long period of time.
1. Make sure your P-touch labeling system is turned off.
2. Press the cover open button to open the top cover.
3. Using a coin or similar object, slowly turn the coin cell battery cover in
the direction of the arrow on the battery cover until it stops, and then
remove the coin cell battery cover.
4. Install the battery.
5. Return the coin cell battery cover to its original position. To install the
coin cell battery cover, use a coin or similar object to slowly turn the coin
cell battery cover in the opposite direction of the arrow on the battery
cover until it stops.
For more information, see the User’s Guide.
Use the AD9100ESA (AC adapter) for this P-touch labeling system. Connect
the AC adapter directly to the P-touch labeling system.
1. Insert the plug on the AC adapter cord into the AC adapter outlet
marked DC IN 24 V on the P-touch labeling system.
2. Insert the plug on the power supply cord into the AC adapter.
3. Insert the power supply plug into a standard electrical socket.
Attaching the Keyboard LCD Unit
NOTE
When you turn on the P-touch labeling system, the keyboard LCD
unit is also turned on.
The keyboard LCD unit can be installed on the P-touch labeling
system by sliding it on the top cover.
When storing the keyboard LCD unit, turn it upside down and slide it
on the top cover with the LCD facing down to prevent it from
becoming dusty or dirty.
You can place the excess cable in the cable holder.
Installing the Coin Cell Battery
IMPORTANT
Dispose of battery at an appropriate collection point, not in the
general waste stream. Be sure to observe all applicable federal,
state, and local regulations.
When storing or discarding the battery, wrap it with cellophane tape
to prevent it from short-circuiting (see illustration).
1 Cellophane tape
2 Coin cell battery
We recommend replacing the battery every two years.
1
2
IMPORTANT
If the coin cell battery cover is forcibly turned past the stop position, it may
become damaged.
IMPORTANT
Be sure to insert the new battery with the + and – sides facing the correct
direction.
Connecting the Power Supply
1 AC adapter
2 Power supply cord
IMPORTANT
Turn off the P-touch labeling system before disconnecting the AC
adapter.
Do not pull or bend the AC adapter cord and power supply cord.
After the power supply plug is inserted into the electrical socket, it
may take a few seconds until the (Power) button is enabled.
NOTE
To safeguard and back up the P-touch labeling system memory, when
the power supply is unplugged it is recommended to leave the
rechargeable Li-ion batteries (optional: PA-BT-4000LI) installed in the
P-touch labeling system.
1
2
Attach the battery base (PA-BB-003) to the P-touch labeling system. For more
information about attaching the battery base, see its instruction manual.
Installing the Rechargeable Li-ion Battery
1. Press and hold the (Power) button to turn off your P-touch labeling
system.
2. Open the battery cover on the bottom of the P-touch labeling system.
3. Insert the battery into the battery compartment.
4. Close the battery cover.
Removing the Rechargeable Li-ion Battery
Press and hold the (Power) button to turn off the P-touch labeling system.
Remove the battery cover and the battery, and then reattach the battery cover.
Charging the Rechargeable Li-ion Battery
1. Make sure the battery is installed in the P-touch labeling system.
2. Use the AC adapter and power supply cord to connect the P-touch
labeling system to an AC power outlet.
Press the (Power) button to turn on the P-touch labeling system if it
is not on already.
The (Battery) indicator lights in orange during charging, and it goes
off when the battery is fully charged.
Stopping Rechargeable Li-ion Battery Charging
To stop charging the battery, disconnect the AC adapter.
The TZe tape, FLe label and HSe tube cassettes can be used in your P-touch
labeling system.
1. Check that the end of the tape is not bent and that it passes through the
tape guides. If it does not, pass it through the tape guides as shown in
the illustration.
2. Press the cover open button to open the top cover.
3. Carefully insert the tape cassette into the tape cassette compartment
with the end of the tape facing the P-touch labeling system’s tape exit
slot, then push down evenly until the tape cassette is installed correctly.
Using a Rechargeable Li-ion Battery
(optional)
NOTE
Before use, fully charge the battery.
To fully charge the battery, charge for approximately three hours.
1 AC adapter
2 Power supply cord
NOTE
Although the charging stops if the P-touch labeling system is used to print,
feed, or perform another operation, the charging will start again
automatically after the operation is finished if the charging is not completed.
Notes on Using the Rechargeable Li-ion Battery
Before use, fully charge the battery. Do not use it before it is fully
charged.
The battery charging must take place in environments between 32°F and
104°F (0°C and 40°C), otherwise the battery will not charge, and the
(Battery) indicator will remain lit. If the charging stops because the
environment temperature is too low or too high, place the P-touch labeling
system with a temperature between 32°F and 104°F (0°C and 40°C) and
try charging again.
If the P-touch labeling system is used to print, feed, or perform another
operation when both the battery is installed and the AC adapter is
connected, the (Battery) indicator may turn off and charging may
stop even if the battery is not fully charged.
1
2
Rechargeable Li-ion Battery Characteristics
To ensure the highest performance and longest life from the battery:
Do not use or store the battery in a location exposed to extreme high or
low temperatures as it may discharge more quickly. This may happen
when using a rechargeable Li-ion battery with a high charge (90%
charged or more) in a location exposed to high temperatures.
Remove the battery when storing the P-touch labeling system for long
periods of time.
Store a battery with less than a 50% charge in a cool dry place out of
direct sunlight.
Recharge the battery every six months if it is stored for long periods of
time.
If you touch a part of the P-touch labeling system while the Li-ion battery
is charging, that part of the P-touch labeling system may feel warm. This
is normal, and the P-touch labeling system may be used safely.
However, if the P-touch labeling system becomes extremely hot,
discontinue use and allow to cool.
Inserting a Tape Cassette
IMPORTANT
If the new tape cassette has a cardboard stopper,
be sure to remove the stopper before inserting the
cassette.
1 End of tape
2 Tape guides (The actual shape may be different depending on
the tape width.)
1 Tape exit slot
1
2
2
1
1
4. Close the top cover.
On: Press the (Power) button to turn on the P-touch labeling system. The
(Power) indicator turns green.
Off: Press and hold the (Power) button again to turn off the P-touch
labeling system. The (Power) indicator may light in orange until the power
is off.
Key Names and Functions
1 Home
Returns to the Home screen to select a menu.
2 Format
Sets characters and attributes.
3 PF (Programmable Function)
Select programmable function.
4 Clear
Clears all text entered, or all text and current settings.
5 Save
Saves the created data in the file memory.
6 Preview
Displays an image of the label that will be printed in the set layout.
7 Cancel
Deletes the print job.
8 Print/Print Option
Prints the current data onto the tape.
Prints multiple copies or changes the print settings when used in
combination with the Shift key.
9 BS (Backspace)
Deletes the character to the left of the cursor.
10 Next
Creates the next page.
11 Enter
Adds a new line when entering text.
Selects the displayed option.
12 Shift
Enters upper-case letters or symbols when used in combination with the
letter keys or number keys.
13 OK
Selects the displayed option.
14 Cursor ( )
Moves the cursor in the direction of the arrow.
15 Esc (Escape)
Cancels the current command and returns the display to the data entry
screen or the previous step.
16 Space
Inserts a blank space.
Returns a setting to the default value.
17 Accent
Selects and enters an accented character.
18 Symbol
Selects and enters a symbol from a list of available symbols.
19 Serialize/Adv.Serialize
Sets serialized numbers.
20 Insert
Inserts a time stamp, barcode, database, or transferred symbol.
21 Caps
Turns the Caps mode on and off.
22 Tab
Inserts a tab.
23 Letter
Enters letters or numbers.
Enters upper-case letters or symbols when used in combination with
the Caps or Shift key.
LCD
Home Screen
1 Auto Format (Templates)
Specifies the label format from the preset templates.
2 Create Label
Displays the label creation screen.
3 Auto Format (Block Layouts)
Specifies the label format from the preset layouts.
4 File
Retrieves data that is saved in the file memory.
5 Cable Label
Specifies the label type from the following seven types: Faceplate/Cable
Wrap/Cable Flag/Patch Panel/Punch-Down Block/Die-cut Flag/Inverted
Label.
6 Transferred Templates
Retrieves data that was transferred from a computer.
7 Settings
Specifies various settings for the P-touch labeling system.
8 Register Programmable Function
Registers, deletes, and renames programs.
9 Wireless Connection
The left icon indicates the status of the Wi-Fi
®
connection and the right
icon indicates the status of the Wireless Direct connection.
10 Battery Level
Indicates the remaining battery level. It appears only when using the
Li-ion battery.
IMPORTANT
When inserting the tape cassette, make sure that the tape and ink
ribbon do not catch on the print head.
Make sure that there is no slack in
the tape. Otherwise the tape may
catch on the protrusion (2) and
become bent or wrinkled, causing
the tape to jam.
To fix the slack in the tape, refer to
the illustration in step 1 and pull
the tape outside of the tape guide.
When removing the tape cassette,
make sure that the tape does not catch on the protrusion (2).
IMPORTANT
Store tape cassettes in a cool dark location, away from direct sunlight
and high temperature, high humidity, or dusty locations. After opening
the sealed package, use the tape cassette as quickly as possible.
Turning Power On/Off
NOTE
When the P-touch labeling system is turned on for the first time, the
language selection screen appears. Select the language you want using
the or key. The language setting can also be changed later. (See
Setting Language and Unit.)
IMPORTANT
When turning off the P-touch labeling system, do NOT remove the
battery or disconnect the AC adapter until the (Power) indicator turns
off.
Keyboard LCD Unit Description
2
Connected in Wi-Fi mode
Disconnected in Wi-Fi mode
Wireless direct mode ON
(Blinking)
Connecting using the Setup Wizard
(Off) Wireless connection OFF
- Full - Low - Charging
- Half - Empty
4
3
6
5
2
1
7
8
10
9
Label Creation Screen
1 Caps mode
Indicates that the Caps mode is on.
2-8 Style Guidance
Indicates the current font (2), character size (3), character width (4),
character style (5), line (6), frame (7), and alignment (8) settings.
9 Layout Guidance
Indicates the orientation, layout, separator, reverse, and repeated text
settings. The displayed items vary according to the selected label type.
10 Block Number
Indicates the block number.
11 Line Number
Indicates the line number within the label layout.
12 Page Separator Line
Indicates the end of one page and the beginning of the next page.
13 Block Separator Line
Indicates the end of a block.
14 Enter/Return Symbol
Indicates the end of a line of text.
15 Cursor
Indicates the current data input position. Characters are entered to the
left of the cursor.
16 Wireless Connection
Indicates the current status of the wireless connection. See Wireless
Connection in the Home Screen section.
17 Tab Length Setting
Indicates the set tab length.
18 Tape Size
Indicates the tape size as follows for the text entered: Tape width × Label
length. If the label length has been specified, also appears on the right
side of the tape size.
19 Battery Level
Indicates the remaining battery level. It appears only when using the
Li-ion battery. See Battery Level in the Home Screen section.
Feed and Cut
The Feed and Cut function feeds approximately 0.88" (22.3 mm) of blank
tape, and then cuts the tape.
1. Press the (Feed and Cut) button.
[Feed & Cut?] appears on the LCD.
2. Select [Feed & Cut] using the or key, and then press the OK or
Enter key. The message [Feeding Tape... Please Wait] appears
while the tape is fed, and then the tape is cut.
Feed Only
This function ejects the tape approximately 22.3 mm, resulting in a blank label
sticking out of the tape cassette. This action is recommended when using
Fabric tapes, which should be cut with scissors.
1. Press the (Feed and Cut) button.
[Feed & Cut?] appears on the LCD.
2. Select [Feed Only] using the or key, and then press the OK or
Enter key. The message [Feeding Tape... Please Wait] appears
while the tape is fed.
Language
1. Select [Settings] in the Home screen using the , , or key,
and then press the OK or Enter key.
2. Select [ Language] using the or key, and then press the OK
or Enter key.
3. Select a language for menu commands and messages shown on the
LCD using the or key.
The following languages are available: [Čeština], [Dansk],
[Deutsch], [English], [Español], [Français], [Hrvatski],
[Italiano], [Magyar], [Nederlands], [Norsk], [Polski],
[Português], [Português(Brasil)], [Română], [Slovenski],
[Slovenský], [Suomi], [Svenska], and [Türkçe].
4. Press the OK or Enter key.
Unit
1. Select [Settings] in the Home screen using the , , or key,
and then press the OK or Enter key.
2. Select [Unit] using the or key, and then press the OK or Enter
key.
3. Select a unit for dimensions shown on the LCD using the or key.
Either [inch] or [mm] can be selected.
4. Press the OK or Enter key.
LCD Contrast
You can change the contrast setting of the LCD to one of five levels (+2, +1,
0, -1, or -2) to make the screen easier to read. The default setting is “0”.
1. Select [Settings] in the Home screen using the , , or key,
and then press the OK or Enter key.
2. Select [LCD Contrast] using the or key, and then press the OK
or Enter key.
3. Set the value using the or key, and then press the OK or Enter
key.
Backlight
You can change the backlight setting either to “On” or “Off”.
The display is easier to see with the backlight on. The default setting is “On”.
1. Select [Settings] in the Home screen using the , , or key,
and then press the OK or Enter key.
2. Select [Backlight] using the or key, and then press the OK or
Enter key.
3. Select [On] or [Off] using the or key, and then press the OK or
Enter key.
During printing, the backlight is turned off. The backlight turns on during data
transmissions.
Feeding Tape
IMPORTANT
Be sure to feed tape to remove any slack in the tape and ink ribbon
after inserting the tape cassette.
Do not pull the label when the P-touch labeling system is
ejecting it from the tape exit slot. Doing so will cause the ink ribbon
to be discharged with the tape. The tape may no longer be functional
after the ink ribbon discharges.
Do not block the tape exit slot during printing or when feeding tape.
Doing so will cause the tape to jam.
NOTE
To exit or cancel this function press the Esc key.
13
12
10
11
1
2 3 4 5 6 7 8 9
1716 18 19
14
15
NOTE
To exit or cancel this function press the Esc key.
Setting Language and Unit
NOTE
To return to the previous step, press the Esc key.
NOTE
The default setting is [inch].
To return to the previous step, press the Esc key.
Adjusting the LCD Settings
NOTE
To return to the previous step, press the Esc key.
Pressing the Space key on the contrast setting screen sets the
contrast to the default value of “0”.
NOTE
Power can be saved when the backlight is turned off.
The backlight automatically turns off. Press any key to turn the
backlight on again.
The indicators light and flash to indicate the your P-touch labeling system’s
status. The symbols used in this section explain the meaning of the different
indicator colors and patterns:
Example: G = Indicator is flashing in green
Label Indicator
Battery Indicator
Wi-Fi Indicator
LED Indicators
= Indicator is lit
G = Green
O = Orange
R = Red
= Indicator is flashing
= Indicator can be off, lit or flashing in any color
(Off) = Indicator is off
(Label) (Power)
Condition
(Off)
O
Power is turning off
Top cover open
(Off)
G
(1 time in 1
second)
Transferring data
O
Now cooling
RR
System error 1
System error 2
System error 3
G
O
Reset mode (when the mode is
starting)
GO
Reset mode (when the button
is pressed 2/4/6 times)
OO
When blinking alternately:
Cutter error
When blinking simultaneously:
High temperature error
R
(1 time in 1 second)
O
Wrong media error
R
(2 times in 1.8 seconds)
G
No cassette error
Wrong type or incompatible
replacement tape error
Media end error
O
G
Top cover open error when
printing
(Battery)
(Power)
Condition
(Off)
Rechargeable battery power:
full
O
Charging
O
(1 time in 4 seconds)
Rechargeable battery power:
half
O
(2 times in 4 seconds)
Rechargeable battery power:
low
RR
Rechargeable battery error
R
G
Rechargeable battery power:
empty
OO
Adapter
connection/disconnection
error
(Wi-Fi)
(Power)
Condition
RO
No available WPS access
point was found
R
O
WPS access point connection
error
R
(2 times in 1.8 seconds)
O
Incorrect security settings
O
(2 times in 1.8 seconds)
O
WPS access point search error
G
Wi-Fi on, not connected
G
Wi-Fi on, connected
(Off) Wi-Fi off
Brother support website
Please visit our support website at support.brother.com.
You can find following information:
Software downloads
Manuals/Documents
Frequently Asked Questions (Troubleshooting, Useful tips on using printer)
Consumable information
Latest OS compatibility information
The contents of this website are subject to change without notice.
You can use the P-touch labeling system’s keyboard LCD unit to create and
print data for labels. Because the P-touch labeling system is portable, it can
be used as a single unit without worrying about the strength of the wireless
signal or connecting to other devices, and can be used anytime and
anywhere.
Your P-touch labeling system can be used as a stand-alone P-touch labeling
system, or it can be connected to a mobile device and used with the Brother
applications to create labels and print directly from your mobile device.
To print labels from your mobile device, install the Brother applications to your
mobile device, and then connect your P-touch labeling system to your mobile
device.
Connecting Your P-touch labeling system to a Mobile Device
1. Turn on your P-touch labeling system, and then press and hold the
(Wi-Fi) button until the (Wi-Fi) indicator is lit in green.
2. Turn on the Wi-Fi function on your Apple device (iPhone/ iPad/ iPod
touch) or Android™ device.
3. Start the application on your Apple device (iPhone/ iPad/ iPod touch) or
Android™ device, and then select your P-touch labeling system as the
printer in the application.
Select “PT-D800W” or “DIRECT-*****_PT-D800W”.
“*****” is the last five digits of the product serial number.
You can find the serial number label on the bottom of the P-touch
labeling system.
When the password (network key) is required, type “00000000”.
Your P-touch labeling system can be connected to a computer and used with
the P-touch Editor or Cable Label Tool software to create more complex
labels.
For more information, see the User’s Guide.
Product Specifications
Model Name PT-D800W
Size
Dimensions approx. 13.31" (W) x 7.40" (D) x 6.81" (H)
(338 mm (W) × 188 mm (D) × 173 mm (H))
(including keybord LCD unit)
Weight approx. 7.50 lb (3.4 kg) (including keybord
LCD unit)
Printing
Method Thermal Transfer
Cassette
Brother TZe tape cassette:
0.13" (3.5 mm), 0.23" (6 mm), 0.35" (9 mm),
0.47" (12 mm), 0.70" (18 mm), 0.94" (24 mm),
1.4" (36 mm)
Brother FLe label cassette:
0.82" (21 mm) × 1.77" (45 mm)
Brother HSe tube cassette:
0.23" (5.8 mm), 0.34" (8.8 mm), 0.46" (11.7 mm),
0.69" (17.7 mm), 0.93" (23.6 mm)
Interface
USB Version 2.0 Full Speed
Wi-Fi Wireless Direct: IEEE802.11n
Ad-Hoc mode: IEEE802.11b
Infrastructure mode: IEEE802.11b/g/n
WPS 2.0
Environment
Operating
temperature/humidity
When running: between 50°F and 95°F (10°C
and 35°C) /
between 20% and 80%
max. wet bulb temperature:
80.6°F (27°C)
Create a Label
1. GETTING STARTED Reference
Preparing the P-touch
labeling system.
Quick Setup Guide (this guide)
2. CREATING A LABEL Reference
The labels are created using the label creation screen. To open the label
creation screen, select [Create Label] in the Home screen.
Selecting an auto format.
Selecting a label type.
User’s Guide
Note:
In addition to entering text, the P-touch labeling
system has a large range of formatting options.
Editing labels:
Entering and editing
text.
Entering symbols,
accented characters,
time stamps, and
serialized text.
Creating a barcode
label.
3. LABEL PRINTING Reference
Setting cut options. User’s Guide
Note:
Before printing, you can check the layout of
your label using the preview function.
Adjusting the label length.
Printing the label.
Create a Label using a Mobile Device
For more information about the mobile
applications available for your printer,
visit support.brother.com/g/d/f5f9
.
Create a Label using a Computer
NOTE
You must install P-touch software and the printer driver to use your
P-touch labeling system with your computer.
Download the installer from www.brother.com/inst
.
Available
Applications
Features Computer Connection
Cable Label
Tool
Create and print labels for
cables, patch panels,
faceplates, electrical
equipment and more.
Windows
Wi-Fi / USB
P-touch Editor Design and print custom
labels with built in drawing
tools, text using different
fonts and styles, imported
graphic images and
barcodes.
Windows /
Mac
Installing the Software and Printer Driver to a Computer
To print from your Windows computer or Mac, install the printer driver,
P-touch Editor and other applications to your computer.
1. Visit our website (www.brother.com/inst) and download the installer
for the software and manuals.
2. Double-click the downloaded .exe file and follow the on-screen
instructions to proceed with the installation.
3. Close the dialog box when the installation is complete.
Connecting the P-touch Labeling System to a Computer
You can connect the P-touch labeling system to a Windows computer or Mac
using a USB cable, or wireless LAN. For more information, see the User’s
Guide.
Connecting Using USB
1. Before connecting the USB, make sure that the P-touch labeling system
is turned off.
2. Connect the USB cable to the USB port on the back of the P-touch
labeling system.
3.
Connect the other end of the USB cable to the USB port on the computer.
4. Turn on the P-touch labeling system.
Connecting Using Wi-Fi
1. Turn on the P-touch labeling system.
2. Press and hold the (Wi-Fi) button on your P-touch labeling system
for one second to turn the Wi-Fi function on. The (Wi-Fi) indicator
starts flashing in green once every three seconds.
Ad-Hoc Mode
For Windows, after installing the printer driver and other applications
to your computer, set the Ad-Hoc mode using the Printer Setting Tool
installed on the computer. (See the User’s Guide.)
For Mac, set the Ad-Hoc mode using the Wireless Device Setup
Wizard.
LCD Problems
Printing Problems
Version Information
NOTE
To connect the P-touch labeling system to a computer using a wireless
connection:
We recommended configuring the wireless network settings while
installing the software. You can change the settings later using
[Settings] in the Home screen or the Printer Setting Tool. For more
information, see the User’s Guide.
We recommended installing the software on a computer wirelessly
connected to your network and configuring the P-touch labeling
system using a USB cable.
Make a note of the SSID (network name) and password (network
key) of the wireless network in advance. If you cannot find this
information, ask your network administrator or wireless access
point/router manufacturer.
If your wireless access point/router supports WPS, you can use
one-push WPS (Wi-Fi Protected Setup) to quickly configure the
wireless network settings.
Troubleshooting
Problem Solution
The screen is locked, or
the P-touch labeling
system does not respond
normally.
Reset the internal memory to the factory
settings. For more information, see the User’s
Guide. If resetting the P-touch labeling system
does not solve the problem, disconnect the AC
adapter and remove the battery for more than
10 minutes.
The display remains blank
after turning on the power.
The POWER indicator
does not light
The P-touch labeling system is receiving no
power.
If using AC power, connect the AC adapter
correctly to the P-touch labeling system and an
AC power outlet.
If using a rechargeable Li-ion battery, make
sure the rechargeable Li-ion battery is firmly
installed in the P-touch labeling system and is
fully charged.
Check that the keyboard LCD unit cable is
securely connected to the keyboard LCD unit
and keyboard LCD unit interface of the P-touch
labeling system.
The LCD messages are
displayed in a foreign
language.
See Setting Language and Unit in this guide to
select the language you want.
Problem Solution
The label is not printed. Check that text has been entered and that
the tape cassette is installed correctly with
sufficient tape remaining.
If the tape is bent, cut off the bent section and
thread the tape through the exit slot or tape
guides.
When printing from a computer or mobile device,
make sure the computer or mobile device is
connected correctly to the P-touch labeling system.
The label is not printed
correctly.
Remove the tape cassette and reinstall it,
pressing it firmly until it locks into place.
If the print head is dirty, clean it with a cotton
swab or optional print head cleaning cassette
(TZe-CL6).
The tape is jammed. If the tape is jammed, remove the tape
cassette from the P-touch labeling system.
Check the tape cassette compartment and tape
exit slot for tape scraps, jammed tape or debris
that may prevent the tape from correctly exiting
the machine. Remove if present.
Examine the tape cassette and cut away any
damaged tape that is present past the tape
guides on the tape cassette.
Check that the end of the tape is not bent and
that is passes through the tape guides. For
more information, see section Inserting a
Tape Cassette of this guide.
Insert the tape cassette into the tape cassette
compartment.
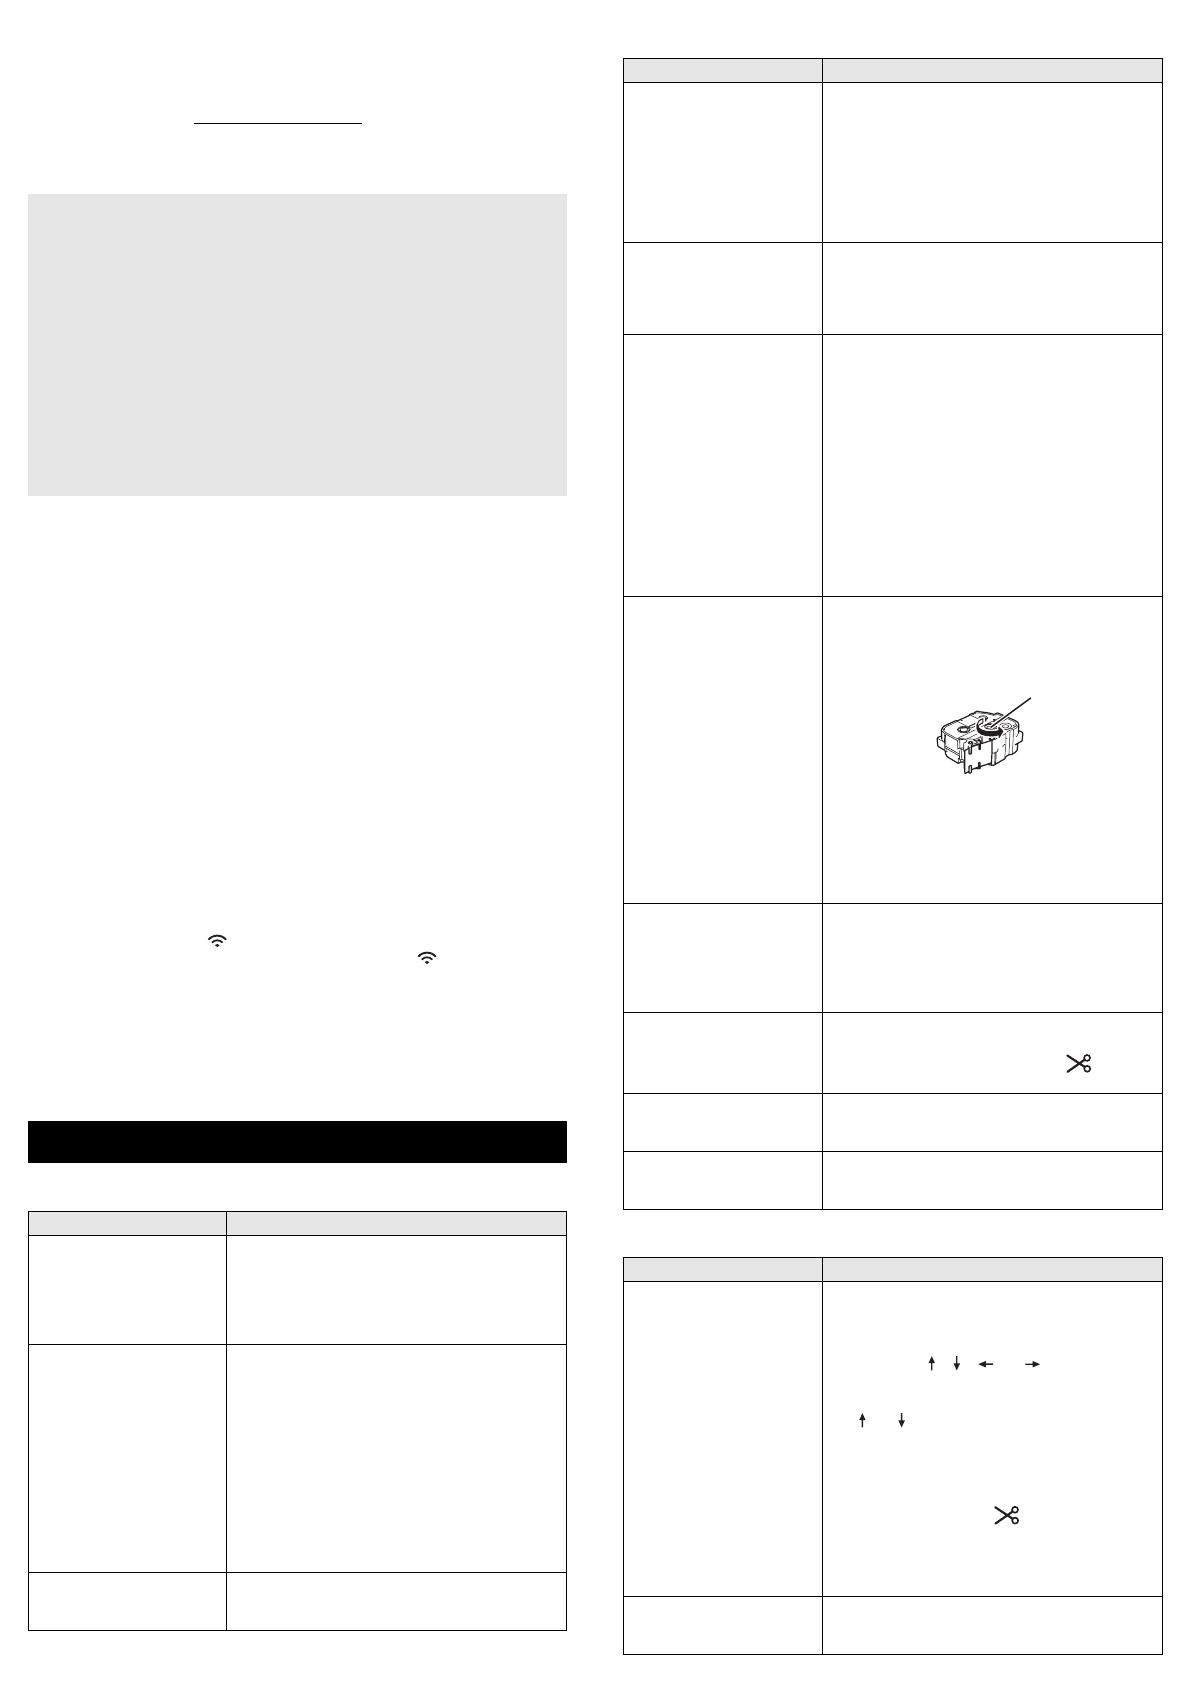
The ink ribbon is separated
from the ink roller.
If the ink ribbon is broken, replace the tape
cassette. If not, leave the tape uncut and
remove the tape cassette, then wind the loose
ink ribbon onto the spool as shown in the figure.
Note:
Do not pull the label when the P-touch
labeling system is ejecting it from the tape exit
slot. Doing so will cause the ink ribbon to be
pulled out with the tape. The tape may no longer
be functional after the ink ribbon is pulled out.
The P-touch labeling
system stops while printing
a label.
Replace the tape cassette if striped tape is
visible, as this indicates that you have
reached the end of the tape.
Connect the AC adapter directly to the
P-touch labeling system, or charge the
rechargeable Li-ion battery.
The label is not cut
automatically.
Check the Cut Option setting. For more
information, see the User’s Guide.
To cut labels manually, press the (Feed
and Cut) button to feed and cut the tape.
A tape jam error cannot be
cleared despite following
the troubleshooting steps.
Contact Brother customer service.
I want to make fine
adjustments to the print
result.
The length and margins can be adjusted in the
Printer Setting Tool. For more information, see
User’s Guide.
Problem Solution
I do not know the version
number of the firmware of
my P-touch labeling
system.
The version number and other information for
the firmware can be confirmed using the
following procedure:
1 Select [Settings] in the Home screen
using the , , or key, and then
press the OK or Enter key.
2 Select [Version Information] using the
or key, and then press the OK or
Enter key.
In addition, you can also use the following
procedure.
1 Turn on your P-touch labeling system.
2 Press and hold the (Feed and Cut)
button for more than 10 seconds to print the
report.
(Use 0.94" (24 mm) or 1.4" (36 mm) tape.)
For more information, see the User’s Guide.
I want to confirm whether I
am using the latest version
of the software.
Use the P-touch Update Software to confirm if
you have the latest version.
For more information, refer to the User's Guide.
1
1 Spool
  • Page 1 1
  • Page 2 2
  • Page 3 3
  • Page 4 4
  • Page 5 5
  • Page 6 6
  • Page 7 7
  • Page 8 8

Brother PT-D800W Quick setup guide

Category
Print & Scan
Type
Quick setup guide

Brother PT-D800W is an intuitive and feature-rich P-touch labeling system that produces professionally designed, high-quality labels. It's ideal for creating labels for various applications, including files, folders, cables, and more. With its built-in features and optional accessories, you can create customized labels with ease.

Ask a question and I''ll find the answer in the document

Finding information in a document is now easier with AI