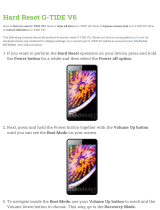
Garmin GPSMAP 3006C User manual

Category
Navigators
Type
User manual

This manual is also suitable for

GPSMAP 3006C/3010C
(GPSMAP 3006C shown)
3006-3010 Cover.indd 1 6/4/2004, 3:03:47 PM
Except as expressly provided herein, no part of this manual may be reproduced, copied, transmitted, disseminated, downloaded or stored in any stor-
age medium, for any purpose without the express prior written consent of Garmin. Garmin hereby grants permission to download a single copy of this
manual and of any revision to this manual onto a hard drive or other electronic storage medium to be viewed and to print one copy of this manual or of
any revision hereto, provided that such electronic or printed copy of this manual or revision must contain the complete text of this copyright notice and
provided further that any unauthorized commercial distribution of this manual or any revision hereto is strictly prohibited.
Information in this document is subject to change without notice. Garmin reserves the right to change or improve its products and to make changes in
the content without obligation to notify any person or organization of such changes or improvements.
Web site address: www.garmin.com
GARMIN
®
, Autolocate
®
, GPSMAP
®
, MapSource
®
, BlueChart
®
and TracBack
®
are registered trademarks of Garmin Ltd. or its subsidiaries and may not be
used without the express permission of Garmin. Fishing Hots Spots
®
is a registered trademark of Fishing Hots Spots, Inc.
June 2004 Part Number 190-00371-00 Rev. A Printed in Taiwan
© Copyright 2004 Garmin Ltd. or its subsidiaries. All Rights Reserved
Garmin International, Inc.
1200 East 151
st
Street
Olathe, Kansas 66062 U.S.A.
Tel. 913/397.8200
Fax 913/397.8282
Garmin (Europe) Ltd.
Unit 5, The Quadrangle,
Abbey Park Industrial Estate
Romsey, SO51 9DL, U.K.
Tel. 44/1794.519944
Fax 44/1794.519222
Garmin Corporation
No. 68, Jangshu 2
nd
Road
Shijr, Taipei County, Taiwan
Tel. 886/2.2642.9199
Fax 886/2.2642.9099
3006-3010 Cover.indd 2 6/4/2004, 3:05:22 PM
1
Introduction
Welcome
,
The Garmin GPSMAP 3006C/3010C has no user-serviceable
parts. Should you ever encounter a problem with your unit,
please take it to an authorized Garmin dealer or contact
Garmin Customer Service (see page 86) for repairs.
The GPSMAP 3006C/3010C is fastened shut with screws.
Any attempt to open the case to change or modify the
unit in any way will void your warranty and may result in
permanent damage to the equipment.
Serial Number
Use this area to record the serial number (8-digit number
located in the back of the unit) in case it is lost, stolen,
needs service, or if you need to contact Technical Support.
Be sure to keep your original sales receipt in a safe place
or attach a photocopy inside the manual.
Serial Number:
Welcome
Thank you for choosing the Garmin GPSMAP 3006C/3010C. The GPSMAP 3006C/3010C utilizes the
proven performance of Garmin GPS and full-featured mapping to create an unsurpassed marine Multi-
Function Display (MFD). Please take a moment now to compare the contents of this package with the
packing list on page 6 of this manual. If any pieces are missing, please contact your Garmin dealer imme-
diately.
About This Manual
To get the most out of your new navigation system, take time to read this manual and learn the operat-
ing procedures for your unit in detail. This manual is organized into the following chapters.
The Introduction contains the Table of Contents, Warnings, and Packing List.
The Getting Started portion provides a unit overview and information that teaches you a basic work-
ing knowledge necessary to use the unit to its fullest potential.
The Reference portion is divided into sections that provide detailed references to the advanced fea-
tures of the GPSMAP 3006C/3010C. This allows you to concentrate on a specifi c topic quickly and can be
used to look up detailed information about the GPSMAP 3006C/3010C.
The Appendix contains information such as specifi cations, regulatory information, and unit care infor-
mation. You can also fi nd warranty and support information in the Appendix.
An Index is provided at the end of the manual for reference. Simply look up the topic you wish to
learn about and read the page or pages listed.
Customer Service Product Registration
Help us better support you by completing our on-line registration today!
Have the serial number of your GPSMAP 3006C/3010C handy and connect to our Web site
(www.garmin.com). Look for the Product Registration link on the Home page. Also, be sure to record your
serial number in the area provided on this page.
2
Introduction
Table of Contents
Introduction.........................................................................................................................1-6
Welcome ...............................................................................................................................1
Table of Contents ..................................................................................................................2
Warnings and Cautions .........................................................................................................5
Packing List & Accessories ....................................................................................................6
Getting Started .................................................................................................................. 7-25
Map Data/Installation/Manual Conventions...........................................................................7
Unit Features.........................................................................................................................8
3006C/3010C Keypad Usage.................................................................................................9
3006C/3010C Data Entry/Shortcut/Soft Keys ......................................................................10
Using the Optional Marine Remote .....................................................................................11
Understanding the Features.................................................................................................12
Power and Backlighting.......................................................................................................13
Selecting Options ................................................................................................................14
Entering Data ......................................................................................................................15
Initializing the Receiver .......................................................................................................16
Status Bar ............................................................................................................................17
Main Pages ..........................................................................................................................18
Confi guring Main Pages ......................................................................................................19
Using Functions/DATA Key .................................................................................................21
Creating Waypoints Introduction ........................................................................................22
Basic Navigation..................................................................................................................24
Reference .......................................................................................................................... 26-74
How to Use the Map Page ...................................................................................................26
3
Introduction
Table of Contents
Using the Map Cursor .........................................................................................................27
Selecting Map Ranges ..........................................................................................................28
Map Page Options ...............................................................................................................29
Using the Compass Page......................................................................................................33
Using the Highway Page......................................................................................................34
Highway Page Options ........................................................................................................35
Video Page ..........................................................................................................................35
Creating Waypoints .............................................................................................................36
Reviewing and Editing Waypoints .......................................................................................39
Waypoint Lists ....................................................................................................................41
Going to a Destination.........................................................................................................44
Follow Track/TracBack ........................................................................................................45
Man OverBoard...................................................................................................................47
Creating a Route..................................................................................................................48
Following a Route ...............................................................................................................49
Reviewing a Route ...............................................................................................................50
Editing a Route....................................................................................................................51
Planning a Route .................................................................................................................53
Using the FIND key.............................................................................................................54
Main Menu Page..................................................................................................................55
Main Menu: GPS Tab...........................................................................................................56
Main Menu: Tide Tab ..........................................................................................................58
Main Menu: Celestial Tab ....................................................................................................60
Main Menu: Trip/Tracks Tabs ..............................................................................................61
Main Menu: DSC Tab ..........................................................................................................63
Main Menu: Cards Tab ........................................................................................................67
Main Menu: Alarms Tab ......................................................................................................68
Main Menu: System Tab ......................................................................................................69
Main Menu: Temp Tab ........................................................................................................74
4
Introduction
Table of Contents
Appendices.....................................................................................................................75-89
Appendix A: Time Offsets ...............................................................................................75
Appendix B: Messages....................................................................................................76
Appendix C: Map Datums...............................................................................................78
Appendix D: Loran TD.....................................................................................................80
Appendix E: Specifi cations/Unit Care ............................................................................82
Appendix F: Installing/Removing Data Cards.................................................................83
Appendix G: Regulatory Information .............................................................................84
Appendix G: Software License Agreement.....................................................................85
Appendix G: Limited Warranty .......................................................................................86
Appendix H: Index ..........................................................................................................87
5
Introduction
Warnings and Cautions
WARNING: The GPS system is operated by the United States government, which is solely responsible
for its accuracy and maintenance. The system is subject to changes which could affect the accuracy and
performance of all GPS equipment. Although the Garmin GPSMAP 3006C/3010C is a precision electronic
NAVigation AID (NAVAID), any NAVAID can be misused or misinterpreted and, therefore, become unsafe.
CAUTION: The electronic chart is an aid to navigation and is designed to facilitate the use of autho-
rized government charts, not replace them. Only offi cial government charts and notices to mariners con-
tain all information needed for safe navigation and, as always, the user is responsible for their prudent use.
CAUTION: Use the GPSMAP 3006C/3010C at your own risk. To reduce the risk of unsafe operation,
carefully review and understand all aspects of this Owner’s Manual, and thoroughly practice operation
using the simulator mode prior to actual use. When in actual use, carefully compare indications from
the GPSMAP 3006C/3010C to all available navigation sources, including the information from other
NAVAIDs, visual sightings, charts, etc. For safety, always resolve any discrepancies before continuing
navigation.
CAUTION: IT IS THE USER’S RESPONSIBILITY TO USE THIS PRODUCT PRUDENTLY. THIS
PRODUCT IS INTENDED TO BE USED ONLY AS A NAVIGATIONAL AID AND MUST NOT BE USED
FOR ANY PURPOSE REQUIRING PRECISE MEASUREMENT OF DIRECTION, DISTANCE, LOCATION,
OR TOPOGRAPHY.
MAP DATA INFORMATION: One of the goals of Garmin is to provide customers with the most
complete and accurate cartography that is available to us at a reasonable cost. We use a combination of
governmental and private data sources, which we identify (as required) in product literature and copyright
messages displayed to the consumer. Virtually all data sources contain inaccurate or incomplete data to
some degree. This is particularly true outside the United States, where complete and accurate digital data
is either not available or prohibitively expensive.
WARNING: This product, its packaging, and its components contain chemicals known to the State
of California to cause cancer, birth defects, or reproductive harm. This Notice is being provided in accor-
dance with California’s Proposition 65. If you have any questions or would like additional information,
please refer to our web site at http://www.garmin.com/prop65.
,
6
Introduction
Packing List &
Accessories
Before installing and getting started with your unit, please check to see that your package includes the
following items. If any parts are missing, please contact your Garmin dealer immediately.
Standard Package:
GPSMAP 3006C or 3010C Unit
GPS 17 GPS Sensor
Bail Mount and Two Knobs
Power/NMEA Cable
Marine A/V Cable
Owner’s Manual
Installation Manual
Quick Reference Guide
Protective Cover
Flush Mount Kit Hardware
Grommet for Marine Cable
Optional Accessories for Purchase:
Marine Infrared (IR) Remote Control
GDL 30/30A Marine Weather XM Satellite Receiver
GMS 10 Network Port Expander
GSD 20 Remote Sounder Module and Transducers
Second Mounting Station
Cigarette Lighter Adapter
Marine Network Cables
BlueChart Marine Data Cards, MapSource CDs, USB Data Card Programmer, and Data Cards
7
Getting Started
Main Page Sequence
7
Getting Started
Map Data/Installation/
Manual Conventions
Using Additional Map Data
The GPSMAP 3006C/3010C comes standard with a built-in basemap showing cities, interstates, coast-
line detail, and U.S. tide stations. Optional Garmin Data Cards and MapSource CD-ROMs enhance the
versatility of your GPSMAP 3006C/3010C. With optional BlueChart cartography, you can access marine
navaids, wrecks, obstructions, anchorage locations, shaded depth contours, intertidal zones, spot sound-
ings, port plans, and more. See your Garmin dealer or visit the Garmin Web site (www.garmin.com) for
more information on available pre-programmed Garmin Data Cards and other MapSource programs to
increase the mapping capability of your new unit.
Installation
Instructions for installing the GPSMAP 3006C/3010C MFD may be found in the GPSMAP 3006C/
3010C & GPS 17 Installation Guide” (p/n 190-00371-02). To complete the installation, you need the
appropriate fasteners, tools, and mounts listed in each section. Installation items that are not provided by
Garmin should be available at most marine dealers. If you experience diffi culty installing the unit, please
contact Garmin or an installation professional in your area.
Manual Conventions
• This manual refers to the GPSMAP 3006C and 3010C as “GPSMAP 3006C/3010C,” “unit,” or “MFD
(Multi-Function Display)”. It makes no distinction between these terms. “GPSMAP 3006C/3010C”
refers to both the GPSMAP 3006C and 3010C models unless specifi cally stated.
• This manual uses the terms “page,” “screen,” and “window” interchangeably.
• This manual uses the words “button” and “key” interchangeably.
• This manual uses the term “press” when you need to activate the keys on the GPSMAP 3006C and
3010C or on the optional remote control.
8
Getting Started
Main Page Sequence
8
Getting Started
Unit Features
VOL
QUIT
ENTER
MARK
PAGE
FCTN
FIND
ADJ
MENU
DATA
CNFG
NAV
MOB
1
ABC
2
DEF
3
GHI
4
JKL
5
MNO
6
PQRS
7
TUV
8
WXYZ
9
+-
0
^
^
^
^
^
Soft Keys Data Entry Keys
Data Card Slots
Function Keys
Connection Ports
Serial Number Tag
Infrared (IR) Window
(For Optional Remote)
GPSMAP 3010C Shown
Data Card Slot 1
Data Card Slot 2
9
Getting Started
Main Page Sequence
9
Getting Started
3006C/3010C Keys
Always press and release a key to perform its primary function. Press, hold for more than
one second, then release the ENTER/MARK, ADJ/MENU, NAV/MOB, and DATA/CNFG keys to
activate their secondary functions.
)
VOL
QUIT
ENTER
MARK
PAG E
FCTN
FIND
ADJ
MENU
DATA
CNFG
NAV
MOB
Keypad Usage
The
POWER/VOL
Key — turns on/off the unit and adjusts the display illumination. Multiple presses
toggle the unit’s backlight between maximum, user-set, and minimum brightness levels. The secondary
VOL (Volume) adjustment is for future audio expansion.
The
RANGE
Keys — adjusts the range scale to show a larger area with less detail (UP Arrow) or a smaller
area with more detail (DOWN Arrow)
The
PAGE
Key — displays the Pages window, cycles the unit through the main pages in sequence, and
returns the display from a submenu page.
The
QUIT
Key — returns the display from a submenu page, restores the previous value in a data entry
eld, or cancels an unintended function.
The
ENTER/MARK
Key — selects a highlighted menu option. When entering data, it allows you to initi-
ate entry, and then to accept the selected value(s). It also marks the current location as a waypoint when
pressed and held for more than one second.
The
ADJ/MENU
Key — shows the available options and features for the current function. Displays the
Main Menu when pressed and held for more than one second.
The
NAV/MOB
Key — displays the Go To and Follow navigation menu. Activates the MOB (Man
OverBoard) navigation feature when pressed and held for more than one second.
The
DATA/CNFG
Key — toggles the display of a main page with/without function windows and data
elds. When pressed and held for more than one second displays the CNFG (Confi guration) page, which
allows you to customize the current main page.
The
FIND
Key — allows you to quickly access User Waypoints and other items used for navigation.
The
FCTN
Key — (Function) key allows you to cycle through function windows. (see page 21)
The
ARROW KEYPAD
— is used to select (highlight) menu options and enter data. It controls the LEFT/
RIGHT, UP/DOWN, and diagonal movement of the cursor.
Power Key
Arrow Keypad
10
Getting Started
Main Page Sequence
10
Getting Started
3006C/3010C Keys
Data Entry/Shortcut Keys
The Data Entry Keys are used when entering alpha-numeric data in the unit, such as a waypoint name.
The Data Entry Keys can be used in conjunction with the ARROW KEYPAD. To select the fi rst letter press
the key once, to select the second letter press the key twice, to select the third letter press the key three
times, or to select the number press the key four times. When you have correct letter or number selected,
pause, and the unit advances the cursor to the next character automatically.
Shortcut Keys are used to quickly jump to main pages, or select menu and list options by pressing the
corresponding number of the desired selection. For numbers 1-9, press the number to choose the desired
selection. For numbers 10 and higher, press the fi rst digit, then press the second digit within one second.
Soft Keys
The Soft Keys are located along the bottom of the display and are used as shortcuts to select the most
commonly used Adjustments for the function that is selected. To select an option, press the Soft Key below
it. Soft Key options vary, depending on which function is selected.
1
ABC
2
DEF
3
GHI
4
JKL
5
MNO
6
PQRS
7
TUV
8
WXYZ
9
+-
0
^
^
^
^
^
SOFT KEY Options
DATA ENTRY
Shortcut Keys
11
Getting Started
Main Page Sequence
11
Getting Started
Using the Optional Marine Remote
QUIT
PAG E
FCTN
ADJ
MENU
NAV
MOB
DA TA
CNFG
1
ABC
2
DEF
3
GHI
4
JKL
5
MNO
6
PQRS
7
TUV
8
WXYZ
9
ZOOM
+-
0
RANGE
ENTER
Optional Alphanumeric Remote Control Usage
The GPSMAP 3006C/3010C’s optional Marine Remote Control gives you the freedom to operate your
MFD from a distance using the remote’s keypad. Contact your Garmin dealer or Garmin to purchase the
Marine Remote Control
In order for the remote to operate properly, be sure to point the IR (infrared) window on the remote
towards the unobstructed IR window on the lower right corner of the GPSMAP 3006C/3010C.
The remote also has function keys that allow you to quickly enter data and perform operations on the
MFD. All the keys on the Remote Control operate in the same manner as the keypad (see pages 9-10) on
the GPSMAP 3006C/3010C. The key’s primary function appears on the key and the secondary func-
tions (same as keys on the MFD) for the ADJ/MENU, NAV/MOB, DATA/CNFG, and THUMB STICK
(ENTER/MARK) can be activated by holding the key for more than two seconds (then release).
THUMB STICK — Combines the operations of the ARROW KEYPAD and ENTER/MARK key.
Selects menu options, changes settings, enters data, and confi rms entry. Also controls movement of the
panning cursor on the Map page. Press IN (ENTER) on the THUMB STICK to select/activate a high-
lighted item or begin data entry. Press IN and hold for two seconds to mark a waypoint.
Remote Control Batteries
The remote requires two AAA alkaline batteries. To install the batteries, press down on the battery
door clip, then pull the battery door away from the remote. Install the batteries observing the correct
polarity (see inside battery compartment). Replace the cover, making sure it is closed all the way.
The remote is for use in shaded/enclosed environments. Direct sunlight interferes with
infrared operation. This remote is NOT waterproof.
IR Window
THUMB STICK
,
12
Getting Started
Main Page Sequence
12
Getting Started
Understanding the Features
The GPSMAP 3006C/3010C unit’s advanced keypad system is designed to allow quick, convenient
selection of navigation options and data entry. As you progress through this Owner’s Manual, you will
often be directed to press a specifi c key or highlight a fi eld on the screen. When you are directed to press
a key, you should press and quickly release the key. If the key needs to be held down for a period of time
to activate a secondary function, the instructions will tell you to do so. The position of the highlight is
controlled by the ARROW KEYPAD. When a fi eld is selected on the screen, it is highlighted in yellow.
The following features are referred to throughout this manual.
<KEYPAD KEY> - Keypress commands appear in upper case BOLD. Press the corresponding key on
the unit’s keypad. Example ENTER/MARK, PAGE, FCTN, etc.
Cursor – The highlighted area on the screen that can be moved UP/DOWN/LEFT/RIGHT with the
ARROW KEYPAD to select individual fi elds. Moving the cursor to a given location allows you to begin
data entry or scroll through a list. A yellow highlight indicates the location of the cursor.
Field – The location on a page where data or an option may be entered and displayed. The cursor is
placed on a fi eld using the ARROW KEYPAD to begin data entry or selection of options.
Button (On-Screen) – Similar to “fi eld.” Use the ARROW KEYPAD to highlight a button and press
ENTER to select the action that corresponds to the button.
Scroll Bar – When viewing a list of items too long to display on the screen, a scroll bar appears along
the right side of the list. The position of the scroll bar indicates which portion of the list is currently dis-
played. The height of the scroll bar indicates the number of items in the list. To scroll through a list, press
UP or DOWN on the ARROW KEYPAD.
Default – A system selection format built into the unit’s memory that is followed unless you change
a setting. For example, the default setting for speed readings is nautical miles per hour (knots), but may
be changed to kilometers or miles per hour. Once a setting is changed, the new setting is retained until
another change is made or a ‘Restore Default’ menu option is selected.
Cursor (Highlight)
Scroll Bar
Fields
Buttons
13
Getting Started
Main Page Sequence
13
Getting Started
Powering On/Off the GPSMAP 3006C/3010C
Learning the basic operations, before moving ahead to the features of the GPSMAP 3006C/3010C, is
essential. Many times throughout this manual you will be prompted to press a key. When instructed, press
and then release the key. If the key needs to be held down, the instructions will prompt you.
Turning the GPSMAP 3006C/3010C ON:
1. Hold the POWER
( )
key until the unit powers on, then release.
As the unit powers on, an Introduction page is displayed. After reading the Introduction page, press
ENTER when “I Agree” highlights in yellow to display the Map Page.
Adjusting the Backlight
The Backlight can be increased in steps to produce the right lighting for the situation. You may cycle
through three light settings; Highest, Selectable, and Lowest.
Adjusting the Backlight’s ‘Selectable’ level:
1. Press the
POWER ( )
key to activate the Backlight Adjustment Window.
2. To increase the selectable backlighting level, press the
ARROW KEYPAD up.
3. To decrease the selectable backlighting level, press the
ARROW KEYPAD down.
TIP:
After the Backlight Adjustment Window is activated, pressing the POWER key repeatedly cycles
through the backlight’s three settings: Highest, Selectable, and Lowest.
Power and Backlighting
Highest
Selectable
Lowest
Welcome Screen
14
Getting Started
Main Page Sequence
14
Getting Started
Selecting Options
How To Select Options
You can select and activate options and enter data to customize the GPSMAP 3006C/3010C to fi t your
requirements. You can use the ENTER and DATA ENTRY keys, and the ARROW KEYPAD to select
options, enter names and numbers in data fi elds, activate your selections, or quickly select an option.
To select and activate an option using the ENTER key and ARROW KEYPAD:
1. Press ADJ/MENU to display the options menu for the selected function (see page 21). The options menu
displays a list of optional features which are specifi c for that particular function. Selecting any feature on
the list of options requires movement of the cursor, which is called “highlighting”, selecting or choosing an
item in a list or a fi eld (box) on a page.
2. Use the ARROW KEYPAD to move the cursor (highlight) up and down a list or up, down, and sideways on
menus.
3. Once you have moved to the desired selection, press ENTER to either activate the feature or RIGHT on the
ARROW KEYPAD to display a sub-menu or list if more feature options exist. Repeat this process to select
an option from the list or press the QUIT key to return to the previous setting.
The QUIT key moves backwards through these steps back to the main page you started on.
To select and activate an option button:
When moving about a page with option buttons, like the waypoint ‘Review’ page, you observe functions
such as Add To Route’, ‘Move Wpt’, ‘Delete’ and ’OK’. To activate the option, highlight the desired button
and press ENTER.
To select and activate an option using DATA ENTRY shortcut keys:
1. Press ADJ/MENU to display the options menu for the current page or selected function (see page 21). The
options menu displays a list of optional features which are specifi c for that particular function.
2. To quickly select any feature on the list of options, press the corresponding DATA ENTRY number key. For
numbers 10 and higher, press the fi rst digit, then press the second digit within one second. Shortcut keys
always use the same corresponding number for easy operation.
To select and activate an option using SOFT KEYS:
Press the SOFT KEY that is below the desired option.
Shorcut
Numbers
SOFT KEY Options
Options Menu with
highlighted option.
Use the ARROW
KEYPAD to highlight the
desired option. Press
ENTER/MARK to
activate.
15
Getting Started
Main Page Sequence
15
Getting Started
Entering Data
How To Enter Data
Naming a waypoint or placing any sort of data that has not been predefi ned requires the use of the
ARROW KEYPAD, ENTER, and/or DATA ENTRY keys.
To enter a name or number in a data fi eld:
1. Once you have accessed a page with programmable data fi elds (e.g. Waypoint Edit’) you can use the
ARROW KEYPAD to move the cursor (Highlight) to fi elds on the page. Use the UP/DOWN arrows to move
up or down and the LEFT/RIGHT arrows to move sideways.
2. Pressing ENTER with the fi eld highlighted begins the process for entering data in the form of alphanumeric
characters.
3. Each DATA ENTRY key has multiple characters assigned to it. Pressing the key one time selects the fi rst
character, twice selects the second character, three times the third character, and four times selects the
number assigned to the key. The only DATA ENTRY key that does not have at least four characters is the
“+, -, 0” key.
When entering data using the DATA ENTRY keys, press the key repeatedly until the correct character is
selected, then pause briefl y or press the next letter/number from a different key. The unit automatically
moves the cursor to the next placeholder.
or
Use the ARROW KEYPAD UP/DOWN arrows to cycle through numbers 0 to 9, plus/minus symbols, blank
space, and the alphabet. Pressing and releasing the keypad moves you character by character through the
list. Pressing and holding the keypad moves you rapidly through the list.
4. Use the ARROW KEYPAD LEFT/RIGHT arrows to manually move to the next character on the line or back-
wards to edit characters. Press LEFT on the ARROW KEYPAD from the fi rst character position to clear the
entire fi eld. If there are more than two lines of data, keep pressing to the RIGHT to drop down to the next
line.
5. When data entry is completed press ENTER to accept data, then move to the next programmable fi eld. Not
all data fi elds are programmable, such as the date and time. When moving about a page with these fi elds,
the cursor skips over them.
Pressing UP or DOWN
on the ARROW KEYPAD
or using the DATA
ENTRY keys changes
numbers and letters.
Pressing LEFT or RIGHT
on the ARROW KEYPAD
moves the cursor along
the line or to the next
line.
16
Getting Started
Main Page Sequence
16
Getting Started
Initializing the Receiver
The fi rst time you power up your new GPSMAP 3006C/3010C MFD and GPS 17 receiver, the receiver
must be given an opportunity to collect satellite data and establish its present position. To ensure proper
initialization, the GPS 17 is shipped from the factory in AutoLocate mode, which allows the receiver to
“fi nd itself” anywhere in the world. The MFD usually provides a position fi x within a few minutes.
Before you initialize, make sure the GPSMAP 3006C/3010C unit and GPS 17 antenna have been cor-
rectly installed on your vessel according to the instructions in the Installation Guide. The antenna needs a
clear and unobstructed view of the sky to receive satellite signals.
To turn the GPSMAP 3006C/3010C on:
Press and hold the POWER key until the display comes on, then release the POWER key.
An Introduction page appears, displaying unit information, Network Connections (attached devices)
and important information regarding the proper use of the unit. It takes a few seconds for the MFD to
search for attached devices. Once the search is complete, the “I Agree” button highlights in yellow. After
reading the Introduction, press the ENTER key if you agree.
Next, you see the fi rst of the Main Pages (see page 18), which is the Map Page. The GPSMAP 3006C/
3010C now begins searching for the GPS satellites. The fi rst time that the unit acquires satellites take sev-
eral minutes. Afterwards, acquisition times are quicker during normal use. The GPS Status icon on the left
side of the Status Bar (see also page 17) shows the progress of the satellite acquisition process. The GPS
icon status colors are:
Red— Acquiring Satellites/ Lost Satellite Reception
Orange— Ready For Navigation/ Ready For Navigation with WAAS
Gray— Lost GPS connection. (Check GPS antenna wiring connections.)
A more detailed visual reference of the satellite acquisition, GPS receiver status, and accuracy is also
available from the GPS tab on the Main Menu.
To view the GPS tab information:
1. Press and hold ADJ/MENU for two seconds, then release. The Main Menu appears.
2. If not already highlighted, use the ARROW KEYPAD to highlight the ‘GPS’ tab.
GPS Icon
Status Bar
GPS Tab
17
Getting Started
Main Page Sequence
17
Getting Started
Initializing the Receiver/
Status Bar
When viewing the GPS Info, a signal strength bar for each satellite in view appears on the right of the
page, with the appropriate satellite number under each bar. The progress of satellite acquisition is shown
in three stages:
No signal strength bars— the receiver is looking for the satellites indicated.
Hollow signal strength bars— the receiver has found the indicated satellite(s) and is collecting data.
Solid green signal strength bars — the receiver has collected the necessary data and the satellite(s)
are ready for use.
Once the receiver has collected information from at least three satellites, the ‘Status’ fi eld displays
either “Ready for Navigation” or “Ready for Navigation with WAAS”. The GPSMAP 3006C/3010C is now
ready for use! Press QUIT to return to the Map Page.
For more detailed information on the GPS tab, its related options, WAAS, and GPS, see pages 56-57.
Status Bar
At the top of each page, a Status Bar provides current status information for connected devices and
several of the MFD functions. As additional devices are added to the MFD or Garmin Marine Network,
icons for the device appear in the Status Bar. Please refer to the documentation for the additional devices
for specifi c information for that device’s icon.
When navigating lists of similar items, such as waypoints, the Status Bar displays helpful tips if addi-
tional ADJ/MENU key options are available.
Alarm alerts also appear in this area. To acknowledge an alarm, press the QUIT key. If an alarm condi-
tion persists, it displays in the Status Bar area until the alarm condition no longer exists. More on alarms
may be found on page 68.
GPS Tab
Status Bar
Status Bar Messages
Press QUIT to acknowledge.
18
Getting Started
Main Page Sequence
18
Getting Started
Main Pages
Main Pages
Main Pages are the primary screens which contain navigation and other helpful information to assist
you. There are three factory default pages: the Map Page, Compass Page, and Highway Page. One optional
page, the Video Page, appears if you are inputting a video signal (see page 35). When the unit is powered
on, the fi rst Main (Primary) Page displayed is the Map Page. As you add optional hardware to the MFD or
Garmin Marine Network, additional Main Pages, Functions (pg. 21), or Adjustments (pg. 21) may appear
automatically. For specifi c information on additional Main Page operations, refer to the documentation
that comes with the optional hardware. When the PAGE key is pressed, the Pages list displays the avail-
able Main Pages. You may cycle through the Main Pages in order, or jump to a specifi c page.
To cycle through the Main Pages in order:
1. Press the PAGE key. Each time the PAGE key is pressed the GPSMAP 3006C/3010C displays the next Main
Page and highlights (in yellow) the name on the Pages List.
2. Press ENTER to accept the current page or wait and the window automatically disappears after a few
seconds.
To jump to a specifi c Main Page:
1. Press the PAGE key. The Pages List displays the available Main Pages along with their corresponding short-
cut number. The current Main Page is highlighted in yellow.
2. Press the DATA ENTRY number key of the Main Page you wish to view or use the ARROW KEYPAD to
highlight the desired page and press ENTER.
MAP PAGE COMPASS PAGE
HIGHWAY PAGE
VIDEO PAGE (OPTIONAL)
Pages List
  • Page 1 1
  • Page 2 2
  • Page 3 3
  • Page 4 4
  • Page 5 5
  • Page 6 6
  • Page 7 7
  • Page 8 8
  • Page 9 9
  • Page 10 10
  • Page 11 11
  • Page 12 12
  • Page 13 13
  • Page 14 14
  • Page 15 15
  • Page 16 16
  • Page 17 17
  • Page 18 18
  • Page 19 19
  • Page 20 20
  • Page 21 21
  • Page 22 22
  • Page 23 23
  • Page 24 24
  • Page 25 25
  • Page 26 26
  • Page 27 27
  • Page 28 28
  • Page 29 29
  • Page 30 30
  • Page 31 31
  • Page 32 32
  • Page 33 33
  • Page 34 34
  • Page 35 35
  • Page 36 36
  • Page 37 37
  • Page 38 38
  • Page 39 39
  • Page 40 40
  • Page 41 41
  • Page 42 42
  • Page 43 43
  • Page 44 44
  • Page 45 45
  • Page 46 46
  • Page 47 47
  • Page 48 48
  • Page 49 49
  • Page 50 50
  • Page 51 51
  • Page 52 52
  • Page 53 53
  • Page 54 54
  • Page 55 55
  • Page 56 56
  • Page 57 57
  • Page 58 58
  • Page 59 59
  • Page 60 60
  • Page 61 61
  • Page 62 62
  • Page 63 63
  • Page 64 64
  • Page 65 65
  • Page 66 66
  • Page 67 67
  • Page 68 68
  • Page 69 69
  • Page 70 70
  • Page 71 71
  • Page 72 72
  • Page 73 73
  • Page 74 74
  • Page 75 75
  • Page 76 76
  • Page 77 77
  • Page 78 78
  • Page 79 79
  • Page 80 80
  • Page 81 81
  • Page 82 82
  • Page 83 83
  • Page 84 84
  • Page 85 85
  • Page 86 86
  • Page 87 87
  • Page 88 88
  • Page 89 89
  • Page 90 90
  • Page 91 91
  • Page 92 92
  • Page 93 93
  • Page 94 94
  • Page 95 95
  • Page 96 96

Garmin GPSMAP 3006C User manual

Category
Navigators
Type
User manual
This manual is also suitable for

Ask a question and I''ll find the answer in the document

Finding information in a document is now easier with AI