Page is loading ...

I
pa
rt
Chapter 1 Getting Started
Chapter 2 Getting Help
Chapter 3 Using Expansion Bay Modules and PC Cards
Chapter 4 Connecting Additional Equipment
Chapter 5 Installing and Using Application Programs
Chapter 6 Power Management


The information and illustrations in this chapter provide an overview of your
Macintosh PowerBook system and get you started using the computer. To
begin, take a few moments to review some important details about the
computer’s hardware, software, and learning materials.
Becoming familiar with your Macintosh PowerBook
Your PowerBook is designed to keep you working productively in any
location. With a PowerBook, you have
m easily expandable hardware
m specialized programs for mobile computing and versatile productivity
applications, in addition to Macintosh system software
m interactive online instructions for using the computer, a manual for setting
up and troubleshooting, and electronic manuals for application programs
provided with the computer
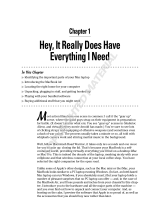
Hardware at a glance
The illustration on the next page shows the built-in features of your computer,
including the slots for PC Cards, the expansion bay for adding a CD-ROM
drive or other internal device, and the ports for connecting to a network, a
printer, and other external equipment.
3
1
Getting Started
Follow the instructions in this
chapter to set up your computer
and learn the basics.

Battery
Infrared window
Expansion card label
Trackpad
Stereo
speakers
Trackpad button
Elevation feet
Elevation foot
release button
g
SCSI port (HDI-30)
-
Sound output port
¯
Power adapter port
V
Apple Desktop Bus
(ADB) port
I
Reset button
√
Sound input port
™
External monitor port
(VGA-style connector)
´
Printer/External modem port
PC Card eject buttons
Two PC Card
(PCMCIA card) slots
Microphone
-
Volume control
¤
Brightness control
Power key
Floppy disk drive module
Expansion bay drive in-use light
Security slot
Sleep indicator
P
Connector for
Ethernet/modem or
Ethernet card
(optional)
Dual speakers
®

Software for mobility and efficiency
Your PowerBook comes with a variety of applications, utility programs, and
control panels that provide broad functionality and flexibility. These include
the following items:
In the Applications folder
m Apple Internet Connection Kit, complete software for using the Internet
m Claris Organizer, for managing contacts and calendar information
m America Online, for electronic mail, information services, and Internet
browsing
m Remote Access Client, for connecting to a computer located elsewhere
m Software for sending faxes and making modem connections (Apple
Te le c om or FaxSTF, depending on the model and geographical region)
In the Apple Extras folder
m Apple IR File Exchange, for sending and receiving files using the
computer’s infrared window
m PowerBook File Assistant, for synchronizing file contents when you have
several versions of a file
m MoviePlayer, for viewing QuickTime movies
In the Control Panels folder
m Apple Location Manager, for saving groups of system settings, called
“locations,” that you can use in different operating environments
In the Utilities folder
m Drive Setup, for testing, formatting, and partitioning hard disk drives and
drives for removable media, such as optical disks
m Disk First Aid, for testing and repairing floppy disks and hard disks or
removable media (except SRAM storage PC Cards)
Each folder contains other items as well.
5
Getting Started

Control Strip for quick changes
The Control Strip appears on the desktop when you start up your PowerBook.
It lets you change settings quickly—by pressing an icon and then choosing
the option you want from a pop-up menu.
(The Control Strip on your computer may look different from the illustration.)
You can adjust the Control Strip and add or remove items from it. For
instructions, see “How do I use the Control Strip?” in the “Customizing Your
Computer” topic area of Mac OS Guide, available from the Guide (h) menu.
Learning materials and other information about the computer
Your PowerBook comes with this user’s manual, which provides the
information you need for setting up the computer, caring for it, and finding
solutions to problems with the hardware. Depending on the PowerBook
model you have, other manuals may be included as well.
The majority of instructions for using your PowerBook are online—in the
Mac OS Tutorial, which introduces new users to the computer, and Mac OS
Guide, which offers step-by-step instructions for the primary tasks you
perform with the computer.
The Guide menu
You use the Guide menu to open Mac OS Tutorial or Mac OS Guide.
6
Chapter 1
Monitor
battery’s charge
Play
audio CD
Set screen’s
colors or grays
Put computer
to sleep
Set screen’s
resolution
Turn
AppleTalk
on or off
Turn file
sharing
on or off
Spin
down the
hard disk
Adjust for
conservation
or performance
Change
default
printer
Adjust
sound
volume
Save
system
settings

The Guide menu contains online instructions for using Macintosh system
software when the Finder is the active program. In addition to Mac OS Guide
and the tutorial, the Guide menu contains an explanation for using the Guide
online instructions (About Apple Guide) and a summary of shortcuts.
The Guide menu usually provides online help for other applications when
they are active.
You also use the Guide menu to turn balloons on or off. When turned on,
balloons display a description of the item on the screen at the pointer’s
location. The illustration shows the balloon for the Trash.
When you have questions about the computer
When you have questions about using your Macintosh, you can look for
answers in several places. These include
m Mac OS Guide and other online instructions available in the Guide menu
m electronic manuals and Read Me documents on your computer’s hard disk
m files that provide demonstrations and tours of the hardware and software
(on the hard disk)
m the printed manuals that came with your computer and with any additional
application programs or equipment you’re using
m Apple’s World Wide Web sites and other information sources on the
Internet (by modem or network connection)
m the Apple support center (by telephone)
7
Getting Started

Where to find answers
The summary that follows indicates the type of information you can expect to
get from each information source.
On the computer’s hard disk
In the Guide menu
The Guide menu (marked with the
h
icon) is your main source
of information about the Macintosh. You can learn basic skills in
the tutorial and get interactive, step-by-step help for tasks in
Mac OS Guide.
In electronic manuals
For some programs, condensed instructions and reference
information are supplied in an online manual. This type of document
usually contains illustrations and bookmarks you use for quick
access to the items you need. You can print this manual also.
In Read Me documents
The Read Me files that come on your computer’s hard disk
contain late-breaking information about your PowerBook and
some of the software that comes with your PowerBook.
In software samplers and tours
Some files on your hard disk offer a tour of the computer’s features
or an introduction to one or more applications.
8
Chapter 1

In the printed materials
In this book
Use this book to set up and learn about your computer and for
useful tips and suggestions if you have problems while using your
computer.
In other manuals
For answers to questions about other equipment or about
application programs you have purchased, see the manuals
that came with them.
On the Internet
At Apple’s Web sites
Apple maintains a number of sites on the World Wide Web
that provide software updates, product information, and technical
information. The central site is http://www.apple.com.
Several other Apple sites (linked to the central one) provide
PowerBook updates, product details, and mobile computing
solutions, including http://powerbook.apple.com.
Over the telephone
From Apple’s customer support line
If you can’t find an answer in any of the materials provided, call the
Apple Assistance Center. (See the service and support information
that came with your computer for the phone number.)
User’s ManualUser’s Manual
Macintosh PowerBookMacintosh Pow
erBoo
k
9
Getting Started

Preparing to set up the computer
Now that you know some essential details about your PowerBook, you’re
ready to set it up and begin using it.
To set up your computer for the first time, you need the power adapter and
the power cord that came with it.
When setting up your computer, place your computer on a sturdy, flat surface
near a grounded electrical outlet. Before following the setup instructions in
this chapter, you may want to read “Arranging Your Work Area and
Equipment” in Appendix A for tips on adjusting your work furniture and
computer so that you’re comfortable when using the computer.
Plugging in the computer
Plugging in the power adapter recharges the computer’s battery. You should
plug in the power adapter in case the battery has drained during shipping or
storage. (If the battery was completely drained, the power will come on
automatically when the power adapter is attached.)
WARNING
Use only the power adapter that came with your Macintosh
PowerBook computer, part number M4895. Adapters for other
electronic devices (including other Macintosh PowerBook models and
other portable computers) may look similar, but they may damage your
computer.
10
Chapter 1

When you are ready to begin, follow these steps:
1Plug one end of the power cord into the power adapter and the other end into a three-
hole grounded outlet or power strip.
2Plug the power adapter plug into the power adapter port (marked with the icon
¯
) on the
back panel of the computer.
Power cord
Power adapter
Power adapter plug
¯
Power adapter port
WARNING
This equipment is intended to be electrically grounded. The
power adapter that came with your Macintosh PowerBook is equipped
with a three-wire grounding plug—a plug that has a third (grounding)
pin. This plug will fit only a grounded AC outlet. This is a safety
feature. If you are unable to insert the plug into the outlet, contact a
licensed electrician to replace the outlet with a properly grounded
outlet. Do not defeat the purpose of the grounding plug!
11
Getting Started

12
Chapter 1
Opening the display
1Slide the latch to the left and lift up the display.
2Position the display at a comfortable viewing angle.
You can adjust the angle of the display at any time by tilting it toward or away
from you.
Slide the latch to the left to open the display.

3Adjust the elevation feet to raise the computer.
The back of the keyboard is slightly elevated when the feet are in use.
It is a good idea to lower the elevation feet whenever you are using your
computer on a flat surface.
Removing the battery label
Most new PowerBooks are shipped with a label covering the battery to
protect it from losing its charge completely. If there is a label, you need to
remove it before the battery will provide power for the computer.
1With the display open, peel off the part of the label on the computer’s case, taking care
not to tear the label.
2Close the display (with the detached part of the label outside of the computer).
To lower the foot, press the release
button. The foot extends automatically.
To raise the foot, press the release button while
pushing up on the foot until it clicks into place.
13
Getting Started

3Press the battery release button on the battery.
4Slide the battery out of its compartment.
5 Carefully remove the label from the battery.
Avoid touching the battery’s metal contacts as you peel off the label.
6 Replace the battery and open the display.
Turning the computer on
To tur n on the computer for the first time, do this:
m
Press the Power key at the upper-right corner of the keyboard to turn the
computer on.
P
Power key
1 Press the button on the battery. 2 Slide the battery out.
14
Chapter 1

You should hear a tone when you turn on the computer. It takes the computer
a few moments to start up. You’ll see the Mac OS startup screen as the system
software is loaded on the computer. After your computer starts up for the first
time, a picture similar to this appears on the screen:
Note: Your screen should look very similar to this, but it may not look exactly
the same.
Problems turning the computer on?
m
Nothing happened when you pressed the Power key.
The battery may be drained. Make sure you plugged in the power adapter,
and that the power adapter is firmly connected to both the computer and a
power source. If the power adapter is plugged into a power strip, make sure
the power strip is plugged in and turned on. If the computer doesn’t make a
sound when you press the Power key, press the reset button (marked with
an I) on the back of the computer. Once the battery has charged you
should be able to use the Power key normally.
If the computer still doesn’t turn on, see “Problems Starting Up the
Computer” in Chapter 7.
15
Getting Started

m
The computer made a sound, but you can’t see anything on the screen.
Adjust the brightness control (marked with the icon ¤) until an image
appears and the screen is easy to read.
m
You see a picture of a disk with a blinking question mark on the screen.
This icon usually means that the computer can’t find system software on
the hard disk or any disks attached to the computer. You may need to
reinstall system software. See “Reinstalling System Software” in Chapter 8.
¤
Brightness control
16
Chapter 1

What’s next?
Yo u’ve now finished setting up your Macintosh PowerBook. Continue with
one of the following steps:
m If you are new to the Macintosh, turn to the next section, “Learning the
Basics.”
m If you are an experienced Macintosh user, turn to Chapter 2, “Getting
Help,” to learn about Mac OS Guide, your main source of information
when you’re working with the Macintosh computer.
m If you have additional equipment to connect to your computer, see
Chapter 4, “Connecting Additional Equipment,” for instructions. (If you
are a new Macintosh user, you should complete “Learning the Basics”
before connecting additional equipment.)
m If you have application programs that you want to install on your computer,
see Chapter 5, “Installing and Using Application Programs,” for
instructions. (If you are a new Macintosh user, you should complete
“Learning the Basics” before installing application programs.)
IMPORTANT
If you need to turn off your computer at any point, read the
instructions in “Turning the Computer Off” later in this chapter to learn the
correct procedure for turning off your Macintosh PowerBook computer.
17
Getting Started

Learning the basics
If you are new to the Macintosh, you should begin by looking at the
easy-to-use program called the Macintosh Tutorial. The tutorial teaches you
the basic skills you’ll need to use your computer. To start the tutorial, follow
these steps:
1Move your finger on the trackpad to move the arrow pointer (
8
) on the screen.
Place your index finger on the trackpad and your thumb on the trackpad
button. Don’t press the trackpad button yet.
Move your finger across the trackpad, watching the arrow on the screen.
Notice that the arrow on the screen moves in the same direction that you
move your finger on the trackpad.
The trackpad is sensitive not only to the direction you move your finger, but
also to how fast you move your finger. If you want the pointer to move a short
distance across the screen, you move your finger slowly across the trackpad.
The faster you move your finger, the farther the pointer moves on the screen.
Trackpad Trackpad button
18
Chapter 1

2Move your finger on the trackpad so that the tip of the arrow (
8
) points to the question
mark in the upper-right portion of the screen.
3With the tip of the arrow (
8
) on the question mark, press and hold down the
trackpad button.
A list of choices (called a menu) appears. This is the Guide (h) menu, which
is the place to go when you have a question about how to use your computer.
4While holding down the trackpad button, move the arrow (
8
)until the words “Macintosh
Tutorial” are highlighted, then release the trackpad button.
A window appears welcoming you to the tutorial. You can set aside this book
for now and follow the instructions you see on the screen. When you have
completed the tutorial, return to this book.
Tips for using the trackpad
For best results when using the trackpad, keep in mind these tips:
m Use your index finger (left or right hand). Use only one finger.
m Use only your finger on the trackpad. Do not use a pen or any
other object.
m Extend your PowerBook’s elevation feet when it is placed on a flat
surface. This gives your fingers better access to the keyboard and
makes it easier to use the tip of your finger on the surface of
the trackpad.
m Sometimes humidity or condensation may cause moisture to gather
on the trackpad. If this happens, gently wipe the trackpad with a
clean cloth before you use it.
19
Getting Started

Reviewing the basics
You can use the following illustrations to review the elements you use on your
screen to do work with your computer.
Menus
The strip across the top of the screen is called the menu bar. The symbols
and words in it represent menus of commands. To open a menu, place the
pointer on the symbol or word for the menu and press and hold down the
trackpad button.
20
Chapter 1
Menu
Control Strip
Window
Icons
Printer menu
You can see a list of printers and choose
any of them as the default printer.
Guide menu
To find an answer to a question,
look in the Guide (
h
) menu.
Application menu
You can have several application programs open at once. To
see which program is active or to switch from one program to
another, use this menu (called the Application menu).
/