Page is loading ...


ii
Consumer Information
FCC Notice
This equipment has been tested and found to comply with the limits for a Class B digital device,
pursuant to Part 15 of the FCC Rules. These limits are designed to provide reasonable
protection against harmful interference in a residential installation. This equipment generates,
uses and can radiate radio frequency energy and, if not installed and used in accordance with
the instructions, may cause harmful interference to radio communications. However, there is no
guarantee that interference will not occur in a particular installation. If interference generated by
this unit is suspected, call Brink’s Customer Care at 1-800-445-0872.
If this equipment does cause harmful interference to radio or television reception, which can be
determined by turning the equipment off and on, the user is encouraged to try to correct the
interference by one or more of the following measures:
♦ Re-orient the radio/television antenna;
♦ Move the television or receiver away from the unit.
♦ Plug the unit and the TV/radio receiver into different outlets, i.e. not on the same
circuit breaker.
♦ Contact Brinks Home Security or an experienced TV/Radio technician for
additional suggestions.
♦ Review additional instructions on www.mybrinks.com.
This equipment complies with FCC Rules, Part 68.
On the outside of this equipment is a label that contains, among other information, the FCC
Registration Number and Ringer Equivalence Number (REN) for this equipment. If
requested, provide this information to your telephone company.
This equipment is equipped with a USOC RJ31X connector. This equipment is designed
to be connected to the telephone network or premises wiring using a compatible modular
jack (RJ31X) which is part 68 compliant.
The REN is useful to determine the quantity of devices you may connect to your telephone
line and still have all of those devices ring when your number is called. In most, but not all
areas, the sum of the REN's of all devices should not exceed five (5.0). To be certain of the
number of devices you may connect to your line, as determined by the REN, you should
call your local telephone company to determine the maximum REN for your calling area.
Should you experience trouble with the telephone lines, disconnect the equipment from the
line to determine the source of the trouble. If it is determined that the equipment is
malfunctioning, discontinue its use until the malfunction has been corrected. Any repairs or
alterations made by the user to this equipment, or equipment malfunctions, may give the
telephone company cause to request the user to disconnect the equipment. If you
experience trouble with this equipment, please contact Brink’s Home Security Customer
Care at 1-800-445-0872 for information on obtaining service or repairs, or visit
www.mybrinks.com and select the Frequently Asked Questions link.
Should this equipment causes harm to the telephone network, the telephone company
may temporarily discontinue your service. If possible, they will provide you with advance
notice. Otherwise they will notify you as soon as possible. The telephone company will also
advise you of changes in its facilities, equipment, operations or procedures which could
affect the operation of your equipment, allowing you the opportunity to maintain
uninterrupted service. You will also be advised of your right to file a complaint with the
FCC.

iii
This equipment must not be used on party lines or coin-operated phone lines.
Industry Canada
NOTICE: The Industry Canada label identifies certified equipment. This certification means
that the equipment meets certain telecommunications network protective, operational and
safety requirements as prescribed in the appropriate Terminal Equipment Technical
Requirements documents. The Department does not guarantee the equipment will operate
to the user's satisfaction.
Before installing this equipment, users should ensure that it is permissible to be connected
to the facilities of the local telecommunications company. The equipment must be installed
using an acceptable method of connection.
The customer should be aware that compliance with the above conditions may not prevent
the degradation of service in some situations.
Repairs to certified equipment should be coordinated by a representative designated by the
supplier. Any repairs or alterations made by the user to this equipment, or equipment
malfunctions may give the telecommunications company cause to request the user to
disconnect the equipment.
Users should ensure for their own protection that the electrical ground connections of the
power utility, telephone lines and internal metallic water pipe system, if present, are
connected together. This precaution may be particularly important in rural areas.
Caution: Users should not attempt to make such connections themselves, but should
contact the appropriate electric inspection authority, or electrician, as appropriate.
NOTICE: The Ringer Equivalence Number (REN) assigned to each terminal device
provides an indication of the maximum number of terminals allowed to be connected to a
telephone interface. The termination on an interface may consist of any combination of
devices subject only to the requirement that the sum of the Ringer Equivalence Numbers of
all the devices does not exceed 5.
This Class B digital apparatus Complies with Canadian ICES-003.
Cet appareil numérique de la classe B est conforme á la norme NMB-003 du Canada.
Visit www.mybrinks.com or contact Brink’s Customer Care at 1-800-445-0872 for
information on obtaining service or repairs.
Certification Number: 1140 10954A.

Table of Contents
Consumer Information......................................................................................................ii
FCC Notice.....................................................................................................................ii
Industry Canada .............................................................................................................iii
Welcome.............................................................................................................................2
How to Avoid False Alarms .............................................................................................3
The Brink’s Home Security System................................................................................4
Standard Equipment.......................................................................................................4
Optional Equipment........................................................................................................6
Optional Features ...........................................................................................................7
The Parts of the Keypad...................................................................................................2
Status Display (Standard Keypad).................................................................................4
Message Window (Premium Keypad) ...........................................................................4
Emergency Keys.............................................................................................................5
Using The Keypad..........................................................................................................6
User Codes.........................................................................................................................7
Entering and Exiting .........................................................................................................7
Designated Doors...........................................................................................................7
Entry Delay .....................................................................................................................7
Exit Delay........................................................................................................................7
Turning the System On ....................................................................................................8
The Four On Modes .......................................................................................................8
Turning the System On in Normal Mode.......................................................................9
Turning the System On with Motions Turned Off Mode................................................9
Turning the System On with Motions Turned Off / Instant Mode..................................10
Turning the System On in Instant Mode........................................................................10
Turning the System On When It Is Not Ready..............................................................11
Turning the System Off ....................................................................................................13
Turning the System Off When No Alarms Are In Progress...........................................13
Turning the System Off and Canceling an Alarm..........................................................13
Turning the System Off Without Canceling an Alarm....................................................14
What to Do in an Actual Emergency..............................................................................14
Turning the System Off After an Alarm in Your Absence..............................................15
System Options.................................................................................................................16
How to Bypass a Zone...................................................................................................16
How to Turn the Door Chime On or Off.........................................................................17
How to View Alarm Memory...........................................................................................17
How to Add an Auxiliary Code .......................................................................................19
How to Delete an Auxiliary Code...................................................................................21
System Testing..................................................................................................................22
Siren and Transmission Test .........................................................................................22
Testing All Burglary Sensors..........................................................................................23
Testing the Smoke Detector...........................................................................................24
Testing the Doors and Windows Only ...........................................................................24
Testing With Not Ready Zones ......................................................................................26

Trouble Messages.............................................................................................................27
Standard Keypad............................................................................................................27
Premium Keypad ............................................................................................................27
No AC Power Indication .................................................................................................28
Low Battery Indication....................................................................................................29
Communication Problem Indication...............................................................................30
Line Cut Indication (Optional Feature)...........................................................................31
Upload/Download Failure...............................................................................................31
Zone Trouble Indication..................................................................................................32
Component Failure.........................................................................................................32
Call Brink’s Indication.....................................................................................................32
Siren Failure Indication...................................................................................................32
Keypad Not Working (Speaker Clicks) ..........................................................................32
If You Trigger an Alarm while Cleaning the Detector....................................................33
Service the Detector Every Two Years..........................................................................33
Setting the Clock...............................................................................................................34
Emergency Evacuation Plans..........................................................................................34
Questions and Answers...................................................................................................36
General Use of the System............................................................................................36
Codes and Code Words.................................................................................................37
Alarms and Emergencies ...............................................................................................38
Emergency Contacts ......................................................................................................38
Financial Questions........................................................................................................39
Repairs and Upgrades....................................................................................................41
Additional Questions?.....................................................................................................41
Warranty Information........................................................................................................41
Important Notices..............................................................................................................42

2
Welcome
Thank you for choosing Brink’s Home Security
®
. We appreciate your
business.
To get the most from the easy-to-use Brink’s Home Security System,
please take the time to read this manual. It describes the components of
the system, and tells you how to use the keypad. It also tells you what
to do in the event of an alarm. Also, be sure to read your Customer
Emergency Information Schedule so that you will have a clear
understanding of Brink’s procedures if you should have an alarm.
If you have any questions about the security system, visit
www.mybrinks.com or call Brink’s Customer Care at 1-800-445-0872.
Customer Care is ready to help you 24 hours a day, seven days a week.

3
How to Avoid False Alarms
Numerous false alarms can affect the quality of your monitoring service.
They can also result in fines from your local municipality. To avoid false
alarms, follow these simple tips:
1. Be sure that everyone in your house knows how to use the alarm
system. Everyone should know a user code and the code word.
You can use the interactive keypad at www.mybrinks.com to
practice turning the system on and off without causing an alarm.
2. If you cause an alarm accidentally, cancel it by entering your user
code and pressing the CANCEL key. (See page 13.)
3. Test the system every week, following the instructions beginning
on page 22. If you discover any problems, promptly notify Brink’s
Customer Care at 1-800-445-0872.
4. If there was an alarm on the system, and you do not know why it
happened, contact Brink’s Customer Care immediately. You may
also review the system’s alarm history at www.mybrinks.com.
5. If you are going to do any kind of work at your home that will create
a large amount of dust, (such as fumigation), completely cover the
system’s motion detectors and smoke/heat detectors. Be sure to
remove the covers when you are finished.
6. If you know that the motion detector is causing false alarms, you
can still turn the system on, while the motion detector is turned off.
See the instructions on page 9 (Turning the System On with
Motions Turned Off Mode). Promptly notify Brink’s Customer Care
to correct the problem.
7. If you get an indoor pet after the system is installed, contact Brink’s
Customer Care. The system’s motion detector may need to be
adjusted so that your pet does not cause a false alarm.
8. Motion detectors can detect the movement of balloons, plants,
curtains, and other common household objects. Be sure that air
currents cannot move these items into the area covered by the
motion detector.
9. Notify Brink’s before you sell or rent out your home, so that we can
teach the new residents how to use the system. Visit our website

4
at www.mybrinks.com to get more information about our Customer
Move Program.
10. Take care when cooking or lighting a fire in the fireplace.
Excessive smoke from these activities can cause false alarms.
The Brink’s Home Security System
Standard Equipment
Master
Control Panel
The master control panel is housed in a metal box. It is
mounted in an out-of-the-way location, such as a
closet. The master control panel processes the
information sent to it by the system’s sensors and
keypad. It also contains a battery that allows the
system to operate during a power failure. When an
alarm occurs, the master control panel sends a
message over the telephone line to the Brink’s
Monitoring Center.
Do not open the master control panel unless a
Brink’s representative instructs you to do so.
Keypad
(Premium Style
Shown)
The keypad is mounted on the wall, near an entry/exit
door. You can use it to turn the system on and off, and
to change other system options. Keypads come in
Premium and Standard styles (see pages 2 and 3.)
You can also use the keypad’s emergency panic
buttons to signal a fire, medical, or police emergency.
(See page 5 for more information or review the
Keypad Functions information at www.mybrinks.com.)
Door/ Window
Sensors
One sensor is placed in or on the frame and body of
each door or window that is protected. If the door or
window is opened while the system is on, an alarm
sounds. An alarm signal is sent to the Brink’s
Monitoring Center.

5
Standard Equipment
Motion Detector
This sensor is mounted on the wall, inside your home.
The sensor can detect when someone is moving within
its field of view. If the system is on at the time a person
is detected, the system sends an alarm signal to the
Brink’s Monitoring Center.
Siren
The siren is a small plastic box, mounted inside your
home. When an alarm occurs, the siren sounds a
warning, designed to frighten off intruders. The siren
may also sound when you use some of the system’s
special features.
Power
Transformer
The power transformer is plugged into an outlet near
the master control panel. It provides electrical power to
the system.
If you should notice that the transformer is
unplugged, plug it back in immediately.
Telephone Jack
This device connects the security system to the
telephone line in your home. It is located near or
inside the master control panel. This makes it possible
for the system to send alarm signals over the telephone
lines to the Brink’s Monitoring Center.
Do not remove the dialer cable from the jack unless
a Brink’s representative or this manual instructs
you to do so.
Yard Sign and
Window Stickers
The highly visible sign and stickers warn potential
intruders that your home is protected by a Brink’s
Home Security system. You will be provided with one
sign and several stickers.

6
Optional Equipment
Smoke/Heat
Detector
This device detects smoke and dangerously high
temperatures. It is mounted in a central location of the
house, on the ceiling. Smoke/heat detectors are not
available for commercial installations.
Heat Sensor
This device detects when the temperature near the
sensor is dangerously high. It is mounted in a central
location of the house, on the ceiling. Heat sensors are
not available for commercial installations.
Glass Breakage
Detector
This small detector is mounted near any large expanse
of glass (windows or doors) in your home. It identifies
the sound of breaking glass.
SmartKey
The SmartKey™ is a small remote-control device for
the security system. The four buttons on the device
can be used to turn the system on and off, and to do
other specialized functions, like trigger an emergency
alarm.
Telephone
Control Module
The optional Telephone Control Module allows you to
control the security system from any touch-tone
telephone, whether you are at home or across the
country. You can check the system’s status while on
vacation, or trigger an emergency alarm from your
bedroom. The Telephone Control Module is also a
helpful feature for visually-impaired users who may
have difficulty using a traditional keypad.

7
Optional Features
Line Cut
If your telephone line is cut, the optional line cut feature
notifies you. If the system is on, the siren sounds. If
the system is off, the keypad beeps and displays a
trouble message. Because a line cut results in a loss
of telephone service, this event is not reported to the
Brink’s Monitoring Center.
Pager/Latchkey
The optional pager/latchkey feature notifies you that
your children have arrived home safely when you are
away. When your child turns the system on or off, you
receive a page on your pager. You can also receive
pages for other system events, like alarms or power
loss.
For information about any of these products or services, visit
www.mybrinks.com or call Brink’s Customer Care at 1-800-445-0872.
Customer Care is ready to help you 24 hours a day, seven days a week.

2
The Parts of the Keypad

3

4
Status Display (Standard Keypad)
The illustration below shows the functions of the keypad’s lights.
Message Window (Premium Keypad)
The Premium Keypad communicates with you by lighting the words and
phrases in the message window. The words that make up the message
may be on different lines, or separated by other words.
For example, while you are changing an auxiliary user code, you will see
the following message window:
The words “ENTER” and “NEW CODE” are lit. This means that you
should enter the new user code.

5
Emergency Keys
If you are home when a police, medical, or fire emergency arises, you
can alert the Brink’s Monitoring Center of your situation with a single
press of an emergency key. The system does not need to be on. (Not
all emergency buttons are available to all commercial customers.)
The table shows what purpose each key serves, and what happens
when it is pressed. (Depending upon how the system is programmed,
you may need to press the emergency key twice within three seconds to
signal an emergency alarm.)
Emergency Press This happens
Fire
The siren sounds and a signal is sent to the
Brink’s Monitoring Center. Brink’s calls the fire
department, and then calls you to verify the
alarm. (This procedure may vary in some
jurisdictions.)
Medical
The keypad beeps and a signal is sent to the
Brink’s Monitoring Center. Brink’s calls you to
verify the alarm. If for any reason you do not
answer that call, Brink’s calls emergency
personnel.
Police
The siren sounds and a signal is sent to the
Brink’s Monitoring Center. Brink’s calls you to
verify the alarm. If for any reason you do not
answer that call, Brink’s calls emergency
personnel.
CALL 911 FIRST
If your community provides 911 Emergency service, and you
are able to reach a telephone during the emergency, Brink’s
recommends that you call 911 before pressing the
emergency key. This gives you the fastest access to
emergency services.
If you press an emergency key accidentally, cancel the alarm by
pressing the CANCEL key, and entering your user code. (For more
information about canceling alarms, see page 13, or review the Reduce
False Alarms information at www.mybrinks.com.)

6
Using The Keypad
The Brink’s Home Security system in your home may have a Standard
Keypad, or a Premium Keypad. Both types of keypads can be used to
turn the system on or off, or to test or customize it. For some
procedures, the keypads’ commands are slightly different. In those
cases, this manual contains two sets of instructions, like those shown
below. If you are using a Standard Keypad, follow the instructions on the
left. If you are using a Premium Keypad, follow the instructions on the
right.
If the keypad looks like this:
Follow the instructions for the
Standard Keypad
If the keypad looks like this:
Follow the instructions for the
Premium Keypad
1. Press the OPTONS
key.
1. Observe the
number displayed
in the message
window. This is
the zone that is not
ready. (There
may be more than
one.)
2. Press the 7 key.
2. Refer to the Pop-
Up Zone Card to
verify the location
of the zone.

7
User Codes
When the system is installed, you select a code number to turn the
system on and off. This is your master user code, and it may be three
or four digits long. To change this code, contact Brink’s Customer Care
at 1-800-445-0872.
You can create a separate auxiliary user code for anyone who needs
access to your home. See page 19 for more information. You can
change or delete the auxiliary code whenever you like.
If you have questions about the system’s user codes, visit our website or
contact Brink’s Customer Care.
Entering and Exiting
Designated Doors
The designated entry/exit doors are those doors that you must use to
enter and leave your home while the system is on. These doors may be
equipped with the door sensors described on page 4. If you use a
different door to enter your home, an alarm may sound.
Entry Delay
When you enter your home while the security system is on, the keypad
beeps. This beeping reminds you to turn the system off. You must enter
your user code before the beeping stops. In most systems, that delay is
40 seconds long. If you do not enter your code before the delay ends,
an alarm is triggered.
Exit Delay
When you turn the system on in normal mode, you must exit the building
and close the door before the exit delay ends. For most systems, the
exit delay is 80 seconds; however, that number may vary if local agency
or regulator restrictions apply. Once that delay has ended, you will
trigger an alarm if you open a protected door or window, or move past a
motion detector.
Note: The length of the system’s entry and exit delays can be adjusted
(within certain limits). If you find it difficult to enter or exit your home

8
before the delay ends, contact Brink’s Customer Care at 1-800-445-0872
to have it changed.
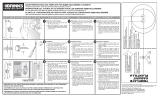
Turning the System On
The Four On Modes
You can arm the Brink’s Home Security system in four different ways:
1) normal mode;
2) motion off;
3) motions off with delay doors instant; and
4) delay doors instant.
The illustration below helps you choose which mode to use.

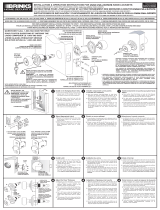
9
Turning the System On in Normal Mode
1. Close all of the doors and windows and make
sure that the message window reads READY
or the READY light is lit. (If not, see page 11.)
2. Press the ON key.
The ON light begins to blink, telling you that
the system is on and that the exit delay has
begun. The Premium Keypad displays the
number of seconds left in the exit delay.
3. Exit promptly. You must leave the building
before the delay ends. The standard delay is
80 seconds.
If the ON light stops blinking and is steadily lit,
the exit delay has ended. If you open a door
now, you will cause an alarm. Turn the system
off by entering your user code, then start over.
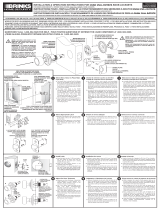
Turning the System On with Motions Turned Off Mode
1. Close all of the doors and windows and make
sure that the message window reads READY
or the READY light is lit. (If not, see page 11.)
2. Press the ON key.
3. Press the MOTION OFF key. (You must press
the MOTION OFF key no more than 20
seconds after you press the ON key.)
The ON light blinks. The Premium Keypad reads
ON, MOTION OFF. The Standard Keypad’s
MOTION OFF and ON lights are lit.

10
Turning the System On with Motions Turned Off / Instant Mode
1. Close all of the doors and windows and make
sure that the message window reads READY
or the READY light is lit. (If not, see page 11.)
2. Press the ON key.
3. Press the MOTION OFF key.
4. Press the INSTANT key.
The ON light turns on. The Premium Keypad
reads ON, MOTION OFF, and INSTANT. The
Standard Keypad’s ON, MOTION OFF and
INSTANT lights are lit.
Do not leave the building, or open any
protected windows without first turning the
system off.
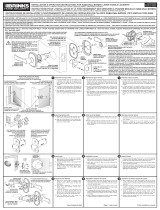
Turning the System On in Instant Mode
1. Close all of the doors and windows and make
sure that the message window reads READY
or the READY light is lit. (If not, see page 11.)
2. Press the ON key.
3. Press the INSTANT key.
The ON light turns on. The Premium Keypad
reads ALL ON, INSTANT. The INSTANT light
of the Standard Keypad turns on.
Do not leave the building, open any
protected windows, or move in front of the
motion detector without first turning the
system off.
/