Page is loading ...

Manufacturer of Hydronic Heating Products
P.O. Box 14818 3633 I. Street
Philadelphia, PA 19134
Tel: (215) 535-8900 • Fax: (215) 535-9736 • www.crownboiler.com
WARNING: Improper installation,
adjustment, alteration, service or
maintenance can cause property
damage, injury, or loss of life. For
assistance or additional information,
consult a qualifi ed installer, service
agency or the gas supplier. Read
these instructions carefully before
installing.
Models:
• CWD060
• CWD083
• CWD110
• CWD138
• CWD165
• CWD193
• CWD220
• CWD245
CWD Series
Gas-Fired Direct Vent Hot Water Boilers
INSTALLATION INSTRUCTIONS
These instructions must be affi xed on or adjacent to the boiler

2
TABLE OF CONTENTS
I Product Description 1
II Specifi cations 1
III Before Installing 2
IV Locating the Boiler 2
V Air for Combustion and Ventilation 4
VI Venting 9
Vent System Design 9
Vent System Assembly 22
VII Gas Piping 32
VIII System Piping 33
IX Wiring 38
CB502 Control System 38
R8285 Control system 44
X Start-up and Checkout 48
XI Service and Maintenance 52
XII Troubleshooting 57
XIII Parts 65
Appendix A:Special Requirements for
Side-Wall Vented Appliances in the
Commonwealth of Massachusetts
74

1
1
I Product Description
The CWD series boiler is a cast iron gas fi red boiler designed for use in forced hot water heating systems. It is is a low
pressure boiler intended for use in closed heating systems with water temperatures under 240F. This boiler may be vented either
vertically or horizontally with combustion air supplied from either outdoors or (under certain conditions) indoors. It is ideal for
use in installations where a reliable source of clean indoor combustion air cannot be guaranteed.
II Specifi cations
TABLE 1: SPECIFICATIONS
MODEL SECTIONS
INPUT
(MBH)
DOE HTG.
CAPY (MBH)
I=B=R NET
RATING (MBH)
AFUE
(%)
FIG 1
DIM. “A” (in.)
VENT
DIA. (in.)
WATER
CONTENT
(Gal.)
CWD060 3 60 51 44 85.1 16-1/8 3 2.0
CWD083 4 82.5 71 62 85.1 19-3/4 3 2.6
CWD110 5 110 94 82 85.2 23-3/8 3 3.1
CWD138 6 137.5 118 103 85.2 27 3 3.6
CWD165 7 165 142 123 85.2 30-5/8 3 OR 4 4.2
CWD193 8 192.5 165 143 85.2 34-1/8 3 OR 4 4.7
CWD220 9 220 189 164 85.2 37-3/4 3 OR 4 5.2
CWD245 10 245 211 183 85.3 41-3/8 3 OR 4 5.8
FIGURE 1: GENERAL CONFIGURATION

2
2
III Before Installing
1) Safe, reliable operation of this boiler depends upon installation by a professional heating contractor in strict accordance
with this manual and the authority having jurisdiction.
• In the absence of an authority having jurisdiction, installation must be in accordance with this manual and the National
Fuel Gas Code, ANSI Z223.1.
• Where required by the authority having jurisdiction, this installation must conform to the Standard for Controls and
Safety Devices for Automatically Fired Boilers (ANSI/ASME CSD-1).
2) Read Section VI to verify that the maximum combustion air and exhaust pipe lengths will not be exceeded in the planned
installation. Also verify that the vent terminal can be located in accordance with Section VI.
3) Make sure that the boiler is correctly sized:
• For heating systems employing convection radiation (baseboard or radiators), use an industry accepted sizing method
such as the I=B=R Heat Loss Calculation Guide (Pub. #H21 or #H22) published by the Hydronics Institute in Berkely
Heights, NJ.
• For new radiant heating systems, refer to the radiant tubing manufacturer’s boiler sizing guidelines.
• For systems including a Crown Mega-Stor indirect water heater, size the boiler to have either the DOE Heating Capacity
required for the Mega-Stor or the net rating required for the heating system, whichever results in the larger boiler.
• For systems that incorporate other indirect water heaters, refer to the indirect water heater manufacturer’s instructions for
boiler output requirements.
4) Make sure that the boiler received is confi gured for the correct gas (natural or LP).
5) This boiler is not designed for use with return temperatures under 120F for a sustained period of time. Some systems, such
as those having large water contents, may require a return water bypass or other special provisions to protect the boiler
against low return temperatures. Failure to provide such provisions if needed could result in severe corrosion damage to the
boiler. For more information on when low water temperatures protection is required, and appropriate protection, see Part
VIII.
6) For installations at altitudes above 2000ft, special orifi ce and pressure switches are required. Make sure that the boiler is
confi gured for use at the correct altitude.
IV Locating the Boiler
1) Boiler clearances are shown in Figure 2. Figure 2a shows clearances from the boiler when outdoor combustion air is
used. Figure 2b shows clearances from the boiler when combustion air is obtained from the boiler room. These minimum
clearances apply to all types of combustible construction as well as noncombustible walls, ceilings and doors. At least 24”
must be provided for servicing at the front of the boiler. This front clearance may be provided through a door, such as a
closet door. Boiler will be much easier to service if at least 12” is provided from the sides and rear of the boiler to walls.
2) Clearances from venting to combustible material depends upon the type of venting, whether the vent pipe is enclosed, and
whether the venting is vertical or horizontal. See Table 2 for vent clearance information.
3) Boiler may be installed on a non-carpeted combustible surface.
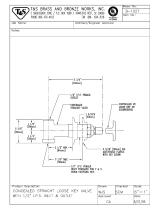
4) The relief valve must not be moved from the location shown in Figure 1.
5) When combustion air is obtained from the boiler room, a 10” clearance is required from the side of the boiler having the air
inlet collar to combustible or non-combustible obstruction (Figure 2b).
6) The boiler should be located so as to minimize the length of the vent system.
7) Do not install this boiler in a location where gasoline or other fl ammable vapors or liquids will be stored or used. Do
not install this boiler in an area where large amounts of airborne dust will be present, such as a workshop. When indoor
combustion air is used, do not install in a location where sources of hydrocarbons will be stored or used. Some common
sources of hydrocarbons include bleaches, fabric softeners, paints, cleaners, refrigerants, and cat boxes. Traces of these
substances can be drawn into the boiler causing severe corrosion damage to the boiler and /or objectionable odors.
NOTICE
This product must be installed by a licensed plumber or gas fi tter when installed within the Commonwealth of Massachusetts.
See Appendix A for additional important information about installing this product within the Commonwealth of Massachusetts.

3
3
FIGURE 2a: CLEARANCES WHEN BOILER IS DIRECT VENTED (OUTDOOR COMBUSTION AIR IS USED)
FIGURE 2b: CLEARANCES WHEN COMBUSTION AIR IS OBTAINED FROM BOILER ROOM

4
4
TABLE 2: CLEARANCES FROM VENT PIPING TO COMBUSTIBLE CONSTRUCTION
TYPE OF VENT PIPE PIPE DIRECTION ENCLOSURE
MINIMUM CLEARANCE
TO COMBUSTIBLE
MATERIAL
HEAT FAB SAF-T VENT
PROTECH FASNSEAL
PROTECH FASNSEAL W2
METAL-FAB CORR/GUARD
VERTICAL OR
HORIZONTAL
AT LEAST ONE SIDE OPEN,
COMBUSTIBLE MATERIAL ON A
MAXIMUM OF THREE SIDES
1”
HEAT FAB SAF-T VENT
PROTECH FASNSEAL
Z-FLEX Z-VENT III
METAL-FAB CORR/GUARD
HORIZONTAL OR VERTICAL
WITH OFFSETS
ENCLOSED ON ALL FOUR SIDES
8”
HEAT FAB SAF-T VENT
PROTECH FASNSEAL
Z-FLEX Z-VENT III
METAL-FAB CORR/GUARD
VERTICAL WITH NO OFFSETS ENCLOSED ON ALL FOUR SIDES
6”
PROTECH FASNSEAL W2 VERTICAL OR HORIZONTAL ENCLOSED ON ALL FOUR SIDES 3”
HEAT FAB SAF-T VENT SC VERTICAL OR HORIZONTAL
UNENCLOSED OR ENCLOSED ON
ALL SIDES
0”
“B” VENT CHASE USED AS PART OF
CROWN COAXIAL VENT SYSTEM*
VERTICAL
PER “B” VENT MANFACTUER’S
INSTRUCTIONS
REFER TO “B” VENT
MANUFACTURER’S
INSTRUCTIONS
* “B” Vent is used as a chase to carry combustion air in this system - never attempt to vent a CWD boiler using “B” vent
V Air for Combustion and Ventilation
Suffi cient fresh air must be supplied for both combustion and ventilation. In general, combustion air is obtained in one of
two ways:
• Direct Vent Installations – Combustion air is piped directly to the boiler inlet collar from the outdoors. This is also
sometimes called a “sealed combustion” installation.
• Direct Exhaust Installations – Combustion air is obtained from the boiler room. In some cases, openings or duct work
may be run from the outdoors to the boiler room, however the ducting is not connected directly to the boiler.
Air for ventilation is required to keep various boiler components from overheating and is always obtained from indoors. To
ensure an adequate combustion and ventilation air supply, perform the following steps:
Step 1: Determine whether the boiler is to be installed in a building of unusually tight construction
A good defi nition of “unusually tight construction” is construction having all of the following features:
• Walls and ceilings exposed to outside atmosphere have a continuous water vapor retarder with a rating of 1 perm or less
with openings gasketed and sealed.
• Weather stripping has been added on openable windows and doors.
• Caulking and sealants are applied to areas such as joints around window and door frames, between sole plates and fl oors,
between wall-ceiling joints, between wall panels, at penetrations for plumbing, electrical, and gas lines, and at other
openings.

5
5
Step 2: Determine whether the boiler is to be installed in a confi ned space
A confi ned space is defi ned by the National Fuel Gas Code as having a volume less than 50 cubic feet per 1000 BTU/hr
input of all appliances installed in that space. To determine whether the boiler room is a confi ned space:
1) Total the input of all appliances in the boiler room in thousands of BTU/hr. Round the result to the next highest 1000 BTU/
hr.
2) Find the volume of the room in cubic feet. The volume of the room in cubic feet is:
Length (ft) x width (ft) x ceiling height (ft)
In calculating the volume of the boiler room, consider the volume of adjoining spaces only if no doors are installed between
them. If doors are installed between the boiler room and an adjoining space, do not consider the volume of the adjoining
space, even if the door is normally left open.
3) Divide the volume of the boiler room by the input in thousands of BTU/hr. If the result is less than 50, the boiler room is a
confi ned space.
Example:
A CWD245 and a water heater are to be installed in a room measuring 6ft – 3 in x 7ft with an 8 ft ceiling. The water heater
has an input of 30000 BTU/hr:
Total input in thousands of BTU/hr = (245000 BTU/hr + 30000 BTU/hr) / 1000 = 275
Volume of room = 6.25 ft x 7 ft x 8 ft = 350 ft
3
350/275 = 1.27. Since 1.27 is less than 50, the boiler room is a confi ned space.
Step 3: Decide whether the boiler will be direct vented or direct exhausted
The boiler must be direct vented (combustion air piped directly to the boiler) if:
• The boiler is to be installed in a laundry room
• The building in which the boiler is installed has an indoor pool.
• The boiler is located in an area having any of the contaminants described in Section IV.
It is also strongly recommended that combustion air be piped from outside when the boiler is installed in a building of
unusually tight construction.
Step 4: If the boiler is Direct Vented, Provide Air as Follows (If Indoor Combustion Air is used,
Skip to Step 5):
1) Combustion air piping must not exceed the maximum lengths called for in Section VI.
2) Although combustion air is obtained directly from outdoors, openings may be required into the boiler room to allow for
adequate equipment ventilation. The following guidelines apply regardless of whether or not the building is of unusually
tight construction:
Unconfi ned Space– Natural infi ltration into the boiler room will provide adequate air for ventilation without additional
openings into boiler room.
Confi ned Space – Provide two openings into the boiler room, one near the fl oor and one near the ceiling. The top edge of
the upper opening must be within 12” of the ceiling and the bottom edge of the lower opening must be within 12” of the
fl oor (Fig 3). The minimum opening dimension is 3 inches.
• If the CWD boiler is the only gas-burning appliance in the boiler room, these openings must each have a free area of 100
square inches.
• If other gas-burning appliances are in the boiler room, size the openings in accordance with the appliance manufacturer’s
instructions or the National Fuel Gas Code. Minimum opening free area is 100 square inches regardless of opening
requirements for other appliances.
• If the total volume of both the boiler room and the room to which the openings connect is less than 50 cubic feet per 1000
BTU/hr of total appliance input, install a pair of identical openings into a third room. Connect additional rooms with
openings until the total volume of all rooms is at least 50 cubic feet per 1000 BTU/hr of input.
• The “free area” of an opening takes into account the blocking effect of mesh, grills, and louvers. Where screens are used,
they must be no fi ner than ¼” (4 x 4) mesh.

6
6
Step 5: If Indoor Combustion Air is Used, Provide Air as Follows:
1) Buildings of other than unusually tight construction:
Unconfi ned Space– Natural infi ltration into the boiler room will normally provide adequate air for combustion and
ventilation without additional louvers or openings into boiler room.
Confi ned Space – Provide two openings into the boiler room, one near the fl oor and one near the ceiling. The top edge of
the upper opening must be within 12” of the ceiling and the bottom edge of the lower opening must be within 12” of the
fl oor (Fig 3).
• Each opening must have a free area of 1 square inch per 1000 BTU/hr input of all gas burning appliances in the boiler
room. The minimum opening dimension is 3 inches. Minimum opening free area is 100 square inches per opening.
• If the total volume of both the boiler room and the room to which the openings connect is less than 50 cubic feet per 1000
BTU/hr of total appliance input, install a pair of identical openings into a third room. Connect additional rooms with
openings until the total volume of all rooms is at least 50 cubic feet per 1000 BTU/hr of input.
• The “free area” of an opening takes into account the blocking effect of mesh, grills, and louvers. Where screens are used,
they must be no fi ner than ¼” (4 x 4) mesh.
2) Buildings of unusually tight construction:
If at all possible, direct vent the boiler. Where the boiler must be installed in unusually tight construction and cannot be
direct vented, openings must be installed between the boiler room and the outdoors or a ventilated space, such as an attic
or crawl space, which communicates directly with the outdoors. Two openings are required. The top edge of the upper
opening must be within 12 inches of the ceiling. The bottom edge of the lower opening must be within 12 inches of the
fl oor. Size openings and ducts as follows:
• Vertical ducts or openings directly outdoors (Fig 4, Fig 5, Fig 6) – Each opening must have a free cross sectional area of
1 square inch per 4000 BTU/hr of the total input of all gas-fi red appliances in the boiler room but not less than 100 square
inches. Minimum opening size is 3 inches.
• Openings to outdoors via horizontal ducts (Fig 7) - Each opening must have a free cross sectional area of 1 square inch
per 2000 BTU/hr of the total input of all gas fi red appliances in the boiler room but not less than 100 square inches.
Minimum opening size is 3 inches.
• The “free area” of an opening takes into account the blocking effect of mesh, grills, and louvers. Where screens are used,
they must be no fi ner than ¼” (4 x 4) mesh.
FIGURE 3: BOILER INSTALLED IN A CONFINED SPACE - VENTILATION OR
COMBUSTION / VENTILATION AIR FROM INSIDE

7
7
FIGURE 4: ALL AIR FROM OUTSIDE USING VENTILATED CRAWL SPACE AND ATTIC
FIGURE 5: ALL AIR FROM OUTSIDE USING VENTILATED ATTIC

8
8
FIGURE 6: ALL AIR FROM OUTSIDE USING OPENINGS INTO BOILER ROOM
FIGURE 7: ALL AIR FROM OUTSIDE USING HORIZONTAL DUCTS INTO BOILER ROOM

9
9
VI Venting
WARNING
Failure to vent this boiler in accordance with these instructions could result in unreliable boiler
operation, severe damage to the boiler or property, or unsafe operation:
* Do not attampt to vent this boiler with galvanized, PVC, or any other vent system not listed in Table 4.
* Do not attempt to mix components from different approved vent systems.
* Do not install a barometric damper or drafthood on this boiler.
* Do not attempt to use the vent system for this boiler with any other appliance.
* Moisture and ice may form on the surfaces around the vent termination. To prevent deterioration,
surfaces should be in good repair (sealed, painted, etc.)
A. Vent System Design
There are three basic ways to vent the CWD boiler:
• Horizontal (“side wall”) Venting - Vent system exits the building through an outside wall. Combustion air is either
obtained through a separate pipe from outside (a “direct vent” installation) or obtained from the boiler room (a “direct
exhaust” installation).
• Vertical Non-Coaxial Venting - Vent system exits the building through a roof. Combustion air is either obtained
through a separate pipe from outside (a “direct vent” installation) or obtained from the boiler room (a “direct exhaust”
installation).
• Vertical Coaxial Venting - Vent system exits the building through a roof. A portion of the vent system is coaxial, meaning
that it consists of a “pipe within a pipe”. Flue gasses exit the building through the inner pipe and combustion air is drawn
through the space between the two pipes.
For each of the above three basic methods, there are several variations, resulting in a total of 13 options for venting
the CWD boiler. A description of each of these venting options is listed in Tables 3a - 3c. For clarity, these vent options are
numbered from 1 to 13 in Table 3. One of the vent option columns in Table 3 must match the planned vent and air intake
system exactly. In addition, observe the following guidelines:
1) Approved vent systems - Use only one of the approved vent systems shown in Table 4. These systems are made of a special
stainless steel alloy (AL29-4C) for protection against corrosive fl ue gas condensate. They are also designed to provide a gas
tight seal at all joints and seams so that fl ue gas does not enter the building. Each approved vent system has unique method
for installation - do not attempt to mix components from different vent systems. The only exceptions are:
• Heat Fab Saf-T Vent SC may be combined with Saf-T Vent EZ Seal.
• Protech FasNSeal W2 may be combined with Protech FasNSeal.
See the vent installation section of this manual for information on how this can be done.
Heat Fab Saf-T Vent SC is a double wall vent system which can be used in two ways on CWD installations. In vertical
coaxial vent systems (Vent Options 12 and 13), the space between the inner and outer pipes is used as a conduit to bring
combustion air to the boiler. In Horizontal (Vent Options 1 to 5) and Vertical (Option 6 to 10) vent systems, Saf-T Vent SC
can be used to obtain a 0” clearance to combustible construction. When this is done, the space between the inner and outer
pipes is used for ventilation, but boiler combustion air comes from elsewhere.
Protech FasNSeal W2 is also a double wall vent system. In some cases, it can used to obtain closer clearances to
combustible construction than are possible using Protech FasNSeal (see Table 2). The space between the inner and outer
pipes on FasNSeal W2 cannot be used as a combustion air conduit.
The Crown Vertical coaxial vent system (Vent Option 11) is similar to that constructed using Heat Fab Saf-T Vent SC
except it is constructed by running one of the 3” single wall vent systems shown in Table 4 inside 5” type “B” vent. The
space between the 3” vent and the “B” vent forms a conduit to bring combustion air to the boiler. The advantage of this
system is that it can be constructed using any of the vent systems shown in Table 4 except for Heat Fab Saf-T Vent SC and
Protech FasNSeal W2. No turns are permitted in the coaxial section of this system.

10
10
TABLE 3a: SUMMARY OF HORIZONTAL VENTING OPTIONS
VENT OPTION # 12345
CLASSIFICATION USED IN THIS
MANUAL
HORIZONTAL
DIRECT VENT
HORIZONTAL
DIRECT VENT
(RESERVED
FOR FUTURE
USE)
HORIZONTAL
DIRECT
EXHAUST
HORIZONTAL
DIRECT
EXHAUST
ILLUSTRATED IN FIGURE 8a OR 8b 8a OR 8b 9 9
VENT PIPE STRUCTURE
PENETRATION
WALL WALL WALL WALL
AIR INTAKE PIPE STRUCTURE
PENETRATION
WALL WALL N.A. N.A.
VENT PIPE SIZE 3” 4” 3” 4”
AIR INTAKE PIPE SIZE 4” 4” N.A. N.A.
MAXIMUM VENT
PIPE LENGTH
CWD060 - CWD138 55 FT
55 FT 55 FT 55 FT
CWD165 35 FT
55 FT 35 FT 55 FT
CWD193 25 FT
55 FT 25 FT 55 FT
CWD220 15 FT
55 FT 15 FT 55 FT
CWD245 N.R.
55FT 10 FT 55 FT
MAXIMUM
INTAKE PIPE
LENGTH
CWD060 - CWD138 60 FT 60 FT N.A. N.A.
CWD165 40 FT 60 FT N.A. N.A.
CWD193 30 FT 60 FT N.A. N.A.
CWD220 20 FT 60 FT N.A. N.A.
CWD245 N.R.
60 FT N.A. N.A.
EXHAUST TERMINAL
3” 90 ELBOW,
TEE, OR
CROWN
COAXIAL
TERMINAL
#50-003
4” 90 ELBOW,
TEE, OR
CROWN
COAXIAL
TERMINAL
#50-004
3” 90 ELBOW
OR TEE
4” 90 ELBOW
OR TEE
AIR INTAKE TERMINAL
4” 90 ELBOW
OR CROWN
COAXIAL
TERMINAL
#50-003
4” 90 ELBOW
OR CROWN
COAXIAL
TERMINAL
#50-004
N.A. N.A.
VENT MATERIAL APPROVED VENT SYSTEM SHOWN IN TABLE 4
AIR INTAKE MATERIAL GALVANIZED OR PVC N.A. N.A.
“N.R” - Not recommended “N.A.” - Not applicable

11
11
FIGURE 8a: HORIZONTAL DIRECT VENTING USING SEPARATE TERMINALS (VENT OPTIONS 1-2)
FIGURE 8b: HORIZONTAL DIRECT VENTING USING COAXIAL TERMINAL (VENT OPTIONS 1-2)

12
12
FIGURE 9: HORIZONTAL DIRECT EXHAUST VENT SYSTEM (VENT OPTIONS 4,5)
2) Maximum Vent and Air Intake Lengths - The maximum length of the vent air intake piping depends upon the vent option
selected, the vent pipe size, and the boiler size. See Table 3 for the maximum vent length. In addition to the maximum
length of piping shown in Table 3, the following fi ttings may also be used:
• Horizontal Vent Systems: One 90 deg. elbow
• Vertical Vent Systems: Two 90 deg. elbows
• Vertical Coaxial Vent Systems: Two 90 deg. elbows
• Air Intake Systems: Two 90 deg. elbows
If additional elbows are desired, the maximum allowable vent length must be reduced by the amount shown in Table 5 for
each additional elbow used. Note: Termination fi ttings do not need to be counted when counting additional elbows.
Example:
A 3” vent system is planned for a horizontal direct vented CWD165 which has the following components:
2 ft vertical pipe
1 90 elbow
5 ft horizontal pipe
1 90 elbow
3 ft horizontal pipe
1 45 elbow
4 ft horizontal pipe
1 termination elbow
The Vent Option #1 column in Table 3a describes a horizontal direct vent system using 3” vent pipe. From this column, we
see that a CWD165 may vent length of up to 35ft. The fi rst 90 elbow and the termination elbow are not considered. From
Table 5, the equivalent length of the 3” 45 elbow is 4ft and the equivalent length of the 3” 90 degree elbow is 5.5ft. The
maximum allowable run of straight pipe on this system is therefore:
35ft – 4 ft – 5.5ft = 25.5ft
Since the planned installation has only 14 ft of straight pipe, the planned vent length is acceptable.
3) Minimum Vent / Exhaust Pipe Length - Minimum vent length is 2ft. Minimum air inlet length is 0ft.

13
13
3) Permitted Terminals for Horizontal Venting (Vent Options 1 - 5) - Table 3a shows permitted types of terminals for both the
vent and air inlet systems. On horizontal direct vent systems using 4” air inlet pipe (Vent Options 1 and 2), the following
Crown co-axial terminals may be used. These terminals have the advantage of requiring only one wall penetration. Part
numbers for the Crown coaxial terminals are as follows:
• 3” Vent - 50-003
• 4” Vent - 50-004
When separate vent and air intake terminals are used, or when the boiler uses indoor combustion air, the vent terminal
is either a tee or an elbow supplied by the vent system manufacturer and equipped with a rodent screen. Vent system
manufacturer’s part numbers for these fi ttings are shown in Table 4. In some cases, the elbows and tees shown in Table 4
require separate adaptors and/or rodent screens. When this is the case, vent manufacturer part numbers for these additional
parts are shown in Table 4 along with the termination fi tting.
When Heat Fab Saf-T Vent SC is used, the Heat Fab 5300CI or 5400CI fi tting is used between the last piece of Saf-T
Vent CI and the terminal. These fi ttings physically adapt from the CI pipe to the terminal and also provide ventilation
openings which must remain open for the Saf-T Vent CI to maintain its clearance rating.
Except when the Crown 50-003 or 50-004 coaxial terminals are used, the air intake fi tting on a horizontal direct vent
system (Options 1 - 2) is always a 90 degree elbow with a rodent screen. This elbow is made out of the same material as the
rest of the air inlet system (either galvanized or PVC) and is installed as shown in Figure 8a.
4) Horizontal vent terminal location - Observe the following limitations on the vent terminal location (also see Fig 15a - d):
• Direct exhaust installations (installations using indoor combustion air) - Exhaust terminal must be at least 4 feet below or
4 feet horizontally from any window, door, or gravity air inlet into the building.
• Direct vent installations – Exhaust elbow or coaxial terminal must be at least 1 foot from any door, window, or gravity
inlet into the building.
• Direct vent installations using termination elbows – Maintain the correct clearance and orientation between the inlet and
exhaust elbows. The elbows must be at the same level and their center lines must be between 12 and 36 inches apart.
• The bottom of the exhaust elbow, tee, or coaxial terminal must be at least 12” above the normal snow line. In no case
should it be less than 12” above grade level.
• The bottom of the exhaust elbow, tee, or coaxial terminal must be at least 7 feet above a public walkway.
• The bottom of the exhaust elbow, tee, or coaxial terminal must be at least 3 feet above any forced air inlet located within
10 feet.
• A clearance of at least 4 feet horizontally or 4 feet vertically must be maintained between the exhaust terminal and gas
meters, electric meters, regulators, and relief equipment.
• Do not locate the terminal under decks or similar structures.
• Top of exhaust elbow, tee, or coaxial terminal must be at least 4 feet below eves, soffi ts, or overhangs. Overhang may not
exceed 3 feet (Figure 15d).
• Terminal must be at least 3 feet from an inside corner.
• Under certain conditions, water in the fl ue gas may condense on the structure in areas around the terminal. If these areas
are made of materials subject to damage by fl ue gas condensate, they should be protected.
• If possible, install the terminal on a wall away from the prevailing wind. Reliable operation of this boiler cannot be
guaranteed if the terminal is subjected to winds in excess of 40 mph.
• The noise level in the vicinity of the terminal is approximately 65 dB (roughly the level of a normal conversation). Avoid
positioning the terminal in areas where this might be objectionable.
5) Horizontal air intake terminal location - Horizontal air intake terminal must be at least 12” above the normal snow line.
6) Permitted Terminals for Vertical Venting (Vent Options 6 - 10) - Terminals used on these systems are caps. Vent
manufacturer part numbers for these caps are shown in Table 4. When Heat Fab Saf-T Vent SC is used, the 5300CI or
5400CI fi tting is used between the highest piece of Saf-T Vent CI and the cap. These fi ttings physically adapt from the
CI pipe to the cap and also provide ventilation openings which must remain open for the Saf-T Vent CI to maintain its
clearance rating.
Vertical direct vent systems (Vent Options 6 - 8) can have combustion air obtained from either a vertical or horizontal air
intake system. When combustion air is obtained from the roof, the air inlet terminal consists of a 180 degree elbow (or two
90 degree elbows) with a rodent screen as shown in Figure 10. When combustion air is obtained through a horizontal vent
system, the air inlet termination is a 90 degree elbow with a rodent screen as shown in Figure 8a.
7) Permitted terminals for Vertical Coaxial Venting (Options 11 - 13) - When the Crown vertical coaxial vent kit is used (Vent
Option 11), a cap compatible with the vent system is used (Figure 12, Table 4). The concentric air intake hood supplied in
the Crown kit is the air inlet terminal (Figure 12).
When vertical coaxial venting is done using Heat Fab Saf-T Vent SC (Options 12, 13), the vent terminal is a SC03VT or
SC04VT terminal installed with a 5300CI or 5400CI adaptor. The openings in this adaptor are used for combustion air.

14
14
TABLE 3b: SUMMARY OF VERTICAL VENTING OPTIONS
VENT OPTION # 678910
CLASSIFICATION USED IN THIS
MANUAL
VERTICAL
DIRECT VENT
VERTICAL
DIRECT VENT
(RESERVED
FOR FUTURE
USE)
VERTICAL
DIRECT
EXHAUST
VERTICAL
DIRECT
EXHAUST
ILLUSTRATED IN FIGURE 10 10 11 11
VENT PIPE STRUCTURE
PENETRATION
ROOF ROOF ROOF ROOF
AIR INTAKE PIPE STRUCTURE
PENETRATION
ROOF OR WALL ROOF OR WALL N.A. N.A.
VENT PIPE SIZE 3” 4” 3” 4”
AIR INTAKE PIPE SIZE 4” 4” N.A. N.A.
MAXIMUM VENT
PIPE LENGTH
CWD060 - CWD138 47 FT
47 FT 47 FT 47 FT
CWD165 27 FT
47 FT 27 FT 47 FT
CWD193 17 FT
47 FT 17 FT 47 FT
CWD220 N.R.
47 FT N.R. 47 FT
CWD245 N.R.
47 FT N.R. 47 FT
MAXIMUM
INTAKE PIPE
LENGTH
CWD060 - CWD138 52 FT 50 FT N.A. N.A.
CWD165 32 FT 50 FT N.A. N.A.
CWD193 22 FT 50 FT N.A. N.A.
CWD220 N.R. 50 FT N.A. N.A.
CWD245 N.R.
50 FT N.A. N.A.
EXHAUST TERMINAL BY VENT SYSTEM MANUFACTURER. SAME DIAMETER AS VENT SYSTEM. SEE TABLE 4.
AIR INTAKE TERMINAL
(ROOF PENETRATION)
4” 180 ELBOW 4” 180 ELBOW N.A. N.A.
AIR INTAKE TERMINAL
(WALL PENETRATION)
4” 90 ELBOW 4” 90 ELBOW N.A. N.A.
VENT MATERIAL APPROVED VENT SYSTEM SHOWN IN TABLE 4
AIR INTAKE MATERIAL GALVANIZED OR PVC N.A. N.A.
“N.R” - Not recommended “N.A.” - Not applicable
8) Vertical Vent Terminal Locations (Vent Options 6 - 13) - Observe the following limitations on the location of all vertical
vent terminals (see Figs. 10, 11, 12, 13):
• The lowest discharge opening on the cap must be at least 2 feet above any object located within 10 feet.
• If outside air is used for combustion (Options 6-7, 11-13), the vertical distance between vent and air inlet terminal
openings must be at least 12”.
• The bottom of the air inlet terminal must be at least 12” above the normal snow accumulation that can be expected on the
roof.
9) Terminal offsets - Horizontal elbow or tee terminals may be offset by as much as 5 ft as shown in Figure 14. This sometimes
helps maintain the 12” minimum clearance required above the snow line. The extra two elbows and the section of vertical
pipe on the outside of the building must be counted when checking that the maximum vent / intake pipe length is not
exceeded. On horizontal direct vent systems, both terminals must be offset by the same amount so that their relationship to
one another is the same as shown in Figure 8a. When this offset is used, the horizontal section of vent pipe must be pitched
away from the outside so that condensate cannot collect in the lower offset elbow.
10) Wall thimbles – Wall thimbles are required where the vent pipe passes through combustible walls with less than the
required clearance shown in Table 2 or as required by local codes. Vent manufacturer’s wall thimble part numbers are
shown in Table 4.
11) Condensate Traps and Pitch of Horizontal piping – All horizontal vent piping must be pitched ¼” per foot so that any
condensate which forms in this piping will run towards either the outdoors or into a condensate trap. Vent manufacturer’s
part numbers for suitable condensate traps are shown in Table 4.
All vertical vent systems must include at least one condensate trap as shown in Figures 10-13. This will collect any
condensate that forms in the vent system as well as any rain water that gets around the vent cap.
The maximum allowable vertical run directly off of the boiler without a condensate trap is 7.5 ft (Figure 16). Install a
condensate trap in longer vertical runs so that condensate which might form in this fi rst vertical section will not run into the
boiler fan.

15
15
FIGURE 10: VERTICAL NON-COAXIAL DIRECT VENT SYSTEM (VENT OPTIONS 6, 7)
FIGURE 11: VERTICAL DIRECT EXHAUST SYSTEM (VENT OPTIONS 9, 10)

16
16
TABLE 3c : SUMMARY OF VERTICAL COAXIAL VENTING OPTIONS
VENT OPTION # 11 12 13
CLASSIFICATION USED IN THIS
MANUAL
VERTICAL
COAXIAL
DIRECT VENT
VERTICAL
COAXIAL
DIRECT VENT
VERTICAL
COAXIAL
DIRECT VENT
VENT PIPE STRUCTURE
PENETRATION
ROOF ROOF ROOF
AIR INTAKE PIPE STRUCTURE
PENETRATION
ROOF ROOF ROOF
VENT PIPE SIZE 3” 3” 4”
AIR INTAKE PIPE SIZE
(NON-COAXIAL SECTION)
4” 4” 4”
AIR INTAKE PIPE SIZE
(COAXIAL SECTION)
5”
5” 7”
MAXIMUM VENT
PIPE LENGTH
CWD060 - CWD138 47 FT
47 FT 47 FT
CWD165 27 FT 27 FT
CONSULT
FACTORY
CWD193 N.R. N.R.
CWD220 N.R. N.R.
CWD245 N.R. N.R.
MAXIMUM LENGTH
COAXIAL SECTION
30 FT OR AS
LIMITED BY MAX
VENT LENGTH,
WHICHEVER IS
LESS
AS LIMITED
BY MAX VENT
LENGTH
CONSULT
FACTORY
MAXIMUM
INTAKE PIPE
LENGTH
CWD060 - CWD138 52 FT 50 FT 50 FT
CWD165 32 FT 32 FT
CONSULT
FACTORY
CWD193 N.R. N.R.
CWD220 N.R. N.R.
CWD245 N.R. N.R.
EXHAUST TERMINAL
BY VENT
SYSTEM
MANUFAC-
TURER. SAME
DIAMETER AS
VENT SYSTEM.
SEE TABLE 4.
HEAT FAB
#SC03RC
HEAT FAB
#SC04RC
AIR INTAKE TERMINAL
SUPPLIED WITH
CROWN #500005
COAXIAL VENT
KIT
HEAT FAB
#SC03VT
HEAT FAB
#SC04VT
ADAPTOR FROM NON-COAXIAL
TO COAXIAL SECTIONS
5” “B” VENT
TEE + SUPPORT
SUPPLIED WITH
CROWN #500005
COAXIAL VENT
KIT
HEAT FAB
#SC03TAD4
HEAT FAB
#SC04TAD4
VENT MATERIAL
(NON-COAXIAL SECTION)
APPROVED
VENT SYSTEM
SHOWN IN
TABLE 4
HEAT FAB
SAF-T VENT
HEAT FAB
SAF-T VENT
VENT MATERIAL
(COAXIAL SECTION)
APPROVED
VENT SYSTEM
SHOWN IN
TABLE 4
HEAT FAB
SAF-T VENT SC
HEAT FAB
SAF-T VENT SC
AIR INTAKE MATERIAL
(NON-COAXIAL SECTION)
GALVANIZED OR PVC
AIR INTAKE MATERIAL
(COAXIAL SECTION)
5” TYPE “B”
VENT
HEAT FAB
SAF-T VENT SC
HEAT FAB
SAF-T VENT SC
“N.R” - Not recommended “N.A.” - Not applicable

17
17
FIGURE 12: VERTICAL COAXIAL DIRECT VENT USING CROWN #500005 VENT KIT (VENT OPTION 11)
FIGURE 13: VERTICAL COAXIAL DIRECT VENT USING HEAT FAB SAF-T VENT SC (VENT OPTIONS 12, 13)

18
18
TABLE 4: PERMISSIBLE VENT SYSTEMS AND PRINCIPLE VENT COMPONENTS
MANUFACTURER VENT SYSTEM SIZE
CONDENSATE
TRAP
WALL
THIMBLES
HORIZONTAL
TERMINATION
VERTICAL
TERMINATION
HEAT FAB
SAF-T VENT
EZ SEAL
3
9321
(NOTE 3)
7393GC
7393GCS
5391CI
ELBOW: 7314TERM
TEE: 7390TEE 5300CI
4
9421
(NOTE 3)
7493GC
7493GCS
5491CI
ELBOW: 7414TERM
TEE: 7490TEE
5400CI
SAF-T VENT SC
3
SC03DRN
(NOTE 3)
SC03FS
SC03FSA
ELBOW (NOTE 5):
SC03HT + 7314TERM
TEE (NOTE 5):
SC03HT + 7390TEE
5300CI + SC03VT
(NOTE 6)
4
SC04DRN
(NOTE 3)
SC04FS
SC04FSA
ELBOW (NOTE 5):
SC04HT + 7414TERM
TEE (NOTE 5):
SC04HT + 7490TEE
5400CI
+ SC04VT
(NOTE 6)
PROTECH
SYSTEMS
INC.
FASNSEAL
3 FSHDT3 FSWT3
ELBOW: FSELB9003 + FSBS3
TEE: FSTT3
FSRC3
4
FSHDT4
OR FSCD4
(NOTE 4)
FSWT4
ELBOW: FSELB9004 + FSBS4
TEE: FSTT4
FSRC4
FASNSEAL W2
3
W2-T3
+W2-DF3
W2-WT3
ELBOW: FSA-SWDW3
+ FSELB9003 + FSBS3
TEE: FSA-SWDW3 + FSTT3
W2-RC3
4
W2-T4
+ W2-DF4
W2-WT4
ELBOW: FSA-DWSW4
+ FSELB9004 + FSBS4
TEE: FSA-SWDW4 + FSTT4
W2-RC4
Z-FLEX
SVE
SERIES III
(“Z-VENT III”)
3 SVEDWCF03 2SVSWTEF03
ELBOW: 2SVSTEX0390
TEE: 2SVSTTF03
2SVSRCF03
4 SVEDWCF04 2SVSWTEF04
ELBOW:
2SVEEWCF0490 + 2SVSTPF
TEE: 2SVSTTF04
2SVSRCF04
METAL-FAB CORR/GUARD
3 CGSWDS(3”) CGSWWPK(3”)
ELBOW: CGSW90LTM(3”)
TEE: CGSWTTM(3”)
CGSWC(3”)
4 CGSWDS(4”) CGSWWPK(4”)
ELBOW: CGSW90LTM(4”)
TEE: CGSWTTM(4”)
CGSWC(4”)
NOTES:
1) See vent system manufacturer’s literature for other part numbers that are required such as straight pipe, elbows, fi restops and
vent supports.
2) In addition to terminals shown, Crown coaxial terminals may be used in some cases. See Table 3 for applications and Crown
part numbers.
3) All Heat Fab condensate traps shown may be installed in vertical or horizontal run.
4) Protech FSCD4 condensate trap may be installed in a vertical or horizontal run. All other Protech traps must be installed in a
horizontal run only.
5) Heat Fab Saf-T Vent SC may not be used for horizontal coaxial venting - a separate air inlet pipe must be provided for hori-
zontal direct vent systems. SC03HT or SC04HT adapters are used to adapt from SC pipe to terminal. Use of SC pipe in horizon-
tal systems does allow for reduced clearances to combustibles in some applications. See Table 2.
6) Heat Fab SC03VT or SC04VT adapters are required on any vertical vent system using Saf-T Vent SC even when combustion
air is obtained through a separate pipe or from the boiler room.
7) Metal-Fab CGSWDS condensate traps may only be installed in a horizontal run.
/