Boss Audio Systems 728CA User manual

Category
Car media receivers
Type
User manual

This manual is also suitable for

4
10 R - 02 1397
The following illustration shows a typical installation. If you have any questions or require information
regarding installation kits, consult your customer car audio dealer or a company suppling kits.
If you are not sure how to install this unit correctly, have it installed by a qualified technician.
Remove the unit
Trim Plate
4
182mm
53mm
1
2
3
Screw
Dashboard
Sleeve
Bend the appropriate
tabs to hold the sleeve
firmly in place.
Trim
Plate
Control
Panel
To attach the front panel back to the unit chassis,
please insert the right side of the panel in the chassis
until it is correctly engaged. Press the left side of the
panel until the mechanism locks it into place.
1
1. Press the Panel Release button.
2. Push the left side of the panel rightward
3. Pull the panel towards you to disengage it from the chassis.
Release
1
1. INSTALLATION
CONNECTOR
ISO
L-CH
WHITE
RED
R-CH
AUX IN
YELLOW
REAR LINE OUT R-CH
REAR LINE OUT L-CH
SUB-W OUT
(Not Supplied)
RCA-TO-RCA CABLE
REAR
L
R
FUSE
AMP
SUB
WOOFER
BLACK
FRONT LINE OUT
R-CH
L-CH
RED
WHITE
RCA-TO-RCA CABLE
(not supplied)
AMP
ANTENNA
JACK
A
N
T
E
N
N
A
S
O
C
K
E
T
ISO CONNECTOR WIRING CHART
YELLOW
WIRE COLOR
VIOLET/BLACK
GREY/BLACK
GREEN/BLACK
WHITE/BLACK
VIOLET
WHITE
GREY
B1
B5
B4
B3
B2
B8
GREEN
B7
B6
A5
A4
PIN
BLACK
A8
RED
A7
BLUE
LEFT FRONT SPEAKER (-)
LEFT REAR SPEAKER (+)
LEFT REAR SPEAKER (-)
RIGHT REAR SPEAKER (+)
RIGHT FRONT SPEAKER (+)
LEFT FRONT SPEAKER (+)
RIGHT FRONT SPEAKER (-)
RIGHT REAR SPEAKER (-)
FUNCTION/LABEL
CONNECT TO SYSTEM CONTROL
TERMINAL OF THE POWER AMP OR
AUTO ANTENNA RELAYCONTROL
TERMINAL(max 150mA 12VDC)
BATTERY(+)
IGNITION(ACC)
GROUND
1
2
3
4
5
6
7
8
4
5 7
8
A
B
FIGURE 2
2. CONNECTING THE SYSTEM
2
No.
Item
Decriptions
MENU
BAND
Short press this button to change between BAND
FM1,FM2,FM3, AM1(MW1) or AM2 (MW2).
1
2
3
4
5
6
7
Press this button to open the control panel.
Press this button access into the System Menu.
AUDIO
Press this button is access into the Audio Menu
mode: .VOL->BAS->TRB->BAL->FAD
(Power)
Press this button or any other button on the front
panel (except Release/Eject) to turn the unit on.
Press this button again to turn the unit off.
MUTE
Press this button to turn the Mute On/Off.
(Release)
VOLUME KNOB
Rotate the encoder volume to increase and
decrease the volume.
(Audio Menu)
(System Menu)
3
Press SOURCE button to select a different mode of
playback mode: Radio, CD play, and Aux In.
SOURCE
9
10
8
EQ
ESC
Press this button to select the preset Equalizer setting:
FLAT -> POP -> ROCK->CLASSIC-> EQ OFF
Press this button to quick return previous menu or mode.
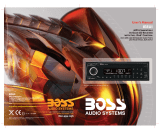
3. THE MAJOR FUNCTION OF THIS UNIT
BROWSE
Under Disc media playback mode, short press
this button to access into the Music Folder/File
searching mode. Rotate the encoder knob to
navigate thru Folder and File list. Once the desire
file appearing on the LCD, press the ENTER
button to confirm and start file play.
Under Disc media playback mode, press this button
to confirm the selection.
ENTER
1
7
2
3
3
4
5
6
8
9
10
11
12
13
14
15 16
Press this button to turn On / Off the iX-BASS
booster function.
Under Tuner mode, press this button briefly to
display the Clock time.
Press this button to eject the Disc.
Press this button to automatically select six
strongest stations and store them in current band.
Under Tuner mode, short press the Numeric
buttons to recall the preset stations. Hold press
the Numberic buttons to store the listening station.
Under Disc media playback mode,press the
Numeric buttons to perform the below operation:
Under Disc media playback mode, press this button
repeatedly to display ID3 information: Track number
and play time ->folder ->file ->title ->artist ->
album ->clock. .
PRESET
NUMERIC
BUTTONS
Press and hold this button to turn On / Off the
Subwoofer function.
SUBW
XBS
INFO
EJECT
AS
No.
Short
press
5
6123
4
Pause/Play
Intro
Folder
Intro
Repeat
Folder
Repeat
Random
Folder
Random
Folder Down Folder UP
13
14
15
16
12
(Subwoofer)
(Auto Store)
Long
press
4
Under Disc media playback mode, press and hold
momentarily to fast forward/backward.
Under tuner mode, press this button to enter into
the Auto Seek mode, press and hold this button
to enter into the Manual Seek mode.
Under Disc media playback mode, press these buttons
to skip a song / file.
FILE UP
/DOWN
TUNE UP
/DOWN
FAST FORWARD
/BACKWARD
11
Press MENU button to access into the System Menu. User can select the below functions:
AREA (Tuner Frequency Spacing)
TIME SET (CLK)
BEEP ON/OFF (Beep Tone)
LOC ON/OFF (Local/Distance Select)
This option allows the selection of the frequency spacing appropriate for your area. “AREA U.S.A” is the
default setting. Rotate the Encoder Volume Konb to select the EUROPE, U.S.A, OIRT (Russia), LATIN,
ASIA (Asia Pacific) or MID-EAST(Middle East) options.
The beep tone feature allows the selection of an audible beep tone to be heard each time a button is
pressed on the face of the radio. "Beep On" is the default display. Rotate Encoder Volume Konb to select
the “Beep Off” option.
The time on the clock is set to “12:00” by default, Rotate the encoder volume knob to adjust the minutes
and hours.Press MENU button to select the hour or minutes.
This feature is used to designate the strength of the signals at which the radio will stop during automatic
tuning. "LOC OFF" is the default, allowing the radio to stop at a broader range of signals. To set the unit to
select only strong local stations during automatic tuning, rotate the Encoder Volume Knob until "LOC ON"
appears in the display.
5
4. ADJUST SYSTEM MENU SETTING
Ground
Left Track
Right Track
Connect the external signal to AUX in jack located atthe front of
the panel, then press Mode button to select Aux mode. Press
Mode Button again to cancel Aux Mode and return to previous
mode.
You can reset the unit to its default setting.
The RESET button is located on the main unit (as shown on the diagram). To press it vertically with a
ballpoint pen or metal object will activate it.
The reset button is to be activated for the following
reasons:
1. Initial installation of the unit when all wiring is
completed.
2. All the function buttons do not operate.
3. Error symbol on the display.
CONNECT THE AUX-IN
RESET THE UNIT
6
5. EXTERNAL CONNECTION AND MEDIA PLAYER
No. Button
Item
Decriptions
1
2
MUTE
Press this button to turn the mute On/Off.
POWER
ON/OFF
When the unit is power on, press this button to
turn Off the unit. Once the unit power off, press
this button to turn On the unit.
4
3
Press this button to increase / decrease the
volume.
VOLUME
KNOB
1
7
2
6
3
4
9
10
5
8
11
12
13
SOURCE
Press this button to select different source
playback mode: RADIO,CD PLAY, TUNER,
AUX IN.
5
6
AUDIO
MENU
ESC
Press this button to enter into the Audio
Menu mode.
Press this button to quick return previous
menu or mode.
SYSTEM
MENU
AUTO
STORE
Press this button to enter into the System
Menu mode.
Press this button to automatically select six
strongest stations and store them in current band.
7
8
7
6. THE FUNCTIONS OF REMOTE CONTROL
9
TUNE UP
/ DOWN
FILE UP
/ DOWN
FAST FORWARD
/BACKWARD
Under the tuner mode, press this button to enter
into the Auto seek mode, press and hold this
button to enter into the Manual Seek mode.
Under Disc/USB/SD media playback mode,
press and hold momentarily to fast forward /
backward.
Under Disc media playback mode, press these
buttons to skip to the next or previous song / file.
Under Tuner mode, short press the Numeric
buttons to recall the preset stations. Hold press
the Numberic buttons to store the listening station.
Under Disc media playback mode, press the
Numeric buttons to perform the below operation:
PRESET
NUMERIC
BUTTONS
13
BAND
XBS
BROWSE
Press this button to change between BAND
FM1,FM2,FM3, AM1(MW1) or AM2 (Mw2).
.
Press this button to turn On/Off the iX-BASS
booster function.
Under the Disc/USB/SD media playback mode,
short press this button is access into the Music
Folder/File searching mode. Rotate the encoder
knob to navigate thru Folder and File list. Once
the desire file appearing on the LCD. Press
‘MENU’ button to confirm and start file play.
10
11
Under Tuner mode, press this button briefly to
display the Clock time.
Under Disc / USB / SD media playback mode,
press this button repeatedly to display ID3
information: Track number and play time ->
folder ->file ->title ->artist ->album ->clock.
Press and hold this button to turn On / Off the
Subwoofer function.
SUBW
INFO
12
(Subwoofer)
No.
Short
press
5
6123
4
Pause/Play
Intro
Folder
Intro
Repeat
Folder
Repeat
Random
Folder
Random
Folder Down Folder UP
Long
press
8
9
Before going through the check list, check wiring connection. If any of the problems persist after check
list has been made, consult your nearest service dealer.
No power or no sound
Noise in broadcasts
Car engine is not on. Turn the car engine on.
Signals are too weak. Select other stations with stronger signals.
Cable is not correctly connected. Check connections.
Check the connection of the car antenna.
Fuse is burnt. Replace fuse.
Change broadcast from Stereo to mono.
Volume is in minimum. Adjust volume to a desired level.
If the above solutions cannot help, press the RESET button.
Ensure that the track played is of a compatible format.
The CD Skips tracks
Ensure that the CD is not damaged or dirty.
Ensure that random mode is deactivated.
Preset stations lost
Battery cable is not correctly connected. Connect the battery cable
to the terminal that is always live.
Cannot play disc
Ensure tha the disc label is inserted with the printed side facing up.
Wipe the disc with fibre cleaning cloth from the centre to the edge
in a straight line.
This disc may be defective. Play another disc.
Ensure that the CD is a finalised CD/CD-R/CD-RW.
Ensure that the CD is not encoded with copyright protection techn-
ologies.
7. TROUBLE SHOOTING
10
Frequency Range
Usable Sensitivity
Usable Sensitivity
Frequency Range
Radio
87.5 - 107.9MHz(American)
87.5 - 108MHz(Europe)
(100KHz per step in auto search and
50KHz per step in manual search)
Better than 15dB at S/N 30dB
Better than 45dB
530 - 1710 KHz(American)
522 -1620KHz(Europe)
-FM
-AM(MW)
Power Supply
Suitable SpeakerImpedance
Pre-AMP output
voltage
Aux-In level
Power output
Fuse
12 V DC (11-14 V), Negative Ground
7.5A
4-8
2.0 V
50W x 4 channels
300mV
8. PRODUCT INFORMATION
Sampling frequency
32/44.1/48 Khz
16/22.05/24 KHz
8/11.025/12KHz
MPEG1
MPEG2
MPEG2.5
ID3
Disc written by Packet Write (UDF) is not supported.
CDROM Mode
1/2
ISO9660 Level
1/2&Joliet(unicode)
999
255
Max File/DIR. Count
Max DIR. Depth
Tree sortingSorting Method
Max File/DIR. Name
64Byte
V1.0/1.1/2.0/2.3(Max 32Byte)
MP3 directory shown in this manual as “Directory”
MP3 file shown “Track”.
Maximum length of file name
31 characters.
Maximum length of directory
32 characters.
Supports CD, CDR and CDRW.
Supports Multi-Session recording.
NOTE
Product information is subject to change without prior notice.
Supported formats:
MPEG1/2/2.5/ Layer 2/3
WMA Version 7/8/9
22/32/44/48KHz
WMA
MP3/WMA
Sampling But rate
32~320Kbps & VBR
If at any time in the future you should need to dispose of this product please note
that Waste electrical products should not be disposed of with household waste.
Please recycle where facilities exist. Check with your Local Authority or retailer for
recycling advice.(Waste Electrical and Electronic Equipment Directive)
  • Page 1 1
  • Page 2 2
  • Page 3 3
  • Page 4 4
  • Page 5 5
  • Page 6 6
  • Page 7 7
  • Page 8 8
  • Page 9 9
  • Page 10 10
  • Page 11 11

Boss Audio Systems 728CA User manual

Category
Car media receivers
Type
User manual
This manual is also suitable for

Ask a question and I''ll find the answer in the document

Finding information in a document is now easier with AI