Kenmore 68088973 User manual
- Category
- Vacuum cleaners
- Type
- User manual
This manual is also suitable for

owner's
manual
MODELNO,
680.88973
Save This Manual For
Future Reference.
CAUTION: Read rules for safe
operation and instructions
carefu Ily.
SHAMPOOER/
POLISHER
• Assembly
• Operation
• Repair Parts
Sold by SEARS, ROEBUCK AND CO., Chicago, IL 60179 U.S.A.

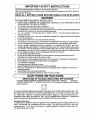
IMPORTANT SAFETY INSTRUCTIONS J
This Rug shampooer/floor polisher is for household use only.
When using electrical Rug shampooer/floor polisher, basic precautions should be followed.
Including the following.
READ ALL INSTRUCTIONS BEFORE USING THIS APPLIANCE
I
I WARNING I
To reduce risk of fire,electric shock,or injury
• DO NOT USE FLAMMABLE OR COMBUSTIBLE LIQUIDS,SUCH AS GASOLINE,OR USE IN
AREAS WHERE THEY MAY BE PRESENT.
• Do not leave this appliance when plugged in.
• To reduce the risk of electric shock-Use indoors only.
• This appliance is provided with doble insulated.Use only identical replacement parts.See
instructions for servicing of double:insulated appliances.
• Do not inmerse. To reduce the risk of electric shock- Use only carpet moistened by
cleaning process.
• To reduce the risk of fire, use only commecially available floor cleaners and waxes intended
" for machine aplication.
• Unplug from outlet when not in use and before servicing.
• Do not allow to be used as a toy. Close attention is necesary when used by or near children.
, Use only as described in this manual.Use only manufacturer's recomended attachments
• Do not use with damaged cord or plug. If appliance is not working as it should, has been
dropped damaged,left outdoors or dropped into water, retum it to a service center before using.
• Do not pull or carry by cord,use cord as a hand e,close a door on cord, or pull a cord aroun_i
sharp edges or corners.Do not run appliance over cord,keep cord away from heated surfaces.
• Do not unplug by pulling on cord.To unplug,grasp the plug, not the cord
• Do not handle plug with wet hands.
• Do not put any object into openings. Do not use with any opening blocked; keep free of
dust,lint, hair,and anything that may reduce air flow.
• Keep hair, loose clothing,fingers, and all parts of body away from openings and moving parts
. Do not attach or remove brushes with electric cord plugged in.
• Turnoff before unplugging.
• Use extra care when cleaning on stairs.
• Never fill dispenser without removing it from the appliance.
• Never turn the appliance an with the handle in the upright position. Make sure handle is in
operating position.
Disassembly of this unit can be hazardous.
Do not leave the appliance turned on when it is not in motion.
SAVE THESE INSTRUCTIONS
SERVICING OF DOUBLE,INSULATED APPLIANCES
A double-insulated appliance is marked Withone or more of the_ following: The words
"'DOUBLE INSULATION" or "'DOUBLE INSULATED" or the double insulation symbol (square
within a square.)
In a double-insulated appliance,two systems of insulation are provided instead of grounding. No
grounding means is provided on a double-insulated appliance, nor should a means for grounding
be added tothe appliance. Servicing a double-insulated appliance requires extreme care and
knowledge of the system, and should be done only by qualified service personnel. Replacement.
parts for a double-insulated appliance must be identical to the parts they replace.
Polarization Intructions:
To reduce the risk of electric shock, this 3ppliance has a polarized plug (one blade is wider than the
other). This plug will fit in a polarized outlet only one way. If the plug does not fit fully in the outlet.
reverse the plug. If still does not fit, contact a qualified electrician to install the proper outlet. Do
not change the plug in any way.

owner's manual
Dear Homemaker:
You have just invested in a fine Kenmore Rug Shampooer-Floor Polisher.
Before using your new Kenmore machine, please pause for a moment and
carefully read this booklet which contains instructions on how to operate and
care for your machine.Specific instructions are given on rug shampooing,
scrubbing,polishing,attaching and cleaning brushes,etc. This will help you
obtain the best performance and avoid unnecessary service expense for
conditions beyond our control.
FULL ONE-YEAR WARRANTY
i =
Whenusedfor privatehouseholdpurposes,ifwithinoneyearfromthedateof
purchese,thisShampooedPolisherfailsdueto defectsin materialor
workntanship,RETURNITTOTHENEARESTSEARSSERVICECENTER
INTHEUNITEDSTATES,andSearswillrepairit,freeofcharge.
Thiswarrantygivesyouspecificlegalrights,andyoumay alsohaveother
rightswhichvaryfromstatetostate.
Sears,RoebuckandCo.,Dept.698/731A,SearsTower,Chicago,lL.60684
f
WHERE TO FIND IT PAGE
Warranty..................................................................................................... 3
Assembly................................................................................................... 4
Dispenser................................................................................................... 5
Operation................................................................................................... 6-7
Parts Ust..................................................................................................... 6-11
Accessories,Service ..................................................................................... 12
\

DO NOT PLUG IN ELECTRIC CORD UNTIL
BRUSHES OR OTHER ACCESORIES HAVE
BEEN ATTACHED AND SWITCH HAS BEEN
PLACED IN THE "OFF"POSITIQN.
HANDLE,
SWITCH BOX AND CORD
.
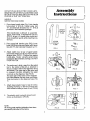
Place lower handle tube (Fig.l)into handle
tube socket"A" (FIG.2). Fasten using bolt
"'B" and internally threaded nut "C" (FIG.3)
provided in the hardware package.
If the handle tube is difucult to assemble
(tight), insert blade of screwdriver into slot
(FIG.4) at rear of handle tube socket and
twist screwdriver gently while inserting han-
dle tube.
2. Place upperhalf handle tube (FIG.l) over
lower half.Aling holes and fasten with remai-
ning bolt "B': and internally threaded nut "'C".
Attach switch box to rear of upper handle
tube.Palce switch box tab (no hole) into rec-
tangular hole (FIG.5). Position box against
handle tube. Fasten using the small screw
provided in the hardware package. DO NOT
OVERTIGHTEN.
,
.
The motor cord, which goes from the switch
box to the bottom of the unit, is attached in
two (2) locations behind the dispenser at top
and bottom. The upper part of the motor cord
is snapped into place alongside the upper
cord hook on the dispenser top (FIG:6).
The lower part of the motor cord is snapped
into place between the two lower cord hooks.
They are located on the dispenser base (FIG.
7).
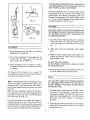
Attach lower plastic hose to rear of unit by
inserting the fitting on the end of hose into
hole located midway at rear of unit (FIG.8).
6. The electric cord is wound around cord
hooks as illustrated in (FIG.9).
NOTE:
All moving parts requiring lubrication have been
permanently lubricated at the factory.
Assembly
Instructions
TUBE
UPPER
_2JHANDLE
TUBE
FIG.1
FIG. 4
FIG. 6
FIG. 8
B o=" ,_ '=_ C
FIG. 2
FIG. 3
r'-,<
o
I
i E
FIG. 5
FIG. 9

_-E
i
CF_ -- G
FIG. "10
C
I
FIG. 11
FIG. 12
j
DISPENS'ER
1. Raise dispenser top "A" (FIG. 10). Position
dispenser "F" in base "B".
2. Press top dispenser firmly against the
handle "tube "G" Valve stem "C" must be
above valve lifter ':D" (FIG. 11).
3. Slide dispenser top "A" down so that it
engages the dispenser and holds it securely
in position.
To dispense the liquid, pull trigger "E"
momentarily and intermittently. Liquid will flow
as long as the trigger is raised
DISPENSING SYSTEM MUST BE THOROUGHLY
CLEANED IMMEDIATELYAFTER EACH USE. DO
NOT STORE LIOUlD IN DISPENSER.
Remove dispenser from unit and empty. Rinse
thoroughly with warm water. The dispensing
system must be flushed immediately after use.
Partially fill dispenser with warm water, mount
on unit and then dispense all the water into a
receptacle placed under the unit.
BRUSHES
ELECTRIC CORD PLUG SHOULD ALWAYS BE
DISCONNECTED FROM THE ELECTRICAL OUT-
LET BEFORE ATTACHING, REMOVING OR
CHANGING BRUSHES.
o
Lay the polisher flat exposing the underside
of the unit (FIG. 12). Using a rotating motion
push the brush on the spindle as far as it will
go.
2. After each use remove brushes with a slight
pull.
3. Wash in warm soapy water after each use.
Shake out excess water. Stand bristles on
paper towel to dry.
DO NOT USE HOT WATER.
DO NOT FORCE DRYING BY USING AN OVEN
OR RADIATOR HEAT.
4. Remove brushes from the machine when not
in use to extend the life of the brush.
PADS
Note: If the dispenser fails to discharge liquid
when the trigger is raised all the way, tilt the
dispenser away from the handle tube. Take a
pair of long-nosed pliers and grasp the valve
lifter "D".
Bend the two projections (tabs) at the same
time upward until a dime fits snugly between
the bottom of the valve stem "C" and the top of
the yalve lifter "D" (FIG. 11).
If liquid continues to flow when the trigger is
released, grasp the valve lifter close to the
handle and bend the two projections downward
until a dime fits snugly between the bottom of
the valve stem and the top of the valve lifter.
THE ELECTRIC CORD PLUG SHOULD ALWAYS
BE DISCONNECTED FROM THE ELECTRICAL
OUTLET BEFORE ATTACHING, REMOVING OR
CHANGING PADS.
,
To attach pads on Shampooer/Polisher: Push
the ends of the adapters (provided in the
hardware package) through the holes in the
pads, then snap adapters on to the Scrubbing
Brushes. DO NOT attach to Shampoo
Brushes.
2, Pads may be cleaned if desired in warm soapy
water. Rinse thoroughly. Stretch out to shape
and allow to dry.

f
I Operationmstru ions
WOOD FLOORS CARE
HARD SURFACE FLOOR CARE
(VINYL, LINOLEUM,ASPHALT TILE AND NO WAX
FLOOR)
I. SCRUBBING (FLOOR STRIPPING AND
CLEANING)
DISCONNECT CORD FROM ELECTRICAL
OUTLE. DO NOT USE MACHINE TO SCRUB
WOOD FLOORS.
Attach scrubbing brushes (for scrubbing floors
with an irregular surface) or nylon scrubbing pads *
(for scrubbing floors with a smooth surface).
RemoVe dispenser tank and fill with, a stripper
and cleaner, diluted as indicated on container.
It is recommended to put the water in first to
avoid foaminq.
Do not overfill tank.Allow at least one inch air space
to avoid spilling.
Attach dispenser.
plug cord into eleclrical outlet.
Lower handle into operalJng position.
Turn swich to proper speed as indicated on the
switch box label.
Clean floor using small circular strokes,dispensing
liquid as needed.
Do not dispense liquid close to the baseboards to
avoid splashing walls.
Wipe up suds with a sponge or cloth.
Disconnect appliance. Remove and wash pads and
brushes.
I1. RENEWING THE FINISH
To renew the finish of your just cleaned floors, you
may use a protective floor finfsh.
Ill.PERIODIC MAINTENANCE
Sweep or vacuum floor frequently.
Damp mop weekly
Be sure to consult floor manufacturer for proper
maintenance.
Never use water based products on wood floors.Only
use solvent based product on wood floors.
CLEANING
Follow instructions on wood floor cleaner found on
Sears Wood Floor Care Kit, or similar product,
II. WAXING
II1.
Follow instructions on wood floor wax found on
Sears Wood Floor Care Kit, or similar product.
PdLISHING
DISCONNECT CORD FROM ELECTRICAL OUTLET.
IV.
Attach the tan polishing pads.
Make sure wax is dry before polishing,
Plug cord into electrical outlet.
Lower handle into operating position.Turn
appliance on.
Guide unit with forward and backwards strokes,
following the direclJon of the grain until the desired
finish is achieved.
Do not apply pressure,the weight of the machine is
sufficient.
Disconnect appliance remove and wash pads
BUFFING
DISCONNECT CORD FROM ELECTRICAL
OUTLET.
Attach the felt buffing pads* or the lambs wool high
luster pads.
Plug cord into electrical outlet. Lower handle into
operating position.Buffing will leave your floors
truly lustrous.
Disconnect appliance, remove and wash pads.
* NOTE'.
NYLON PADS( # 53871) AND BUFFING PADS (# 53471)NOT INCLUDED REFER TO PAGE 12,TO ORDER.
6

V. PERIODIC MAINTENANCE
Sweep,dust or vacuum floor regularly.
Buff floors as needed,following the directions
above.
To remove scuff marks on heavy traffic areas, follow
the polishing directions above
Polishing and:buffing floors often will prolong the
time between waxing.
CARPET CARE
Do not overfill the tank.Allow at least one inch air space
to avoid spilling.
Attach dispenser
Plug cord into electrical outlet.Lower handle into
operating position. Turn swich to proper speed as
indicated on the switch box label:
Clean small areas of 3 X 3 feet at a time using small,
circular and overlapping strokes.Dispense liquid until a
small uniform film of foam appears.
AVOID SOAKING. Mildewing or discoloration may
occur.
SHAMPOOING
DISCONNECT CORD FROM ELECTRICAL OUTLET.
Continue to shampoo until the foam disappears,then
proceed to another area.
tach the shampoo brushes.
Vacuum the carpet first to remove any loose dirt.
Remove all furniture from room,or protect its legs with a
heavy plastic or aluminum foil.
Test the color fastness of your carpet by applying a
small undiluted amount of shampoo dereotly to the carpet
with a sponge on a small hidden area.If the color holds,
you can proceed to shampoo the rest of your carpet.
Remove dispenser tank and fill with a carpet
shampoo, d_luted as indicated on tl_e container
It is recommended to put the water in first to
avoid foaming
Do not apply pressure.Light contact with the rug is
sufficient for thorough cleaning.
When shampooing a large area,the container may need
to be refilled. Always unplug the shapooer and
remove the dispenser before refilling. At this time it may
be convenient to check the brushes and remove any
carpet fibers with a comb.
After shampooing_ disconnect cord from electrical
outlet. Remove and wash brushes, and flush the
dispensing system.
Allow carpeting to dry thoroughly, preferably overnight.
Ventilating the room or using a fan may reduce drying
time.If you need to walk over wet carpet, protect it with a
white cloth or towel.
Vacuum carpet to remove any dirt freed by shampooing

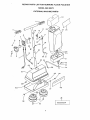
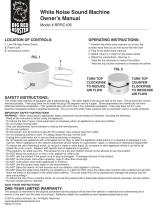
REPAIR PARTS LIST FOR KENMORE FLOOR POLISHER
MODEL 680 88973
EXTERNAL MACHINE PARTS
3
14
12 27 26
48
37
49
r ]
!
I , 5-22-23-52-54 i
L
...... J

Key
1
2
3
6
7
8
9
10
11
12
13
14
15
16
17
18
19
2O
21
24
25
26
27
28
29
PartNo.
100099
130950
010536
010063
110083
130951
171724
130952
100049
130947
230257
060463
250661
240158
010063
060464
090811
052197
052223
010063
052710
130064
171890
450169
461675
040136
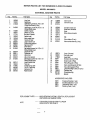
REPAIR PARTS LIST FOR KENMORE FLOOR POLISHER
MODEL 680 88973
EXTERNAL MACHINE PARTS
PartName
Une Cord
Switchbox
Self-tappingscrewNo. 6-20x 3/4.
Phillipsovalhead (2 Req)
Self-lapping screwNo.6-20x 1/2
Phillipsfillisterhead
Switch3 speed
Switchboxcover
Boxlabel 3 speed
Switchknob
MotorcableAssy
Handle(2 Req)
Upperhandle tube
Controllever support
Spiral pin 3/32
Valvespring
Self-tappingscrewNo. 6-20x 1/2
Phillips_llisterhead
Dispenserlever
Dispenserrod
Valvehook
Valvehook spacer
Self-tappingscrewNo, 6-20x 1/2
Phillipsfillisterhead
Lowerhandle tube
Tankcap
Containertoplabel
144 Oz. TankAssy
HardwarePks.
Ruberwasher
Key Parl No. PartName
30 130068 Valvecover
31 130948 Container base
32 010154
33 120096 Containerbase seal
34 130582 Hose-tank connector
35 130076 Hose
36 130065 Elbowhose connector
37 130715
38 O52692 Clip
39 04-0444 Yokeretainer(2 req.)
40 461846 Yokesocket assembly(lreq,)
47 130374 Cover(Chrome)
48 120054 Furnitureguard
49 171892 Headlabel
50 53071 Shampoobrush(2Req)
50 53271 Scrubbrush(2Req)
51 53471 Feltbuffingpad(2Req)
51 53871 Nylonscrubbingpads(2Req)
51 53971 Tanpolishingpad(2Req)
51 53671 Lambswoolhighlusterpad(2req)
53 130949 Containertop
54 081728 Potyetylanebag
190153 Manual
ACCESSORIESINCLUDED:
53071 Shampoo Brushes(1 pair)
53271 Scrubbing Brushes(1 pair)
53671 LambswoolPads (1pair)
53971 Polishing Pads(1 pair)
I
REPLACEMENTPARTS --
NOTE
WHENSERVICINGUSEONLYIDENTICALREPLACEMENT
PARTS.REPLACEDAMAGECORDS.
-- FORINSTRUCTIONSON"HOWTO ORDER
REPAIRPARTS"SEEPAGE 12

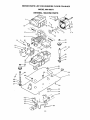
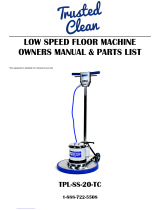
REPAIR PARTS LIST FOR KENMORE FLOOR POLISHER
MODEL 680 88973
INTERNAL MACHINE PARTS
I
15
6 5 4-A
17-B
18

REPAIR PARTS LIST FOR KENMORE FLOOR POLISHER
MODEL 680 88973
INTERNAL MACHINE PARTS
I key PartNo. Part.Name Key Part No, Part. Name
1
2
3
131418
280267
011489
4 051085
5 250059
5-A 250060
6 260001
7 011490
8 050607
9 260026
10 120133
12 280324
14 280263
15 011483
16
17-A
17-B
18
19
20
051119
230462
230461
370133
230330
020016
Motorcover
Field3speed
Self-tappingscrewNo,8-18X 1/2
typeB,Hex,Washerhead(4Req),
Fieldsupport(2 Req)
Pushplate(3Req)
Pushplate(3 Req)
Thrustball(2 Req)
Self-tappingscrewNo,8X 5/16type
B,Hexwasherhead(2 Req)
BearingClamp(2Req)
Armaturebearing(2 Req)
aringarmatureseal(2 Req)
BrushHolderAssy
Armature
Self-tappingscrewNo,6X 3/8Hex,
Washerhead(11Req)
Connectorsupport
Gearcasecoverconmutator(1 Req)
GearCaseCoverfan(1 Req)
Gasket(2Req)
MotorframeAssy
3/8"hex,nut(2 Req)
21 420012
22 420011
23 250849
24 250640
25 040018
26 040238
27 130058
29 130167
30 130758
31 230499
32 240244
33 130551
34 461610
35 130216
36 010154
37 130059
40 011492
42 011492
Bronzegear L
BronzegearR
Spindle(2 Req)
SpindleKey(2 Req)
Washer(4 Req)
Spindleretainer(2req)
Frameinsulator(2 Req)
MotorSupport (3 Req)
Baseinsulator
BasePlateassembly(1 Req)
Spring.yoke!ors!on,(1req)
crewJnsu=a[or{J _eq_
Spindlecapinsulatorp_g(2 Req)
Tray
Self-tappingscrewNo,6X 5/6typeB
Hex,washerhead(2 Req)
Framespacer
Self-tappingscrewNo,8X 1/2type B
Hex,washerhead(4 Req).
Self-tappingscrewNo,8× 1/2typeB
Hex,washerhead(3 Req)
REPLACEMENT PARTS
NOTE
WHEN SERVICING USE ONLY IDENTICAL REPLACEMENT
PARTS .REPLACE DAMAGED CORDS.
FOR INSTRUCTIONS ON "HOW TO ORDER REPAIR PARTS"
SEE PAGE 12
11

TheServiceSideof Sears.-
MODEL NO.
68O.88973
Model / Serial
Number
Model and Serial Number
may be found on the num-
ber plate on the BO'FI-OMOF
THESHAMPOOER/POLISHER
You should record both
MOdel and Serial Number
and keep in a safe place for
future reference.
For the repair or replacement parts you need
Call 7 am-7 pm, 7 days a week
1-800-366-PART
(1-800-366-7278)
eo_eeeooee_eeoeoeeeeeeeeoeeeooeeoe
For in-home major brand repair service
Call 24 hours a day, 7 days a week
1-800-4-MY-HOME_,
(1-800-469'4663)
eeeeoeoeeeeeoseoeeeeeeeeoeooe-eee
For the location of a
Sears Parts and Service Center
in your area
Call 24 hours a day, 7 days a week
1-800-488-1222
(1-800-469-4663)
eeee_eeeeao,oeeoo,oeoo.oeooeeeooeo
For more information on purchasing a
Sears Maintenance Agreement
" n
or to inquire about an existing Agreeme t
Call 9 am-5 pm, Monday-Saturday
1-800-827-6655
YourSears Merchandise has added value when you consider that Sears has service units
nationwide staffed with Sears trained technicians... Professional technicians specially
trained on Sears products, having the parts, tools and the equipment to insure that we
meet our pledge to you... We service what we sell.
®
Sold by SEARS, ROEBUCK AND CO., Chicago, IL 60179 U.S.A.
19-0153-7 PRINTEDIN MEXICO (_
-
 1
1
-
 2
2
-
 3
3
-
 4
4
-
 5
5
-
 6
6
-
 7
7
-
 8
8
-
 9
9
-
 10
10
-
 11
11
-
 12
12


Kenmore 68088973 User manual
- Category
- Vacuum cleaners
- Type
- User manual
- This manual is also suitable for
Ask a question and I''ll find the answer in the document
Finding information in a document is now easier with AI
Related papers
-
Sears 680.84973 User manual
-
Kenmore 114.85925 User manual
-
-
-
-
-
-
-
-
Other documents
-
Hoover Shampoo- Polisher User manual
-
Electrolux 700SLC-1 User manual
-
-
Pullman Holt Gloss Boss Polisher Operation & Care Instructions
-
-
 Big Red Rooster BRRC106B User manual
-
GE 71722 User manual
-
Coopers 9222 Operating instructions
-
 Trusted Clean TPL-SS-17-TC Owner's Manual & Parts List
-
Eureka 2500 User manual

