Page is loading ...

Version 1.1 - 11/11/2008
Page 1 of 31
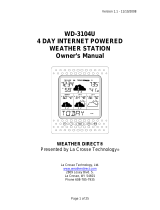
WA-1140U
4 Day Talking Weather Forecaster
Owner’s Manual
WEATHER DIRECT®
Presented by La Crosse Technology
®
La Crosse Technology, Ltd.
www.weatherdirect.com
2809 Losey Blvd. S.
La Crosse, WI 54601
Phone 608-785-7935

Version 1.1 - 11/11/2008
Page 2 of 31
Table of Contents
Table of Contents ............................................................................................................................ 2
Congratulations ................................................................................................................................ 4
Quality Forecasts ............................................................................................................................. 4
Weather Direct® is Green ............................................................................................................... 4
Included in the Box .......................................................................................................................... 5
915 MHz Wireless Sensor Technology ........................................................................................... 5
What You Need to Get Started: ....................................................................................................... 6
IMPORTANT MESSAGE: ................................................................................................................ 7
Set Up your WA-1140U ................................................................................................................... 7
Hardware Installation ....................................................................................................................... 7
Wireless Outdoor Sensor Installation Options ............................................................................ 8
To Surface Mount the Outdoor Sensor: .................................................................................. 8
To Wall Mount the Outdoor Sensor: ....................................................................................... 8
Gateway Installation ........................................................................................................................ 8
Online Resources ............................................................................................................................ 9
Features ......................................................................................................................................... 10
Time Setting on Wireless Display .................................................................................................. 10
Wireless Outdoor Sensor .............................................................................................................. 11
Edit Device Settings Online ........................................................................................................... 11
Wireless Display Operation ........................................................................................................... 14
“MODE” Key .............................................................................................................................. 16
“ALARM” Key ............................................................................................................................ 17
Turn Alarm ON/OFF .............................................................................................................. 17
Set Alarm Time ..................................................................................................................... 17
“SNOOZE” Key .......................................................................................................................... 17
Alarm Snooze ....................................................................................................................... 17
View Outdoor Temperature................................................................................................... 17
Manually Request a Weather Direct® Data Update ............................................................. 17
Listen to a Severe Weather Alert .......................................................................................... 18
“- VOLUME +” Key .................................................................................................................... 18
Change the Volume of Audio Playback ................................................................................ 18
Change a Setting While Using the “SET” Modes ................................................................. 18
Forecast “ ” Key ................................................................................................................... 19
Hear the Talking Weather Forecast ...................................................................................... 19
Set a Custom Greeting to Hear Before the Forecast ............................................................ 19
“A, B and C” Keys – Custom Audio Feeds ................................................................................ 19
Assign an Audio Feed to the “A, B or C” Key ....................................................................... 19

Version 1.1 - 11/11/2008
Page 3 of 31
Hear the Audio Feed Assigned to the “A, B or C” Key ......................................................... 20
“SET” Key .................................................................................................................................. 20
When ADD 4 LOCATIONS Expansion Option is Active ....................................................... 20
Changing Settings on Your Wireless Display ....................................................................... 20
Set Mode 1 – Set LCD Contrast (1-8) .............................................................................. 21
Set Mode 2 - Set Text Scrolling Speed (1-3) .................................................................... 21
Set Mode 3 – Factory Reset of Wireless Display ............................................................. 21
Set Mode 4 - View Device ID ............................................................................................ 22
FREE Trial of Expansion Options for 14 Days .............................................................................. 22
Four Additional Forecast Locations ........................................................................................... 23
Severe Weather Alerts .................................................................................................................. 23
Types of Severe Weather Alerts: .......................................................................................... 24
Forecast Icons Explained .............................................................................................................. 25
Care and Maintenance .................................................................................................................. 26
Battery Low Icons .......................................................................................................................... 26
Battery Replacement ..................................................................................................................... 27
Troubleshooting ............................................................................................................................. 27
Specifications ................................................................................................................................. 27
Temperature Range .............................................................................................................. 27
Battery Life ............................................................................................................................ 27
Dimensions ........................................................................................................................... 27
Weather Direct® Update Rate .............................................................................................. 27
Weather Direct® Wireless Range ......................................................................................... 27
Power Requirements ..................................................................................................................... 27
Liability Disclaimer ......................................................................................................................... 28
FCC Statements ............................................................................................................................ 29
Warranty Information ..................................................................................................................... 30

Version 1.1 - 11/11/2008
Page 4 of 31
Congratulations
You have just purchased the world’s first Internet-Powered Weather Station.
Weather Direct® uses the power of the Internet to deliver weather data and other
important information tailored to you, because you are in control of the
information it delivers.
We understand that no one likes having to read a manual, so we’ve tried to make
this a fun and rewarding read. After all, Weather Direct® is all about you. It’s like
having your own personal assistant to tell you the weather how, when and where
you want it. Knowing how Weather Direct® works will allow you to get the most
out of this innovative new system.
Weather Direct® - Not Just Another Weather Station. Weather Direct® is the
complete weather experience.
Quality Forecasts
Weather Direct® provides the most accurate forecast information available,
customized to your exact location! Our forecasts go beyond backyard
measurements by using Internet-enabled weather data provided by official
National Weather Service instrumentation and local weather reporting stations
widely distributed throughout North America.
The same quality weather information used by meteorologists to deliver the local
forecast plus additional weather data unique to the Weather Direct® network is
available to you 24 hours a day! We provide the most detailed, customized, up-
to-date weather forecasts available on any medium. Weather Direct® allows you
to pinpoint your exact location to ensure that you receive precision weather
forecasts customized for you!
Weather Direct® is Green
We are doing our part to keep our planet healthy by eliminating our paper
manuals, saving trees in the process. Not only are we reducing the amount of
paper, but we are also trying to help you save space in your desk drawer, file
cabinet or box in the basement where all these pesky manuals end up. Now you
can print only the pages from this manual that you need… or not print any at all if
you find what you are looking for online.

Version 1.1 - 11/11/2008
Page 5 of 31
The Gateway uses only 1 watt of power with a two year battery life on the
Wireless Display and Temperature sensor. Since the Weather Direct® system
works even when your computer is off, you save money on electricity.
Included in the Box
The WA-1140U 4 Day Talking Weather Forecaster is a complete Weather
Direct® system that includes:
• WA-1140U Wireless Display – Provides weather forecast information,
time, date and other custom data from the Internet. Also receives and
displays wireless outdoor temperature, from your backyard using the
included Wireless Outdoor Sensor.
• Wireless Gateway + Mounting Plate – Provides your Weather Direct®
System with weather data and other customizable feeds from the
Internet. Sends data your Wireless Display with a wireless range of up
to 330 feet (open air).
• TX-50U Wireless Outdoor Temperature Sensor + Mounting Plate –
Measures the outdoor temperature where you are and sends
temperature data to your Wireless Display with a wireless range of up
to 330 feet (open air).
• (4) Screws and drywall anchors for mounting the Wireless Outdoor
Temperature Sensor and the Wireless Gateway
• Quick Set Up Card
• Weather Club Information Card
• LAN cable to connect the Gateway to a network router
• AC adapter for Gateway
915 MHz Wireless Sensor Technology
This product offers:
INSTANT TRANSMISSIO
N
is the state-o
f
-the-art new
wireless transmission technology, exclusively designed
and developed by LA CROSSE TECHNOLOGY®.
INSTANT TRANSMISSION offers you an immediate
update (every 4 seconds!) of all your outdoor data
measured from the sensors: follow your climatic
variations in real-time!

Version 1.1 - 11/11/2008
Page 6 of 31
What You Need to Get Started:
• High-speed Internet connection – cable, DSL or other broadband
Internet service will work. NOTE: If you only have a Dial-Up Internet
connection, Weather Direct® will not work. However, you can use
Weather Direct® Lite with a Dial-Up connection using your computer’s
USB port – see www.weatherdirect.com/lite
• Router or broadband modem with built-in router. (contact your Internet
service provider ISP for information on compatibility with their service)
• If you have any questions about routers, or you would like a
recommendation on a great router for use with Weather Direct®, see -
www.weatherdirect.com/router
• Valid e-mail address – required to make sure you can retrieve your
password and receive other information about your user profile.
• 2 “AA” Alkaline batteries for the Wireless Outdoor Sensor
NOTE: Rechargeable batteries are not recommended due to the wide variation in
performance between brands and types. Please use only fresh Alkaline batteries.
• 3 “C” Alkaline batteries for the Wireless Display
NOTE: Rechargeable batteries are not recommended due to the wide variation in
performance between brands and types. Please use only fresh Alkaline batteries.
• Visit www.weatherdirect.com and click “Register” to Start
• After you have registered and selected a forecast location and Time
Zone for your Wireless Display, the forecast data will show up on the
display within 60 seconds.
• A reasonably current Windows, Macintosh, or Linux PC with internet
browser installed is required for initial set up and configuration
changes.
• The browser must be configured with Java Script enabled. Most
browsers allow JavaScript as a standard feature. If you have turned
off support for JavaScript in your browser, please allow JavaScript to
run again to register or configure your Device.

Version 1.1 - 11/11/2008
Page 7 of 31
IMPORTANT MESSAGE:
Please DO NOT insert batteries into the Wireless Display or the Outdoor Sensor
until instructed to do so.
Connect the Gateway to an available LAN port on your network router with the
LAN cable (included) and then power up the Gateway with the AC Adapter
(included).
Set Up your WA-1140U
NOTE: The Quick Set-Up Card that is included in the box contains additional
instructions to help you get started quickly if you want to perform a basic setup of
your Weather Direct® system without reading this entire manual.
Open www.weatherdirect.com
in a web browser and click “REGISTER” at the top
of the page. Our Online Registration Wizard will guide you through the complete
registration process.
Hardware Installation
NOTE: Hardware installation is only intended to be performed after you have
registered your Gateway and Wireless Display, inserted batteries into the
Wireless Outdoor Temperature Sensor, and have confirmed successful reception
of weather data.

Version 1.1 - 11/11/2008
Page 8 of 31
Wireless Outdoor Sensor Installation Options
NOTE: Move the Wireless Outdoor Sensor into its intended location and wait for
10 minutes to make sure the outdoor temperature is still being received by the
Wireless Display. Press the “SNOOZE” Key on your Wireless Display to show
the outdoor temperature. If the display shows - -,-F for the outdoor temperature,
the signal cannot reach the Wireless Display. Find a closer location to mount the
Wireless Outdoor Sensor and wait 10 minutes to check the Wireless Display
again for reception.
DO NOT mount the Wireless Outdoor Sensor in a permanent fashion until
you are sure the signal is being received by the Wireless Display.
To Surface Mount the Outdoor Sensor:
We have provided a mounting plate that you can attach to a surface
with the supplied screws. The Sensor can be positioned on a flat
surface by securing the stand to the bottom by gently pushing the
bottom of the Sensor onto the holding pegs of the stand until they
click into place in the grooves on the Sensor.
To Wall Mount the Outdoor Sensor:
The Outdoor Sensor is weather resistant, but not water proof. To
ensure maximum Sensor life, mount it in a covered place out of the
elements like under the eaves. Placement on the North side of your
home will provide the most accurate readings. Mount it about 18”
down from the eaves for optimum performance. This ensures that the
weather data collected by the Outdoor Sensor will not be affected by
the temperature of the air leaving the attic.
We have provided a mounting plate that you can attach to the wall with the
supplied screws. Gently snap the Sensor onto the holding pegs on the mounting
plate after the plate is screwed to the wall. When the holding pegs are securely
locked into the slots on the Sensor, you will hear a “Click”.
Gateway Installation
The Gateway should be installed indoors in an
easy-to-reach location. Registration requires
that you press the gray button on the
Gateway. It can be mounted securely to the
wall with the included mounting plate and
drywall anchors.

Version 1.1 - 11/11/2008
Page 9 of 31
If you require a longer LAN cable to mount the Gateway in a desired location,
any standard Category 5 network cable will work, but a crossover cable may not
work. Crossover cables designed to connect two computers without networking
hardware may not work with your Gateway.
NOTE: Network cables usually have length limitations. The same length
limitations will apply that apply to computers on your home network.
The Gateway sends weather forecasts to your Wireless Display over a maximum
330 ft. range. Walls and other obstructions between the Gateway and Wireless
Display will affect the range. The Wireless Signal Icon
will indicate the signal
strength to let you know if your Gateway and Wireless Display are within range.
Online Resources
These links can help to enrich your Weather Direct® experience:
• Help – www.weatherdirect.com/help
• FREE Membership Included to the Weather Club, at
www.theweatherclub.com featuring:
Online weather forecasts by Meteorologist Paul Douglas
Radar maps
Video and photo uploads
And Much more!
• For a list of places to choose from as forecast locations -
www.weatherdirect.com/places

Version 1.1 - 11/11/2008
Page 10 of 31
Features
• Free Forecasts for Over 40,000 Locations in the United States and
Canada, Including Your Hometown, Golf Courses, Parks Sports
Venues and More.
• Automatically Updates Itself via the Gateway
• 4 Day Forecast with Daily Sky Condition Icons
• Specific Forecast for Morning, Afternoon, Evening and Night and Full
Day
• Lower LCD Line Scrolls City Name, Forecast, Outdoor Temperature,
Sun Rise/Set
• Lower LCD Line Scrolling Speed Adjustment (1-4)
• LCD Contrast Setting (1-7)
• Daily HI / LOW Temperature Forecast
• Wireless Outdoor Temperature (°F/°C)
• Monitor Your Outdoor Temperature From Anywhere in the World on a
Free Membership to the Online Weather Club. For more details,
please visit www.theweatherclub.com
• Time Alarm with Snooze
• Time and Date Set Automatically
• Low Battery Indicator on the LCD and the web site for the Wireless
Display and Outdoor Sensors
Time Setting on Wireless Display
The Time Zone you select
on www.weatherdirect.com
for your Wireless Display is
intended to set the time for
your physical location so
the clock on your Wireless
Display is accurate. This
time is independent of your
selected forecast locations.
The Wireless Display will
ONLY display the time from
the “Time Zone for Wireless
Display Clock” set on the
web site, NOT the time at
the forecast locations.
There is only one Time
Zone available per Wireless

Version 1.1 - 11/11/2008
Page 11 of 31
Display.
The Daylight Saving Time (DST) checkbox on your Wireless Display settings at
www.weatherdirect.com is selected by default because most locations observe
DST. If you are in a location that does not observe DST, please make sure to
uncheck this box.
Wireless Outdoor Sensor
The Wireless Outdoor Sensor sends temperature data to your Wireless Display,
accurate to within a tenth of one degree.
The Outdoor Temperature Sensor uses 2 x “AA”,
Alkaline batteries. To install and replace the
batteries, please follow the steps below:
1. Remove the battery compartment cover on
the back of the sensor.
2. Insert the batteries, observing the correct
polarity (see marking).
3. Replace the battery compartment cover on
the unit.
Press the “SNOOZE” Key on your Wireless Display to show the outdoor
temperature at any time. The outdoor temperature will scroll on the bottom of the
LCD.
Edit Device Settings Online
This section will show you how to set up your Wireless Display using your
account at www.weatherdirect.com .
• Log In to your profile on www.weatherdirect.com and click on your
WA-1140U Wireless Display under the “My Devices” banner

Version 1.1 - 11/11/2008
Page 12 of 31
• Click the “Edit Device Settings” button
• Scroll down to the desired section on the setup page and enter your
preferences.
• Click the “Save Settings” button to finish

Version 1.1 - 11/11/2008
Page 13 of 31

Version 1.1 - 11/11/2008
Page 14 of 31
Wireless Display Operation
This section will teach you how to use your Wireless Display once you have
completed online registration.
There are 6 control Keys located on the front of the Wireless Display: “Forecast
”, “A”, “B”, “C”, “SET” and “MODE”.
There are 3 control Keys located on the top of the Wireless Display: “ALARM”,
“SNOOZE” and “- VOLUME +”
The following information is divided into sections based on the function of each
Key.

Version 1.1 - 11/11/2008
Page 15 of 31
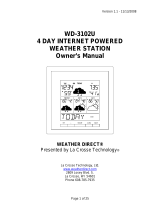
Battery
Low
Icons
Alarm
Icon
LCD Has 4 Day Forecasts
Starting with “ TODAY”.
All Days Have a Sky Condition
Icon with Daily
HI and LO Temperature
Time
Scrolling Text Display:
Scrolls Location,
Outdoor Temperature
Weather Data
Battery
Compartment
Date
Speaker for TALKING
Weather Forecasts
and More
Forecast
Key
ALARM
Key
Set
Key
Mode
Key
Audio Feed
Keys A,B,C
SNOOZE
Key
VOLUME +/-
Key

Version 1.1 - 11/11/2008
Page 16 of 31
“MODE” Key
Specific Forecasts help you prepare for different weather conditions during the
day by providing weather information for Morning, Afternoon, Evening and Night.
You'll know if the weather during the morning commute will be different from the
weather during the rest of the day.
You'll know to bring your umbrella to work on a deceptively beautiful sunny
morning, because Micro Forecasts will inform you that it will rain in the afternoon
on your way home.
Going to the game today? The Afternoon and Evening forecasts are a lifesaver!
Micro Forecasts help to make sure that you pack a blanket or a rain coat if
needed.
Work 2nd or 3rd shift? Receive detailed forecast information tailored to specific
times of the day when you are the most active.
You can change the Micro Forecast reading on your Wireless Display by
pressing the “MODE” Key to toggle between the available options.
Press the “MODE” Key to cycle through the Micro Forecast options:
1. MORNING
Forecast from 6:00 AM - 11:59 AM with Daily HI/LO Temperature
2. AFTERNOON
Forecast from 12:00 PM - 5:59 PM with Daily HI/LO Temperature
3. EVENING
Forecast from 6:00 PM - 11:59 PM with Daily HI/LO Temperature
4. NIGHT
Forecast from 12:00 AM – 5:59 AM with Daily HI/LO Temperature
5. ROLL DAY
Rotates between the four Micro Forecasts and the Daily Forecast
6. SECTION+
Shows the forecast for the next six hour period so you can be prepared for
the upcoming weather. If it was morning now, it would show the afternoon
forecast. If it was evening now, it would show the night forecast, etc.

Version 1.1 - 11/11/2008
Page 17 of 31
7. ONLY DAY
Shows only the Daily forecast when you are only interested in the weather
for the day rather than forecasts for morning, afternoon, evening or night.
“ALARM” Key
Turn Alarm ON/OFF
• Press the “ALARM” Key to turn the alarm ON. The Alarm icon “((•))”
will appear on the LCD.
• Press the “ALARM” Key again to turn the alarm OFF. The Alarm icon
“((•))” will disappear from the LCD.
• Press the “ALARM” Key when the alarm is sounding to stop the alarm
for 24 Hours.
Set Alarm Time
• Press and Hold the “ALARM” Key until the hours digit flashes to set the
alarm time. Alarm will sound once every 24 hours while active.
• Press the “VOLUME +” Key to change the hour. “PM” will indicate a
PM time, while no icon next to the time means AM time.
• Press the “ALARM” Key again and the minutes digit will flash.
• Press the “VOLUME +” Key to change minutes.
• Press the “ALARM” Key once more to return to normal display
“SNOOZE” Key
Alarm Snooze
• Press the “SNOOZE” Key to temporarily silence the alarm for 5
minutes. The Alarm icon “((•))” will flash on the LCD while the Snooze
function is active. Press any Key to cancel Snooze and turn the Alarm
off until tomorrow.
View Outdoor Temperature
• Press the “SNOOZE” Key to view the current outdoor temperature from
your synchronized wireless outdoor sensor.
Manually Request a Weather Direct® Data Update
• When you register your Wireless Display, the weather data is updated
within a few minutes. Every 6 hours after that, your Gateway will send
weather data to update your Wireless Display.

Version 1.1 - 11/11/2008
Page 18 of 31
• After changing the forecast location or other setting on the web site, it
can be up to six hours for your next scheduled automatic update.
• After adding an Expansion Option to your Wireless Display, it can be
up to six hours for your next scheduled automatic update.
• If you do not want to wait for your Wireless Display to update
automatically, Press and Hold the “SNOOZE” Key for 3 seconds until
your Wireless Display beeps once. A second beep within a few
seconds will signify that the Wireless Display is receiving the data.
The bottom of the LCD will read “UPDATE” and a number code until
the Wireless Display has finished downloading the weather and audio
data.
Listen to a Severe Weather Alert
NOTE: The Severe Weather Alert Expansion Option MUST be Active for Your
Wireless Display to Listen to a Severe Weather Alert. Visit
www.weatherdirect.com
and log in to your account to add the Severe Weather
Alerts Expansion Option to this Wireless Display.
• Press and hold the “SNOOZE” Key for one second to hear the current
active Severe Weather Alert.
• The Severe Weather Alert text will scroll across the bottom of the LCD.
• Press the “SNOOZE” Key again to cancel playback of the Severe
Weather Alert and return to normal mode.
“- VOLUME +” Key
Change the Volume of Audio Playback
• Press the “- VOLUME +” Key on the “+” side to increase the volume.
• Press the “- VOLUME +” Key on the “-” side to decrease the volume.
• “VOLUME” and the current setting will display on the bottom of the
LCD while setting the volume.
• The Volume range is from 1-20
Change a Setting While Using the “SET” Modes
NOTE: See the section on the “SET” Key on page 20 for more information.
• Press the “- VOLUME +” Key on the “+” side to increase the setting.
• Press the “- VOLUME +” Key on the “-” side to decrease the setting.

Version 1.1 - 11/11/2008
Page 19 of 31
Forecast “ ” Key
Hear the Talking Weather Forecast
• Press the Key to hear the Talking Weather Forecast with custom
greeting message. You can set the custom greeting message to be
spoken before the forecast.
• It will take the server a little time to process your Talking Weather
Forecast after you make changes to your setup. Please be patient.
While the server processing is happening, we automatically send
Weather to your LCD display, including icons and scrolling text. You
will receive this LCD Weather data first, and then the Talking forecast
as soon as it is ready.
Set a Custom Greeting to Hear Before the Forecast
• See “Edit Device Settings Online” on page 11 for information on
how to access the setup page for your Wireless Display.
• Scroll down to the “Audio Forecast Greeting Text” section
• Enter your Greeting, up to 50 characters long
• Click the “Save Settings” button to finish
“A, B and C” Keys – Custom Audio Feeds
Assign an Audio Feed to the “A, B or C” Key
• See “Edit Device Settings Online” on page 11 for information on
how to access the setup page for your Wireless Display.
• Scroll down to the “Audio Feed Selection” near the bottom
• You can assign up to three feeds to play when you press this Key
• Select your Audio Feeds
• Click the “Save Settings” button to finish

Version 1.1 - 11/11/2008
Page 20 of 31
Hear the Audio Feed Assigned to the “A, B or C” Key
• Press the “A, B or C” Key to hear the Audio Feeds you chose
• It will take the server a little time to process your Audio Feeds after you
make changes to your setup. Please be patient. While the server
processing is happening, we automatically send Weather to your LCD
display, including icons and scrolling text. You will receive this LCD
Weather data first, and then the audio feed as soon as it is ready.
“SET” Key
When ADD 4 LOCATIONS Expansion Option is Active
Press the “SET” Key to toggle between the forecast locations on the Wireless
Display when the ADD 4 LOCATIONS Expansion Option is active. The name of
the location will appear briefly on the bottom of the LCD when it is selected.
Weather data for up to 5 locations can be viewed on your Wireless Display.
Changing Settings on Your Wireless Display
Press and hold the “SET” Key until the Wireless Display beeps to enter the SET
mode. Press the “SET” Key to toggle through the four SET modes. If you wait for
5 seconds without pressing a Key, the Wireless Display will exit the SET mode
and return to normal operation.
/