Page is loading ...


2
Precautions
TO REDUCE THE RISK OF ELECTRIC SHOCK, DO NOT
REMOVE THE COVER(OR BACK).
NO USER-SERVICEABLE PARTS ARE INSIDE. REFER
SERVICING TO QUALIFIED SERVICE PERSONNEL.
This symbol indicates “danger-
ous voltage” inside the product
that presents a risk of electric
shock or personal injury.
This symbol indicates important
instructions accompanying the
product.
RISK OF ELECTRIC SHOCK
DO NOT OPEN
CAUTION: DVD PLAYERS USE AN INVISIBLE LASER BEAM WHICH CAN
CAUSE HAZARDOUS RADIATION EXPOSURE IF DIRECTED.
BE SURE TO OPERATE PLAYER CORRECTLY AS INSTRUCTED.
CAUTIONS
Caution: To prevent electric shock, match wide blade of plug to wide slot, fully insert.
Attention: Pour éviter les chocs électriques, introduíre la lame la plus large de la fiche dans
la borne correspondante de la prise et pousser jusqu au fond.
This product satisfies FCC regulations when shielded cables and connectors are used to
connect the unit to other equipment. To prevent electromagnetic interference with electric
appliances, such as radios and televisions, use shielded cables and connectors for
connections.
FCC NOTE (for U.S.A):
This equipment has been tested and found to comply with the limits for a Class B digital
device, pursuant to Part 15 of the FCC rules. These limits are designed to provide reason-
able protection against harmful interference in a residential installation. This equipment gen-
erates, uses and can radiate radio frequency energy and, if not installed and used in accor-
dance with the instructions, may cause harmful interference to radio or television reception,
which can be determined by turning the equipment off and on, the user is encouraged to try
to correct the interference by one or more of the following measures.
• Reorient or relocate the receiving antenna.
• Increase the separation between the equipment and receiver.
• Connect this equipment into an outlet on a circuit different from that to which the receiver is
connected.
• Consult the dealer or an experienced radio/TV technician for help.
This class B digital apparatus meets all requirements of the Canadian Interference --
Causing Equipment Regulations.
CLASS 1 LASER PRODUCT
LUOKAN 1 LASER LAITE
KLASS 1 LASER APPARAT

3
Precautions
CAUTION
THIS PRODUCT UTILIZES A LASER. USE OF CONTROLS OR
ADJUSTMENTS OR PERFORMANCE OF PROCEDURES
OTHER THAN THOSE SPECIFIED HEREIN MAY RESULT IN
HAZARDOUS RADIATION EXPOSURE. DO NOT OPEN COVER
AND DO NOT REPAIR YOURSELF. REFER SERVICING TO
QUALIFIED PERSONNEL.
Note:
• This unit can be used only where the power supply is AC 120V, 60Hz. It cannot be used
elsewhere.
• This DVD player is designed and manufactured to respond to the Region Management
Information. If the Region number of a DVD disc does not correspond to the Region
number of this DVD player, the DVD player cannot play the disc.
• This device is protected by U.S. patent numbers 4,631,603, 4,577,216 and 4,819,098
and other intellectual property rights. The use of Macrovision’s copy protection technolo-
gy in the device must be authorized by Macrovision and is intended for home and other
limited pay-per-view uses only, unless otherwise authorized in writing by Macrovision.
Reverse engineering or disassembly is prohibited.
WARNING
To reduce the
risk of fire or
shock hazard, do
not expose this
DVD player to
rain or moisture.
• Before connecting other components to this player, be sure to turn them all off.
• Do not move the player while a disc is being played, or the disc may be scratched or bro-
ken, and the player’s internal parts may be damaged.
• Do not put a flower vase filled with water or any small metal objects on the player.
• Be careful not to put your hand into the disc tray.
• Do not place anything other than the disc in the disc tray.
• Exterior interference such as lightning and static electricity can affect normal operation of
this player. If this occurs, turn the player off and on again with the POWER button, or dis-
connect and then reconnect the AC power cord to the AC power outlet. The player will
operate normally.
• Be sure to remove the disc and turn off the player after use.
• Disconnect the AC power cord from the AC outlet when you don’t intend to use the player
for long periods of time.
• Clean the disc by wiping in a straight line from the inside to the outside of the disc.
Be careful not to harm the disc because the data on these discs is highly vulnerable to the
environment.
• Do not keep under direct sunlight.
• Keep in a cool ventilated area.
• Store vertically.
• Keep in a clean protection jacket.
For safety reasons, be sure to disconnect the AC power cord from the AC outlet.
• Do not use benzene, thinner, or other solvents for cleaning.
• Wipe the cabinet with a soft cloth.
Handling Cautions
Disc Storage
Maintenance of Cabinet

4
About Discs
Digital video discs
5" and 31/2", single or double sided, single or dual layer. DVDs are
high density optical discs on which high quality picture and audio
are recorded by means of digital signals.
Video CDs
5" and 31/2" (with or without playback control).
Audio CDs
5" and 31/2"
NUON interactive DVD software
Functions and information available on the DVDs (titles, chapters, subtitles, ratings, multi
angles and more) may differ from disc to disc.
• When appears on screen, it indicates an invalid button press.
OPEN/
CLOSE
SKIP
OPEN/CLOSE
STOP
SCREEN FIT
HEAD
DVD-N2000
Discs you can play
Disc Functions
CD-I, CD-ROM, DVD-ROM, DVD-RAM discs cannot be played in this unit.
CD-G can play audio only, not graphics.
Region code
Your DVD player is designed and manufactured to respond to the
region management information that is recorded on a DVD disc.
Discs that cannot be played
~
• Many DVD discs are encoded with copy protection. Because of this, you should
only connect your DVD player directly to your TV, not to a VCR. Connecting to a
VCR results in a distorted picture from copy-protected DVD discs.
• This product incorporates copyright protection technology that is protected by methods
claims of certain U.S. patents and other intellectual property rights owned by the
Macrovision Corporation and other rights owners. Use of this copyright protection
technology must be authorized by the Macrovision Corporation, and is intended for home
and other limited viewing uses only unless otherwise authorized by Macrovision
Corporation. Reverse engineering or disassembly is prohibited.
COPY PROTECTION
N U O N
TM

SETUP
CONNEC-
TIONS
PLAYBACK
SPECIALS
REFERENCE
5
TABLE OF CONTENTS
TABLE OF CONTENTS
Choosing a Connection
.........................
13
• Connection to an Audio System
..........
13
• Connection to a TV
..............................
14
Using the Setup Menu
..........................
15
Setting Up the Language Features
......
..
16
Playing a Disc
.........................................
17
Search & Skip
..........................................
19
A-B Repeat & 3D Sound
..........................
20
Bookmark
..........................................
.
21
MediaMacro
TM
Zoom & Pan
....................
22
ActionCapture
TM
Strobe & Snapshot
TM
Mode
.
23
AngleView
TM
Display & Screen Fit
...........
24
Selecting the Audio Language
............
.
25
Selecting the Subtitle Language
..........
.
26
Spectrum Analyzer & Game
.................
27
Using the Display Function
....................
.
28
Setting Up the Disc Language
..............
29
Setting Up the Parental Control
............
30
Setting Up the Audio Options
...............
31
Setting Up the Display Options
.............
32
Remote Control Setting
........................
33
Troubleshooting Guide
.........................
34
Specifications
....................................
35
Warranty
...........................................
36
Before You Start
......................................
6
Description
..............................................
7
• Front Panel
...........................................
7
• Front Panel Display
...............................
8
• Rear Panel
..........................................
9
Tour of the Remote Control
.......
...
.........
10
• DVD Function Buttons
.........................
11
• TV Function Buttons
............................
11
• Samsung N2000 Joystick
....................
12

Before Y ou S tart
1
Open the battery cover on the back of the remote.
2
Insert two AA batteries. Make sure that the polarities (+ and -) are
aligned correctly.
3
Replace the battery cover.
• Check the polarity + - of the batteries (Dry-Cell)
• Check if the batteries are drained.
• Check if remote sensor is blocked by obstacles.
• Check if there is any fluorescent lighting nearby.
Remote Control
Batteries for
Remote Control
(AA Size)
S-Video Cable
User’s Manual
Video/Audio Cable
Joy Stick
6
Accessories
Install Batteries in the Remote
If remote doesn’t operate properly:

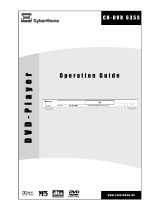
D escription-Front Panel
7
OPEN/
CLOSE
SKIP
OPEN/CLOSE
STOP
SCREEN FIT
HEAD
1
STANDBY/ON
• When the unit is first plugged in, this indicator lights.
2
NUON PORTS
• Allow you to plug in joystick or other peripherals.
3
HEADPHONES JACK
• You can attach headphones here for private listening.
4
HEADPHONES VOLUME
• Use to adjust headphones volume level.
5
DISPLAY
• Operation indicators are displayed here.
6
DISC TRAY
• Press OPEN/CLOSE to open and close the disc tray.
7
SKIP
• Use to skip chapters or tracks.
8
JOG DIAL
• Operates frame by frame playback.
9
SHUTTLE DIAL
• Performs fast or slow motion playback.
10
PLAY/PAUSE
• Begin or pause disc play.
11
OPEN/CLOSE
• Press to open and close the disc tray.
12
STOP
• Stops disc play.
13
SCREEN FIT
• Allows you to eliminate the black bars of the screen and fill any TV screen completely
with the picture.
Front Panel Controls
2
3
4
5
6
11
1213
7
9
1
8
10
SETUP

Front Panel Display
8
1
Indicates Disc is turning
2
Disc playback
3
Disc type indicators
4
Still picture or audio pause
5
Lights when 3D surround is turned on.
6
Angle indicator. You can select multiple angles of a scene recorded by different
cameras.
7
DVD : Title number, Video/Audio CD : Track number
8
DVD : Chapter number.
9
Displays title, chapter or track number.
10
Repeat play mode
11
Displays various messages concerning operations such as PLAY, STOP, LOAD, ...
no DISC : No disc loaded.
OPEN : The disc tray is open.
LOAD : Player is loading disc information.
HDCD : When an HDCD
®
recording is detected, the letters “HDCD” will flash for
about 10 seconds at the beginning of the track. (See NOTE below.)
12
Dolby Digital Disc
13
Linear PCM audio output
14
DTS (Digital Theater System) output
Front Panel Indicators
1 3 5 6
9 10
12
24
7
8 11
13
14
NOTE
This product is equipped with HDCD
®
decoding and filtering technology. Please note that
HDCD playback decoding will increase the dynamic range of CDs recorded with the
HDCD process, which may cause their average level to sound quieter than other CDs.

9
D escription-Rear Panel
OPTICAL COAXIAL
DIGITAL AUDIO OUT 5.1CH SURROUND AUDIO OUT AUDIO OUT
VIDEO OUT S-VIDEO OUT
V1
V2
COMPONENT VIDEO OUT
YPr
Pb
R FRONT L
R1
R2
L1
L2
CENTER
S/W
R SURROUND L
1
DIGITAL AUDIO OUT JACK
• Use either an optical or coaxial digital cable to connect to a compatible Dolby Digital
receiver. Use to connect to an A/V Amplifier that contains a Dolby Digital decoder or
DTS decoder.
2
5.1CH SURROUND AUDIO OUT JACKS
• Connect to an amplifier with 5.1CH analog input jacks.
3
AUDIO OUT JACKS
• Connect to the Audio input jacks of your television, audio/video receiver, or VCR.
• Audio will be output via Front (R/L) of the analog audio out jacks except for
CASE1 (2CH).
4
VIDEO OUT JACKS
• Use a video cable to connect one of these jacks to the Video input on your television.
5
S-VIDEO OUT JACK
• Use the S-Video cable to connect this jack to the S-Video jack on your television for a
higher quality picture.
6
COMPONENT VIDEO OUT JACKS
• Use these jacks if you have a TV with Component Video in jack on your television for a
higher quality picture.
2
3
4
5
6
1
Rear Panel Jacks
Connect headphones with a standard stereo plug to the headphone jack (M6).
• Before connecting, set headphone volume at minimum. Then adjust to a suitable volume.
To Connect Headphones (not included)
SETUP

10
Tour of the Remote Control
1
13
15
14
16
17
18
19
20
21
22
23
24
25
26
4
5
6
7
8
9
10
11
12
2
3
A
C
B

Tour of the Remote Control
11
1
DVD POWER
2
NUMBER
3
OPEN/CLOSE
4
SETUP/SNAP SHOT
• During normal play, pressing the
SETUP button will bring up the DVD
player's Setup menu. When the
SETUP button is pressed in the
"pause" mode (when the PAUSE but-
ton has been pressed), a special
image processing menu comes up on
the screen. This menu allows you to
modify the picture characteristics-
Gamma, color, contrast, and bright-
ness- of the still image on the screen.
5
ZOOM
6
SEARCH
• Allows you to search forward/back-
ward through a disc while it is in play
mode (or slow speed search in pause
mode).
7
STOP
8
STEP
• Advances playback one frame at a
time.
9
RETURN
• Returns to previous state.
10
TOP MENU
• Takes you to the menu on the DVD
disc or CD/VCD.
11
AUDIO
• Use this button to access various
audio functions on a disc.
12
STROBE
• Pressing this button divides the
screen into 9 blocks. A continuous
motion snap-shot advancing every 0.5
seconds is split across these blocks
in order.
13
TV POWER
• Use to set the remote to control a
compatible TV.
14
SCREEN FIT
• Allows you to eliminate the black bars
at the top and bottom of the screen.
15
3D SOUND
• Use to simulate the surround effect
through speaker or headphones.
16
BOOKMARK
• Use to memorize scenes for replay.
17
PLAY/PAUSE
• Begin/Pause disc play.
18
SKIP
• Use to skip the title, chapter, or track.
19
CLEAR
• Use to remove menus or status dis-
plays from the screen.
20
NUON
•Pressing this button brings up a spe-
cial NUON menu. When a DVD disc
has enhanced NUON content, you can
navigate and view this extra content by
going to this menu first.
21
DISPLAY
•Brings up a "SmartMartrix
TM
user inter-
face" On-screen display, that displays
the current disc mode (for DVD) and
allows you instant access to the DVD
features. During CD playback this
brings up a VLM (Virtual Light
Machine
TM
) screen.
22
MENU
• Brings up the Disc menu.
• Use to select the various VLM
screens.
23
ENTER/DIRECTION
(UP/DOWN or LEFT/RIGHT)
• This button functions as a toggle
switch.
24
ANGLE
• Use to access multiple angles on a
DVD.
25
SUBTITLE
26
A-B REPEAT
• Use to mark a segment to repeat
between A and B.
DVD Function Buttons
m
p
A
CHANNEL UP/DOWN Buttons
B
TV/VIDEO Selection Button
C
VOLUME UP/DOWN Buttons
TV Function Buttons
SETUP

Samsung N2000 Joystick
12
7
8
6
1
2
5
3
4
1
D (Up/ Down/ Left/ Right) Button
2
Front Left Button
3
NUON Button
4
B Button
5
Front Right Button
6
Start Button
7
A Button
8
C (Up/ Down/ Left/ Right) Buttons
Joystick Controls

Choosing a Connection
13
The following show examples of connections commonly used to connect
the DVD player with a TV and other components.
• Always turn off the DVD player, TV, and other components before you con-
nect or disconnect any cables.
• Refer to user’s manual of the components you are connecting for more infor-
mation on those particular components.
AUDIO
SYSTEM

14
Choosing a Connection
• Method 1 DVD Player + TV with Video Input Jack
• Method 2 DVD Player + TV with S-Video Input Jack
• Method 3 DVD Player + TV with Component Video Jacks
TV (Normal, Widescreen, Projection, etc..)
Connection to a TV
Connection to a TV (For Video)
AUDIO OUT
R1
R2
L1
RL
L2
COMPONENT VIDEO OUT
Y
Y
Pr
Pr
Pb
Pb
VIDEO OUT
S-VIDEO OUT
V1
V2

15
NOTE
Using the Setup Menu
The Setup Menu lets you customize your DVD player by allowing you to select various lan-
guage preferences, set up a parental control, even adjust the player to the type of television
screen you have.
1
Press the SETUP button on the remote.
DISC MENU
Setup of the Menu Language (See page 29)
Use the Menu preference menu to select the language you want a DVD’s disc menu to be
displayed in.
AUDIO
Setup of the Audio Language (See page 16)
Use the Audio preference menu to select the soundtrack language.
SUBTITLE
Setup of the Subtitle Language (See page 16)
Use the Subtitle preference menu to select the language the disc’s subtitles are to be
displayed in.
PARENTAL
Setup of the Parental Control (See page 30)
Use to deny playback of discs or scenes with objectionable material.
(Must be supported by the disc.)
AUDIO OPTIONS
Setup of the Audio Options (See page 31)
Use to set up the audio options such as speaker setup.
DISPLAY OPTIONS
Setup of the Display Options (See page 32)
Use to select which type of screen you want to watch and several display options.
2
Use the UP/DOWN button on the remote to access the different fea-
tures.
3
Press the ENTER button to access the sub features.
To make the setup screen disappear after setting up, press the SETUP but-
ton again.
• Not all Setup Menu selections will work - this is dependent on the DVD disc content. For
example, the subtitle setup menu option will not have any effect on a disc that does not
have subtitle support. The Setup menu won't work with VCDs.
• Changes made to the first three Setup Menu items (1. Disk Menu, 2. Audio, 3. Subtitle)
will only become effective after opening and closing the disc tray.
PLAYBACK

16
NOTE
Setting Up the Language Features
1
Press the SETUP button.
2
Press the UP/DOWN button
to move to AUDIO.
3
Press the ENTER button.
4
Use the UP/DOWN button to
select ‘ENGLISH’ .
- Select “ORIGINAL” if you want the
default soundtrack language to be
the original language the disc is
recorded in.
5
Press the ENTER button.
- ENGLISH is selected and the screen
returns to SETUP MENU.
1
Press the SETUP button.
2
Use the UP/DOWN button to
select SUBTITLE.
3
Press the ENTER button.
4
Use the UP/DOWN button to
select ‘ENGLISH’.
- Select “AUTOMATIC” if you want the
subtitle language to be the same as
the language selected as the audio
preference.
5
Press the ENTER button.
- ENGLISH is selected and the
screen returns to SETUP MENU.
• If the selected language is not recorded on the disc, the original pre-recorded language is
selected.
•
Howto make the SETUP MENU disappear or return to menu screen during set
up;
Press the RETURN button.
SETUP MENU
SETUP MENU
Using the Audio Language
Using the Subtitle Language
English
Nederlands
Norsk
Arabiv
Russian
Francais
Oesky
Polski
Chinese
Turkish
Deutsch
Dansk
Portugues
Greek
Original
Espanol
Magyar
Suomi
Hindi
Italiano
Svenska
Afrikanns
Japanese
Audio Language
SETUP MENU
SETUP MENU
English
Nederlands
Norsk
Arabiv
Russian
Francais
Oesky
Polski
Chinese
Turkish
Deutsch
Dansk
Portugues
Greek
Automatic
Espanol
Magyar
Suomi
Hindi
Italiano
Svenska
Afrikanns
Japanese
Subtitle Language
1 Disc Menu English
2 Audio English
3 Subtitle Automatic
4 Parental Unlocked
5 Audio Options
6 Display Options
1 Disc Menu English
2 Audio English
3 Subtitle Automatic
4 Parental Unlocked
5 Audio Options
6 Display Options
ex) Setting up in ENGLISH.
ex) Setting up in ENGLISH.

NOTE
17
Playing a Disc
1
Press the OPEN/CLOSE button.
The STANDBY indicator light goes out and the tray opens.
2
Place a disc gently into the tray with the disc’s label facing up.
3
Press the PLAY/PAUSE button to start playback.
4
Press the STOP button to stop playback.
When you stop disc play, the player remembers where you stopped, so when you press
PLAY again, it will pick up where you left off (unless the disc is removed, the STOP button
is pressed twice or the player is unplugged.).
• If the player is left for 5 minutes in pause mode, it will stop.
• The power is automatically turned off after approximately 30 minutes have elapsed in
the stop mode (auto power-off feature).
• If the player is left in stop mode for more than one minute without any user interaction, a
screen saver will be activated.
• This icon indicates an invalid button press.
Playback
RESUME function
PLAYBACK

Playing a Disc
18
1
Stop
Press the STOP button during playback.
2
Remove
Press the OPEN/CLOSE button.
3
Pause
Press the PLAY/PAUSE or STEP button on the remote during
playback.
- Screen stops, no sound.
- To resume, press the PLAY/PAUSE button once again.
4
Step Motion (Except CD)
Press the STEP button on the remote during playback.
- Each time the button is pressed, a new frame will appear.
- No sound is heard during STEP mode.
- Press PLAY/PAUSE to resume normal playback.
(You can only perform step motion playback in the forward direction.)
5
Slow Motion (Except CD)
Press the FWD or REV SEARCH button on the remote during
PAUSE or STEP mode.
- By pressing or shuttling, you can select slow motion playback for 1/2, 1/4 or 1/8 of
normal speed.
- No sound is heard during slow mode.
- Press PLAY/PAUSE to resume normal playback.
- When playing a VCD, reverse slow motion playback will not work.

19
Search & Skip
NOTE
The skip function allows you to "skip" from one chapter another in the forward or reverse
direction.
Press the NEXT SKIP or BACK SKIP button during playback.
• When playing a DVD, if you press the NEXT SKIP button, it moves to the next chapter.
If you press the BACK SKIP button, it moves to the beginning of the chapter. One more
press makes it move to the beginning of the previous chapter.
• When playing a VCD or a CD, if you press the NEXT SKIP button, it moves to the next
track. If you press the BACK SKIP button, it moves to the the beginning of the track.
One more press makes it move to the beginning of the previous track.
Searching is not restricted to within a "chapter" or "track".
Press the FWD or REV SEARCH button on the remote or turn the
SHUTTLE dial on the front of the DVD player during play back.
• Press the REVERSE or FORWARD SEARCH button on the remote and press again to
search at a faster speed(2X/4X/8X/16X/32X/normal speed, in order) on the DVD.
• Press the REVERSE or FORWARD SEARCH button on the remote and press again to
search at a faster speed(2X/4X/8X/normal speed in order) on VCD and CD.
• To return to normal speed playback, press the PLAY/ PAUSE button.
• When in search mode (4X/8X/16X/32X) on a DVD or high-speed playback on a VCD, no
sound will be heard.
• Depending on the disc, audio may not be heard when a disc is in 2X playback mode.
Searching a Chapter/Track
Skipping Tracks
PLAYBACK

20
NOTE
A-B Repeat & 3D Sound
The A-B Repeat function lets you mark a segment to repeat between the beginning (A) and
the end (B) of the segment you want to review.
1
Press the A-B REPEAT but-
ton at the beginning (A) of
the segment you want to
review.
2
Press the A-B REPEAT but-
ton again at the end (B) of
the segment you want to
review. The segment will
begin repeating.
3
To clear A-B Repeat, press
the A-B REPEAT button
again.
• The A-B Repeat function works on the same title or track.
• If the title or track is completed before marking the end (B), the end of the title or track
becomes B automatically.
• Depending on the disc, the A-B Repeat and 3D Sound functions may not work.
• 3D sound will not operate in VLM (Virtual Light Machine) mode.
Repeat A ->
Repeat A -> B
Repeat A -> B OFF
3D Sound
The simulated surround effect (SPATIALIZER N-2-2) depends on the disc contents. If you
connect the unit to your stereo system, you can enhance sound quality and produce a
greater surround effect. This feature is useful when you are using the DVD player with a
two channel stereo through the analog outputs.
(Discs which are recorded with DTS will not work. When the DIGITAL OUTPUT is set to
BITSTREAM in the SETUP MENU, the 3D Sound function will not work.)
1
Press the DISPLAY button. Use the UP/DOWN or LEFT/RIGHT to
select 3D Sound. Or press the 3D SOUND button on the remote.
(Be sure the DIGITAL OUTPUT is set to PCM.)
2
Use the UP/DOWN button to select the sound you want among
Speakers, Headphones or Off.(on DVD/VCD)
(When playing a CD, you can select On or Off.)
A-B Repeat
/