Page is loading ...
Handling instructions
H ng d n s d ng
Petunjuk pemakaian
en
zh
ko
vi
th
ar
id
DH 45ME DH 45MEY
en
zh
ko
vi
th
ar
id

2
English
Carrying power tools with your fi nger on the switch
or energising power tools that have the switch on
invites accidents.
d) Remove any adjusting key or wrench before
turning the power tool on.
A wrench or a key left attached to a rotating part of
the power tool may result in personal injury.
e) Do not overreach. Keep proper footing and
balance at all times.
This enables better control of the power tool in
unexpected situations.
f) Dress properly. Do not wear loose clothing or
jewellery. Keep your hair, clothing and gloves
away from moving parts.
Loose clothes, jewellery or long hair can be caught in
moving parts.
g) If devices are provided for the connection of
dust extraction and collection facilities, ensure
these are connected and properly used.
Use of dust collection can reduce dust-related
hazards.
4) Power tool use and care
a) Do not force the power tool. Use the correct
power tool for your application.
The correct power tool will do the job better and safer
at the rate for which it was designed.
b) Do not use the power tool if the switch does not
turn it on and o .
Any power tool that cannot be controlled with the
switch is dangerous and must be repaired.
c) Disconnect the plug from the power source and/
or the battery pack from the power tool before
making any adjustments, changing accessories,
or storing power tools.
Such preventive safety measures reduce the risk of
starting the power tool accidentally.
d) Store idle power tools out of the reach of
children and do not allow persons unfamiliar
with the power tool or these instructions to
operate the power tool.
Power tools are dangerous in the hands of untrained
users.
e) Maintain power tools. Check for misalignment
or binding of moving parts, breakage of parts
and any other condition that may a ect the
power tool s operation.
If damaged, have the power tool repaired before
use.
Many accidents are caused by poorly maintained
power tools.
f) Keep cutting tools sharp and clean.
Properly maintained cutting tools with sharp cutting
edges are less likely to bind and are easier to control.
g) Use the power tool, accessories and tool bits
etc. in accordance with these instructions,
taking into account the working conditions and
the work to be performed.
Use of the power tool for operations di erent from
those intended could result in a hazardous situation.
5) Service
a) Have your power tool serviced by a qualifi ed
repair person using only identical replacement
parts.
This will ensure that the safety of the power tool is
maintained.
PRECAUTION
Keep children and infi rm persons away.
When not in use, tools should be stored out of reach of
children and infi rm persons.
GENERAL POWER TOOL SAFETY
WARNINGS
WARNING
Read all safety warnings and all instructions.
Failure to follow the warnings and instructions may result in
electric shock, fi re and/or serious injury.
Save all warnings and instructions for future reference.
The term “power tool” in the warnings refers to your mains-
operated (corded) power tool or battery-operated (cordless)
power tool.
1) Work area safety
a) Keep work area clean and well lit.
Cluttered or dark areas invite accidents.
b) Do not operate power tools in explosive
atmospheres, such as in the presence of
fl ammable liquids, gases or dust.
Power tools create sparks which may ignite the dust
or fumes.
c) Keep children and bystanders away while
operating a power tool.
Distractions can cause you to lose control.
2) Electrical safety
a) Power tool plugs must match the outlet.
Never modify the plug in any way.
Do not use any adapter plugs with earthed
(grounded) power tools.
Unmodifi ed plugs and matching outlets will reduce
risk of electric shock.
b) Avoid body contact with earthed or grounded
surfaces, such as pipes, radiators, ranges and
refrigerators.
There is an increased risk of electric shock if your
body is earthed or grounded.
c) Do not expose power tools to rain or wet
conditions.
Water entering a power tool will increase the risk of
electric shock.
d) Do not abuse the cord. Never use the cord for
carrying, pulling or unplugging the power tool.
Keep cord away from heat, oil, sharp edges or
moving parts.
Damaged or entangled cords increase the risk of
electric shock.
e) When operating a power tool outdoors, use an
extension cord suitable for outdoor use.
Use of a cord suitable for outdoor use reduces the
risk of electric shock.
f) If operating a power tool in a damp location
is unavoidable, use a residual current device
(RCD) protected supply.
Use of an RCD reduces the risk of electric shock.
3) Personal safety
a) Stay alert, watch what you are doing and use
common sense when operating a power tool.
Do not use a power tool while you are tired
or under the infl uence of drugs, alcohol or
medication.
A moment of inattention while operating power tools
may result in serious personal injury.
b) Use personal protective equipment. Always
wear eye protection.
Protective equipment such as dust mask, non-skid
safety shoes, hard hat, or hearing protection used for
appropriate conditions will reduce personal injuries.
c) Prevent unintentional starting. Ensure the
switch is in the o position before connecting to
power source and/or battery pack, picking up or
carrying the tool.

3
English
ROTARY HAMMER SAFETY
WARNINGS
1. Wear ear protectors
Exposure to noise can cause hearing loss.
2. Use auxiliary handle(s), if supplied with the tool.
Loss of control can cause personal injury.
3. Hold power tool by insulated gripping surfaces,
when performing an operation where the cutting
accessory may contact hidden wiring or its own
cord.
Cutting accessory contacting a “live” wire may make
exposed metal parts of the power tool “live” and could
give the operator an electric shock.
ADDITIONAL SAFETY WARNINGS
1. Ensure that the power source to be utilized conforms
to the power requirements specifi ed on the product
nameplate.
2. Ensure that the power switch is in the OFF position.
If the plug is connected to a receptacle while the power
switch is in the ON position, the power tool will start
operating immediately, which could cause a serious
accident.
3. When the work area is removed from the power source,
use an extension cord of su cient thickness and rated
capacity. The extension cord should be kept as short as
practicable.
4. Do not touch the bit during or immediately after
operation. The bit becomes very hot during operation
and could cause serious burns.
5. Before starting to break, chip or drill into a wall, fl oor or
ceiling, thoroughly confi rm that such items as electric
cables or conduits are not buried inside.
6. Always hold the body handle and side handle of the
power tool fi rmly. Otherwise the counterforce produced
may result in inaccurate and even dangerous operation.
7. Wear a dust mask.
Do not inhale the harmful dusts generated in drilling or
chiseling operation. The dust can endanger the health of
yourself and bystanders.
8. Mounting the tool
To prevent accidents, make sure to turn the switch o
and disconnect the plug from the receptacle.
When using tools such as bull points, drill bits, etc.,
make sure to use the genuine parts designated by our
company.
Clean the shank portion of the drill bit. Then smear the
shank portion with the grease or machine oil.
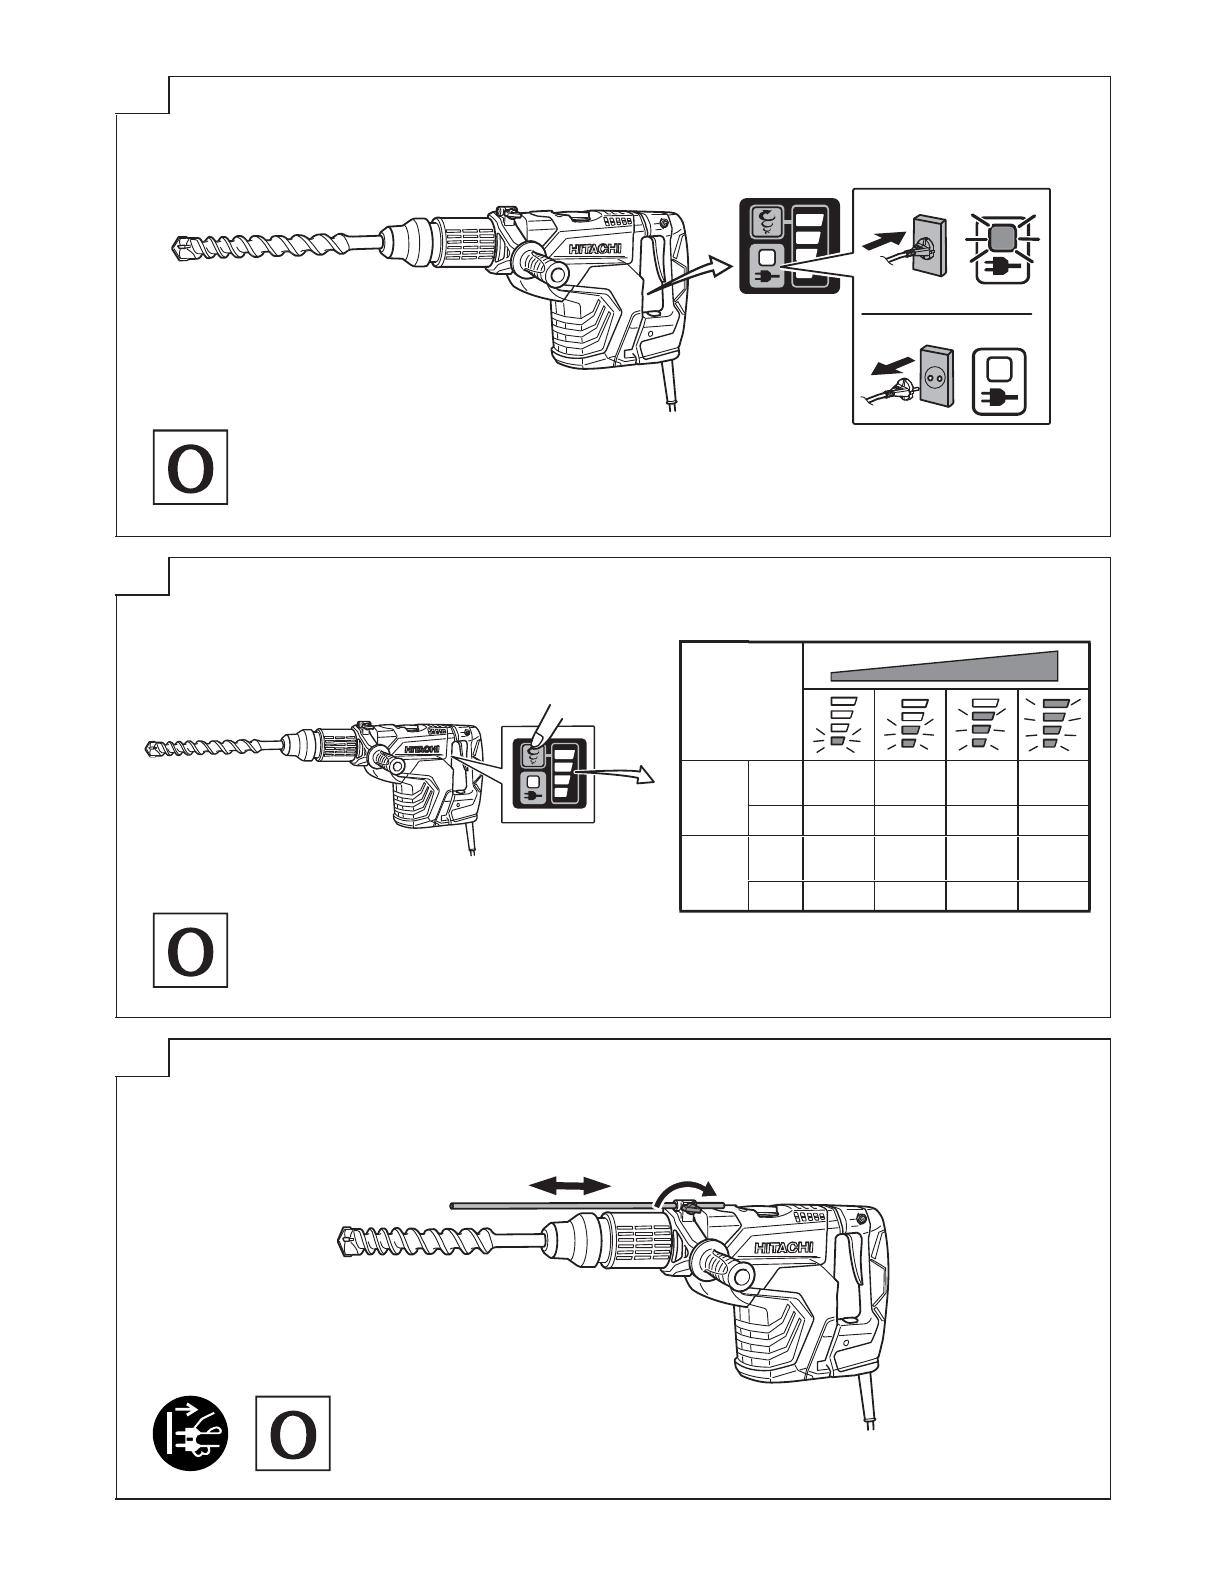
9. The rotation speed cannot be changed by pressing the
rotation speed selector switch while the motor is rotating.
To change speeds, switch o the tool fi rst.
10. RCD
The use of a residual current device with a rated residual
current of 30mA or less at all times is recommended.
SYMBOLS
WARNING
The following show symbols used for the machine.
Be sure that you understand their meaning before
use.
DH45ME / DH45MEY: Rotary Hammer
User Vibration Protection
Read all safety warnings and all instructions.
V
Rated voltage
P
Power Input
n
0
No-load speed
Bpm Full-load impact rate
max
Drilling diameter, max.
kg
Weight
Drill bit
Core bit
Adjustment of the tool position function
Hammering only function
Rotation and hammering function
Switching ON
Switching OFF
Continuous operation button
Power lamp
Rotation speed selector switch
Display lamp
Ls
Low speed / impact rate
Hs
High speed / impact rate
Disconnect mains plug from electrical outlet
Class II tool
SDS max shank
STANDARD ACCESSORIES
In addition to the main unit (1 unit), the package
contains the accessories listed in the below.
Plastic case ................................................................ 1
Side handle ................................................................. 1
Stopper ...................................................................... 1
Hammer Grease A ..................................................... 1
Standard accessories are subject to change without notice.
4
English
APPLICATIONS
Rotation and hammering function
Drilling anchor holes
Drilling holes in concrete
Hammering only function
Crushing concrete, chipping, digging, and squaring
(by applying optional accessories)
SPECIFICATIONS
The specifi cations of this machine are listed in the Table on
page 30.
NOTE
Due to HITACHI’s continuing program of research and
development, the specifi cations herein are subject to
change without prior notice.
MOUNTING AND OPERATION
Action Figure Page
Inserting SDS-max tools 1 31
Removing SDS-max tools 2 31
Changing tool direction 3 31
Selecting the operating mode 4 31
Switching on and o 5 31
About the power lamp 6 32
Speed change 7 32
Install the stopper 8 32
Using tapershank adapter 9 33
Removing tapershank adapter 10 33
Mounting core bit 11 33
Mounting guide plate and center pin 12 33
Selecting accessories* –
34, 35
* For detailed information regarding each tool, contact a
Hitachi authorized service center.
Warming up (Fig. 13)
The grease lubrication system in this unit may require
warming up in cold regions.
Position the end of the bit so makes contact with the
concrete, turn on the switch and perform the warming
up operation. Make sure that a hitting sound is produced
and then use the unit.
CAUTION
When the warming up operation is performed, hold the
side handle and the main body securely with both hands
to maintain a secure grip and be careful not to twist your
body by the jammed drill bit.
Using Continuous operation button
The Continuous operation button feature is only available
for “Hammering Mode ”. Pressing the Continuous
operation button will switch on a blue LED that indicates
the activation of the Continuous operation function which
will keep the tool running even after the trigger switch is
released. To cancel the function, press the Continuous
operation button again or push the trigger switch to the
ON position. (Fig. 14)
NOTE
Continuous operation will be deactivated when the switch
is pressed. During continuous operation, keep your hand
away from the switch and grip the lower part of the handle
to avoid any unintentional contact with the switch. (
Fig.15
)
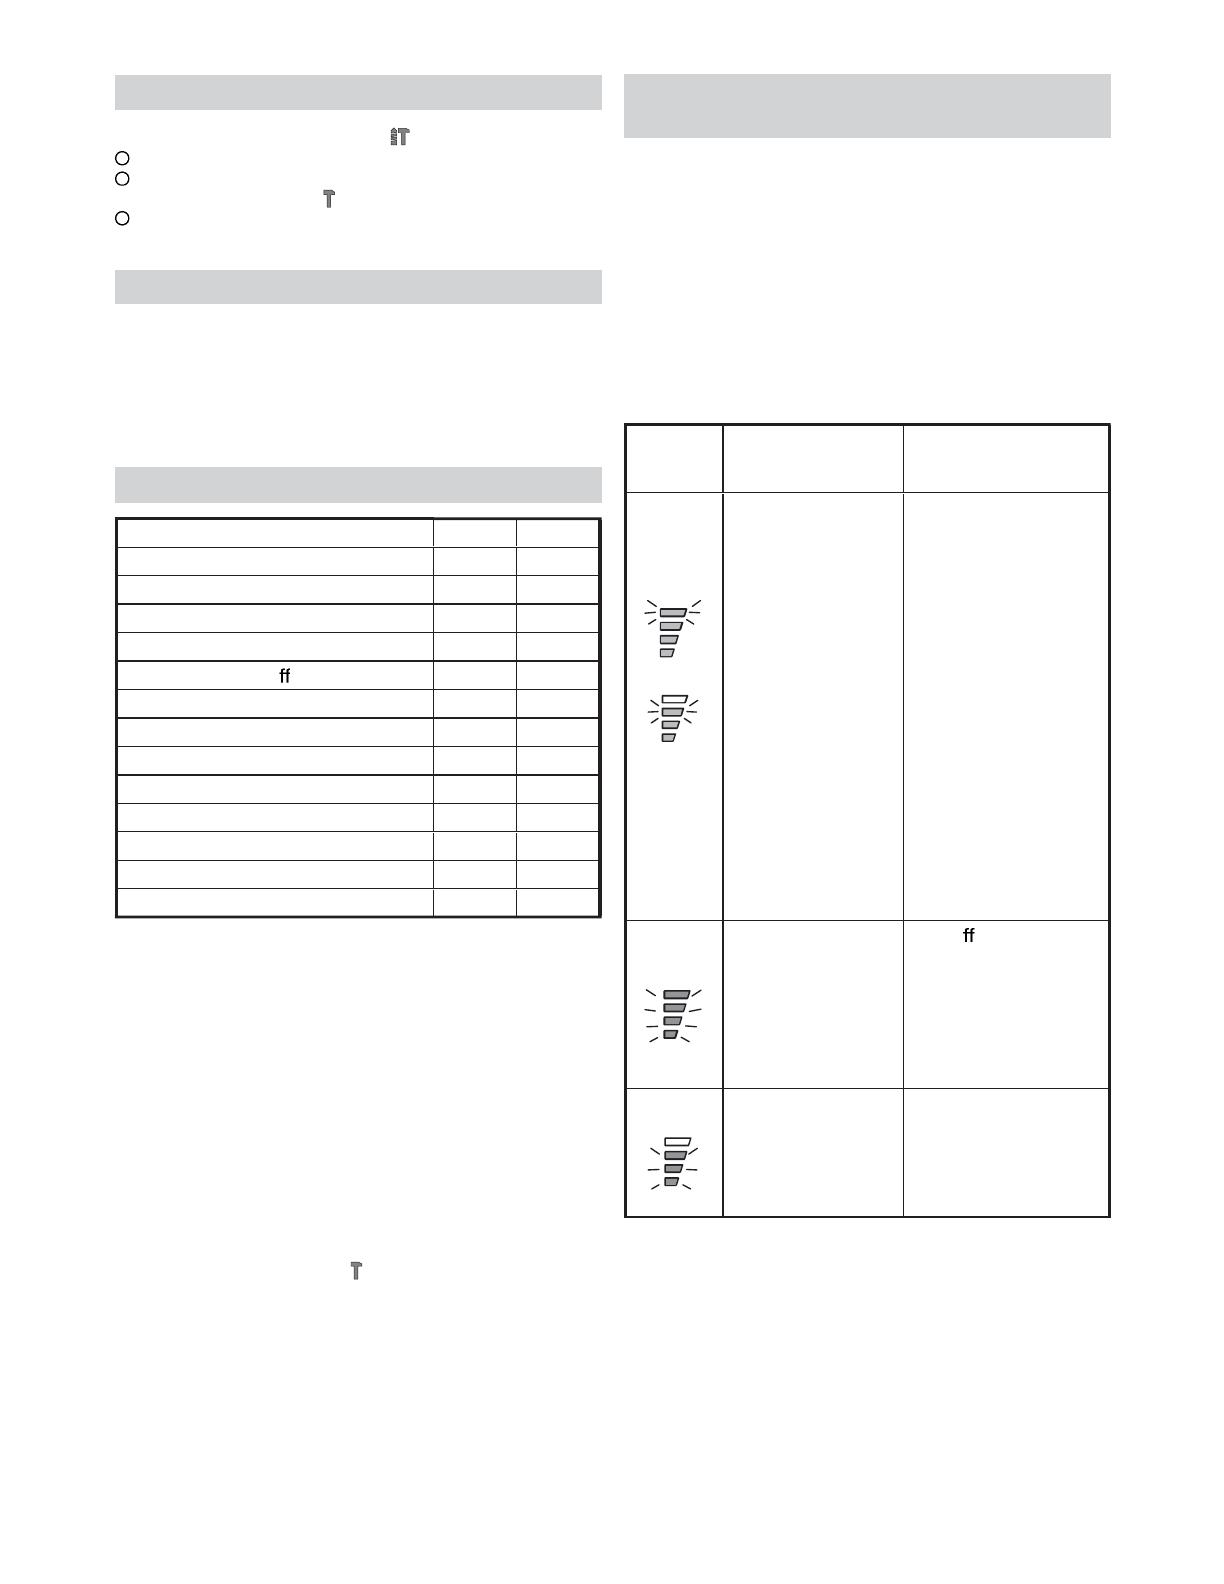
ABOUT THE PROTECTION
FUNCTION
This tool has a built-in protection circuit for preventing
damage to the unit in the event of an abnormality. Depending
on the nature of the abnormality, the display lamp will fl ash
as shown in Table 1 and the unit will cease to operate. In
such cases, verify the problem indicated by the fl ashing and
take whatever steps are necessary to correct the problem.
NOTE
Repair may be required if the display lamp continues
to fl ash after taking all necessary steps to correct the
problem. If the problem persists, please arrange for
repairs.
Table 1
Display
lamp
fl ashing
Cause Solution
Flash
or
(110 V,
120 V,
127 V
ONLY)
The tool’s
temperature
increase protection
function gradually
reduced the
rotation speed
as the internal
temperature of the
tool approached
the specifi ed
temperature range
for automatic
shutdown.
(Power regulation
function)
* The power
regulation function
will not activate if
only one or two of
the display lamp
bars are lighting.
The tool will return to
normal power once the
temperature is lowered
by reducing its load.
Continued operation
may result in automatic
shutdown by the tool’s
temperature increase
protection function.
(See row below)
Flash
Internal temperature
has risen beyond
the unit’s specifi ed
temperature.
(Temperature
increase protection
function)
Turn o the unit
and allow it to cool
down for about 15 to
30 minutes.
When the temperature
goes down, press the
rotation speed selector
switch to recover.
Flash
Excessive pressure
applied to the tool
has resulted in an
overload.
(Overload
protection function)
Press the rotation
speed selector switch
to recover. Try to avoid
tasks that will apply
excess pressure to
the unit.

5
English
Flash
ï Tool fails to
startup or has
shut down due
to the unit being
connected to a
power source
whose voltage is
either too high or
too low.
î Tool has shut
down due to a
voltage signal
read error that
occurred from
the unit’s power
cord being
plugged in and
out at short
intervals.
(Circuit protection
function)
ï Connect the unit
to a power supply
matching the input
voltage specifi ed
on the nameplate.
Press the rotation
speed selector
switch to recover.
î Allow for an interval
of 3 seconds or
more when plugging
the power cord
in and out. Press
the rotation speed
selector switch to
recover.
Flash
Sensor signal read
error.
(Control monitoring
function)
Press the rotation
speed selector switch
to recover. Repair may
be required if this error
continuously occurs.
GREASE REPLACEMENT
This Rotary Hammer is of full air-tight construction to protect
against dust and to prevent lubricant leakage.
Therefore, this Rotary Hammer can be used without
lubrication for long periods. Replace the grease as described
below.
Grease Replacement Period
After purchase, replace grease after every 6 months of
usage. Ask for grease replacement at the nearest authorized
Service Center.
MAINTENANCE AND INSPECTION
1. Inspecting the drill bits
Since use of a dull tool will cause motor malfunctioning
and degraded e ciency, replace the drill bit with new
ones or resharpen them without delay when abrasion is
noted.
2. Inspecting the mounting screws
Regularly inspect all mounting screws and ensure that
they are properly tightened. Should any of the screws be
loose, retighten them immediately. Failure to do so could
result in serious hazard.
3. Maintenance of the motor
The motor unit winding is the very “heart” of the power
tool.
Exercise due care to ensure the winding does not
become damaged and/or wet with oil or water.
4. Replacing supply cord
If the replacement of the supply cord is necessary, this
has to be done by the manufacturer of this agent in order
to avoid a safety hazard.
CAUTION
In the operation and maintenance of power tools, the
safety regulations and standards prescribed in each
country must be observed.
NOTE
Due to HITACHI’s continuing program of research and
development, the specifi cations herein are subject to
change without prior notice.

30
DH45ME DH45MEY
V
(110 V, 120 V, 127 V, 220 V, 230 V, 240 V)
P
1500 W
n
0
110 V, 120 V, 127 V : 120 – 270 /min
220 V, 230 V, 240 V : 120 – 310 /min
Bpm
110 V, 120 V, 127 V : 1200 – 2500 /min
220 V, 230 V, 240 V : 1200 – 2950 /min
max
45 mm
max
125 mm
kg
9.0 kg 9.5 kg

31
1
3
1
5
2
4
2 3
1
2
4 5
32
6
7
8
1
2
Ls
Hs
110 V
120 V
127 V
n
0
120 170 220 270
Bpm 1200 1600 2100 2500
220 V
230 V
240 V
n
0
120 180 240 310
Bpm 1200 1700 2300 2950

33
9
10 11
12 13

34
14 15
300 mm : 313466 (D
<
35)
313467 (D
>
38)
313464
944477
313465
930515
321813 313468
12,7 mm : 313469
19,0 mm : 313470
D
956009 (D
<
35)
955165 (D
>
38)

35
30 g : 981840
971786
313477
313479
W50
×
400 mm : 313475
400 mm : 313476
313478
313479
320859
318085
150 mm
280 mm : 313471
400 mm : 313472
280 mm : 313473
400 mm : 313474
949859
333227
338165
949556
337577
330209
338166
339060

412
Code No. C99713532 M
Printed in Malaysia
/