Page is loading ...

STIHL RG-KM
Instruction Manual


Translation of Original Instruction
Manual
Printed on chlorine-free paper
Printing inks contain vegetable oils, paper can be recycled.
© ANDREAS STIHL AG & Co. KG 2019
0458-811-0121-A. VA1.L19.
0000008769_001_GB
0458-811-0121-A
English
1
This instruction manual is protected by copyright. All rights reserved, especially the rights to reproduce, translate and process
with electronic systems.
Contents
1 Introduction
. . . . . . . . . . . . . . . . . . . . . . . . . . . . . . . . . . . . . . . . .
2
2 Guide to Using this Manual
. . . . . . . . . . . . . . . . . . . . . . . . . .
2
2.1 Applicable Documentation
. . . . . . . . . . . . . . . . . . . . . . . . . . .
2
2.2 Symbols used with warnings in the text
. . . . . . . . . . . . . .
2
2.3 Symbols in Text
. . . . . . . . . . . . . . . . . . . . . . . . . . . . . . . . . . . . .
2
3 Overview
. . . . . . . . . . . . . . . . . . . . . . . . . . . . . . . . . . . . . . . . . . . .
2
3.1 KombiTool
. . . . . . . . . . . . . . . . . . . . . . . . . . . . . . . . . . . . . . . . . .
2
3.2 Symbols
. . . . . . . . . . . . . . . . . . . . . . . . . . . . . . . . . . . . . . . . . . . .
3
4 Safety Precautions
. . . . . . . . . . . . . . . . . . . . . . . . . . . . . . . . . .
3
4.1 Warning Symbols
. . . . . . . . . . . . . . . . . . . . . . . . . . . . . . . . . . .
3
4.2 Intended Use
. . . . . . . . . . . . . . . . . . . . . . . . . . . . . . . . . . . . . . . .
4
4.3 The Operator
. . . . . . . . . . . . . . . . . . . . . . . . . . . . . . . . . . . . . . . .
4
4.4 Clothing and Equipment
. . . . . . . . . . . . . . . . . . . . . . . . . . . . .
4
4.5 Work Area and Surroundings
. . . . . . . . . . . . . . . . . . . . . . . .
5
4.6 Safe Condition
. . . . . . . . . . . . . . . . . . . . . . . . . . . . . . . . . . . . . .
5
4.7 Operation
. . . . . . . . . . . . . . . . . . . . . . . . . . . . . . . . . . . . . . . . . . .
6
4.8 Transporting
. . . . . . . . . . . . . . . . . . . . . . . . . . . . . . . . . . . . . . . .
7
4.9 Storing
. . . . . . . . . . . . . . . . . . . . . . . . . . . . . . . . . . . . . . . . . . . . . .
7
4.10 Cleaning, Maintenance and Repairs
. . . . . . . . . . . . . . . . .
7
5 Preparing KombiTool for Operation
. . . . . . . . . . . . . . . . . .
8
5.1 Preparing KombiTool for Operation
. . . . . . . . . . . . . . . . . .
8
6 Assembling the KombiTool
. . . . . . . . . . . . . . . . . . . . . . . . . .
8
6.1 Connecting Drive Tube to Gear Housing
. . . . . . . . . . . . .
8
6.2 Mounting and Removing the KombiTool
. . . . . . . . . . . . .
8
7 Checking the KombiTool
. . . . . . . . . . . . . . . . . . . . . . . . . . . .
9
7.1 Checking the Blades
. . . . . . . . . . . . . . . . . . . . . . . . . . . . . . . .
9
8 Using the KombiTool
. . . . . . . . . . . . . . . . . . . . . . . . . . . . . . . .
9
8.1 Holding and Controlling the KombiTool
. . . . . . . . . . . . . .
9
8.2 Weeding and Mowing Grass
. . . . . . . . . . . . . . . . . . . . . . . .
10
9 After Finishing Work
. . . . . . . . . . . . . . . . . . . . . . . . . . . . . . . .
10
9.1 After Finishing Work
. . . . . . . . . . . . . . . . . . . . . . . . . . . . . . . .
10
10 Transporting
. . . . . . . . . . . . . . . . . . . . . . . . . . . . . . . . . . . . . . .
10
10.1 Transporting the KombiTool
. . . . . . . . . . . . . . . . . . . . . . . .
10
11 Storing
. . . . . . . . . . . . . . . . . . . . . . . . . . . . . . . . . . . . . . . . . . . . .
10
11.1 Storing the KombiTool
. . . . . . . . . . . . . . . . . . . . . . . . . . . . .
10
12 Cleaning
. . . . . . . . . . . . . . . . . . . . . . . . . . . . . . . . . . . . . . . . . . .
10
12.1 Cleaning the KombiTool
. . . . . . . . . . . . . . . . . . . . . . . . . . .
10
12.2 Cleaning the Blades
. . . . . . . . . . . . . . . . . . . . . . . . . . . . . . .
11
13 Maintenance
. . . . . . . . . . . . . . . . . . . . . . . . . . . . . . . . . . . . . . .
11
13.1 Maintenance Intervals
. . . . . . . . . . . . . . . . . . . . . . . . . . . . .
11
13.2 Lubricating the Gearbox
. . . . . . . . . . . . . . . . . . . . . . . . . . .
11
13.3 Removing and Attaching the Blade
. . . . . . . . . . . . . . . . .
11
13.4 Offsetting the Blades
. . . . . . . . . . . . . . . . . . . . . . . . . . . . . . .
12
13.5 Sharpening the Blades
. . . . . . . . . . . . . . . . . . . . . . . . . . . . .
12
14 Repairing
. . . . . . . . . . . . . . . . . . . . . . . . . . . . . . . . . . . . . . . . . .
13
14.1 Repairing the KombiTool
. . . . . . . . . . . . . . . . . . . . . . . . . . .
13
15 Specifications
. . . . . . . . . . . . . . . . . . . . . . . . . . . . . . . . . . . . . .
13
15.1 STIHL RG-KM KombiTool
. . . . . . . . . . . . . . . . . . . . . . . . . .
13
15.2 Blades
. . . . . . . . . . . . . . . . . . . . . . . . . . . . . . . . . . . . . . . . . . . . .
13
15.3 Noise and Vibration Data
. . . . . . . . . . . . . . . . . . . . . . . . . .
13
15.4 REACH
. . . . . . . . . . . . . . . . . . . . . . . . . . . . . . . . . . . . . . . . . . . .
14
16 Combinations with KombiMotors
. . . . . . . . . . . . . . . . . . .
14
16.1 STIHL RG-KM
. . . . . . . . . . . . . . . . . . . . . . . . . . . . . . . . . . . . .
14
17 Spare Parts and Accessories
. . . . . . . . . . . . . . . . . . . . . . .
14
17.1 Spare Parts and Accessories
. . . . . . . . . . . . . . . . . . . . . .
14
18 Disposal
. . . . . . . . . . . . . . . . . . . . . . . . . . . . . . . . . . . . . . . . . . .
14
18.1 Disposing of KombiTool
. . . . . . . . . . . . . . . . . . . . . . . . . . . .
14
19 EC Declaration of Conformity
. . . . . . . . . . . . . . . . . . . . . .
14
19.1 STIHL RG-KM KombiTool
. . . . . . . . . . . . . . . . . . . . . . . . . .
14

0458-811-0121-A
2
English
1 Introduction
Dear Customer,
Thank you for choosing STIHL. We develop and
manufacture our quality products to meet our customers’
requirements. The products are designed for reliability even
under extreme conditions.
STIHL also stands for premium service quality. Our
specialist dealers guarantee competent advice and
instruction as well as comprehensive service support.
We thank you for your confidence in us and hope you will
enjoy working with your STIHL product.
Dr. Nikolas Stihl
IMPORTANT: READ BEFORE USE AND KEEP IN A SAFE
PLACE.
2.1 Applicable Documentation
Local safety regulations apply.
► Read, understand and save the following documents in
addition to this instruction manual:
– Instruction manual of STIHL KombiTool being used.
2.2 Symbols used with warnings in the text
WARNING
This symbol indicates dangers that can cause serious
injuries or death.
► The measures indicated can avoid serious injuries or
death.
NOTICE
This symbol indicates dangers that can cause damage to
property.
► The measures indicated can avoid damage to property.
2.3 Symbols in Text
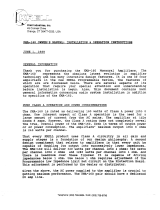
3.1 KombiTool
1 Machine Support
For resting KombiTool on the ground.
1Introduction
2 Guide to Using this Manual
This symbol refers to a chapter in this instruction
manual.
3Overview
5
4
2
1
8
7
9
10
11
3
6
0000-GXX-8731-A1

0458-811-0121-A
3
English
4 Safety Precautions
2 Blades
Cut weeds and grass.
3 Rider Plate
Covers the blade mounting.
4 Protective cap
Covers the end of the drive tube.
5Mark
Defines the depth the KombiTool must be inserted in the
KombiMotor.
6Drive Tube
Connects KombiTool to KombiMotor
7Screw
Secures rider plate to KombiTool.
8 Transport Guard
Helps protect user from contact with blades.
9 Blade Mounting
Serves to secure the blades.
10 Gear Housing
Encloses the gearbox.
11 Screw Plug
Closes filler opening for STIHL gear grease.
3.2 Symbols
Meanings of symbols that may be on the KombiTool:
4.1 Warning Symbols
Meanings of warning symbols on the KombiTool:
This symbol marks the filler opening for STIHL
gear grease.
Push drive tube into KombiTool’s coupling
sleeve as far as mark.
XXXXX
4 Safety Precautions
Observe safety notices and take the necessary
precautions.
Read, understand and save the instruction
manual.
Wear safety glasses and hearing protection.
Wear safety boots.
Wear protective gloves.
Do not touch the moving blades.
Maintain safe distance.
Do not touch hot surface.
5 m (17 ft)

0458-811-0121-A
4
English
4 Safety Precautions
4.2 Intended Use
The STIHL RG-KM KombiTool is designed to be combined
with a STIHL KombiMotor and used for removing weeds and
mowing grass.
WARNING
■ Using the KombiTool for purposes for which it is not
designed may result in serious or fatal injuries and
damage to property.
► Use the KombiTool as described in this instruction
manual.
► Use the KombiMotor as described in the instruction
manual supplied with the STIHL KombiMotor.
4.3 The Operator
WARNING
■ Users who have had no instruction cannot recognize or
assess the risks involved in using the KombiTool. The
user or other persons may sustain serious or fatal injuries.
► If you pass the KombiTool on to another person: Always
give them the instruction manual.
► Make sure the user meets the following requirements:
– The user must be rested.
– The user must be in good physical condition and
mental health to operate and work with the
KombiTool. If the user’s physical, sensory or mental
ability is restricted, he or she may work only under the
supervision of or as instructed by a responsible
person.
– The user is able to recognize and assess the risks
involved in using the KombiTool.
– The user must be of legal age or is being trained in a
trade under supervision in accordance with national
rules and regulations.
– The user has received instruction from a STIHL
servicing dealer or other experienced user before
working with the KombiTool for the first time.
– The user must not be under the influence of alcohol,
medication or drugs.
► If you have any queries: Contact a STIHL servicing
dealer for assistance.
4.4 Clothing and Equipment
WARNING
■ Objects can be thrown through the air at high speed
during operation. This can result in personal injury.
► Wear long trousers made of durable material.
■ Noise occurs during operation. Noise can harm your
hearing.
► Read, understand and save the instruction
manual.
► Wear close-fitting safety glasses. Suitable
safety glasses that have been tested and
labeled in accordance with EN 166 or
national standards are available from
retailers.
► Wear hearing protection.

0458-811-0121-A
5
English
4 Safety Precautions
■ Dust can be whipped up during operation: Whipped up
dust can damage the respiratory passages and cause
allergic reactions.
► If dust is whipped up and forms a cloud: Wear a dust
respirator mask.
■ Unsuitable clothing can snag on wood, brush or the
KombiTool. Not wearing personal protective equipment
may result in serious injury.
► Wear snug-fitting clothing.
► Do not wear a scarf or jewelry.
■ The user can come into contact with the blades during
operation. This can result in serious injuries.
► Wear long trousers made of durable material.
■ The user can come into contact with the blades during
cleaning and maintenance work. This can result in
personal injury.
■ Wearing unsuitable footwear may cause you to slip or
stumble. This can result in personal injury.
► Wear sturdy enclosed footwear with non-slip soles.
4.5 Work Area and Surroundings
WARNING
■ Innocent bystanders, children and animals are not aware
of the dangers of the KombiTool or flying debris.
Bystanders, children and animals may be seriously injured
and damage to property may occur.
► Maintain a clearance of 3 meters from objects.
► Do not leave the KombiTool unattended.
► Make sure that children cannot play with the KombiTool.
4.6 Safe Condition
4.6.1 KombiTool
The KombiTool is in a safe condition if the following points
are observed:
– The KombiTool is not damaged.
– The KombiTool is clean.
– The KombiTool is correctly mounted.
– Only original STIHL accessories for this KombiTool model
are fitted.
– Accessories are properly mounted.
WARNING
■ If components do not comply with safety requirements,
they will no longer function properly and safety devices
may be rendered inoperative. This can result in serious or
fatal injuries.
► Work only with an undamaged KombiTool.
► If the KombiTool is dirty: Clean the KombiTool.
► Do not modify the KombiTool.
► Only fit original STIHL accessories designed for this
KombiTool model.
► Install the blades as described in the instruction manual.
► Mount accessories as described in this instruction
manual or the instructions supplied with the accessory.
► If you have any queries: Contact a STIHL servicing
dealer for assistance.
► Wear steel-toed safety boots.
► Wear work gloves made of durable material.
► Do not allow bystanders, children
or animals within 5 meters of the
work area.
5 m (17 ft)

0458-811-0121-A
6
English
4 Safety Precautions
4.6.2 Blades
The blades are in a safe condition if the following points are
observed:
– The blades and mounting hardware are undamaged.
– The blades are not deformed.
– The blades are properly mounted.
– The blades are burr-free.
WARNING
■ If they are in an unsafe condition, parts of the blades may
come off and be thrown at high speed. This can result in
serious injuries.
► Never work with damaged blades or damaged mounting
hardware.
► Sharpen the blades properly.
► Deburr the cutting edges with a file.
► If you have any queries: Contact a STIHL servicing
dealer for assistance.
4.7 Operation
WARNING
■ The user cannot concentrate on the work in certain
situations. The user may stumble, fall and be seriously
injured.
► Work calmly and carefully.
► If light and visibility are poor: Do not work with the
KombiTool.
► Operate the KombiTool alone.
► Keep the KombiTool close to the ground.
► Watch out for obstacles.
► Stand on the ground while working and keep a good
balance.
► If you begin to feel tired: Take a break.
■ The moving blades can cut the user. This can result in
serious injuries.
■ If the behavior of the KombiTool changes during operation
or feels unusual, it may no longer be in a safe condition.
This can result in serious injuries and damage to property.
► Stop work and contact your STIHL dealer for
assistance.
■ KombiTool vibrations may occur during operation.
► Take regular breaks.
► If signs of circulation problems occur: Seek medical
advice.
■ Sparks may occur if the rotating blades make contact with
a hard object. Sparks may cause a fire in an easily
combustible location. This can result in serious or fatal
injuries and damage to property.
► Do not work in an easily combustible location.
■ There is an increased risk of objects being thrown if
cutting performance deteriorates or cuttings frequently
become jammed. This can result in personal injury.
► Sharpen the blades as described in the instruction
manual.
■ Note that the blades continue to move for a few seconds
after you let go of the throttle on the KombiMotor. This can
result in serious injuries.
► Wait until the blades come to a complete standstill.
► Do not touch the moving blades.
► If the blades are blocked by an object:
Switch off the KombiMotor. Then remove
the object causing the blockage.
► Wear gloves.

0458-811-0121-A
7
English
4 Safety Precautions
DANGER
■ Working near live electric cables can result in accidental
contact with the blades and damage the cables. This can
result in serious or fatal injuries.
► Do not work near live electric cables.
► Also watch out for buried cables.
4.8 Transporting
WARNING
■ The gear housing can get hot during operation. There is a
risk of burn injuries.
■ The KombiTool can turn over or move while being
transported. This may result in personal injuries and
damage to property.
► Fit the transport guard.
► Secure the KombiTool with lashing straps, belts or a net
to prevent it turning over and moving.
4.9 Storing
WARNING
■ Children are not aware of and cannot assess the dangers
of the KombiTool and can be seriously injured.
► Fit the transport guard.
► Store KombiTool out of the reach of children.
■ The metal parts of the KombiTool can corrode if they are
damp. The KombiTool may be damaged.
► Store the KombiTool in a clean and dry condition.
4.10 Cleaning, Maintenance and Repairs
WARNING
■ The gearbox can get hot during operation. There is a risk
of burn injuries.
■ Aggressive cleaning agents, cleaning with a jet of water or
pointed objects can damage the KombiTool. If the
KombiTool is not cleaned correctly, components may no
longer function properly or safety devices may be
rendered inoperative. This can result in serious injuries.
► Clean the KombiTool as described in this instruction
manual.
■ If the KombiTool is not serviced or repaired correctly,
components may no longer function properly or safety
devices may be rendered inoperative. This can result in
serious or fatal injuries.
► Do not attempt to repair the KombiTool yourself.
► If the KombiTool needs to be repaired: Contact a STIHL
servicing dealer for assistance.
► Maintain the KombiTool as described in this instruction
manual.
■ The user can be cut by the sharp cutting edges while
cleaning or maintaining the blades. This can result in
personal injury.
► Do not touch a hot gear housing.
► Do not touch a hot gearbox.
► Wear work gloves made of durable material.

0458-811-0121-A
8
English
5 Preparing KombiTool for Operation
5.1 Preparing KombiTool for Operation
Perform the following steps before starting work:
► Make sure the following components are in a safe
condition:
– KombiTool, @ 4.6.1.
– KombiMotor, as described in the instruction manual.
► Clean the KombiTool, @ 12.1.
► Connect drive tube to the gearbox, @ 6.1.
► Mount the KombiTool on the KombiMotor, @ 6.2.1.
► If you are using a KombiMotor with a loop handle: Mount
a barrier bar as described in the KombiMotor’s instruction
manual.
► Use a carrying system, @ 8.1.
► If you cannot carry out the above steps: Do not use the
KombiTool and contact your STIHL servicing dealer for
assistance.
6.1 Connecting Drive Tube to Gear Housing
► Remove protective caps (1) from both ends of the drive
tube (2).
► Loosen the screw (6).
► Push the drive tube (2) into the gear housing (5) and rotate
it until the gear shaft (4) engages.
► Tighten the screw (6) moderately.
► Align the drive tube (2) so that the lug (3) faces up.
► Tighten down the screw (6) firmly.
The drive tube need not be removed again.
6.2 Mounting and Removing the KombiTool
6.2.1 Mounting the KombiTool
► Loosen the wing screw (1).
► Line up the lug (4) and the slot (3).
► Push the drive tube (5) into the coupling sleeve (2) as far
as stop.
The red line (6) is flush with the coupling sleeve (2).
► Tighten down the wing screw (1) firmly.
6.2.2 Removing the KombiTool
► Fit the transport guard.
► Loosen the wing screw on the KombiTool.
► Pull the drive tube out of the KombiTool.
5 Preparing KombiTool for Operation
6 Assembling the KombiTool
6
2
4
5
31
2
1
0000-GXX-8735-A1
2
4
1
5
3
6
1
2
0000-GXX-4689-A0

0458-811-0121-A
9
English
7 Checking the KombiTool
7.1 Checking the Blades
► Switch off the KombiMotor.
► Measure the following points on the blades:
– Length a
– Width b
–Angle c
► Compare measurements, @ 15.2.
► If the minimum length is less than specified: Offset the
blades, @ 13.4.
► If the minimum width is less than specified: Replace the
blades, @ 13.3.
► If the filing angle is not correct: Sharpen the blades,
@ 13.5.
► If you have any queries: Contact a STIHL servicing dealer
for assistance.
8.1 Holding and Controlling the KombiTool
► Hook the KombiMotor’s carrying ring (2) to the carrying
system’s carabiner (1).
KombiMotor with loop handle.
► Hold the KombiMotor with your right hand on the control
handle – wrap your thumb around the control handle.
► Hold the KombiMotor with your left hand on the loop
handle – wrap your thumb around the loop handle.
7 Checking the KombiTool
a
b
c
0000-GXX-8740-A0
8 Using the KombiTool
2
1
0000-GXX-7807-A0
0000-GXX-4644-A0

0458-811-0121-A
10
English
9 After Finishing Work
KombiMotor with bike handle
► Hold the KombiMotor with your right hand on the control
handle – wrap your thumb around the control handle.
► Hold the KombiMotor with your the left hand on the handle
– wrap your thumb around the handle.
8.2 Weeding and Mowing Grass
The cutting height is determined by the distance of the
blades from the ground.
► Swing the KombiTool back and forth in an arc.
► Walk slowly and steadily forwards.
9.1 After Finishing Work
► Switch off the KombiMotor.
► If the KombiTool is wet: Allow KombiTool to dry.
► Clean the KombiTool.
► Fit the transport guard.
10.1 Transporting the KombiTool
► Switch off the KombiMotor.
► Fit the transport guard.
► Carry the KombiTool,by the drive tube.
► If the KombiTool is transported in a vehicle: Secure the
KombiTool to prevent turnover and movement.
11.1 Storing the KombiTool
► Switch off the KombiMotor.
► Fit the transport guard.
► Check the following points when storing the KombiTool:
– KombiTool is out of the reach of children.
– KombiTool is clean and dry.
12.1 Cleaning the KombiTool
► Switch off the KombiMotor.
► Allow gear housing to cool down.
0000-GXX-7850-A0
0000-GXX-8737-A0
9 After Finishing Work
10 Transporting
11 Storing
12 Cleaning

0458-811-0121-A
11
English
13 Maintenance
► Clean the KombiTool with a damp cloth.
12.2 Cleaning the Blades
► Switch off the KombiMotor.
► Spray the blades with STIHL resin solvent.
► Switch on the KombiMotor for 5 seconds.
The blades run. STIHL resin solvent is distributed evenly.
13.1 Maintenance Intervals
The maintenance intervals are dependent on the
environmental and operating conditions. STIHL
recommends the following maintenance intervals:
After every 25 hours of operation
► Lubricate the gearbox.
13.2 Lubricating the Gearbox
► Switch off the KombiMotor.
► Remove the screw plug (2).
► If no grease can be seen on the end of the screw plug (2):
► Screw the tube (1) of STIHL gear grease into the filler
hole.
► Pump 10 g of STIHL gear grease into the gear housing.
► Unscrew the tube (1) of STIHL gear grease.
► Refit and tighten down the screw plug (2) firmly.
► Run the KombiMotor for 1 minute.
STIHL gear grease is distributed evenly.
13.3 Removing and Attaching the Blade
13.3.1 Removing the Blades
WARNING
The cutting edges of the blades are sharp. There is a risk of
cut injuries.
► Wear work gloves made of durable material.
► Switch off the KombiMotor.
► Remove screw (1) clockwise.
► Remove the rider plate (2).
► Remove screws (3) counterclockwise.
► Remove the blade (4).
► Remove screws (5) counterclockwise.
► Remove the blade (6).
13.3.2 Mounting the Blades
WARNING
The cutting edges of the blades are sharp. There is a risk of
cut injuries.
► Wear work gloves made of durable material.
13 Maintenance
2
1
0000-GXX-8739-A0
2
1
6
4
3
5
0000-GXX-8733-A0

0458-811-0121-A
12
English
13 Maintenance
► Switch off the KombiMotor.
► Fit the blade (1).
► Insert the screws (2) clockwise and tighten them down
firmly.
► Fit the blade (3).
► Insert the screws (4) clockwise and tighten them down
firmly.
► Fit the rider plate (5).
► Fit the screw (6) and tighten it down firmly
counterclockwise.
13.4 Offsetting the Blades
WARNING
The cutting edges of the blades are sharp. There is a risk of
cut injuries.
► Wear work gloves made of durable material.
► Switch off the KombiMotor.
► Remove the blades.
► Mount the blades 120° offset.
► If the blades have already been offset twice: Replace the
blades.
► If you have any queries: Contact a STIHL servicing dealer
for assistance.
13.5 Sharpening the Blades
WARNING
The cutting edges of the blades are sharp. There is a risk of
cut injuries.
► Wear work gloves made of durable material.
► Switch off the KombiMotor.
► Remove the blades.
5
6
3
4
1
2
0000-GXX-8734-A0
120°
0000-GXX-8741-A0
1
2
0000-GXX-8742-A0

0458-811-0121-A
13
English
14 Repairing
► Use a STIHL flat crosscut file to sharpen the cutting edge
(2). The file only sharpens on the forward stroke. Maintain
the specified sharpening angle, @ 15.2.
► Sharpen the other cutting edges.
► Mount the blades.
► If you have any queries: Contact a STIHL servicing dealer
for assistance.
14.1 Repairing the KombiTool
The KombiTool cannot be repaired by the user.
► If the KombiTool is damaged: Do not use the KombiTool
and contact your STIHL servicing dealer for assistance.
15.1 STIHL RG-KM KombiTool
– Weight with blades: 2.5 kg
15.2 Blades
– Thickness: 1.25 mm
– Minimum width (tooth): 5 mm
– Minimum length (tooth): 10 mm
– Sharpening angle: 45°
15.3 Noise and Vibration Data
K-value (uncertainty) for sound pressure level is 2 dB(A). K-
value (uncertainty) for sound power level is 2 dB(A). K-value
for vibration level is 2 m/s².
RG-KM with KM 94 R
– Sound pressure level L
p
measured on reflective surface
according to ISO 22868: 93 dB(A)
– Sound pressure level L
p
measured on reflective surface
according to ISO 22868: 107 dB(A)
– Vibration level a
hv
measured according to ISO 22867
– Control handle: < 6.1 m/s²
– Loop handle: 5.9 m/s²
RG-KM with KM 111 R
– Sound pressure level L
p
measured on reflective surface
according to ISO 22868: 96 dB(A)
– Sound pressure level L
p
measured on reflective surface
according to ISO 22868: 108 dB(A)
– Vibration level a
hv
measured according to ISO 22867
– Control handle: < 5.4 m/s²
– Loop handle: 5.8 m/s²
RG-KM with KM 131
– Sound pressure level L
p
measured on reflective surface
according to ISO 22868: 98 dB(A)
– Sound pressure level L
p
measured on reflective surface
according to ISO 22868: 109 dB(A)
– Vibration level a
hv
measured according to ISO 22867
– Control handle: 4.5 m/s².
– Left handle: 5.0 m/s²
RG-KM with KM 131 R
– Sound pressure level L
p
measured on reflective surface
according to ISO 22868: 98 dB(A)
– Sound pressure level L
p
measured on reflective surface
according to ISO 22868: 109 dB(A)
– Vibration level a
hv
measured according to ISO 22867
– Control handle: < 5.6 m/s²
– Loop handle: 6.1 m/s²
14 Repairing
15 Specifications

0458-811-0121-A
14
English
16 Combinations with KombiMotors
RG-KM with KMA 130 R
– Sound pressure level L
p
measured on reflective surface
according to ISO 22868: 84 dB(A)
– Sound pressure level L
p
measured on reflective surface
according to ISO 22868: 94 dB(A)
– Vibration level a
hv
measured according to ISO 22867
– Control handle: < 4.1 m/s²
– Loop handle: 4.4 m/s²
Information on compliance with Vibration Directive
2002/44/EC is available at www.stihl.com/vib.
15.4 REACH
REACH is an EC regulation and stands for the Registration,
Evaluation, Authorisation and Restriction of Chemical
substances.
For information on compliance with the REACH regulation
see www.stihl.com/reach.
16.1 STIHL RG-KM
The KombiTool may be mounted to the following
KombiMotors:
–STIHLKM94R
–STIHLKM111R
–STIHL KM 131
–STIHLKM131R
–STIHLKMA130R
17.1 Spare Parts and Accessories
STIHL recommends the use of original STIHL replacement
parts and accessories.
Original STIHL replacement parts and original STIHL
accessories are available from STIHL servicing dealers.
18.1 Disposing of KombiTool
Information on disposal is available from STIHL servicing
dealers.
► Dispose of the KombiTool, blades, accessories and
packaging in accordance with local regulations and
environmental requirements.
19.1 STIHL RG-KM KombiTool
ANDREAS STIHL AG & Co. KG
Badstrasse 115
D-71336 Waiblingen
Germany
declare in exclusive responsibility that
– Category: Weeder KombiTool
–Make: STIHL
– Model: RG-KM
– Serial identification: 4180
16 Combinations with KombiMotors
17 Spare Parts and Accessories
These symbols identify original STIHL
replacement parts and original STIHL
accessories.
18 Disposal
19 EC Declaration of Conformity

0458-811-0121-A
15
English
19 EC Declaration of Conformity
conforms to the relevant provisions of Directive 2006/42/EC
and has been developed and manufactured in conjunction
with the KombiMotors listed in this instruction manual to
comply with the following standards in the versions valid on
the date of production: EN ISO 12100
Technical documents are deposited at ANDREAS STIHL AG
& Co. KG Produktzulassung (Product Licensing).
The year of manufacture is specified on the KombiTool.
Done at Waiblingen, 01.03.2019
ANDREAS STIHL AG & Co. KG
Thomas Elsner, Director Product Management and Services

0458-811-0121-A
16
English
19 EC Declaration of Conformity


www.stihl.com
*04588110121A*
0458-811-0121-A
0458-811-0121-A
englisch
G
/