Page is loading ...

4. Press AL/SET again; press UP/DOWN tp choose the
sound level (HI/LO). The corresponding icons are
displayed on the screen.
5. Press AL/SET again to exit the alarm setup mode.
SELECT ALARM MODE
In idle mode, press AL/SET to toggle between the
available alarm modes - see below.
REMINDER - TO UNLOCK THE CLOCK:
Press and Hold DOWN/UNLOCK button until it beeps
Audible alarm mode
Bed shaker alarm mode
Light alarm mode
Audible + Bed shaker mode
Audible + Light alarm mode
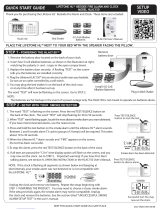
BATTERY INSTALLATION
Your Jolt requires 1 x AAA alkaline battery and 2 x AA alka-
line batteries.
1. On the back of your unit, press the latch and remove
battery door.
2. Install batteries as shown, ensuring polarity matches
the diagram.
3. Close battery door; make sure latch clicks in place.
IMPORTANT!
Auto Key Lock feature is active after 1 minute of no
buttons being pressed on the unit. This ensures that
buttons cannot be pressed by mistake while traveling
and/or while sleeping.
TO UNLOCK THE CLOCK:
Press and hold the DOWN/UNLOCK button until you
hear the unlock beep tones.
SET TIME/SET SNOOZE DURATION
1. Press and hold SET/TIMER until the hour digits start
flashing; release SET/TIMER button. Press UP/DOWN
to set the time in hours.
2. Press SET/TIMER again; you will see the minutes digits
flashing. Press UP/DOWN to set the time in minutes.
3. Press SET/TIMER again; press UP/DOWN to choose
between 12 hour or 24 hour display for your Jolt
(default setting is 24 hour display). If 12 hour is
selected, press UP/DOWN to choose between AM and
PM.
4. Press SET/TIMER again; now you will have the
opportunity to choose the SNOOZE duration (default
is 5 minutes). You can choose any timing between 5
minutes and 60 minutes.
5. Press SET/TIMER again to exit the time/snooze setup
mode.
SET ALARM (default is 6:00 AM)
1. Press and hold AL/SET button until AL is displayed
and the hour digits start flashing; release the AL/SET
button. Press UP/DOWN to set the hour for your alarm
time.
2. Press AL/SET again; you will see the minutes digits
flashing. Press UP/DOWN to set the minutes for the
alarm time.
3. Press AL/SET again; press UP/DOWN to choose the
vibration level (HI/LO). The corresponding icons are
displayed on the screen.
SNOOZE/TURN OFF ALARM
6. To snooze: while alarm is active, press SNOOZE button
to engage the snooze function; alarm will stop and come
back on after snooze time expires.
7. To turn o: while alarm is active, press AL SEL/SELECT
once; alarm will stop and be active again the following
day at the same time.
FLASHLIGHT
Press and hold SNOOZE/FLASHLIGHT to turn on the
Flashlight function. Press and hold SNOOZE/FLASHLIGHT
again to turn it o.
TIMER FEATURE
1. In idle mode, press SET/TIMER once to activate the
timer/stopwatch feature. The timer icon is displayed
on the screen, and the digits start flashing.
2. Press DOWN to set timer in hours, press UP to set
timer in minutes.
3. Press START/STOP to start timer; you will see the “:”
and DOWN icon flashing.
™
WakeAssure
Snooze / Flashlight
PM
Low Battery
Timer/
Stopwatch
Light Alarm
Bed Shaker
Audible Alarm
UP/Test
AL SET/
SELECT
START / STOP
(timer)
SET
TIMER
DOWN
UNLOCK
TIMER ON
icon
STOPWATCH
ON icon
ALARM ON
icon
AM
AAA Battery
2 x AA Batteries

SPECIFICATIONS
Alarm Duration 1 minute
Snooze Duration 5 to 60 minutes
Default Settings
Time format 24 hour
Time 0:00
Alarm 6:00 (6:00 AM)
Shaker/alarm level Hi
Snooze duration 5 minutes
Timer/Stopwatch 23 hrs 59 mins
Audible Alarm 80dBSPL at 1m
WARRANTY
The following warranty and service information applies only
to products purchased and used in the U.S. and Canada. For
warranty information in other countries, please contact your
local retailer or distributor.
Limited Warranty: Clarity Products LLC (“Clarity”) warrants to
the original consumer purchaser that, except for limitations
and exclusions set forth below, this product shall be free from
defects in materials and workmanship for a period of one (1)
year from the date of original purchase (“Warranty Period”).
The obligation of Clarity under this warranty shall be at Clarity’s
option, without charge, of any part or unit that proves to be
defective in material or workmanship during the Warranty
Period.
Please use the original container, or pack the unit(s) in a sturdy
carton with sucient packing material to prevent damage.
Include the following information:
Proof-of-purchase indicating:
• Model number and date of purchase;
• Bill-to address;
• Ship-to address;
• Number and description of units shipped;
• Name and telephone number of person to call, should
contact be necessary;
• Reason for return and description of the problem.
Damage occurring during shipment is deemed the
responsibility of the carrier, and claims should be made directly
with the carrier.
For complete detailed information on warranty and on how to
return your product, please visit
www.clarityproducts.com/returns.
REGULATORY INFORMATION
PART 15 OF FCC RULES INFORMATION
This device complies with part 15 of the FCC Rules. Operation is
subject to the following two conditions: (1) This device may not
cause harmful interference, and (2) this device must accept any
interference received, including interference that may cause
undesired operation.
This equipment has been tested and found to comply with the
limits of a Class B digital device, pursuant to Part 15 of FCC rules.
These limits are designed to provide reasonable protection
against harmful interference in residential installation.
This equipment generates, uses, and can radiate radio
frequency energy and, if not installed and used in accordance
with the instructions, may cause harmful interference to radio
communications.
However, there is no guarantee that interference will not
occur in a particular installation; if this equipment does cause
harmful interference to radio or television reception, which
can be determined by turning the equipment o and on, you
are encouraged to try to correct the interference by one of the
following measures:1. Where it can be done safely, reorient the
receiving television or radio antenna.
2. To the extent possible, relocate the television, radio or other
receiver with respect to the device.
WARNING: To maintain the compliance with the FCC’s RF
exposure guideline, place the base unit at least 20 cm from
nearby persons.
For body worn operation, this device has been tested and
meets the FCC RF exposure guidelines when used with the
Clarity accessories supplied or designated for this product. Use
of other accessories may not ensure compliance with FCC RF
exposure guidelines.
WARNING: Changes or modifications to this equipment not
expressly approved by the party responsible for compliance
could void the user’s authority to operate the equipment.
REGULATORY INFORMATION
CAN ICES-3 (B)/NMB-3(B) (CANADA)
This Class B digital apparatus complies with Canadian ICES-003.
[The term “IC:” before the certification/registration number
only signifies that the Industry Canada technical specifications
were met.]
This digital apparatus does not exceed the Class B limits
for radio noise emissions from digital apparatus set out
in the interference-causing equipment standard entitled
“Digital Apparatus,” ICES-003 of the Canadian Department of
Communications.
This device complies with Industry Canada license-exempt RSS
standard(s).
Operation is subject to the following two conditions: (1) This
device may not cause harmful interference, and (2) this device
must accept any interference received, including interference
that may cause undesired operation.
4. During timer countdown, press START/STOP to pause
the timer; from here, press START/STOP to resume,
OR press and hold START/STOP again to stop or reset
the timer.
5. When the timer reaches 0:00, the alarm goes o. It
then starts counting the time in order to display the
elapsed time since timer expiration. Press START/
STOP to stop the alarm.
6. NOTE: during timer countdown, press SET/TIMER
to return to clock display. The timer icon flashes to
indicate the active timer/stopwatch. To stop the
timer in this mode, press and hold the DOWN/UNLOCK
button.
STOPWATCH FEATURE
1. In idle mode, press SET/TIMER once to activate the
timer/stopwatch feature. The timer icon is displayed
on the screen, and the digits start flashing. Press and
hold START/STOP to reset display to “0:00”.
2. Press START/STOP to start the stopwatch; you will see
the “:” and UP icon flashing.
3. During stopwatch mode, press START/STOP to pause
the stopwatch; from here, press START/STOP to
resume, OR press and hold START/STOP again to stop
or reset the stopwatch.
4. NOTE: during stopwatch mode, press SET/TIMER
to return to clock display. The timer icon flashes to
indicate the active timer/stopwatch.
LOW BATTERY
When low battery icon is displayed, replace batteries with
equivalent/alkaline only batteries. NOTE: frequent use of
bed shaker feature with your alarm will shorten the life of
the batteries.
TROUBLESHOOTING
If your Jolt does not function properly, reset the unit by
removing/reinstalling the batteries. You will need to set
the time again.
TEST MODE
In order to quickly check the features of the unit, unlock
the Jolt first (press and hold the DOWN/UNLOCK button
to unlock), then press and hold the TEST button. The
following features turn on for 5 seconds: bed shaker, light
flashing, audible alarm.
/