Page is loading ...

Website:www.casainc.com
Servicecontact: service@casainc.com
Customer Service 888-257-3857
Installation ManualInstallation Manual
SHOWER FAUCETSHOWER FAUCET

Installation precautions
Preparation before installation
1. Please read the installation manual carefully before installation.
2. Installation work must be performed by a professional installer.
3. Installation tool:
1
Plumber's
putty Thread seal
tape
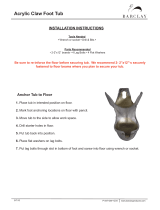
Included

S-connector
Escutcheon
M5 Screw
2.5mm Hex Wrench
PTFE Thread
Sealant Tape
Hand Shower Holder
Mounting Bracket
Escutcheon
Wall Anchor
Mounting Screw
M5 Screw
Swivel Joint
Color Button
M5 Screw
Screw
Handle
Top Escutcheon
Shower Body
Mounting Screw
Wall Anchor
Shower Hose
Hand Shower
Middle Shower Riser
Rain Shower Head
Shower Arm
S-connector
Escutcheon
M5 Screw
2.5mm Hex Wrench
Sealant Tape
Hand Shower Holder
Mounting Bracket
Escutcheon
Wall Anchor
Mounting Screw
M5 Screw
Swivel Joint
Shower Hose
Hand Shower
Middle Shower Riser
Rain Shower Head
Shower Arm
Body
Body
S-connector
Escutcheon
M5 Screw
2.5mm Hex Wrench
Hand Shower Holder
PTFE Thread
Sealant Tape
Mounting Bracket
Escutcheon
Wall Anchor
Mounting Screw
M5 Screw
Swivel Joint
Body
Shower Hose
Hand Shower
Rain Shower Head
Shower Arm
Middle Shower Riser
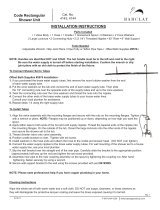
Soap Dish
Shower Support
M5 Screw
Anchor
08 Hole
Mounting Bracket
Mounting Screw Escutcheon
S-connector
Escutcheon
Diverter
Shower Body
Middle Shower Riser
Shower Hose
Hand Shower
Rain Shower Head
Lock Nut
2

3
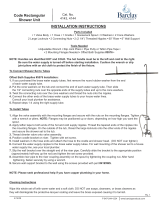
1.As specified in diagram, attach the shower base to the water supply pipes in the wall.
2. Wrap the S-connectors with Teflon tape, and thread the connectors onto the supply
pipes. Tighten with your adjustable wrench.
3.Use a level to verify the connectors are aligned properly. Adjust as necessary.
4. Thread the inner rings onto the S-connectors, keeping the threaded portion facing
outward. Place the escutcheons on the inner rings with the horn mouth facing inward,
and push them against the wall.
5. Attach the connecting nuts to the S-connector, and tighten
6. Attach the connecting rod to the middle shower riser. Hold the mounting bracket in
place in the desired mounting location.
7.Attach the middle shower riser to the shower body. Use a level to very that the shower
riser is in the proper location. When all pieces are properly aligned, mark the location of
the mounting bracket on the wall.
8. Remove the middle shower riser, and drill two Ø8 holes at the locations marked in the
previous step. Insert the wall anchors. Attach the mounting bracket to the wall with
mounting screws. Attach the escutcheon to the mounting bracket.
9.Attach the shower support and the middle shower riser. Connect the bottom of the
riser to the shower body and the top of the riser to the mounting bracket. Tighten the M5
screw to secure.
10.Thread the shower head onto the shower support. Tighten the locking nut and
shower head to secure.
11.Connect the hand shower and shower hose.
12.Install shower valve and attached the water supply pipes in the wall.Then install the shower
body and handle.

4
Clearance and maintenance
In order to keep the faucet appearance smooth and good performance, please
follow the below steps to clean and maintain the faucet.
1. Clean with water and dry with a soft cotton cloth.
2. Use a mild liquid and a colorless glass cleaner to remove surface dirt and
scale, also you can use the cleaner without grinding function.
3. Do not use detergents, polishing tools, abrasive cloth, paper towels or
scrapers to clean the faucet.
4. Do not use acid cleaners, insoluble granular detergents, soaps etc to clean
the faucet.
Product reparation
/