Stovax Futura 5 Installation guide
- Category
- Wood stove
- Type
- Installation guide
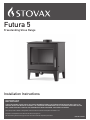
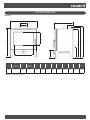
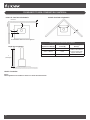
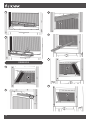
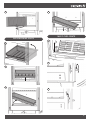
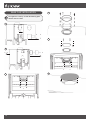
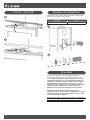
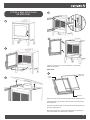
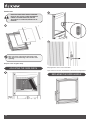
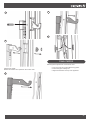
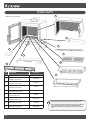
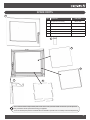
Stovax Futura 5 is a freestanding stove range designed for burning wood or solid fuels, boasting an impressive efficiency of up to 82%. It features a top or rear flue outlet, providing flexibility in installation, and meets the European Min Spec for Chimney Flue - T400 N2 D 3 G50. The Futura 5 incorporates a variety of safety features, including a stay-cool handle and an outer casing that remains at a safe temperature during operation. Its compact dimensions, measuring 588mm in width, 623mm in depth, and 673mm in height, make it suitable for smaller spaces.
Stovax Futura 5 is a freestanding stove range designed for burning wood or solid fuels, boasting an impressive efficiency of up to 82%. It features a top or rear flue outlet, providing flexibility in installation, and meets the European Min Spec for Chimney Flue - T400 N2 D 3 G50. The Futura 5 incorporates a variety of safety features, including a stay-cool handle and an outer casing that remains at a safe temperature during operation. Its compact dimensions, measuring 588mm in width, 623mm in depth, and 673mm in height, make it suitable for smaller spaces.


-
 1
1
-
 2
2
-
 3
3
-
 4
4
-
 5
5
-
 6
6
-
 7
7
-
 8
8
-
 9
9
-
 10
10
-
 11
11
-
 12
12
-
 13
13
-
 14
14
-
 15
15
-
 16
16
-
 17
17
-
 18
18
-
 19
19
-
 20
20
-
 21
21
-
 22
22
-
 23
23
-
 24
24
-
 25
25
-
 26
26
-
 27
27
-
 28
28
-
 29
29
-
 30
30
-
 31
31
-
 32
32


Stovax Futura 5 Installation guide
- Category
- Wood stove
- Type
- Installation guide
Stovax Futura 5 is a freestanding stove range designed for burning wood or solid fuels, boasting an impressive efficiency of up to 82%. It features a top or rear flue outlet, providing flexibility in installation, and meets the European Min Spec for Chimney Flue - T400 N2 D 3 G50. The Futura 5 incorporates a variety of safety features, including a stay-cool handle and an outer casing that remains at a safe temperature during operation. Its compact dimensions, measuring 588mm in width, 623mm in depth, and 673mm in height, make it suitable for smaller spaces.
Ask a question and I''ll find the answer in the document
Finding information in a document is now easier with AI
Related papers
-
Stovax County 5 Installation guide
-
-
-
-
-
-
-
-
-