Page is loading ...

62939 Installation Instructions. Revision 1 September 2008
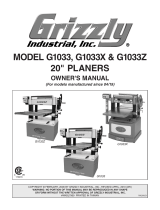
OUTSIDE MOUNTING
NOTE
Must be installed with C2 Ext. Leg Bracket (not supplied).
Part No. 00600 Bracket “C2” LH Ext. Leg Plated.
Part No. 00601 Bracket “C2” RH Ext. Leg Plated.
INSTALLATION STEPS
1. Position door for clear access to the end of the axle and drum.
2. Mount and secure main bracket onto the wall bracket with 3 sets of M12 bolts, washers and spring washers.
3. Install L-Bracket as well as U-Bracket (pre-assembled with bearing) onto the main bracket with 4 sets M12x35mm long set screws.
4. Place the motor onto the L-bracket, by guiding the 4 fi xed bolts through the slot holes at shown position and secured with 4 nuts,
washers and spring washers.
5. Slide the 6.4mm-keyed shaft into motor and place the second 8mm key into the groove, slide steel sprocket onto the shaft and the
shaft through the bearing.
6. Secure shaft with the second external clip.
7. Align the 13 teeth steel sprocket with the above sprocket, tighten with grub screw.
8. Attach and link 10B steel chain around sprockets semi tight and adjust motor position by releasing the corresponding nuts so that
all parts rotate freely in operation.
9. Check tension of the 10B steel chain over its full rotation and if necessary realign plastic sprocket concentric to the door drum axle.
2.
3.
4.
5.
7.
8.
5.
6.
"C2" LH EXT.
LEG BRACKET
A
SEE DETAIL A
DISCLAIMER
THESE INSTRUCTIONS ARE INTENDED FOR PROFESSIONAL GARAGE DOOR INSTALLERS
and only apply to the fittings
Note: All references are taken from inside looking out
MARANTEC OPENER ON
ROLL-A-DOOR
INSTALLATION INSTRUCTIONS
Part No. 62693

Marantec Opener on Roll-A-Door Installation Instructions
INSIDE MOUNTING
NOTE
Must be installed with C2 Ext. Leg Bracket (not supplied).
Part No. 00600 Bracket “C2” LH Ext. Leg Plated.
Part No. 00601 Bracket “C2” RH Ext. Leg Plated.
INSTALLATION STEPS
1. Position door for clear access to the end of the axle and drum.
2. Mount and secure main bracket onto the wall bracket with 3 sets of M12 bolts, washers and spring washers.
3. Install L-Bracket as well as U-Bracket (pre-assembled with bearing) onto the main bracket with 4 sets of M12x25mm and 4 sets of
M12x35mm long set screws.
4. Place the motor onto the L-Bracket by guiding the 4 fi xed bolts through the slot holes at shown position and secured with 4 nuts,
washer and spring washers.
5. Slide the 6.4mm-keyed shaft into motor and place the 8mm key into the groove, slide steel sprocket onto the shaft and the shaft
through the bearing.
6. Secure shaft with the second external clip.
7. Align the 13 teeth steel sprocket with the above sprocket, tighten with grub screw.
8. Attach and link 10B steel chain around sprockets semi tight and adjust motor position by releasing the corresponding nuts so that
all parts rotate freely in operation.
9. Check tension of the 10B steel chain over its full rotation and if necessary realign plactic sprocket concentric to the door drum axle.
2.
3.
4.
5.
6.
"C2" LH EXT.
LEG BRACKET
8.
7.
62939 Installation Instructions. Revision 1 September 2008
B
SEE DETAIL B
/