Pioneer MVH-S320BT User manual

Category
Receiver
Type
User manual

This manual is also suitable for

English Français Italiano Español Deutsch Nederlands
DIGITAL MEDIA RECEIVER
RÉCEPTEUR NUMÉRIQUE MULTIMÉDIA
RICEVITORE MULTIMEDIALE DIGITALE
RECEPTOR DE MEDIOS DIGITALES
DIGITALER MEDIA RECEIVER
DIGITALE MEDIA-RECEIVER
MVH-S420BT
MVH-S42BT
MVH-S320BT
Operation Manual
Mode d’emploi
Manuale d’istruzioni
Manual de instrucciones
Bedienungsanleitung
Bedieningshandleiding
- 2 -
English
Getting Started........................................................................................ 3
Radio.......................................................................................................... 7
USB/iPhone/AUX...................................................................................... 8
Bluetooth ............................................................................................... 10
Spotify® .................................................................................................. 14
Using Pioneer Smart Sync/APP.......................................................... 16
Using the Karaoke Function............................................................... 20
Audio Adjustments .............................................................................. 21
Settings .................................................................................................. 21
FUNCTION settings ............................................................................... 22
AUDIO settings ...................................................................................... 23
SYSTEM settings.................................................................................... 26
ILLUMINATION settings........................................................................ 29
MICROPHONE settings......................................................................... 29
Additional Information ....................................................................... 30
About this manual:
In the following instructions, a USB memory or USB audio player are referred to as
“USB device.
Table of Contents
- 3 -- 3 -
English
MVH-S420BT/S42BT/S320BT
Frequently used operations
* When this unit’s blue/white lead is connected to the vehicle’s auto-antenna relay control terminal,
the vehicle’s antenna extends when this units source is turned on. To retract the antenna, turn the
source off.
Getting Started
Basic operation
Purpose Operation
Turn on the power* Press SRC/OFF to turn on the power.
Press and hold SRC/OFF to turn off the
power.
Adjust the volume Turn the M.C. dial.
Select a source Press SRC/OFF repeatedly.
Change the display information Press DISP repeatedly.
Return to the previous display/list Press BAND/.
Return to the normal display from the menu Press and hold BAND/.
Change the display brightness Press and hold BAND/.
Answering a call Press any button.
Ending a call Press .
SRC (source)/OFF
Detach button
Display window
M.C. (multi-control) dial
BAND/
(navigation)/LIST
USB port
AUX input jack (3.5 mm stereo jack)
DISP (display)
- 4 -
English
Display indication
Detach the front panel to prevent theft. Remove any cables and devices attached to the
front panel and turn off the unit before detaching it.
Important
Avoid subjecting the front panel to excessive shock.
Keep the front panel out of direct sunlight and high temperatures.
Always store the detached front panel in a protective case or bag.
The microprocessor must be reset in the following situations:
Before using this unit for the first time after installation
If the unit fails to operate properly
When strange or incorrect messages appear on the display
1 Remove the front panel (page 4).
2 Press the RESET button with a pointed instrument longer than 8 mm.
Indication Description
Appears when a lower tier of the menu or folder exists.
Appears when a traffic program is received.
BASS Appears when the BASS function is activated.
Appears when random/shuffle play is set (except when BT AUDIO is
selected as the source).
Appears when repeat play is set (except when BT AUDIO is selected as the
source).
Appears when a Bluetooth connection is made (page 10).
APP Appears when a Pioneer Smart Sync connection is made (page 16).
Detaching the front panel
Resetting the microprocessor
Detach Attach
- 5 -- 5 -
English
When you turn the ignition switch to ON after installation, the setup menu appears in
the display.
1 Turn the M.C. dial to select the options, then press to confirm.
To proceed to the next menu option, you need to confirm your selection.
2 [QUIT :YES] appears.
To return to the first item of the setup menu, turn the M.C. dial to select [QUIT :NO],
then press to confirm.
3 Press the M.C. dial to confirm the settings.
NOTE
These settings can be made at any time from the SYSTEM settings (page 26) and INITIAL settings
(page 6).
Setup menu
Menu Item Description
LANGUAGE Select the language to display the text information from a
compressed audio file.
[ENG](English),
[РУС](Russian),
[TUR](Turkish),
[FRA](French),
[DEU](German)
CLOCK SET Set the clock.
1 Turn the M.C. dial to adjust the hour, then press to confirm.
The indicator moves to the minute setting automatically.
2 Turn the M.C. dial to adjust the minute, then press to confirm.
FM STEP Select the FM tuning step from 100 kHz or 50 kHz.
[100], [50]
RESET button
- 6 -
English
1 Press the M.C. dial to display the main menu.
2 Turn the M.C. dial to select [SYSTEM], then press to confirm.
3 Turn the M.C. dial to select [DEMO OFF], then press to confirm.
4 Turn the M.C. dial to select [YES], then press to confirm.
1 Press and hold SRC/OFF until the unit turns off.
2 Press and hold SRC/OFF to display the main menu.
3 Turn the M.C. dial to select [INITIAL], then press to confirm.
4 Turn the M.C. dial to select an option, then press to confirm.
Canceling the demonstration display (DEMO OFF)
INITIAL settings
Menu Item Description
FM STEP Select the FM tuning step from 100 kHz or 50 kHz.
[100], [50]
SP-P/O MODE Select when there is a full-range speaker connected to the rear
speaker output leads and there is a subwoofer connected to the
RCA output.
[REAR/SUB.W]
[SUB.W/SUB.W] Select when there is a passive subwoofer connected directly to
the rear speaker output leads and there is a subwoofer
connected to the RCA output.
[REAR/REAR] Select when there are full-range speakers connected to the rear
speaker output leads and RCA output. If there is a full-range
speaker connected to the rear speaker output leads, and the
RCA output is not used, you may select either [REAR/SUB.W] or
[REAR/REAR].
SYSTEM UPDATE Select [SYSTEM INFO] to confirm the latest system information
on the unit.
Select [S/W UPDATE] to update the unit to the latest software
and initialize the unit settings. For details on the latest software
and updating, visit our website.
[SYSTEM INFO], [S/
W UPDATE]
SYSTEM RESET Select [YES] to initialize the unit settings. The unit will be
restarted automatically.
[YES], [NO]
- 7 -- 7 -
English
The tuner frequencies on this unit are allocated for use in Western Europe, Asia, the
Middle East, Africa and Oceania. Use in other areas may result in poor reception. The RDS
(radio data system) function only works in areas that broadcast RDS signals for FM
stations.
1 Press SRC/OFF to select [RADIO].
2 Press BAND/ to select the band from [FM1], [FM2], [FM3], [MW] or [LW].
3 Press a number button (1/ to 6/).
TIP
The / buttons can be also used to select a preset station when [SEEK] is set to [PCH] in the
FUNCTION settings (page 23).
The six strongest stations are stored on the number buttons (1/ to 6/).
1 After selecting the band, press the M.C. dial to display the main menu.
2 Turn the M.C. dial to select [FUNCTION], then press to confirm.
3 Turn the M.C. dial to select [BSM], then press to confirm.
To seek a station manually
1
After selecting the band, press / to select a station.
Press and hold / then release to seek an available station. Scanning stops
when the unit receives a station. To cancel seek tuning, press / .
NOTE
[SEEK] needs to be set to [MAN] in the FUNCTION settings (page 23).
To store stations manually
1
While receiving the station you want to store, press and hold one of the number
buttons (1/ to 6/ ) until it stops flashing.
Radio
Receiving preset stations
Best stations memory (BSM)
- 8 -
English
The unit searches for a station by PTY (program type) information.
1 Press and hold during FM reception.
2 Turn the M.C. dial to select a program type from [NEWS/INFO], [POPULAR],
[CLASSICS] or [OTHERS].
3 Press the M.C. dial.
The unit begins to search for a station. When it is found, its program service name is
displayed.
NOTES
To cancel the search, press the M.C. dial.
The program of some stations may differ from that indicated by the transmitted PTY.
If no station is broadcasting the type of program you searched for, [NOT FOUND] is displayed for
about two seconds and then the tuner returns to the original station.
(iPhone source is not available when [USB MTP] is set to [ON] in the SYSTEM settings
(page 27).)
NOTE
iPhone function is not available for MVH-S320BT.
Disconnect headphones from the device before connecting it to the unit.
USB devices (including Android™)/iPhone
1
Open the USB port cover.
2 Plug in the USB device/iPhone using an appropriate cable.
NOTE
To automatically switch to USB source when a USB device/iPhone is connected to the unit, set [USB
AUTO] to [ON] in the SYSTEM settings (page 28).
CAUTION
Use a USB cable (sold separately) to connect the USB device as any device connected directly to the
unit will protrude out from the unit, which could be dangerous.
Using PTY functions
USB/iPhone/AUX
Playing back
- 9 -- 9 -
English
Before removing the device, stop playback.
AOA connections
A device running Android OS 4.1 or later installed and also supports AOA (Android Open
Accessory) 2.0 can be connected to the unit via AOA, using the cable supplied with the
device.
NOTE
If you use an AOA connection, [APP CONTROL] needs to be set to [WIRED] (page 27) and [USB MTP]
needs to be set to [OFF] (page 27) in the SYSTEM settings.
MTP connection
A device installed with Android OS 4.0 or most of later versions can be connected to the unit via MTP,
using the cable supplied with the device. However, depending on the connected device, OS version or
the numbers of the files in the device, audio files/songs may not be able to be played back via MTP.
Note that MTP connection is not compatible with WAV and FLAC file formats.
NOTE
If you use an MTP connection, [USB MTP] needs to be set to [ON] in the SYSTEM settings (page 27).
AUX
1
Insert the stereo mini plug into the AUX input jack.
2 Press SRC/OFF to select [AUX IN] as the source.
NOTE
If [AUX] is set to [OFF] in the SYSTEM settings, [AUX IN] cannot be selected as a source (page 27).
You can make various adjustments in the FUNCTION settings (page 22) (except for AUX
IN/USB source).
Note that the following operations do not work for an AUX device. To operate an AUX
device, use the device itself.
Operations
Purpose Operation
Select a folder*1 Press 1/ or 2/.
Select a track/song (chapter) Press or .
Fast forward or reverse*2 Press and hold or .
Search for a file from a list (USB only) 1 Press and hold to display the list.
2 Turn the M.C. dial to select the desired
file (folder) name or category, then press
to confirm.
3 Turn the M.C. dial to select the desired
file, then press to confirm.
Playback starts.
- 10 -
English
*1 Compressed audio files only
*2 When you use the fast forward or reverse function while playing a VBR file, the playback time may
be not correct.
Important
If ten or more Bluetooth devices (e.g. a phone and separate audio player) are connected, they may not
work properly.
TIP
The next connection to the unit is performed automatically if the Bluetooth device has been connected
previously in the following steps.
1 Turn on the Bluetooth function of the device.
If you make a Bluetooth connection from the device, proceed to step 4.
2 Press to display the [ADD DEVICE] setting.
The unit starts to search for available devices, then displays them in the device list.
To cancel searching, press the M.C. dial.
If the desired device is not in the list, select [RE-SEARCH].
If there is no device available, [NOT FOUND] appears in the display.
If there is already a connected device, the phone menu appears by pressing .
3 Turn the M.C. dial to select a device from the device list, then press to confirm.
View a list of the files in the selected folder/
category*1
Press the M.C. dial when a folder/category
is selected.
Play a song in the selected folder/
category*1
Press and hold the M.C. dial when a folder/
category is selected.
Repeat play Press 6/.
Random/shuffle play Press 5/.
Pause/resume playback Press 4/PAUSE.
Sound retriever*1 Press 3/S.Rtrv.
[1]: Effective for low compression rates
[2]: Effective for high compression rates
Return to root folder (USB only)*1 Press and hold 1/.
Bluetooth
Bluetooth connection
Purpose Operation
- 11 -- 11 -
English
Press and hold the M.C. dial to switch the displayed device information between the
Bluetooth device address and device name.
If you make a Bluetooth connection from the unit, proceed to step 5.
4 Select the unit name shown in the device display.
5 Make sure the same 6-digit number appears on this unit and the device, then
select [YES] if the 6-digit numbers displayed on this unit and the device are the
same.
First, make a Bluetooth connection with the Bluetooth telephone (page 10). Up to two
Bluetooth telephones can be connected simultaneously.
Important
Leaving the unit on standby to connect to your phone via Bluetooth while the engine is not running
can drain the vehicles battery.
Be sure to park your vehicle in a safe place and apply the parking brake before operation.
To make a phone call
1
Press to display the phone menu.
When two phones are connected, a phone name appears first then a phone menu
will display. To switch to another phone, press again.
2 Turn the M.C. dial to select [RECENTS] or [PHONE BOOK], then press to confirm.
If you select [PHONE BOOK], proceed to step 4.
3 Turn the M.C. dial to select [MISSED], [DIALLED] or [RECEIVED], then press to
confirm.
4 Turn the M.C. dial to select a name or phone number, then press to confirm.
The phone call starts.
To answer an incoming call
1
Press any button when a call is received.
TIP
When two phones are connected to the unit via Bluetooth and there is an incoming call while one
phone is being used for a call, a message will appear in the display. To answer that incoming call, you
need to end the existing call.
Bluetooth telephone
- 12 -
English
Basic operations
To preset phone numbers
1
Select a phone number from a phone book or call history.
2 Press and hold one of the number buttons (1/ to 6/).
The contact is stored in the selected preset number.
To make a call using a preset number, press one of the number buttons (1/ to 6/),
then press the M.C. dial, while the phone menu is displayed.
Voice recognition
(iPhone function is not available for MVH-S320BT.)
This function is only available when an iPhone/Android device equipped with voice
recognition is connected to the unit via Bluetooth.
1 Press and hold and then talk into the microphone to input voice commands.
To exit the voice recognition mode, press BAND/.
NOTE
For details on the voice recognition features, refer to the manual supplied with your device.
TIP
When a Pioneer Smart Sync connection is made (page 16), you can also use the voice recognition
function from Pioneer Smart Sync installed on your iPhone/Android device by pressing and holding
. For details on the voice recognition features, see the applications help section.
Phone menu
1
Press to display the phone menu.
Purpose Operation
End a call Press .
Reject an incoming call Press and hold when a call is received.
Switch between the current caller
and a caller on hold
Press the M.C. dial.
Cancel a caller on hold Press and hold .
Adjust the volume of the callers
voice (When private mode is on,
this function is not available.)
Turn the M.C. dial during the call.
Turn the private mode on or off Press BAND/ during the call.
- 13 -- 13 -
English
* If two phones are connected, this function does not work on incoming calls that are received while
one of the phones is being used for a call.
Important
Depending on the Bluetooth audio player connected to this unit, the available operations will be
limited to the following two levels:
– A2DP (Advanced Audio Distribution Profile) can only play back songs on your audio player.
– AVRCP (Audio/Video Remote Control Profile) can perform functions such as playback, pause, select
song, etc.
The sound of the Bluetooth audio player will be muted when the phone is in use.
When the Bluetooth audio player is in use, you cannot connect to a Bluetooth telephone
automatically.
Depending on the type of Bluetooth audio player you have connected to this unit, operation and
information displayed may vary based on availability and functionality.
Menu Item Description
RECENTS Display the missed call history.
[MISSED]
[DIALLED] Display the dialed call history.
[RECEIVED] Display the received call history.
PHONE BOOK Display the contacts in your phone.
PRESET 1-6 Recall the preset phone numbers. You can also recall the preset
phone numbers by pressing one of the number buttons (1/
to 6/).
A.ANSR* Select [ON] to answer an incoming call automatically.
[ON], [OFF]
PB INVT Invert the order of names in the phone book (name view).
DEVICELIST Display the list of paired Bluetooth devices. “*” appears on the
device name when the Bluetooth connection is established.
When no device is selected in the device list, this function is not
available.
DEL DEVICE Delete the device information.
[DELETE YES],
[DELETE NO]
ADD DEVICE Register a new device.
DEV. INFO Switch the device information on the display between the
device name and Bluetooth device address.
Bluetooth audio
- 14 -
English
1 Make a Bluetooth connection with the Bluetooth audio player.
2 Press SRC/OFF to select [BT AUDIO] as the source.
3 Press BAND/ to start playback.
NOTE
You must reconnect the Bluetooth connection when the source is switched or the unit is turned off.
TIP
When more than two and up to five devices are registered to the unit via Bluetooth, you can switch the
Bluetooth device by playing back songs on the device. By doing so, playing back a song from the
Bluetooth device of each passenger is easily available. However, depending on the usage conditions,
multiple connections may not be available and the audio files/songs may not be able to be played back
properly.
Basic operations
You can make various adjustments in the FUNCTION settings (page 22).
* Depending on the connected device, these operations may not be available.
(Not available when [USB MTP] is set to [ON] in the SYSTEM settings (page 27).)
NOTE
iPhone connection is not available for MVH-S320BT.
Spotify is a music streaming distribution service not affiliated with Pioneer. More
information is available at http://www.spotify.com.
Purpose Operation
Fast forward or reverse Press and hold or .
Select a track Press or .
Repeat play* Press 6/.
Random play* Press 5/.
Pause/resume playback Press 4/PAUSE.
Search for a file from a list 1 Press and hold to display a list.
2 Turn the M.C. dial to select the desired
folder name, then press to confirm.
3 Turn the M.C. dial to select the desired
file, then press to confirm.
Playback starts.
Spotify®
- 15 -- 15 -
English
The Spotify application is available for compatible smartphones, please visit https://
support.spotify.com/ for the latest compatibility information.
To enjoy Spotify as you drive, first download the Spotify app to your iPhone or Android
device. You can download it on the iTunes App Store or Google Play™. Choose a free
account or a paid Premium account, either in the app or at spotify.com. A Premium
account gives you more features, like offline listening.
Important
This product incorporates Spotify software which is subject to 3rd party licenses found here:
www.spotify.com/connect/third-party-licenses.
For information on the countries and regions where Spotify can be used, take a look at https://
spotify.com/us/select-your-country/.
Update the firmware of the Spotify application to the latest version before use.
1 Connect this unit with the mobile device.
iPhone via USB (page 8)
iPhone/Android device via Bluetooth (page 10)
2 Press SRC/OFF to select [SPOTIFY].
3 Press and hold 1/ to display [APP CONTROL].
4 Turn the M.C. dial to select one of the below.
Select [WIRED] for the USB connection.
Select [BLUETOOTH] for the Bluetooth connection.
5 Press SRC/OFF to select [SPOTIFY].
6 Launch the Spotify application on the mobile device and start playback.
NOTE
When you connect a mobile device other than an iPhone/Android device, it may not operate correctly
depending on your mobile device.
Basic operations
You can make various adjustments in the FUNCTION settings (page 22).
NOTE
The available operations may vary according to the type of contents (track/album/artist/playlist/radio)
you want to play.
Listening to Spotify
Purpose Operation
Skip a track Press or .
- 16 -
English
NOTE
Some functions of Spotify may not be operated from the unit.
NOTE
iPhone connection is not available for MVH-S320BT.
Pioneer Smart Sync is the application that intelligently brings your maps, messages, and
music together in the vehicle.
You can operate the unit from Pioneer Smart Sync installed on an iPhone/Android
device. In some cases, you can control aspects of the application, such as source
selection, pause, etc., by using the unit.
For details on what operations are available on the application, see the applications help
section.
NOTE
The APP source is not available when a Pioneer Smart Sync connection is not made or [USB MTP] is set
to [ON] in the SYSTEM settings (page 27).
WARNING
Functions operated with a smartphone are merely tools available to the driver. The driver shall
observe safe and sensible driving behavior under all circumstances.
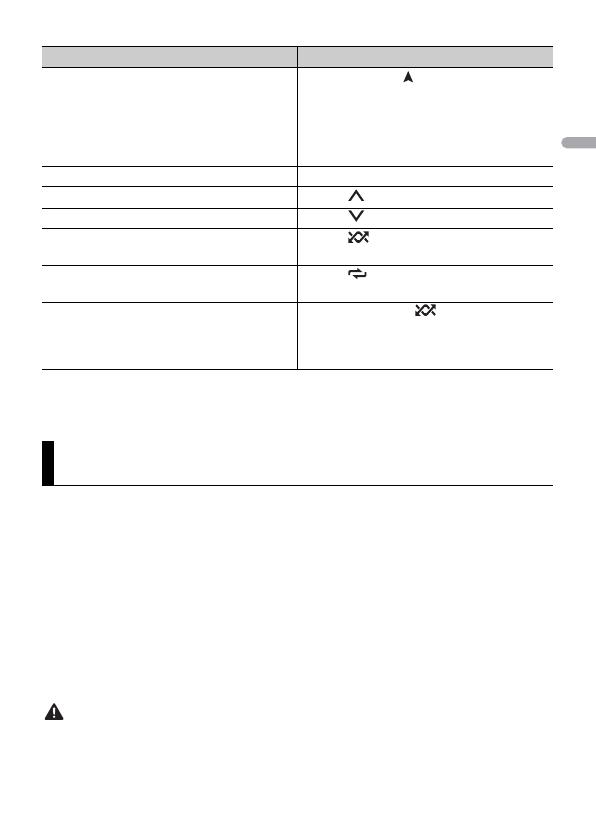
Search for a track from a list 1 Press and hold to display the list.
2 Turn the M.C. dial to select the desired
category, then press to confirm.
3 Turn the M.C. dial to select the desired
file, then press to confirm.
Playback starts.
Pause/resume playback Press 4/PAUSE.
Thumbs Up (Only for radio) Press 1/.
Thumbs Down (Only for radio) Press 2/.
Random play (Only for track/album/artist/
playlist)
Press 5/.
Repeat play (Only for track/album/artist/
playlist)
Press 6/.
Start a radio channel based on the song
currently being played.
1 Press and hold 5/ to start a radio.
2 Press the M.C. dial.
This function may not be available
depending on the selected song.
Using Pioneer Smart Sync/APP
Purpose Operation
- 17 -- 17 -
English
Do not attempt to operate the application while driving. Make sure to pull off the road and park your
vehicle in a safe location before attempting to use the controls on the application.
For iPhone users
This function is compatible with iOS 10.3 or later.
You can download Pioneer Smart Sync on iTunes App Store.
For Android device users
For Bluetooth connections, this function is compatible with devices that have Android
OS 5.0 or later installed.
For USB connections, this function is compatible with a phone that runs Android 5.0 or
later up to 7.1.2 and also supports AOA (Android Open Accessory) 2.0. However, the
compatibility depends on the smartphone.
You can download Pioneer Smart Sync on Google Play.
NOTE
Some Android devices connected via AOA 2.0 may not work properly or emit sounds due to their own
software design, regardless of the OS version.
What kind of function does the application have?
Promoting the use of the unit
The interface of the unit can be evolved by using your iPhone/Android device.
- 18 -
English
Image (example):
Examples:
Selecting a source of the unit
Listening to the music on your iPhone/Android device
Controlling the sound field intuitively
Controlling your connected Bluetooth device
Extending the functions of the unit by using the application
The following functions, which are unavailable on the unit alone, are available by
making a Pioneer Smart Sync connection.
NOTES
Some functions may be restricted depending on the connection conditions with the application.
The 31 Band EQ setting is converted into 13 bands when a music source from this product is engaged.
TIP
It is recommended to enter the search term "Pioneer Smart Sync" in the search field to search for the
application.
Menu Item (example) Description
Using a navigation application You can specify and start the navigation
application installed on your device.
Message reading You can read messages received from the
apps installed on your device.
31 Band EQ setting You can select an equalizer band from the
31-band graphic equalizer (13-band for not
using the Pioneer Smart Sync connection).
Super "Todoroki" Sound You can boost the bass level more
dynamically than when not using the
Pioneer Smart Sync connection.
Easy Sound Fit You can perform the time alignment setting
easily by selecting your vehicle type.
- 19 -- 19 -
English
1 Press the M.C. dial to display the main menu.
2 Turn the M.C. dial to select [SYSTEM], then press to confirm.
3 Turn the M.C. dial to select [APP CONTROL], then press to confirm.
4 Turn the M.C. dial to select one of the below.
Select [WIRED] for the USB connection.
Select [BLUETOOTH] for the Bluetooth connection.
5 Turn the M.C. dial to select [AUTO APP CONN], then press to confirm.
6 Turn the M.C. dial to select [ON], then press to confirm.
7 Connect this unit with the mobile device.
iPhone/Android device via USB (page 8)
iPhone/Android device via Bluetooth (page 10)
Pioneer Smart Sync on the device starts automatically.
NOTE
Regardless of whether the [AUTO APP CONN] setting is set to [ON] or [OFF], you can
also perform the following to start Pioneer Smart Sync.
For devices other than the USB-connected Android device, press SRC/OFF to select
any source and press and hold the M.C. dial.
For iPhone, launch Pioneer Smart Sync on the mobile device.
NOTES
When you connect a mobile device other than an iPhone/Android device, it may not operate
correctly depending on your mobile device.
If Pioneer Smart Sync has not been installed on your iPhone/Android device yet, a message that
prompts you to install the application will appear on your iPhone/Android device (except for the
Android device connected via Bluetooth). Select [OFF] in [AUTO APP CONN] to clear the message
(page 27).
1 Press SRC/OFF to select [APP].
Making a connection with Pioneer Smart Sync
Listening to music on your device
- 20 -
English
WARNING
A driver should never sing with a microphone while driving. Doing so may result in an accident.
Do not carelessly leave a microphone for preventing an accident.
CAUTION
It is extremely dangerous to allow the microphone lead to become wound around the steering column,
brake pedal or shift lever, which may cause an accident. Be sure to install the microphone in such a way
that it will not obstruct driving.
NOTES
Use a commercially available dynamic mic and not the supplied microphone.
This function is not available when the selected source is the following.
–RADIO
–AUX IN
1 Insert the stereo mini plug of your microphone into the AUX input jack.
2 Press the M.C. dial to display the main menu.
3 Turn the M.C. dial to select [MICROPHONE].
4 Press the M.C. dial to select [ON].
When the karaoke mode is activated, the volume on the unit is muted. Adjust the
microphone volume on the [MIC VOL] setting.
To adjust the microphone volume
1
Press the M.C. dial to display the main menu.
2 Turn the M.C. dial to select [MICROPHONE], then press to confirm.
3 Turn the M.C. dial to select [MIC VOL].
4 Turn the M.C. dial to adjust the volume level.
NOTE
If howling occurs when using the microphone, keep the microphone away from the speaker or lower
the microphone volume.
To reduce the level of the vocals in a song
1
Press the M.C. dial to display the main menu.
2 Turn the M.C. dial to select [MICROPHONE] then press to confirm.
3 Turn the M.C. dial to select [VOCAL].
4 Press the M.C. dial to select [OFF].
Using the Karaoke Function
  • Page 1 1
  • Page 2 2
  • Page 3 3
  • Page 4 4
  • Page 5 5
  • Page 6 6
  • Page 7 7
  • Page 8 8
  • Page 9 9
  • Page 10 10
  • Page 11 11
  • Page 12 12
  • Page 13 13
  • Page 14 14
  • Page 15 15
  • Page 16 16
  • Page 17 17
  • Page 18 18
  • Page 19 19
  • Page 20 20
  • Page 21 21
  • Page 22 22
  • Page 23 23
  • Page 24 24
  • Page 25 25
  • Page 26 26
  • Page 27 27
  • Page 28 28
  • Page 29 29
  • Page 30 30
  • Page 31 31
  • Page 32 32
  • Page 33 33
  • Page 34 34
  • Page 35 35
  • Page 36 36
  • Page 37 37
  • Page 38 38
  • Page 39 39
  • Page 40 40
  • Page 41 41
  • Page 42 42
  • Page 43 43
  • Page 44 44
  • Page 45 45
  • Page 46 46
  • Page 47 47
  • Page 48 48
  • Page 49 49
  • Page 50 50
  • Page 51 51
  • Page 52 52
  • Page 53 53
  • Page 54 54
  • Page 55 55
  • Page 56 56
  • Page 57 57
  • Page 58 58
  • Page 59 59
  • Page 60 60
  • Page 61 61
  • Page 62 62
  • Page 63 63
  • Page 64 64
  • Page 65 65
  • Page 66 66
  • Page 67 67
  • Page 68 68
  • Page 69 69
  • Page 70 70
  • Page 71 71
  • Page 72 72
  • Page 73 73
  • Page 74 74
  • Page 75 75
  • Page 76 76
  • Page 77 77
  • Page 78 78
  • Page 79 79
  • Page 80 80
  • Page 81 81
  • Page 82 82
  • Page 83 83
  • Page 84 84
  • Page 85 85
  • Page 86 86
  • Page 87 87
  • Page 88 88
  • Page 89 89
  • Page 90 90
  • Page 91 91
  • Page 92 92
  • Page 93 93
  • Page 94 94
  • Page 95 95
  • Page 96 96
  • Page 97 97
  • Page 98 98
  • Page 99 99
  • Page 100 100
  • Page 101 101
  • Page 102 102
  • Page 103 103
  • Page 104 104
  • Page 105 105
  • Page 106 106
  • Page 107 107
  • Page 108 108
  • Page 109 109
  • Page 110 110
  • Page 111 111
  • Page 112 112
  • Page 113 113
  • Page 114 114
  • Page 115 115
  • Page 116 116
  • Page 117 117
  • Page 118 118
  • Page 119 119
  • Page 120 120
  • Page 121 121
  • Page 122 122
  • Page 123 123
  • Page 124 124
  • Page 125 125
  • Page 126 126
  • Page 127 127
  • Page 128 128
  • Page 129 129
  • Page 130 130
  • Page 131 131
  • Page 132 132
  • Page 133 133
  • Page 134 134
  • Page 135 135
  • Page 136 136
  • Page 137 137
  • Page 138 138
  • Page 139 139
  • Page 140 140
  • Page 141 141
  • Page 142 142
  • Page 143 143
  • Page 144 144
  • Page 145 145
  • Page 146 146
  • Page 147 147
  • Page 148 148
  • Page 149 149
  • Page 150 150
  • Page 151 151
  • Page 152 152
  • Page 153 153
  • Page 154 154
  • Page 155 155
  • Page 156 156
  • Page 157 157
  • Page 158 158
  • Page 159 159
  • Page 160 160
  • Page 161 161
  • Page 162 162
  • Page 163 163
  • Page 164 164
  • Page 165 165
  • Page 166 166
  • Page 167 167
  • Page 168 168
  • Page 169 169
  • Page 170 170
  • Page 171 171
  • Page 172 172
  • Page 173 173
  • Page 174 174
  • Page 175 175
  • Page 176 176
  • Page 177 177
  • Page 178 178
  • Page 179 179
  • Page 180 180
  • Page 181 181
  • Page 182 182
  • Page 183 183
  • Page 184 184
  • Page 185 185
  • Page 186 186
  • Page 187 187
  • Page 188 188
  • Page 189 189
  • Page 190 190
  • Page 191 191
  • Page 192 192
  • Page 193 193
  • Page 194 194
  • Page 195 195
  • Page 196 196
  • Page 197 197
  • Page 198 198
  • Page 199 199
  • Page 200 200
  • Page 201 201
  • Page 202 202
  • Page 203 203
  • Page 204 204
  • Page 205 205
  • Page 206 206
  • Page 207 207
  • Page 208 208
  • Page 209 209
  • Page 210 210
  • Page 211 211
  • Page 212 212
  • Page 213 213
  • Page 214 214
  • Page 215 215
  • Page 216 216
  • Page 217 217
  • Page 218 218
  • Page 219 219
  • Page 220 220
  • Page 221 221
  • Page 222 222
  • Page 223 223
  • Page 224 224
  • Page 225 225
  • Page 226 226
  • Page 227 227
  • Page 228 228
  • Page 229 229
  • Page 230 230
  • Page 231 231
  • Page 232 232
  • Page 233 233
  • Page 234 234
  • Page 235 235

Pioneer MVH-S320BT User manual

Category
Receiver
Type
User manual
This manual is also suitable for

Ask a question and I''ll find the answer in the document

Finding information in a document is now easier with AI