Fe Powertools FE IW 18V/T650 User manual
- Category
- Power impact wrenches
- Type
- User manual

6096-795515
USER MANUAL
18V Li-ion High Torque Brushless
Impact Wrench
Model No. : FE IW 18V/T650
P
O
W
E
R
T
O
O
L
S
Q
u
a
l
i
t
y
p
r
o
d
u
c
t
Lithium
SPECIFICATIONS
Square Driver ..........1/2” (12.7mm)
Motor ................18V
No load speed .........(L) 0~900/min. (M) 0~1,200/min.
............(H) 0~1,900/min. (R) 0~1,900/500/min.
Impacts per minute......(L) 0~1,200 I.P.M. (M) 0~1,600 I.P.M.
. . . . .(H) 0~2,400 I.P.M.
Max. torque............650 Nm
Net weight (w/o battery) . .2.32kg
Charger
Model No. .............FE IW 18V/T650C
Input . . . . . . . . . . . . . . . . .100V~240V, 50-60Hz, 80W
Charging voltage .......20V
Battery
Model No. .............FE IW 18V/T650B3 (3.0Ah)
..............FE IW 18V/T650B4 (4.0Ah)
..............FE IW 18V/T650B5 (5.0Ah)

Thank You For Buying A FE Powertools tool
Manufactured to Fe Powertools high standard for dependability, properly cared for, it will give you years of trouble free performance.
Important:
Carefully read through this entire owner’s manual before using your new tool. Pay close attention to the Rules for Safe Opera-
tion. Warnings and Cautions. Use your tool properly and only for what it is intended.
The use of safety symbols in this manual it to attract your attention to possible dangers. The safety symbols, and the explana-
tions with them, require your full understanding. The safety warnings do not by themselves eliminate any danger, nor are they
substitutes for proper accident prevention measures.
GENERAL SAFETY RULES
SYMBOL :
This Safety Alert Symbol indicates caution, warning, or danger. Failure to obey a safety warning
can result in serious injury to yourself or others. To reduce the risk of injury, re, or electric shock always fol-
low the safety precautions.
KNOW YOUR TOOL
Safe operation of this tool requires that your read and fully
understand this owner’s manual and all labels afxed to
the tool.
Learn its applications and limitations as well as the po-
tential hazards peculiar to a power tool. Keep this manual
readily available for future reference.
IMPORTANT
Servicing of a tool requires extreme care and know ledge
and should be performed only by a qualied service tech-
nician. For service or repair contact and Authorize Service
Center.
Save all warnings and instructions for future refer-
ence
The term “power tool” in the warnings refer to your mains
operated (corded) power tool or battery operated (cord-
less) power tool.
1) SAFETY
a
)
Keep work area clean and well lit.
Cluttered and
dark areas invite accidents.
b)
Do not operate power tools in explosive atmo-
spheres, such as in the presence of ammable
liquids, gases or dust.
Power tools create sparks
which may ignite the dust or fumes.
c)
Keep children and bystanders away while operat-
ing a power tool.
Distractions can cause you to lose
control.
2) Electrical safety
a)
Avoid body contact with earthed or grounded
surfaces such as pipes, radiators, ranges and
refrigerators.
There is an increased risk of electric
shock if your body is earthed or grounded.
b)
Do not expose power tools to rain or wet condi-
tions.
Water entering a power tool will increase the
risk of electric shock.
3) Personal safety
a)
Stay alert, watch what you are doing and use
common sense when operating a power tool. Do
not use a power tool while you are tired or under
the inuence of drugs, alcohol or medication.
A
moment of inattention while operating power tools
may result in serious personal injury.
b)
Use safety equipment. Always wear eye protec-
tion.
Safety equipment such as dust mask, non-skid
safety shoes, hard hat, or hearing protection used for
appropriate conditions will reduce personal injuries.
c)
Remove any adjusting key or wrench before
turning the power tool on.
A wrench or a key left at-
tached to a rotating part of the power tool may result
in personal injury.
d)
Do not overreach. Keep proper footing and bal-
ance at all times.
This enables better control of the
power tool in unexpected situations.
e)
Dress properly. Do not wear loose clothing or
jewellery. Keep your hair, clothing and gloves
away from moving parts.
Loose clothes, jewellery
or long hair can be caught in moving parts.
f)
If devices are provided for the connection of dust
extraction and collection facilities, ensure these
are connected and properly used.
Use of these
devices can reduce dust- related hazards.
GENERAL POWER TOOL SAFETY
WARNINGS
CAUTION :
Do not attempt to operate this
tool until your have thoroughly read and
completely understood all instructions, safety
rules, etc., contained in this manual. Failure
to comply can result in accidents involv-
ing re, electric shock, or serious personal
injury. Save the Owner’s Manual and review
frequently for continuing safe operation and
for instructing others who may use this tool.
WARNING :
When using power tools, basic
safety precautions should always be followed
to reduce the risk of re, electric shock, and
personal injury, including the precautions fol-
lowing.
WARNING :
Read all safety warnings and
all instructions Failure to follow all warnings
and instructions may result in electric shock,
re and/or serious injury.
1

2
4) Power tool use and care
a)
Do not force the power tool. Use the correct
power tool for your application.
The correct power
tool will do the job better and safer at the rate for
which it was designed.
b)
Do not use the power tool if the switch does not
turn it on and off.
Any power tool that cannot be
controlled with the switch is dangerous and must be
repaired.
c)
Store idle power tools out of the reach of children
and do not allow persons unfamiliar with the
power tool or these instructions to operate the
power tool.
Power tools are dangerous in the hands
of untrained users.
d)
Maintain power tools. Check for misalignment or
binding of moving parts,breakage of parts and
any other condition that may affect the power
tools operation. If damaged,have the power tool
repaired before use.
Many accidents are caused by
poorly maintained power tools.
e)
Use the power tool, accessories and tool bits etc.,
in accordance with these instructions and in the
manner intended for the particular type of power
tool, taking into account the working conditions
and the work to be performed.
Use of the power
tool for operations different from intended could result
in a hazardous situation.
5) Battery tool use and care
a)
Recharge only with the charger specied by the
manufacturer.
A charter that is suitable for one type
of battery pack may create a risk of re when used
with another battery pack.
b)
Use power tools only with specically designated
battery packs.
Use of any other battery packs may
create a risk of injury and re.
c)
When battery pack is not in use, keep it away
from other metal objects, lie paper clips, coins,
keys, nails, screws or other small metal objects,
that can make a connection from one terminal to
another.
Shorting the battery terminals together may
cause burns or a re.
d)
Under abusive conditions, liquid may be ejected
from the battery; avoid contact. If contact acci-
dentally occurs, ush with water. If liquid con-
tacts eyes, additionally seek medical help.
Liquid
ejected form the battery may cause irritation or burns.
6) Service
a)
Have your power tool serviced by a qualied
repair person using only identical replacement
parts.
This will ensure that the safety of the power
tool is maintained.
Save These Instructions
Input: Only use the rated voltage marked in charger.
1. Charging voltage: 20V
Quick charge current : 3A ± 0.3A
Maintaining charge : 200mA ± 50mA
Battery charging time at 20˚C
3.0Ah ....................Approx ≤ 60 min.
4.0Ah ....................Approx ≤ 90 min.
5.0Ah ....................Approx ≤ 100 min.
NOTE:
The charging time may vary according to an
ambient temperature and power source voltage.
2. Before charging, study the instruction sheet;
3. Disconnect the supply before making or breaking
connections to the battery;
4. For indoor use or do not expose to rain (for ordinary
battery chargers).
5. Correct use: Universal fast chargers are to be used
exclusively for charging 18V Fe Powertools serious
rechargeable battery packs. Any other may result in
risk of re, electric shock or electrocution.
The user bears sole responsibility for any damage
caused by inappropriate use.
The generally recognized accident prevention regula-
tions and the safety instructions which accompany
them must be adhered to.
6.
SAVE THESE INSTRUCTIONS.
This manual con-
tains important safety and operating instructions for
battery charger.
7. Before using the battery charger, read all instructions
and cautionary markings on (1) the charger, (2) the
battery, and (3) the product using battery.
8. The charger is specically designed to charge the FE
Powertools battery as listed in the preceding table.
Do not attempt to charge any other battery with this
charger.
9.
CAUTION:
Danger of explosion may happen if bat-
tery is incorrectly replaced. Replace only with the
same or equivalent type.
10. Do not expose charger to rain or snow. Do not use in
damp or wet locations.
11. Use of an attachment not recommended or sold by
the battery charger manufacturer may result in a risk
of re, electric shock, or injury to persons.
WARNING :
The operation of any tool can
result in foreign objects being thrown into
your eyes, which can result in severe eye
damage. Before operating power tool, always
wear safety goggles or safety glasses with
side shields and a full face shield when
needed. We recommend Wide Vision Safety
Mask for use over eyeglasses or standard
safety glasses with side shields.
WEAR YOUR
SAFETY
GLASSES AND
DUST MASK
IMPORTANT SAFETY INSTRUCTIONS
FOR CHARGER
Battery Charger
Model No.
Battery Pack
Model Volt
FE IW 18V/T650C
FE IW 18V/T650B3 18V, 3.0Ah
FE IW 18V/T650B4 18V, 4.0Ah
FE IW 18V/T650B5 18V, 5.0Ah
• Do not try to charge non-chargeable batteries with
this charger.

3
12. To reduce risk of damage to electric plug and cord,
pull by plug rather than cord when dis-connecting
charger.
13. Make sure cord is appropriately located so that it will
not be stepped on, tripped over, or otherwise subject
to damage or stress.
14. Do not operate charger with damaged cord or plug.
Please replace them immediately should any damage
found.
15. Do not operate charger if it has received as harp
blow, been dropped, or otherwise damaged in any
way; take it to an authorized Service Station.
16. Do not disassemble charger; take it to an authorized
Service Station when service or repair is required.
Incorrect reassembly may result in a risk of electric
shock or re.
17. To reduce risk of electric shock, unplug charger from
outlet before attempting any maintenance or clean-
ing.
18. Charging must only be performed when the battery
temperature is between 32°F (0°C) and 113°F (45°C).
19. The charger vents shall be strictly prohibited to be
covered or clogged by any foreign object.
20. The charger is designed to operate on standard
household electrical power. Do not attempt to use it
on any other voltage!
21. WARNING: The parts inside the charger are live and
can create a shock hazard! Do not stick anything in
the battery charger terminal slots!
22. Unplug the charger immediately if there is any sign of
smoke or ame!
23. Do not drill into the housing of the charger or battery!
24. Keep the charger away from children!
1. Do not charge battery when temperature is below
32°F (0°C) or above 113°F (45°C). The most suit-
able temperature for charging is that of 20~25˚C
(68~77˚F).
2. Never attempt to connect two chargers together.
3. The charger is designed to operate on standard
household electrical power. Do not attempt to use it
on any other voltage.
4. Do not insert foreign matter into the hole reserved for
the battery in charger stand.
5. Do not charge by means of an engine generator or
DC power source.
6. Do not disassemble the battery and charger by
yourself. Incorrect reassembly may result in a risk of
electric shock, electrocution or re. Having the battery
and charger repaired by professional engineer.
7. Do not store the tool and battery in locations where
the temperature may reach or exceed 140˚F (60˚C),
such as outside sheds or metal buildings in summer.
8. Do not incinerate the battery, even if it is severely
damaged or completely worn out. The battery may
explode in re.
9. Battery leakage may occur under conditions of
extreme usage or temperature. If liquid comes in
contact with skin, wash quickly with soap and water,
then lemon juice or vinegar. If liquid gets in your
eyes, wash with a strong solution of boric acid and
seek medical advice immediately.
10. Never short-circuit the rechargeable battery. Short
circuiting the battery will cause a great electric cur-
rent and over heat. It results in burn or damage the
battery.
11. Charge battery only with the charger provided.
12. The battery for this tool has been shipped in a low
charge condition, therefore, you should charge it prior
to use.
13. Do not insert foreign object into the air ventilation
slots of the charger. Inserting metal objects or inam-
mable into the slots will result in electrical shock
hazard or damaged charger.
14. This appliance is not intended for use by persons
(including children) with reduced physical, sensory
or mental capabilities, or lack of experience and
knowledge, unless they have been given supervision
or instruction concerning use of the appliance by a
person responsible for their safety.
15. Children should be supervised to ensure that they do
not play with the appliance.
16. Do not dispose of electrical appliances as unsorted
municipal waste, use separate collection facilities.
17. Contact your local government for information regard-
ing the collection systems available.
18. If electrical appliances are disposed of in landlls
or dumps, hazardous substances can leak into the
groundwater and get into the food chain, damaging
your health and well-being.
19. When replacing old appliances with new ones, the
retailer is legally obligated to take back your old appli-
ance for disposal at least for free of charge.
20. If the supply cord is damaged, it must be replaced by
the manufacturer, its service agent or similarly quali-
ed persons in order to avoid a hazard.
21. Dispose of batteries properly according to federal,
state and local laws. Do not throw battery into a re!
Do not immerse batteries in water! Do not dispose of
in landlls!
SAFETY PRECAUTIONS WHEN USING
CHARGER AND BATTERY
WARNING :
If any parts are missing, do
not operate tool until the missing parts are
replaced. Failure to do so could result in pos-
sible serious personal injury.

4
• DISPOSAL OF THE EXHAUSTED BATTERY
For safety and to preserve natural resources, please
recycle or dispose of properly. This Product Contains
Lithium Ion Battery.
Must Be Disposed Of Properly. Local, state, or federal
laws may prohibit disposal of Lithium Ion batteries in ordi-
nary trash. Consult your local waste authority for informa-
tion regarding available recycling and/or disposal options.
• BATTERY PACK PREPARATION FOR
RECYCLING
This product contains Lithium Ion batteries which must be
disposed of properly.
1. Be aware that this tool is always in an operating con-
dition, because it does not have to be plugged into an
electrical outlet.
2. Fully charge the battery for better operation.
3. Be sure the battery is snapped in place.
4. When not in use, lock the switch.
5. When operating at a high place, be aware of things
below and around you.
6. This unit features the overload protection design.
When the unit overload or stall, the power would
be cut-off automatically. This will protect the motor,
switch and battery.
7. This unit features a battery temperature detective
sensor. If the battery exceeds the safety working tem-
perature, the unit would shut-off automatically. Once
the temperature dropped back to the safe tempera-
ture zone, the unit would function normally again.
8. This unit features a battery over-discharge protection
system which can prolong the battery’s lifespan.
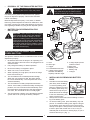
• INSTALLING OR REMOVING BATTERY
PACK
1. Hold the tool and the battery
pack rmly when installing
or removing battery pack.
Failure to hold the tool and
the battery pack rmly may
cause them to slip off your
hands and result in damage
to the tool and battery pack
and a personal injury.
2. Always switch off the tool before installing or remov-
ing of the battery pack.
3. To remove battery pack, press the battery clip, and
pull out. To install the battery pack, align the tongue
on the battery pack with the groove in the housing
and slip it into place. Always insert it all the way until
it locks in place with a little click. If not, it may ac-
cidentally fall out of the tool, causing injury to you or
someone around you. (Fig. 1)
WARNING :
Upon removal, cover the battery
pack’s terminals with heavy duty adhesive
tape. Do not attempt to destroy or dis- as-
semble the battery pack or remove any of its
components. Do not touch both terminals with
metal objects and body parts, as short- circuit
may result. Keep away from children. Failure
to comply with these warnings could result in
re and/or serious injury.
WARNING :
Do not attempt to disassemble
the battery pack. Fire or injury may result.
PRECAUTIONS ON USING YOUR
CORDLESS TOOL
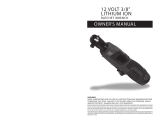
OPERATION INFORMATION
WARNING :
Before attempting to use any
tool, make sure your are familiar with all
operating features and safety
r
equirements.
A. Anvil
B. LED Light
C. Trigger
D. Forward/Reverse level
E. 4 Stage Impact Power
Selection and Battery
Capacity Indicator Light
F. 4 Stage impact power
selection button
G. Belt Hook
H. Battery Pack
I. Battery Clip
J . Charger
G
D
A
B
C
F
J
E
I
H
Fig. 1

NOTE:
Do not use force when installing the battery pack.
If the cartridge does not slide in easily, it is not being
inserted correctly.
• CHARGING THE BATTERY PACK
1. The battery pack for this
tool is supplied in a low
charge condition to prevent
possible problems, there-
fore, you have to charge
the battery before rst use.
2. Charge battery pack only
with the charger provided.
3. Using an other charger can
cause severe damage or even cause battery to ex-
plode from the work piece and determine the reason
for jamming.
4. Connect the charger to a power outlet. Place the
battery pack in the charger aligning raised rib on the
battery pack with the groove in the charger. (Fig. 2)
NOTE:
• Lithium battery does not have memory effect, there-
fore to prolong the battery life please fully charged
the battery before storage. This will reduce battery
self discharging characteristics. If the voltage of the
battery is too low, it’ll automatically lock itself. If the
tool feels lack of power, please stop the operation
and charge the battery immediately. If the battery is
stored more than 3 months, please charge the battery
rst before operation.
• If the tool does not function, please clear all debris
and restart again. If malfunction continues malfunc-
tions, please remove the battery immediately and
contact the local service dealers for assistance.
• The battery pack will become slightly warmer while
charging. This is normal and does not indicate a
problem.
• Do not place charger in an environment either
extreme hot or cold. It will work best at normal room
temperature.
• When the battery is fully-charged, unplug your char-
ger from the power supply and remove the battery
pack from the charger.
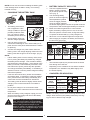
• BATTERY CAPACITY INDICATOR
1.
The tool is applied with the
battery capacity indicator
(A) on the top pad for easy
view. (Fig. 3)
2. The remaining battery
power is shown as lights by
three alphabetic symbols
when the trigger pressed;
when the trigger released,
the button stays lighted is shown the speed mode the
tool performs and will last approximately 60 seconds.
3. Either the indicator light blinks or none indicator
lights, the battery capacity has run out, so the tool
does not operate. In these cases, charge the battery
or replace the dead battery by a fully-charged on.
4. When two or more indicator lights do not light even
after charging is complete, the battery has reached
the end of its service life.
NOTE:
• The indicated capacity may be lower than the actual
level during use of the tool.
• Depending on the conditions of use and the ambient
temperature, the indication may differ slightly from
the actual capacity.
• CHARGER LED INDICATION
NOTE:
The battery will not reach full charge after the rst
charge. Allow several cycles (drilling followed by recharg-
ing) for them to become fully charged.
5
Green Light
Red Light
Fig. 2
DANGER:
If battery pack case is
cracked or damaged, do
not insert into charger.
Danger of electric shock
or electrocution.
Cracked
CAUTION :
To prevent damage to the battery
pack, remove the battery pack immediately
from the charger when no charger LED lights.
Return battery pack and charger to your
dealer for checking or replacing. Do not insert
a battery pack into a damaged charger, it may
damage your battery pack.
Fig. 3
A
INDICATOR LIGHTS
Lighted OFF Blinking
≥ 60% 30~60% ≤ 30%
≤ 10%
(
Charge the
battery
)
Malfunction
CHARGER
STANDBY
Red light steady on Stand by
WHILE
CHARGING
Red and green light
steady on
Charging
Red light blinking
Battery too hot
Battery too cold
CHARGING
COMPLETE
Red light steady on
green light blinking
Full charged
MALFUNCTION
BATTERY
Red and Green lights
blink alternately
Replace the
battery

6
• FORWARD/REVERSE LEVEL
This determines the direction of
rotation of the chuck, ie. clockwise
or anti-clockwise.
To alter the direction of rota-
tion stop the drill then push the
selection lever to the left of right.
When the lever is in the “Forward”
position the chuck will rotate
clockwise. When the lever is in
the “Reverse” position the chuck will rotate anti-clockwise.
Before operation check that the level is set in the required
position. (Fig. 4)
• TRIGGER
1. To start the tool, simply
press the trigger. Tool speed
is increased by increas-
ing pressure on the trigger.
Release the trigger to stop.
(Fig. 5)
2. When the trigger is de-
pressed the chuck will rotate
(provided the forward/ reverse level is set in the for-
ward or reverse position). The trigger can be locked
in the OFF position. This helps reduce the possibility
of accidental starting when not in use. To lock trigger,
place selection lever in the centre position.
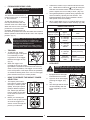
• HOW TO OPERATE THE IMPACT POWER
SELECTION
1.
The impact power selec-
tion button is used to adjust
the torque, rotation speed
(RPM), and impact speed
(IPM) for different applica-
tion. Please pay attention.
Power modes are not able
to be switched when tool
being run.
2. Before you selecting the
mode on the top pad, please
click out the trigger to let
electric current through the
pad for your selection.
3. L/M/H three modes only be selected at forward rota-
tion, L/M/H three modes and mode (R mode) are
selected at reversed rotation. When the letter you
press is lighted, the tool is ready to work. (Fig. 6A)
4. The lighted alphabetic symbols during operation are
shown as battery capacity the tool remains . The
lighted alphabetic when trigger released is shown
what speed mode the tool stays.
5. When 4 lights ash at once it symbols either the tool
or the battery failed. Please check carefully. (Fig. 6B)
• LED LIGHT
1. Equipped with a LED light
indicated the front of bits.
2. Light can be on with slightly
pressing the trigger. (Fig.
7A)
3. The LED light will be turned
off automatically after the
tool is stopped by 15 sec-
onds.
WARNING :
Always check the direction of
rotation before operation.
WARNING :
Use the reversing switch only
after the tool comes to a complete stop.
Changing the direction of rotation before the
tool stops may damage the tool.
When not operating the tool, always set the
reversing switch lever to the neutral position.
Fig. 4
Reverse
Forward
Fig. 5
Trigger
Fig. 6A
Light
Button
Fig. 6B
WARNING :
Don’t stare at the LED light, nor
put the light illuminates people eyes. If eyes
focus on the light for a while, may cause
pains.
Fig. 7
LED
Light
INDICATOR LIGHTS
Lighted OFF
Impact force grade
displayed on panel
Approx.
rpm / ipm / torque
Work
0~1,900 rpm
0~2,400 ipm
650 Nm
Heavy duty fastening
0~1,200 rpm
0~1,600 ipm
400 Nm
Moderate duty fatening
0~900 rpm
0~1,200 ipm
200 Nm
Light duty fastening
Automatic
adjustment by
PCB
"R Mode"
for nuts in case y out
at hgiht speed

7
• BELT HOOK
1. The belt hook is convenient
for temporarily hanging the
tool. This can be installed
on either side of the tool.
2. To install the belt hook,
insert it into a groove in the
tool housing on either side
and then secure it with a
screw. To remove, loosen
the screw and then take it
out. (Fig. 8A & Fig. 8B)
3. After installing the belt
hook, make sure that it is
screwed rmly.
• INSTALLING AND REMOVING SOCKET
NOTE :
Always be sure that
the tools is switched off and the
battery pack is removed before
installing or removing the socket.
1. Always use the correct size
socket for bolts and nuts.
An incorrect size socket will
result in inaccurate and in-
consistent fastening torque
and/or damage to the bolt or
nut.
2. To attach a socket, align the
accessory with the anvil and
push it rmly over the retain-
ing ring. (Fig. 9A)
3. To remove the socket, pull
the socket off the anvil. (Fig. 9B)
• CLEANING
Remove the battery.
1. Keep the air vents free of obstructions. Do not spray,
wash, or immerse the air vents in water.
2. Wipe off the housing and the plastic components
using a moist, soft cloth. Do not use strong solvents
or detergents on the plastic housing or plastic compo-
nents. Certain household cleaners may cause dam-
age, and may cause a shock hazard.
• MAINTENANCE
1. Place switch in OFF position and remove the battery
before the appliance is serviced, cleaned, or mainte-
nance is performed.
2.
Check if device loose, parts damaged such.
3.
Please storage locked tools in dry location where the
children cannot touch when you didn’t use tool.
4.
Only use recommended spare parts and accessories
from manufacturer for replacement.
5.
Before and after using, check and maintain tools
regularly. Fix tool via our authorized center.
6.
Keep hands dry, clean and no greasiness and lubri-
cant.
7. Please don’t install battery pack into tool when stor-
age.
Fig. 8B
Fig. 8A
Fig. 9A
Fig. 9B
MAINTENANCE INFORMATION
WARNING :
Always wear safety goggles
or safety glasses with side shields when
operating tool. Failure to do so could result in
objects being thrown into your eyes, resulting
in possible serious injury.
WARNING :
Read all instructions Failure to
follow all instructions listed below may result
in electric shock, re and/or serious injury.
The term "power tool" in all of the warnings
listed below refers to your mains-operated
(corded) power tool or battery-operated (cord-
less) power tool.
WARNING :
Always be sure that the tool is
switched off and battery is removed before at-
tempting to perform inspection or maintenance
on the tool. Failure to switch off and remove
the battery may result in serious personal injury
from accidental start-up.
CAUTION :
When installing the hook, tighten
the screw rmly.Failure to do so may cause
the breakage of the toolor personal injury.
-
 1
1
-
 2
2
-
 3
3
-
 4
4
-
 5
5
-
 6
6
-
 7
7
-
 8
8


Fe Powertools FE IW 18V/T650 User manual
- Category
- Power impact wrenches
- Type
- User manual
Ask a question and I''ll find the answer in the document
Finding information in a document is now easier with AI
Other documents
-
Worx WX290 Safety And Operating Manual
-
Rockwell ShopSeries RS2317K User manual
-
 JUEMEL Mini impact wrench User manual
-
-
 Meagle 3/8” Cordless Ratchet Wrench Set User manual
-
DeWalt DCH283 User manual
-
Hitachi WH 18DSDL Handling Instructions Manual
-
JCB JCB-18BLDD Instructions & User's Manual
-
Pulsar PT2520 Owner's manual
-
King Canada 8055L User manual

