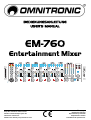
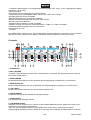
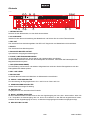
Omnitronic EM-760 is a 6-channel entertainment mixer with a wide range of features for professional audio mixing. It offers multiple inputs for microphones, phono, and auxiliary devices, allowing you to connect various audio sources. Each channel has individual gain and EQ controls, giving you precise control over your mix. The EM-760 also includes a 3-band EQ on the master output for further sound shaping. With its versatile connectivity and intuitive controls, this mixer is ideal for DJs, musicians, and karaoke enthusiasts seeking a reliable and feature-rich mixing solution.
Omnitronic EM-760 is a 6-channel entertainment mixer with a wide range of features for professional audio mixing. It offers multiple inputs for microphones, phono, and auxiliary devices, allowing you to connect various audio sources. Each channel has individual gain and EQ controls, giving you precise control over your mix. The EM-760 also includes a 3-band EQ on the master output for further sound shaping. With its versatile connectivity and intuitive controls, this mixer is ideal for DJs, musicians, and karaoke enthusiasts seeking a reliable and feature-rich mixing solution.


-
 1
1
-
 2
2
-
 3
3
-
 4
4
-
 5
5
-
 6
6
-
 7
7
-
 8
8
-
 9
9
-
 10
10
-
 11
11
-
 12
12
-
 13
13
-
 14
14
-
 15
15
-
 16
16
-
 17
17
-
 18
18
-
 19
19
-
 20
20


Omnitronic EM-760 is a 6-channel entertainment mixer with a wide range of features for professional audio mixing. It offers multiple inputs for microphones, phono, and auxiliary devices, allowing you to connect various audio sources. Each channel has individual gain and EQ controls, giving you precise control over your mix. The EM-760 also includes a 3-band EQ on the master output for further sound shaping. With its versatile connectivity and intuitive controls, this mixer is ideal for DJs, musicians, and karaoke enthusiasts seeking a reliable and feature-rich mixing solution.
Ask a question and I''ll find the answer in the document
Finding information in a document is now easier with AI
in other languages
- Deutsch: Omnitronic EM-760 Benutzerhandbuch
Related papers
-
Omnitronic PM-408 User manual
-
Omnitronic ALP-5A Active Speaker Black Set Of 2 User manual
-
Omnitronic PM-3010 Pro User manual
-
Omnitronic MPZ-180.6 User manual
-
-
-
Omnitronic PM-4010 Pro User manual
-
-
Omnitronic XO-23 User manual
-
Other documents
-
EuroLite LED SL-150 User manual
-
-
DYNACORD PowerMate 600 Owner's manual
-
Pioneer DJM-850-K User manual
-
Reloop rmx-80 User manual
-
Denon DJ DN-X400 User manual
-
-
Ecler nuo5 User manual
-
-
BST SYMBOL400 Owner's manual