The RØDELink System is pre-paired
and does not require any conguration.
However for multiple devices you
may wish to change the channel
conguration or pair the devices again.
For more information on this process
please visit the FAQs found at
www.rode.com/wireless/lmmaker or
scan the QR code with your phone.
Das RØDELink-System braucht vor dem Einsatz nicht kon-
guriert zu werden. Wenn Sie allerdings mehrere Geräte
verwenden möchten, müssen Sie die Kanalkonguration ändern
oder die gewünschten Geräte erneut miteinander p ren.
Weitere Infos hierzu nden Sie im FAQ-Bereich unter
www.rode.com/wireless/lmmaker. Alternativ können Sie auch
den QR-Code mit Ihrem Smartphone scannen.
Le système RØDELink ne nécessite aucune conguration avant
l’utilisation. Si, par contre, vous utilisez plusieurs dispositifs,
vous serez peut-être amené à modier la conguration des
canaux ou à répéter l’appairage.
Pour en savoir plus, voyez la section FAQ sur
www.rode.com/wireless/lmmaker ou scannez simplement le
code QR avec votre smartphone.
El sistema RØDELink viene enlazado de fábrica y no necesita
ninguna conguración. No obstante, si utiliza varios dispositivos
es posible que desees cambiar la conguración de canales o
volver a enlazarlos.
Para más información acerca de este proceso, visita
la sección de preguntas frecuentes de la página
www.rode.com/wireless/lmmaker, o escanea el código QR
con el teléfono.
Il Sistema RØDELink è già pre-accoppiato e non richiede
nessuna congurazione. Comunque in caso di utilizzo
di più apparecchi potreste avere bisogno di cambiare la
congurazione dei canali o accoppiare di nuovo gli apparecchi.
Per maggiori informazioni su questa procedura
vi preghiamo di visitare la FAQ che trovate su
www.rode.com/wireless/lmmaker oppure scansionate il
codice QR con il vostro smartphone.
RØDELink 系统已预先配对,无需任何设置。 不过,使用多个设
备时,您可能要更改通道配置或者再次配对设备。
有关此过程的更多信息,请访问
www.rode.com/wireless/lmmaker 上的常见问题,或者用您
的手机扫描 QR 码。
RØDELink システムは出荷時に予めペアリングされているため、 設
定する必要はありません。しかし、複数の装置を使用したいという
場合であればチャンネル設定、または装置のペアリングをし直す
必要があります。
このプロセスに関する詳細は、
www.rode.com/wireless/lmmaker へアクセスするか、またはQR
コードを読み取ってFAQを参照してください。
RØDELink 시스템은 사전에 이미 페어링이 되어 있으므로 다른
설정이 필요 없습니다. 그러나 다중 기기 페어링의 경우에는
채널 설정을 바꾸거나, 기기를 다시 페어링해야 할 경우가 있을
수 있습니다.
이 과정에 대한 더 자세한 사항을 보시려면
www.rode.com/wireless/lmmaker의 FAQ를 참고하거나
전화기로 QR코드를 스캔하십시오.
POWERING ON
Einschalten/Mise sous tension/Activación/Accensione/供电/電源を入れる/전원 켜기
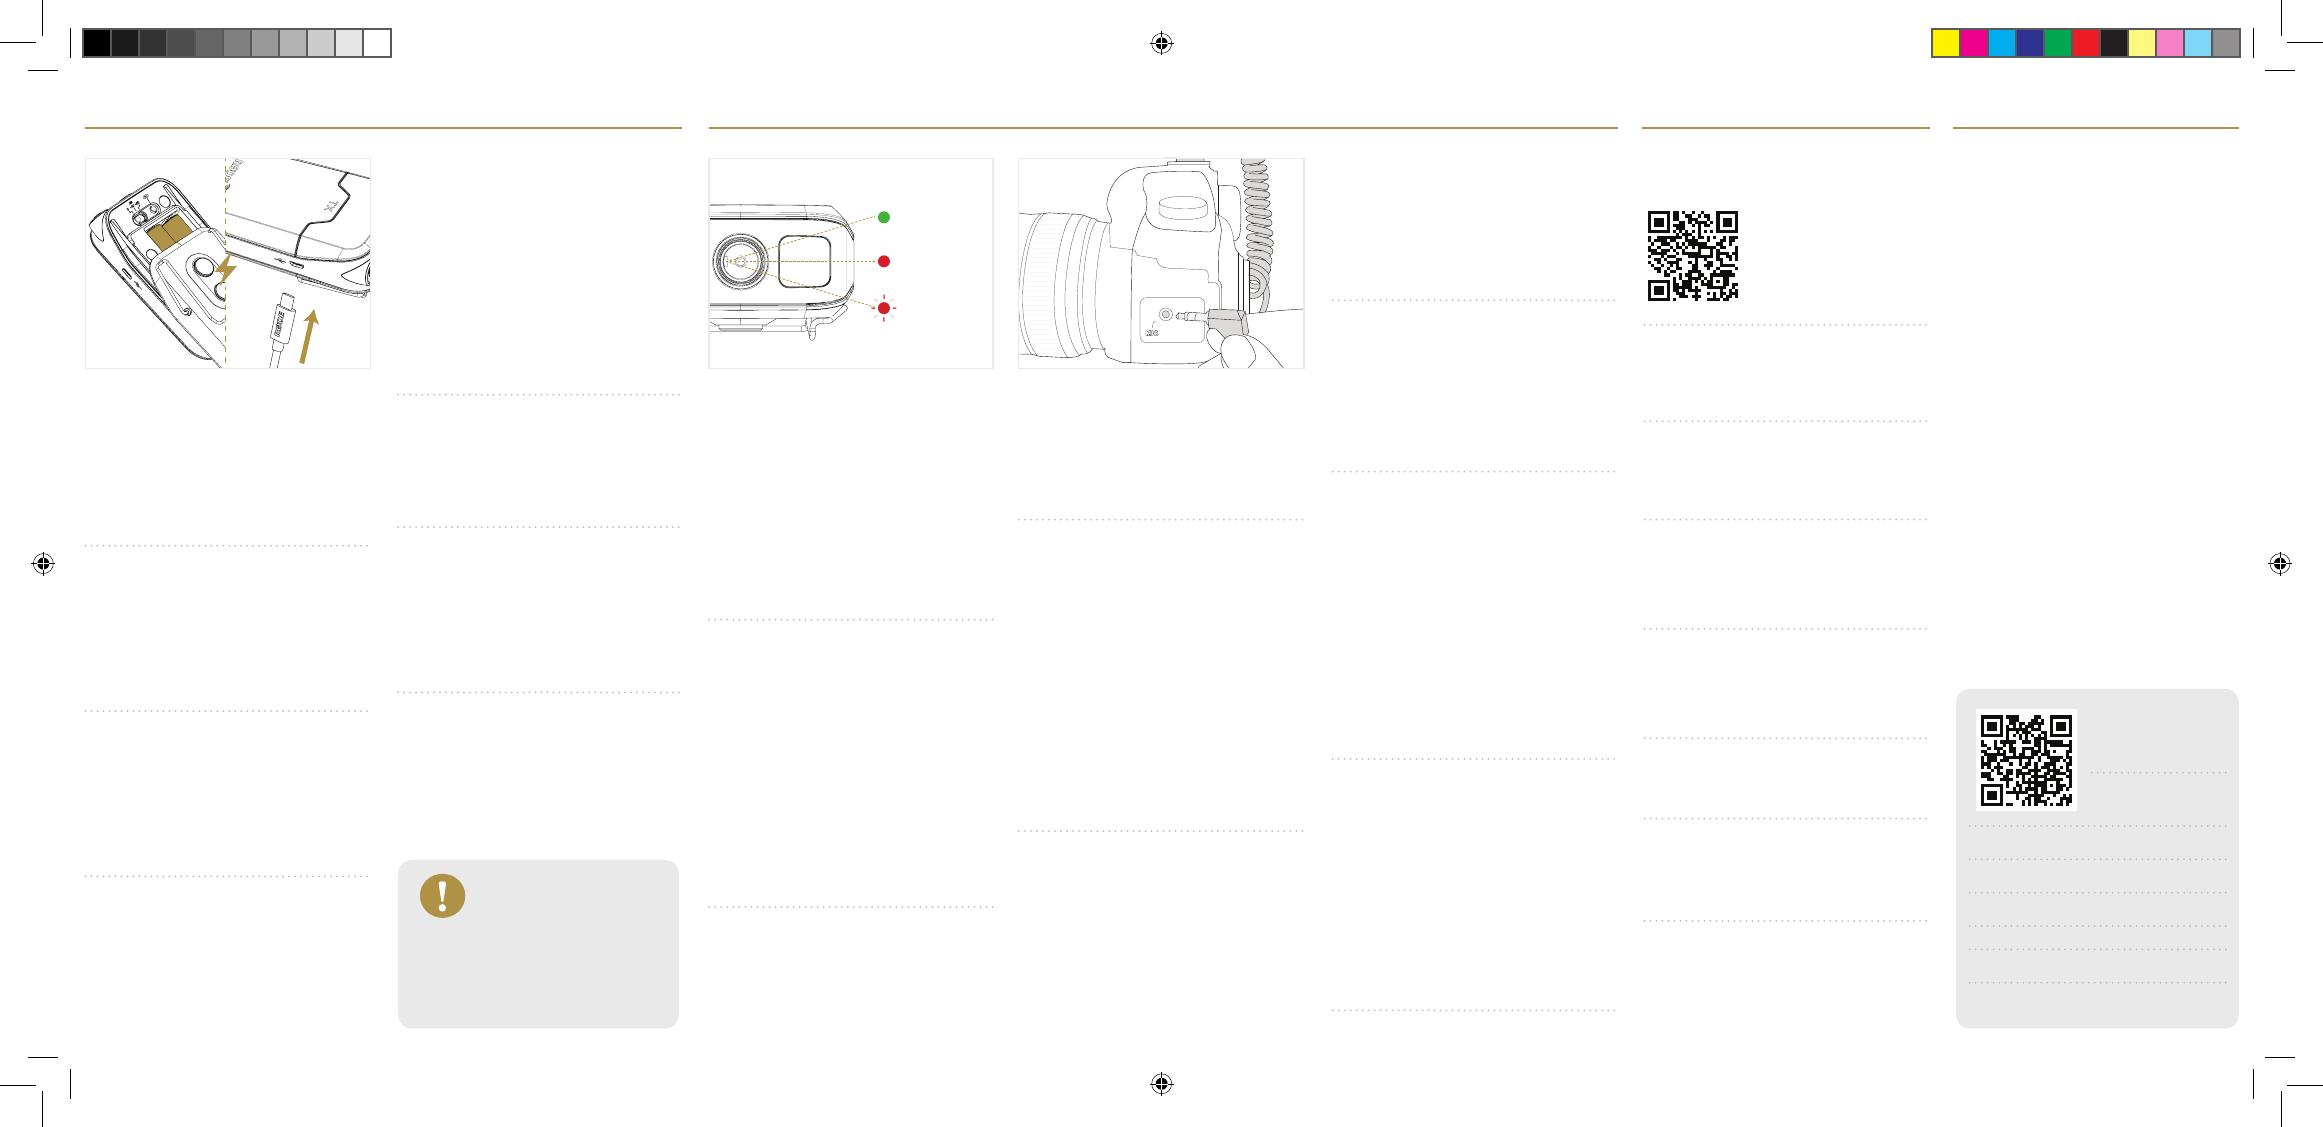
The receiver and transmitter are powered either by 2 x AA
Alkaline batteries or a suitable USB power source via the Micro
USB connector.
• To insert batteries, press the battery compartment release
and slide the rear cover down.
• Press and hold the power button. The power LED will turn
GREEN.
• The Receiver will automatically sync with the Transmitter.
Once it has paired you will see the transmitter battery status
and audio gain displayed on the receiver.
Note that the power LED will ash if there is low battery
level. For optimal performance RØDE recommends the use of
Energizer Ultimate lithium batteries.
Empfänger und Sender können wahlweise mit 2 AA-Batterien
oder über ihren Micro-USB-Port gespeist werden.
• Um Batterien einzulegen, drücken Sie den Riegel des
Batteriefachs und schieben die rückseitige Blende hinunter.
• Halten Sie den Betriebstaster gedrückt, bis seine Diode
GRÜN leuchtet.
• Der Empfänger baut automatisch eine Verbindung mit dem
Sender auf. Sobald das geschehen ist, zeigt der Empfänger
den Batteriestatus und die Pegeleinstellung des Senders an.
Wenn die Batterien fast erschöpft sind, blinkt die Diode. Im
Sinne einer optimalen Leistung rät RØDE zur Verwendung von
Energizer Ultimate-Lithiumbatterien.
Le récepteur et l’émetteur peuvent être alimentés par 2 piles
AA ou via le port Micro-USB.
• Pour insérer des piles, déverrouillez le couvercle en face
arrière et poussez-le vers le bas.
• Maintenez le bouton d’alimentation enfoncé, jusqu’à ce que
son témoin s’allume en VERT.
• Le récepteur établit automatiquement une connexion avec
l’émetteur. Une fois la connexion établie, le récepteur
afche l’état des piles et le réglage de niveau de l’émetteur.
Lorsque les piles sont presque épuisées, le témoin se met à
clignoter. Pour une performance optimale, RØDE conseille
l’utilisation de piles au lithium Energizer Ultimate.
La alimentación para el receptor y el transmisor se suministra
mediante 2 pilas AA o mediante una fuente de alimentación
USB adecuada a través del conector Micro-USB.
• Para insertar las pilas, presiona la apertura del
compartimiento de las pilas y desliza la cubierta posterior
hacia abajo.
• Mantén pulsado el botón de alimentación. El LED de
activación se iluminará en VERDE.
• El receptor se sincronizará automáticamente con el
transmisor. Una vez enlazados, la carga de las pilas del
transmisor y la ganancia de audio se mostrarán en el
receptor.
AUDIO CONNECTIONS
Audioverbindungen/Connexions audio/Conexiones de audio/Collegamenti Audio/音频连接/ オーディオ接続/오디오 연결
INPUT OVERLOAD
(DISTORTION)
NORMAL
OPERATION
MUTE
Connect your microphone to the Transmitter Mic Input. The
Transmitter accepts both standard (MiCon-2 style) and lock-nut
(MiCon-1 style) 3.5mm jack plugs. 4V ‘Plug In Power’ is supplied.
Set the three-position input level gain switch (0db, +10db,
+20db) which is revealed on the back of the Transmitter by
pressing the Battery Compartment Release and sliding the rear
cover down. The input status LED should be solid GREEN for
normal operation. If the LED briey turns red during operation it
can be an indication of input overload (distortion) and the input
level should be reduced to correct for this.
Connect the locking nut end of the Output Cable to the
Receiver Mic Output, and the other to your camera 3.5mm mic
input or other recording device.
If required, set the three-position output level gain switch (0db,
-10db, -20db) which is revealed on the back of the Receiver by
pressing the Battery Compartment Release and sliding the rear
cover down. Check your camera or recorder’s audio input level
to ensure your signal is not clipping.
Schließen Sie Ihr Mikrofon an den Eingang des Senders an. Der
Sender unterstützt sowohl herkömmliche (z.B. MiCon-2) 3,5mm-
Klinkenstecker als auch Ausführungen mit Schraubmutter
(MiCon-1). Der Sender liefert 4V-Steckerspeisung.
Um den Pegel (0dB, +10dB, +20dB) zu ändern, öffnen Sie
das Batteriefach des Senders, indem Sie es entriegeln, die
rückseitige Blende nach unten schieben und den Pegelschalter
wunschgemäß einstellen. Im Normalfall sollte die Statusdiode
GRÜN leuchten, wenn ein Signal eingeht. Wenn die Diode kurz
rot leuchtet, weist dies eventuell auf eine Übersteuerung hin.
Dann sollten Sie den Eingangspegel reduzieren.
Verbinden Sie den Ausgangskabelstecker mit der Rändel-
schraube mit dem Ausgang des Empfängers und den Stecker
am anderen Kabelende mit dem 3,5mm-Mikrofoneingang des
Aufnahmegeräts.
Um den Pegel (0dB, -10dB, -20dB) zu ändern, öffnen Sie das
Batteriefach des Empfänger, indem Sie es entriegeln, die
rückseitige Blende nach unten schieben und den Schalter
wunschgemäß einstellen. Überprüfen Sie den Aufnahmepegel
der Kamera oder des Recorders – das eingehende Signal darf zu
keiner Zeit übersteuern.
Branchez votre microphone à l’entrée de l’émetteur. L’émetteur
accepte aussi bien une che normale (de type MiCon-2) qu’une
che de 3,5mm avec écrou de blocage (MiCon-1). L’émetteur
peut fournir une alimentation plug-in de 4V.
Pour modier le niveau (0dB, +10dB, +20dB), ouvrez le
compar timent à piles en déverrouillant son couvercle à l’arrière
de l’émetteur et en le poussant vers le bas puis choisissez la
position voulue. Normalement, le témoin du signal d’entrée
doit s’allumer en VERT à la réception d’un signal. S’il s’allume
en rouge (même brièvement), le signal d’entrée sature. Dans ce
cas, diminuez le niveau d’entrée.
Branchez la che munie de l’écrou de blocage à la sortie micro
du récepteur et reliez la che de 3,5mm à l’autre extrémité du
câble à l’entrée du dispositif d’enregistrement.
Pour modier le niveau (0dB, -10dB, -20dB), ouvrez le com-
par timent à piles en déverrouillant son couvercle à l’arrière
du récepteur et en le poussant vers le bas puis choisissez la
position voulue. Vériez le niveau audio de la caméra ou de
l’enregistreur: le signal ne doit jamais saturer.
Conecta el micrófono a la entrada de micrófono del transmisor.
El transmisor acepta tanto conectores estándar (de estilo
MiCon-2) como del tipo tuerca de seguridad (de estilo MiCon-1)
de 3,5mm. Alimentación "Plug In" de 4V.
Ajusta el conmutador de ganancia del nivel de entrada de
tres posiciones (0dB, +10dB, +20dB) que se encuentra en la
parte posterior del transmisor presionando la apertura del
compartimiento de las pilas y deslizando la cubierta posterior
hacia abajo. El LED de estado de entrada se iluminará en color
VERDE durante el funcionamiento normal. Si el LED se ilumina
brevemente en rojo durante el funcionamiento puede indicar
una sobrecarga de entrada (distorsión), y debería reducirse el
nivel de entrada para corregir el problema.
Conecta el extremo de la tuerca de bloqueo del cable de
salida a la salida de micrófono del receptor, y el otro extremo
a la entrada de micrófono de 3,5mm de la cámara o a otro
dispositivo de grabación.
Si fuera necesario, ajusta el conmutador de ganancia del nivel de
salida de tres posiciones (0dB, -10dB, -20dB) que se encuentra
en la parte posterior del receptor presionando la apertura del
compartimiento de las pilas y deslizando la cubierta posterior
hacia abajo. Revisa el nivel de entrada de audio de la grabadora
o de la cámara para comprobar que la señal no queda cortada.
Collegate il vostro microfono all’Ingresso del Microfono del
Trasmettitore. Il Trasmettitore accetta sia il connettore jack da
3,5mm standard (stile MiCon-2) che quello con ghiera di blocco
(stile MiCon-1). Viene fornita l’alimentazione ‘Plug In Power’ di
4V.
Impostate il livello del guadagno in ingresso tramite l’apposito
selettore (0dB, +10dB, +20dB) che trovate nel retro del
Trasmettitore premendo il Pulsante di Apertura del Vano Batterie
e facendo scorrere verso il basso il coperchio posteriore. Per il
normale funzionamento il LED di stato dell’ingresso deve essere
VERDE sso. Se durante l’utilizzo il LED si illumina brevemente in
rosso potrebbe indicare il sovraccarico dell’ingresso (distorsione)
e per correggere questo problema il livello di ingresso dovrebbe
essere diminuito.
Collegate il connettore del Cavo di Uscita con la ghiera
di ssaggio all’Uscita Microfonica del Ricevitore, e l’altro
connettore all’ingresso microfonico da 3,5mm della
videocamera o di un altro registratore.
Se necessario, impostate il livello del guadagno in uscita
tramite l’apposito selettore (0dB, -10dB, -20dB) che trovate
nel retro del Ricevitore premendo il Pulsante di Apertura del
Vano Batterie e facendo scorrere verso il basso il coperchio
posteriore. Controllate il livello dell’ingresso audio della vostra
videocamera o del registratore per assicurarvi che il segnale
non stia distorcendo.
您的话筒连接到发射器的话筒输入。 发射器接受标准 (MiCon-2)
和锁定式 (MiCon-1) 3,5mm 插孔。 随附 4V 插入式电源。
按住电池仓开关,把后背板滑下,可调节发射器背面的三段输入
电平增益开关 (0dB, +10dB, +20dB)。 输入状态 LED 正常工作时
应为绿色长亮。 如果 LEd 灯在工作过程中暂时变为红色,则表示
输入过载(失真),此时应降低输入电平来纠正。
将输出连接线的锁定端连接到接收器话筒输出,另一端接到您摄
像机的 3,5mm 话筒输入或者其他录音设备上。
如有需要,按住电池仓开关,把后背板滑下,可调节发射器背面
的三段输入电平增益开关 (0dB, -10dB, -20dB)。 检查您摄像机
或者录音机的音频输入电平,确保信号没有过载。
マイクをトランスミッター側のマイク入力に接続します。トランスミ
ッターは、標準 (MiCon-2 スタイル) とロックナット (MiCon-1 スタ
イル) 3、5mm ジャック・プラグのどちらにも対応しています。4V「プ
ラグインパワー」 が同梱されています。
3ポジション入力レベルゲインスイッチ
(0dB、+10dB、+20dB)を設定します。このスイッチは電池
収納部の内側にあるため、トランスミッターのバッテリーコン
パートメント・リリースをスライドして下げないと見えませ
ん。入力状態のLED は、通常の場合は緑色で点灯します。操
作中にLEDが赤色で点滅した場合、入力過負荷(ディストーシ
ョン)の状態を意味していますので、入力レベルを下げて修正
してください。
出力ケーブルの端の締め付けナットをレシーバーマイク出力に接
続し、ケーブルのもう一方の端をカメラ3、5mm のマイク入力、ま
たはその他の録音機器に接続します。
必要に応じて、3ポジション入力レベルゲインスイッチ
(0dB、-10dB、-20dB)を設定します。このスイッチは電池収
納部の内側にあるため、トランスミッターのバッテリーコンパ
ートメント・リリースをスライドして下げないと見えません。
カメラ、または録音機器のオーディオ入力レベルを確認して、
信号がクリップしないように注意してください。
마이크를 전송기 마이크 입력 단자에 연결하십시오. 전송기는
표준(MiCon-2 스타일) 및 잠금 너트(MiCon-1 스타일) 3,5mm
잭 플러그를 모두 지원합니다. 4V ‘플러그인 전원’이 공급됩니다.
배터리 장착 부위 해제를 누르고 뒷면 커버를 아래로 밀면
전송기 뒤쪽에 나타나는 3단계 입력 레벨 게인 스위치(0dB,
+10dB, +20dB)를 설정하십시오. 입력 상태 LED는 정상 작동
시 안정된 녹색을 나타냅니다. 만약 작동 도중 LED가 잠시
빨간색으로 바뀌면 이는 입력 과부하(디스토션)를 의미할 수
있으며, 이를 해결하기 위해서는 입력 레벨을 줄여야 할 수도
있습니다.
출력 케이블의 잠금 너트 끝부분을 수신기 마이크 출력 단자에
연결하고, 다른 끝을 카메라 3,5mm 마이크 입력 단자 또는 기타
녹음 기기에 연결합니다.
필요한 경우, 배터리 장착 부위 해제를 누르고 뒷면 커버를
아래로 밀면 수신기 뒤쪽에 나타나는 3단계 출력 레벨 게인
스위치(0dB, -10dB, -20dB)를 설정하십시오. 신호가 과부하로
인해 클리핑되지 않도록 카메라 또는 녹음 기기의 입력 레벨을
확인하십시오.
PAIRING NEW OR MULTIPLE TRANSMITTERS
Paaren mit einem anderen oder weiteren Sendern/ Appairage avec
d’autres émetteurs/Enlazar nuevos o varios transmisores/Accoppiare
Trasmettitori Nuovi o Più Trasmettitori/配对新的或多个发射器/新し
い、または複数のトランスミッターのペアリング/새 전송기 페어링 또
는 다중 전송기 페어링
RF EXPOSURE STATEMENT:
This transmitter must not be co-located or operated in
conjunction with any other antenna or transmitter.
This equipment complies with FCC/IC radiation exposure limits
set forth for an uncontrolled environment and meets the FCC
radio frequency (RF) Exposure Guidelines and RSS-102 of the
IC radio frequency (RF) Exposure rules. This equipment has
very low levels of RF energy that it deemed to comply without
maximum permissive exposure evaluation. (MPE). But it is
desirable that it should be installed and operated keeping the
radiator at least 20cm or more away from person’s body.
NOTE: This equipment has been tested and found to comply
with the limits for a Class B digital device, pursuant to Part
15 of the FCC Rules. These limits are designed to provide
reasonable protection against harmful interference in a
residential installation. This equipment generates, uses and
can radiate radio frequency energy and, if not installed and
used in accordance with the instructions, may cause harmful
interference to radio communications. However, there is
no guarantee that interference will not occur in a particular
installation.
If this equipment does cause harmful interference to radio or
television reception, which can be determined by turning the
equipment off and on, the user is encouraged to try to correct
the interference by one or more of the following measures:
1. Reorient or relocate the receiving antenna.
2. Increase the separation between the equipment and
receiver.
3. Connect the equipment into an outlet on a circuit
different from that to which the receiver is connected.
4. Consult the dealer or an experienced radio/TV
technician for help.
This device complies with Part 15 of the FCC Rules. Operation is
subject to the following two conditions: (1) this device may not
cause harmful interference, and (2) this device must accept any
interference received, including interference that may cause
undesired operation.
Changes or modications to the equipment not expressly
approved by the party responsible for compliance could void
the user's authority to operate the equipment.
Ten en cuenta que el LED de activación parpadeará si el nivel de
carga de las pilas es bajo. Para un rendimiento óptimo, RØDE
recomienda utilizar baterías de litio Energizer Ultimate.
Ricevitore ed il trasmettitore vengono alimentati o tramite 2
batterie tipo AA o da una fonte di alimentazione USB tramite il
connettore Micro-USB.
• Per mettere le batterie, premete il pulsante di apertura
del vano batterie e fate scorrere verso il basso il coperchio
posteriore.
• Premete e tenete premuto il pulsante di accensione. Il LED
di accensione si illuminerà in VERDE.
• Il Ricevitore si abbinerà automaticamente al Trasmettitore.
Una volta abbinati vedrete visualizzati sullo schermo del
ricevitore lo stato delle batterie del trasmettitore ed il
guadagno audio.
Notate che il LED di accensione lampeggerà se le batterie sono
scariche. Per ottenere le prestazioni migliori RØDE consiglia
l’utilizzo delle batterie al litio Energizer Ultimate.
接收器和发射器均采用 2 x AA 电池供电,也可使用合适的 USB
电源通过 Micro-USB 接头供电。
• 要安装电池,按住电池仓开关,把后背板滑下。
• 按住电源键。 电源 LED 指示灯变为绿色。
• 接收器将自动与发射器同步。 配对完成后,您将看到接收器
上显示发射器的电池状态和音频增益。
请注意,电池电量低时,电源 LED 将闪烁。为保证最佳性
能,RØDE建议使用Energizer Ultimate锂电池。
レシーバーとトランスミッターは、 2 x AA 乾電池または電力を供
給できるUSB 機器(Micro-USB コネクターを使用)のどちらでも動
作させることができます。
• 電池を装着する際は、バッテリーコンパートメント・リリースを
軽く押してスライドさせ、リアカバーを下げて下さい。
• 電源ボタンを長押しします。電源LEDが緑色で点灯します。
• レシーバーは自動的にトランスミッターと同期します。ペアリン
グが終了すると、レシーバーの画面に電池の状態とオーディオ
ゲインが表示されます。
電池残量が少なくなると電源LEDが点滅しますので、注意して
ください。 性能を最大限に発揮させるために、RØDEは Energizer
Ultimateリチウム電池の使用を推奨します。
수신기 및 전송기는 2 x AA 배터리 또는 적절한 Micro-USB
커넥터로 연결된 USB 전원 공급원에 의해 작동합니다.
• 배터리를 삽입하려면 배터리 장착 부위 해제를 누르고 뒷면
커버를 아래로 밀어주십시오.
• 전원 버튼을 누른 채로 유지합니다. 전원 LED가 녹색으로
변하게 됩니다.
• 수신기는 자동적으로 전송기와 동기화됩니다. 일단 페어를
이루고 나면 전송기 배터리 상태 및 오디오 게인 표시를
수신기에서 확인할 수 있습니다.
전원 LED가 깜빡이면 배터리 잔량이 얼마 남지 않았다는
뜻입니다. 최적의 성능을 위해 RØDE는 Energizer Ultimate 리튬
배터리의 사용을 권장합니다.
Risk of explosion if battery is
replaced by an incorrect type.
Dispose of used batteries
according to the instructions.
CAUTION
Register your RODELink
kit to be notied by
email of updates to
rmware
Registrieren Sie Ihr
RØDELink-Kit, um rechtzeitig
über Firmware-Updates
informiert zu werden.
Enregistrez votre kit RØDELink pour être prévenu des
mises à jour du produit.
Registra tu kit RØDELink para recibir noticaciones de
actualizaciones de rmware y productos.
Registra il tuo kit RØDELink per ricevere notizie su
aggiornamenti di prodotti e rmware.
注册您的RØDELink套件,随时获得产品和固件更新通知。
製品とファームウエアのアップデート情報を得るため
に、RØDELinkキットを登録してください。
RØDELink 제품 및 펌웨어 업데이트 알림 등록을 해주십시오.
391-964-2-1_filmmaker-qsg.indd 2 29/10/2015 1:48 pm


