Page is loading ...

This Quick Start Manual has been specially designed to guide you through the basic functions and features of your device.
For more information, refer to the User Manual included on the supplied CD-ROM.
Please read the Quick Start Manual and User Manual carefully to ensure safe and correct use.
Please refer to the warranty that came with your product or go
to our website http://www.samsung.com/ for after-sales service
or inquiries.
AD68-03085A
English/Español
TL34HD
The CE Mark is a Directive conformity
mark of the European Community (EC)

EN-2
English
EN-3
Please follow these procedures
before using the camera.
©2008 Samsung Electronics
America, inc.
The specifications of the camera
or contents of this manual may be
changed without prior notice due
to upgrade of camera functions.
Copyright information
Microsoft Windows and the
Windows logo are registered
trademarks of the Microsoft
Corporation.
HDMI, the HDMI logo and the
term "High Definition Multimedia
Interface" are trademarks or
registered trademarks of HDMI
Licensing LLC.
QuickTime and QuickTime logo
are trademarks or registered
trademarks of Apple Computer,
Inc., used under license.
▪
▪
▪
1. Unpack ………………………6
2. Insert the battery and
memory card …………………7
3. Charge the battery and turn
on your camera ……………8
4. Select a language and set
the date and time ……………9
Camera layout ……………… 10
Icons ………………………… 12
Use the touch screen ……… 13
Take a photo ………………… 14
Record a video ……………… 15
Transfer files to a PC
(for Windows) ………………… 16
Specifications ………………… 18
FCC notice …………………… 19
Provided manuals
Quick Start Manual
Explains how to assemble
and prepare your camera
for its first use, capture
photos or videos and
transfer files to a PC.
User Manual (CD-ROM)
Explains how to shoot with
various shooting modes, set
shooting options, and use the
settings menu. It also includes
how to handle error messages
and maintain your camera.
Contents
You can easily solve most problems by setting shooting options.
There are more details about how to set shooting options in the CD version of the user manual.
The subject's
eyes appear red.
This is caused by a reflection from the camera flash.
Set the flash option to Red Eye or Red Eye Fix. (See the user manual p.33)
If the photo has already been taken, select Red Eye Fix in the edit menu.
(See the user manual p.57)
•
•
Photos have dust
spots.
Dust particles floating in the air may be captured in photos when using the flash.
Turn the flash off or avoid taking photos in a dusty place.
Set ISO speed options. (See the user manual p.35)
•
•
Photos are
blurred.
This may be caused by taking photos in low light conditions or holding the camera
incorrectly. Set the Optical Image Stabilization (OIS) option or press [Shutter] halfway
down to make sure the subject is focused. (See the user manual p.26)
Photos are
blurred when
shooting at night.
As the camera tries to let in more light, the shutter speed slows.
This can make it difficult to steady the camera and may result in camera shake.
Turn the flash on. (See the user manual p.33)
Select the 6 mode. (See the user manual p.20)
Set ISO speed options. (See the user manual p.35)
Use a tripod to prevent your camera from shaking.
•
•
•
•
Subjects come
out too dark
because of
backlighting.
When the light source is behind the subject or when there is a high contrast between
the light and dark areas, the subject may come out shaded.
Avoid shooting in front of the sun.
Select BACKLIGHT in the 4 mode. (See the user manual p.20)
Set the flash option to Fill in. (See the user manual p.33)
Set the Auto Contrast Balance (ACB) option. (See the user manual p.41)
Adjust the exposure. (See the user manual p.40)
Set the metering option to Spot if a bright subject is in the center of the frame.
(See the user manual p.42)
•
•
•
•
•
•
Indication information
In this manual, camera
buttons are represented by
bold type in brackets.
For example, [Shutter]
represents the Shutter button.
Get answers to common questions

EN-4
English
EN-5
Comply with the following precautions to avoid dangerous or illegal situations while operating
the camera and keep this manual handy for future reference.
Health and Safety Information
Situations that could cause injury to yourself or others
Warnings
Do not use your camera near flammable or
explosive gases and liquids
Do not use your camera near fuels, combustibles, or
flammable chemicals. Do not store or carry flammable
liquids, gases, or explosive materials in the same
compartment as the camera or its accessories.
Keep your camera away from small children
and pets
Keep your camera and all accessories out of the reach
of small children and animals. Small parts may cause
choking or serious injury if swallowed. Moving parts and
accessories may present physical dangers as well.
Prevent damage to subjects’ eyesight
Do not use the flash in close proximity (closer than
1m/3 ft) to people or animals. Using the flash too
close to your subject’s eyes can cause temporary or
permanent damage.
Handle and dispose of batteries and chargers
with care
Use only Samsung-approved batteries and chargers.
Incompatible batteries and chargers can cause
serious injuries or damage to your camera.
Never dispose of batteries in a fire. Follow all local
regulations when disposing of used batteries.
Never place batteries or cameras on or in heating
devices, such as microwave ovens, stoves, or
radiators. Batteries may explode when overheated.
•
•
•
Situations that could cause damage to your camera or other equipment
Cautions
Handle and store your camera carefully and
sensibly
Do not allow your camera to get wet—liquids can
cause serious damage. Do not handle your camera
with wet hands. Water damage to your camera can
void your manufacturer’s warranty.
Avoid using or storing your camera in dusty, dirty,
humid, or poorly-ventilated areas to prevent damage
to moving parts and internal components.
Protect your camera from impact, rough handling,
and excessive vibration to avoid serious damage.
Exercise caution when connecting cables or
adapters and installing batteries and memory cards.
Forcing the connectors, improperly connecting
cables, or improperly installing batteries and
memory cards can damage ports, connectors, and
accessories.
Do not insert foreign objects into any of your
camera’s compartments, slots, or access points.
This type of damages may not be covered by your
warranty.
•
•
•
•
Protect batteries, chargers, and memory cards
from damage
Avoid exposing batteries or memory cards to very
cold or very hot temperatures (below 0°C/32°F or
above 40°C/104°F). Extreme temperatures can
reduce the charging capacity of your batteries and
can cause memory cards to malfunction.
Prevent batteries from making contact with metal
objects, as this can create a connection between
the + and – terminals of your battery and lead to
temporary or permanent battery damage.
Prevent memory cards from making in contact with
liquids, dirt, or foreign substances. If dirty, wipe the
memory card clean with a soft cloth before inserting
in your camera.
Use only Samsung-approved accessories
Using incompatible accessories may damage your
camera, cause injury, or void your warranty.
Protect your camera’s lens
Protect your lens from fingerprints and scratches.
Clean your lens with a soft, clean, debris-free lens cloth.
•
•
•
p.1 ‘Health and Safety Information’

EN-6
English
EN-7
Optional accessories
Sold as a set
Remove the battery and memory card
Camera AC adapter (SAC-47)/
USB cable (SUC-C4)
AD44-00131A/AD39-00151A
Rechargeable
battery
AD81-00884A
Strap
Silver: AD63-02602A/
Black: AD63-02603A
A
/
V cable
AD39-00150A
Quick Start Manual
AD68-03085A
Software CD-ROM
(User manual included)
AD46-00189A
Push gently until the
card disengages from
the camera and then
pull it out of the slot.
Note
The internal memory can be used as a temporary storage
device when the memory card is not inserted.
1. Unpack 2. Insert the battery and memory card
Push the lock up to
release the battery.
Insert memory cards
with the gold-colored
contacts facing up.
Insert batteries with
the Samsung logo
facing down.
Memory card
Battery
Battery
lock
Memory cardsCamera case
AD69-01783A
Remote control
AD59-00164A
HDMI cradle manual
AD68-03092A
HDMI cable
(for viewing high-
resolution images or
playing videos)
AD39-00152A
Cradle (for charging the
battery and connecting
your camera to an
HDTV or PC)
AD61-03811A
p.74 ‘About memory cards’
p.75 ‘About the battery’

EN-8
English
EN-9
Date & Time
3. Charge the battery and turn on your camera
Press [POWER]
When you turn on your camera
for the first time, select a language
and set the date and time.
Press [Playback] to view stored files.
Press and hold [Playback] to mute camera sounds.
▪
▪
4. Select a language and set the date and time
➊
Select a
field
p.75 ‘About the battery’
Charge the battery Turn on your camera
Indicator light
Red: Charging
Green: Fully charged
▪
▪
1
2
3
4
Language
Date & Time
ENGLISH
2008/01/01
Select a language Set the date and time
Language
Date & Time
Language
Date & Time
Language
ENGLISH
Date & Time
Language
dd/mm/yyyy
Off
08 01 01 12 00
World Time
Date & Time
Date & Time
Language
➌
Touch
2008/01/01
2008/01/01
ENGLISH
ENGLISH
2008/01/01
yyyy/mm/dd
mm/dd/yyyy
DEUTSCH
FRANÇAIS
2008/01/01
yyyy/mm/dd
mm/dd/yyyy
dd/mm/yyyy
Off
➊
Select a date format
➋
Touch to
switch to
Shooting
mode
➋
Touch to change
the number
London
Touch to select a city
from the world map

EN-10
English
EN-11
Remote control
sensor
Mode dial
See below
Shutter button
POWER button
Lens
Camera layout
Flash unit
When the flash is needed,
the flash unit opens
automatically if you press
[Shutter] (Press down gently
to close).
Caution
While not in use, keep the flash unit closed to
prevent damage.
Forcing open the flash unit may cause damage to
your camera.
•
•
AF-assist light/Timer lamp
Microphone
Zoom T/Expand button
Zoom W/Thumbnail button
Touch screen
MENU button
Access the camera
settings menu
Status lamp
Blinking: When saving a photo or video,
recording a voice memo, being read by a
computer or printer, or out of focus
Steady: When connecting to a computer or in focus
▪
▪
Battery chamber cover
Insert a memory card and battery
USB and A
/
V port
Tripod mount
Playback button
Speaker
Icon Mode Description
2
AUTO
Take a photo conveniently with
minimal settings
1
PROGRAM
Take a photo by setting options
(except for shutter speed and
aperture value)
8
MANUAL
Take a photo by setting options
manually
7
DUAL IS
Take a photo with options
suitable for reducing camera shake
Icon Mode Description
6
NIGHT
Take a photo with options for
shooting at night
5
BEAUTY
SHOT
Take a photo of a person with
options to hide facial imperfections
4
SCENE
Take a photo with options for a
preset scene
3
MOVIE
Record a video

EN-12
English
EN-13
Icons Use the touch screen
The icons displayed will change according to the selected mode or options you set. Learn basic actions to use the touch screen.
The touch screen works best when touched with the soft part of your finger.
Caution
Do not use any sharp objects to touch the screen. Doing so may damage the screen.
Touch an icon to open a
menu or set an option.
Dragging Touching
B. Touch icons
Icon Description
Selected photo style
Select a white balance
Adjust the exposure with ACB
Select a display type
Return to the previous screen
Select a scene
Select an ISO speed
Adjust the brightness of the
face
Adjust the exposure manually
Adjust the shutter speed
Adjust imperfections of the
face
Select an aperture value
Select an auto focus option
Select a flash option
Select a video resolution
Icon Description
Select a photo resolution
Select a frame rate
Select a face detection option
Select a focus area option
Select a burst type
Select a metering option
Select photo quality
Select a timer option
Add a voice memo to a photo
or record a voice memo
Set the Optical Image
Stabilization option
Apply a color effect
Adjust sharpness
Adjust contrast
Adjust saturation
Display another row of options
Drag your finger left or right to
scroll horizontally.
Drag your finger up or down
to scroll vertically.
Beep Sound
Volume
Medium
Sound 1
Sound 1
Off
On
Shutter Sound
Start Sound
AF Sound
A
B
A. Main display
Icon Description
Selected shooting mode
: Fully charged
: Partially charged
: Charging needed
Internal memory
Memory card inserted
Available number of photos
Available recording time
Optical Image Stabilization (OIS)
Current date and time
Zoom ratio
Voice memo
Auto focus frame
Camera shake
Option set 1 (of 3)

EN-14
English
EN-15
Viewing photos Playing a video
1
Press [Playback].
2
Touch .
3
Use the following icons to control playback.
Icon Description
Skip backward
Pause or resume playback
Stop playback
Skip forward
1
Select 3.
2
Align your subject in the frame.
3
Press [Shutter].
4
Press [Shutter] again to stop the recording.
Note
You can record videos of up to 20 minutes in length.
Take a photo Record a video
1
Select 2.
2
Align your subject in the frame.
3
Press [Shutter] halfway down to focus automatically.
4
Press [Shutter] all the way down to take the photo.
Green: In focus
Red: Out of focus
▪
▪
Touch to view the
previous photo
Touch to view
the next photo
Touch to delete
the photo
1
Press [Playback].
If the camera is off, it will turn on.
2
Drag your finger left or right to
scroll through photos.
▪
Touch to pause
Touch again to resume
▪
▪
Stop: Shutter

EN-16
English
EN-17
1
Insert the installation CD in a CD-ROM drive and
follow the on-screen instructions.
Note
Click User Manual to read the user manual.
The CD contains the following programs
Samsung Master
Edit photos and videos
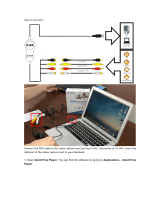
QuickTime Player 7.4
View videos
Adobe Reader
View the user manual
Transfer files to a PC (for Windows)
2
Connect the camera to the PC with the USB cable.
Caution
You must plug the end of the cable with the indicator
light (▲) into your camera. If the cable is reversed,
it may damage your files. The manufacturer is not
responsible for any loss of data.
3
Turn on the camera.
4
Touch Computer.
5
On your PC, select My Computer >
Removable Disk > DCIM > 100SSCAM.
p.61 ‘Tansferring files to your computer’
USB
Computer
Printer
To disconnect safely (for Windows XP)
Click
6
Select the files you want and drag or save them
to the PC.
Click
The way to disconnect the USB cable for
Windows 2000/Vista is similar.

EN-18
English
EN-19
Image
sensor
Type 1/1.72″ (1.49 cm) CCD
Pixel
Effective pixels: approx. 14.7 mega-pixels,
Total pixels: approx. 15.0 mega-pixels
Lens
Focal length
Schneider-KREUZNACH lens f = 6.0 - 21.6 mm
(35 mm film equivalent: 28 - 102 mm)
F-stop range F2.8 (W) - F5.9 (T)
LCD monitor
3.0″ (7.62 cm) hVGA color TFT LCD (460,000 pixels)
(Touch)
Focusing
Type
TTL auto focus
(Multi AF, Center AF, Touch AF, Face Detection AF)
Range
Wide Tele
Normal 80 cm-infinity
Macro 5 cm-80 cm 50 cm- 80 cm
Auto macro 5 cm-infinity 50 cm-infinity
Shutter speed
AUTO: 1 - 1/2,000 sec.
MANUAL: 16 - 1/2,000 sec.
NIGHT: 8 - 1/2,000 sec.
FIREWORK: 4 sec.
Shake reduction
Dual IS [OIS (Optical Image Stabilization) +
DIS (Digital Image Stabilization)]
Storage
Media
Internal memory: approx. 40 MB
External memory (Optional): SD card
(up to 4 GB guaranteed), SDHC card (up to
8 GB guaranteed), MMC Plus (up to 2 GB
guaranteed, 4 bit 20 MHz)
Internal memory capacity may not match these
specifications.
File format
Still image: JPEG (DCF), EXIF 2.21,
DPOF 1.1, PictBridge 1.0
Movie: MP4 (H.264 (MPEG4.AVC))
Audio: WAV
Image size
For 1 GB SD
Super fine Fine Normal
4384x3288 136 265 386
4384x2920 153 296 430
4384x2464 180 347 501
3264x2448 240 457 653
2592x1944 370 685 957
1920x1080 807 1374 1794
1024x768 1655 2438 2894
These figures are measured under Samsung’s standard
conditions and may vary depending on shooting conditions
and camera settings.
Interface
Digital output Connector: USB 2.0 (30 pin)
Audio output Mono (Internal speaker), Stereo (Microphone)
Video output
AV: NTSC, PAL (selectable)
HDMI 1.2: NTSC, PAL (selectable)
HDMI is available when it is connected to the optional
cradle.
DC power
input
connector
30 pin, 4.2V
Power
source
Rechargeable
battery
Lithium-ion battery SLB-1137D (1100 mAh)
AC adapter Power adapter (SAC-47), USB cable (SUC-C4)
Cradle
(Optional)
SCC-NV5 HD
The power source may differ depending on your
region.
Dimensions (W x H x D)
94.9 X 59.5 X 19.9 mm (without projection part)
Weight
138 g (without battery and memory card)
Operating temperature
0 - 40°C
Operating humidity
5 - 85%
Specifications
p.79 ‘Camera specifications’
▪ NOTE:
This equipment has been tested and found to comply with
the limits for a Class B digital device, pursuant to part 15
of the FCC Rules. These limits are designed to provide
reasonable protection against harmful interference in a
residential installation. This equipment generates, uses and
can radiate radio frequency energy and, if not installed and
used in accordance with the instructions, may cause harmful
interference to radio communications. However, there is
no guarantee that interference will not occur in a particular
installation. If this equipment does cause harmful interference
to radio or television reception, which can be determined by
turning the equipment off and on, the user is encouraged to
try to correct the interference by one or more of the following
measures:
- Reorientate, or relocate, the receiving antenna.
- Increase the distance between the equipment and
receiver.
- Connect the equipment into an outlet on a circuit different
from that to which the receiver is connected.
- Consult the dealer or an experienced radio / TV technician
for help.
▪ CAUTION:
Changes or modifications not expressly approved by the
manufacturer responsible for compliance could void the
user’s authority to operate the equipment.
▪ Declaration of Conformity
Trade Name : Samsung Electronics America, inc.
Model No. : Samsung TL34HD
Responsible Party : Samsung Electronics America, inc.
Address : 105 Challenger Road Ridgefield
Park NJ
Telephone No. : 1-800-SAMSUNG (726-7864)
This device complies with Part 15 of the FCC Rules.
Operation is subject to the following two conditions:
(1) This device may not cause harmful interference, and (2)
this device must accept any interference received, including
interference that may cause undesired operation.
FCC notice
Samsung Eco-mark
It is Samsung’s own symbol mark is used to
effectively communicate Samsung’s environmental
friendly product activities to the consumers. The
mark represents Samsung’s continuous effort on
development of environmental conscious products.
/