Sunco Lighting 4 Pack Wraparound 11" Wide LED Shop Light, 4 FT, Linkable, 72W, 8500 LM, 5000K Daylight, Integrated, Prismatic Lens, Direct Wire, Flush Mount Fixture, Garage - ETL Installation guide
- Category
- Motorcycle Accessories
- Type
- Installation guide

The Brighter Choice
WRAPAROUND 11”
Install Guide and Manual
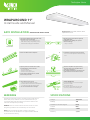
SPECIFICATIONS
Voltage
Wattage
Damp
8500
7.49lbs
7 years
120V/277V
72W
Lumens
Weight
Warranty
Suitable for Locations Ingress
EASY INSTALLATION JUNCTION BOX INSTALLATION
WARNING
1.
4.
6.
7.
10.
11.
2.
3.
5.
8.
1.
9.
2.
3.
All electrical connections must be in accordance with local and National
Electric Code (N.E.C.) standards. Consult a qualified electrician if you
are unfamiliar with proper electrical wiring connections. Please review
instructions carefully before proceeding.
WARNING: Risk of fire or electric shock. Don’t alter, relocate or remove
wiring during installation. Don’t install directly over a heat source.
NOTE: When first turned on wait about 1 minute for the circuitry
to calibrate. Not for use with dimmers. Use proper installation methods
to prevent water from entering.
Turn off circuit breaker that provides power to the
light switch for the recessed lights.
• If replacing a xture, remove existing xture and
make a sketch of wiring conguration (by color) or
mark wires with masking tape for identication.
Remove the diffuser from the lamp base.
Open the junction box and take out the cables
from the lamp base, connect the wires:
• Live to Live (black);
• Neutral to Neutral (white);
• Ground to Ground (yellow/green).
Secure the wires with the wire nuts, and fold
them into the junction box.
Put the diffuser (cover) back on
a) Align one end then slowly press down;
b) Push the diffuser to the corner of the lamp base;
c) Lock the diffuser with the aluminium base.
Turn on circuit breaker and the test light.
Mounting surface must be able to support the
weight of the fixture.
Depending on your lighting plan, space the
fixtures accordingly.
• Link up to 4 Fixtures
Install the two screws (AA) into the junction box.
• Leave 1/4” of screws exposed to accommodate lamp
base.
Attach the Lamp Base to the junction box by
aligning the holes on the Lamp Base with the
screws on the junction box.
Turn Lamp Base clockwise to lock into place and
tighten screws to ensure the fixture is secure.
LINKING INFORMATION
Use provided linking cords to connect multiple
fixtures to one outlet;
Link up the 4 Fixtures;
For protection, place plastic end caps on the
ends of any final fixtures in the linking line.
Required Tools: Drill, Ladder, Hammer, Pliers,
Tape Measure, Pencil.
Turn Power OFF
A
A
b
c
a
Junction
Box
AA
F

The Brighter Choice
WRAPAROUND 11”
Install Guide and Manual
1.
4.
6.
8.
10.
2.
3.
5.
7.
9.
Turn off circuit breaker that provides power to the
light switch for the recessed lights.
• If replacing a fixture, remove existing fixture and
make a sketch of wiring configuration (by color) or
mark wires with masking tape for identification.
Use a screwdriver to punch out one of the
knocked holes and take out the cables from the
lamp base.
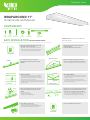
DRYWALL MOUNTING
• If the mounting holes go through drywall without a
stud, drill four small pilot holes by a 1/8” drill bit
(not included) and install wall anchors (DD) into the
holes with a hammer (not included).
• Install the four wood screws into the mounting surface
but leave about a 3/8” gap between the screw head and
mounting surface.
Remove the shrink wrap from the end of the wires,
connect to the supply wires using the wire nuts
provided.
• Live to Live (black);
• Neutral to Neutral (white);
• Ground to Ground (yellow/green).
Insert the four screws into the keyhole slots and slide
the lamp base (a) in the direction in which the screw
heads rest over the narrow part of the keyhole slot.
• Once the fixture is supported, tighten the screws until
the fixture is secured to the mounting surface.
• Add C washer for extra protection - not included.
Put the diffuser (cover) back on
a) Align one end then slowly press down;
b) Push the diffuser to the corner of the lamp base;
c) Lock the diffuser with the aluminium base.
Turn on circuit breaker and the test light.
Mounting surface must be able to support the
weight of the fixture.
Remove the diffuser from the lamp base.
Attach the Lamp Base by aligning the knockout
holes on the Lamp Base with the mounting location.
• Mark the 4 keyhole slots at each end of the housing.
WALL SETUP MOUNTING
• If the mounting holes go through wall studs, drill four
small pilot holes using a 5/32” drill bit (not included)
for the wood screws.
• Install the four wood screws into the mounting
surface but leave about a 3/8” gap between the screw
head and mounting surface.
Required Tools: Drill, Ladder, Tape, Measure,
Pencil, Stud Finder.
EASY INSTALLATION KEYHOLE INSTALLATION
11.
COMPONENTS
Screws Wire Nuts Wood Screws End Caps Wall Anchors Linking Cables
Turn Power OFF
Take out the
Cables
Drywall
Drywall mounting
Wire nuts
(mounting surface)
Mark these locations
Wall stud
Pilot hole
Wall stud mounting
Turn Power ON
b
c
a
2x 3x 4x 4x2x 2x
-
 1
1
-
 2
2


Sunco Lighting 4 Pack Wraparound 11" Wide LED Shop Light, 4 FT, Linkable, 72W, 8500 LM, 5000K Daylight, Integrated, Prismatic Lens, Direct Wire, Flush Mount Fixture, Garage - ETL Installation guide
- Category
- Motorcycle Accessories
- Type
- Installation guide
Ask a question and I''ll find the answer in the document
Finding information in a document is now easier with AI
Related papers
Other documents
-
Trend Lighting TW40070AB User manual
-
Sea gull lighting 5792593S-15 Installation guide
-
Acclaim Lighting TW40072AB User manual
-
-
-
Design House 578575 Operating instructions
-
-
-
 Generation Lighting 7650893S Installation guide
-
Lightolier A0100 User manual
