Page is loading ...

No Wire, True Wireless Stereo In-ear
Earbuds with Charging Case
TrueBT Air
LEVEL OF PROTECTION
FROM WATER INTRUSION
X4
- English -
User Manual
English

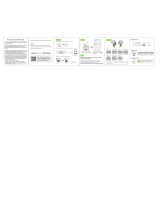
1. Overview of the Product
2. What’s Included
S
Earbuds with ear ns
3 sizes ear tips*
Charging case
Micro USB
charging cable (3 ft)
M L
User
Manual
1st
Setup
Ear Tip
Ear Fin
Status LED
Multifuntion
Button (L)
Multifunction
Button (R)
Battery status LEDCharging case lid
2
* Medium size ear tips are premounted on the earbuds.

3. Attention
IPX4 rated TrueBT Air can resist water splash and
sweat but must not be merged inside water or
left on wet place long time.
TrueBT Air earbuds are designed with
angled in-ear tips for each left and right
ear to provide comfortable and secure
t. Insert each earbud into your left and
right ear, and slightly rotate to t in your
ear canal. Try each of dierent ear tip sizes.
X4
When the earbuds are charged enough for
your use, insert into your ear canals and voice
guidance will begin in 5 seconds after
removed from the charging case.
4. Wear Earbuds
3
Please charge your TrueBT Air
before use. Earbuds will be
automatically turned on when
removed from the charging case.

Pairing
successful
5. Power On and Pairing
1. To turn on, press multifunction buttons on BOTH earbuds for
2 seconds
After opening a new package initially, follow these steps. Skip
step 5-1 when the earbuds are taken from the charging case.
The right earbud is assigned as the master earbud by default
and connects to left earbud (slave earbud) automatically.
2. Turn on Bluetooth on your mobile device
a. Go to settings
c. Scan for and select
"iLuv TrueBT Air"
d. Voice Prompt: "Pairing
Successful" on right earbud
b. Turn on Bluetooth
iLuv TrueBT Air
1. Power on
2. Connected,
right channel
3. Please pair to your device
(On master earbud)
1. Power on
2. Connected,
left channel
...
:02
Hold
:02
Hold
4

Click
Double
Click
1. Once paired, open music app on your
mobile device
2. Click a multifunction button on either
of earbuds to play
3. Click a multifunction button again to
pause
6. Music Playback
1. Double click a multifunction button on
any earbud.
2. Siri on iPhone or Google assistant on
Android phone will be activated.
3. Ask question or command with your voice
7. Voice Command
5

3. Hold the multifunction button for 1 second to decline when
you receive an incoming call
1. When you receive an incoming call, click a
multifunction button on any earbud to answer the call.
2. Click a multifunction button again to hang up
8. Answer the Call
Incoming call
Click
:01
Hold
di, di
(On master
earbud)
6

Fully charged charging case can recharge the earbuds up to 5
times and provide up to 30 hours playtime on the go in total.
1. Insert the smaller end of the included 3ft Micro USB charging
cable into Micro USB charging port on the Charging Case
Red LED: Charging
LED o : Fully charged
2. Insert the other end of the Micro USB charging cable into a
USB wall charger or a USB port on a computer
3ft.
Charging Case
9. Charging
Battery status LED for
Charging case
7

Fully charged earbuds support your active lifestyle with up to 6
hours playtime.
Earbuds
1. Put the earbuds in the charging case
and close the lid. The earbuds will turn
o automatically and start charging. The
cover must be closed so that the
earbuds are connected to charging pins
securely.
2. While charging, the red LED indicators
on the backside of charging case will be
on.
3. When fully charged. LED will turn o.
4. When you take the earbuds out of the
charging case, the earbuds will turn on
automatically.
Battery status
LED for right
earbud
Battery status
LED for left
earbud
L
R
8

1. Put the earbuds in the charging case and close the lid. The
earbuds will turn o automatically and start charging.
2. When you take the earbuds out of the charging case, the
earbuds will turn on and connect to the previously paired
phone automatically.
When you use the charging Case
10. Power O/On
1. Power On
2. Connected, right channel
3. Pairing successful
(On master earbud)
1. Power On
2. Connected,
left channel
...
9

Power off
:03
Hold
1. Press multifunction button on
any earbud for 3 seconds to turn
o both earbuds.
When you use multifunction
button
10
2. Press multifunction buttons on BOTH earbuds for 2 seconds
to turn on the earbuds. The earbuds will connect to the
previously paired phone automatically.
11. Reconnecting the Left & Right Channels
In most cases you can reconnect two earbuds by inserting
both earpieces into the case.
1. Insert the earbuds into the case and close the lid for about 15
seconds.
2. Remove them from the case so they will reconnect.

1. After charging earbuds from the charging case, should I
connect them to my phone via Bluetooth again?
No, you don’t need to. When you take them out of charging
case, they automatically connect to your previously connected
device.
2. Should I turn o power before charging and turn on power
after charging the earbuds?
No, you don’t. When you place the earbuds inside the charging
case and close the lid, they will be turned o automatically.
Then, they will start charging.
When you take them out of the charging case, they will be
automatically turned on.
3. What is music play time?
When the earbuds are fully charged, you can play music or talk
up to 6 hours which varies depending on the music content
and volume. Standby time is up to 100 hours.
Since the charging case can charge both earbuds 5 times, you
can play music up to 30 hours with 5 times of charge.
Frequently Asked Questions
11

Hereby, iLUV Creative Technology declares that the radio equipment typeTrueBT
Air is in compliance with Directive 2014/53/EU. The full text of the EU declaration of
conformity is available at the following internet address:www.iluv.com
iLuv Creative Technology erklärt, dass das Party On Air Bluetooth Gerät mit der RED
2014/53/EU Richtlinie konform ist. Der vollständige Text der Konformitätserklärung
ist auf der http://support.iluv.com/support.asp?section=manual Webseite abrufbar.
Thank you for purchasing your new iLuv product. We are fully committed providing
our customers the utmost satisfaction through the use of our products. For
warranty service, Please visit us at www.support.iluv.com and submit a ticket with
your date of purchase, product model number and a brief summary of your issue.
In the event of any issues with your product(s), please review the troubleshooting
section provided in the user manual. For further assistance, please contact us VIA
customer service and speak to one of our representatives.
NOTE: This equipment has been tested and found to comply with the limits for a Class B digital device, pursuant to
part 15 of the FCC Rules. These limits are designed to provide reasonable protection against harmful interference in
a residential installation. This equipment generates uses and can radiate radio frequency energy and, if not installed
and used in accordance with the instructions, may cause harmful interference to radio communications. However,
there is no guarantee that interference will not occur in a particular installation. If this equipment does cause
harmful interference to radio or television reception, which can be determined by turning the equipment o and
on, the user is encouraged to try to correct the interference by one or more of the following measures:
- Reorient or relocate the receiving antenna.
- Increase the separation between the equipment and receiver.
-Connect the equipment into an outlet on a circuit dierent from that to which the receiver is connected.
-Consult the dealer or an experienced radio/TV technician for help
Changes or modications not expressly approved by the party responsible for compliance could void the user's
authority to operate the equipment.
This device complies with Part 15 of the FCC Rules. Operation is subject to the following two conditions:
(1) this device may not cause harmful interference, and(2) this device must accept any interference received,
including interference that may cause undesired operation.
Printed in China.
ONE YEAR LIMITED WARRANTY
TWO YEARS LIMITED WARRANTY
GARANTÍA LIMITADA DE UN AÑO
GARANTÍA LIMITADA DE DOS AÑOS
GARANTIE LIMITÉE D’UN AN
GARANTIE LIMITÉE DE DEUX ANS
EIN JAHR GARANTIE
ZWEI JAHRE GARANTIE
ΠΕΡΙΟΡΙΣΜΕΝΗ ΕΓΓΥΗΣΗ ΕΝΟΣ ΕΤΟΥΣ
ΠΕΡΙΟΡΙΣΜΕΝΗ ΕΓΓΥΗΣΗ ΔΥΟ ΕΤΩΝ
EUROPEAN UNION

Product Registration: www.iLuv.com ->
“Product Registration” menu at the bottom
Customer Service: Support.iLuv.com
Customer Service Contact
Online
We take your privacy seriously.
Please visit https://www.iluv.com/pages/security-privacy-policy for more
information about how we use personal information.
support@iLuv.com
Email
1-866-807-5946
Mon-Fri: 8:30 AM - 5:30 PM EST
Phone

Inspired in New York. Designed by iLuv®.
/