Page is loading ...

1
®
12/15/2011
VISIT THE LIFETIME WEB SITE:
WWW.LIFETIME.COM
3.5” GROUND SLEEVE
MODEL #0023
ASSEMBLY INSTRUCTIONS
AND OWNER’S MANUAL
Save this instruction in the event that the manufacturer has to be contacted for replacement parts.
WARNING
To ensure your safety, do not attempt to assemble this system
without reading and following all instructions carefully. Identify and
inventory the parts using the Parts List. Failure to comply with any
of the warnings in these instructions may result in serious personal
injuries such as cuts, broken bones, nerve damage, paralysis,
brain injury, or death. Failure to comply may also result in property
damage. Please heed all warnings and cautions.
INSTRUCTION #1019201 B
**U.S. and Canada customers ONLY**
IF ASSISTANCE IS NEEDED,
DO NOT CONTACT THE STORE!!!
CALL OUR CUSTOMER SERVICE DEPARTMENT at 1 (800) 225-3865
HOURS: 7:00 a.m. to 5:00 p.m. Monday through Friday (Mountain Standard Time)
**Call, or visit our Web site for Saturday hours**
**For customers outside the U.S. or Canada, please contact the store for assistance.**
TOOLS AND MATERIALS REQUIRED
FOR ASSEMBLY
1. Concrete (Six 90-lb. bags)
2. Water Supply
3. Wheelbarrow
4. Shovel
5. Carpenter’s Level
6. 9/16” Wrench
7. Funnel
8. Pencil or Marker
9. Tape Measure
COPY

2
PARTS LIST
ID Part # Description Qty
AA 1018892 Ground Sleeve 1
Hardware (HD9039)
AB 300111 3/8” x 3/4” Hex Bolt 1
AC 500058 Plastic Cap 2
AD 800051 Locking Tab 1
HARDWARE IS ACTUAL SIZE
AB
BEFORE BEGINNING
ASSEMBLY
A. If any parts are missing, call our Customer Service
Department.
B. Test fit all Bolts by inserting them into their
respective holes. If necessary, carefully scrape away
any excess powder coating buildup from inside the
holes. Do not scrape away all of the powder coating.
Bare metal may rust.
NOTE: This Ground Sleeve is for use with in-ground
poles only. The Bottom Pole section is not included with
this product. Use the Bottom Pole section from your
purchased Lifetime
®
system.
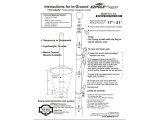
a. Insert the dimpled end of the Bottom Pole into the
Ground Sleeve (AA). Make sure the Bottom Pole section
ts completely into the Ground Sleeve.
b. Tap the pole and ground sleeve lightly on the ground so
they stay together during the cementing steps.
STEP 1 STEP 2
a. Insert the 3/8” x 3/4” Hex Bolt (AB) into the
hole of the Locking Tab (AD) and screw the
Bolt in until the end of the Bolt is ush with
the edge of the Tab.
b. Push the Locking Tab assembly into the slot in
the top of the Ground Sleeve as shown. Push
the Locking Tab in as far as it will go.
c. Tighten the Bolt just enough to hold the
Bottom Pole section in position. DO NOT
OVERTIGHTEN. The Bolt will be removed
later in the installation.
d. Place a Plastic Cap (AC) over the lower end of
the Ground Sleeve to prevent cement from
seeping in.
AD
AC
AB
AD
SAFETY INSTRUCTIONS
Most injuries are caused by misuse and/or not following instructions. Use caution when using this system.
Owner must ensure that all players know and follow these rules for safe operation of the system.
To ensure safety, do not attempt to assemble this system without following the instructions carefully. Check entire box and inside
all packing material for parts and/or additional instruction material. Before beginning assembly, read the instructions and identify
parts using the hardware identier and parts list in this document. Proper and complete assembly, use and supervision are
essential for proper orientation and to reduce the risk of accident or injury. A high probability of serious injury exists if this
system is not installed, maintained, and operated properly.
FAILURE TO FOLLOW THESE WARNINGS MAY RESULT IN SERIOUS INJURY OR PROPERTY DAMAGE AND WILL VOID WARRANTY.
• If using a ladder during assembly, use extreme caution.
• Two capable adults are recommended for this operation.
• Assemble the pole sections properly (if applicable). Failure to do so could cause the pole sections to separate during play.
• Before digging, contact utility company to locate underground power cables, gas, and water lines. Ensure that there are no
overhead power lines within 20 ft. (7m) radius of pole location.
AB
Bottom
Pole
dimples
AA
COPY

3
a. Dig a round hole 24” deep and 18” in diameter.
b. Mix all 6 bags of concrete, except 1/3 of a bag which will be
used later to ll the inside of the Bottom Pole section.
c. Fill the hole half full with concrete. Insert the Ground Sleeve
and Bottom Pole section into the cement. The correct distance
from the basketball court to the front of the pole is 4 inches. The
top of the Ground Sleeve should be ush with the basketball
court. The Hex Bolt and Locking Tab must face away from the
basketball court.
1ST POURING
2nd POURING
STEP 3
a. Using a level, check the pole several times within the rst
hour to make sure all sides are vertical. Readjust the pole
if necessary before the concrete begins to rm.
b. Be sure the inner edges of the Ground Sleeve are free of
concrete.
CAUTION: Allow at least four hours for the
concrete to set up before continuing assembly.
STEP 4
STEP 5
a. Loosen the Bolt and remove the Locking Tab from
the Ground Sleeve. Carefully remove the Bottom
Pole section from the Ground Sleeve.
b. Place the other Plastic Cap (AC) over the lower
end of the Bottom Pole section.
c. Mix the remaining 1/3 bag of concrete. Using a
funnel, pour the concrete into the Bottom Pole
section until it is just below the slot in the top of
the pole. Leave the pole standing in an upright
position until the concrete sets.
a. Remove the Plastic Cap from the Bottom
Pole section and discard.
b. Measure 14 1/2” up from the bottom
of the Bottom Pole section and make a
mark on the Pole. Insert the Bottom Pole
section into the Ground Sleeve, making
sure that the 14 1/2” mark reaches the
top edge of the Ground Sleeve. Refere to
the manufacturer’s instructions for pole
alignment.
c. Install the Locking Tab so the Bolt touches
the rim of the Ground Sleeve.
d. Tighten the Locking Bolt securely with an
open end wrench to prevent the pole from
rotating. Do not overtighten the Bolt or
the Locking Tab may be damaged.
WARNING: The Bottom Pole section
must be inserted 14 1/2” into the
Ground Sleeve. The dimples on the
Bottom Pole are for identication
purposes only. If the Bottom Pole
section does not fit, check the
bottom of the Ground Sleeve for
debris or concrete. Clean out the
Ground Sleeve and reinstall the
Bottom Pole section.
STEP 6
AC
Continue with Step 7 on the next page.
18”
24”
PLAYING
SURFACE
4”
d. Finish lling the hole with
concrete. Make sure the
Ground Sleeve is ush with
the basketball court and is
not sunk into or positioned
above the concrete.
e. Form the concrete into a
downward slope, away from
the Ground Sleeve. This will
allow any water buildup to
ow away from the Ground
Sleeve. Failure to do so may
result in premature rusting
of the Ground Sleeve.

4
a. Allow the concrete to set
for at least 72 hours.
b. Follow the manufacturer’s
instructions to complete
the installation of your
system.
STEP 7
PRODUCT DESCRIPTION MODEL #
Pole Pad 0600
This heavy-duty foam pad is cov-
ered with tough vinyl. Protects
players from impact with the
pole.
TO PLACE ORDERS, USE
A MASTER CARD
OR VISA AND CALL OUR
CUSTOMER SERVICE
DEPARTMENT
ACCESSORIES AVAILABLE FOR
MORE BASKETBALL FUN!
For Price and Shipping costs call
our Customer Service Department.
LIFETIME BASKETBALL EQUIPMENT
5-YEAR LIMITED FACTORY WARRANTY
THE MANUFACTURER RESERVES THE RIGHT TO MAKE SUBSTITUTIONS TO WARRANTY CLAIMS IF PARTS ARE
UNAVAILABLE OR OBSOLETE.
1. Lifetime basketball systems are warranted to the original purchaser to be free from defects in material or workmanship for a
period of ve years from the date of original retail purchase. The word “defects” is dened as imperfections that impair the use
of the product. Defects resulting from misuse, abuse or negligence will void this warranty. This warranty does not cover defects
due to improper installation, alteration or accident. This warranty does not cover damage caused by vandalism, rusting, “acts of
nature” or any other event beyond the control of the manufacturer.
2. This warranty is nontransferable and is expressly limited to the repair or replacement of defective basketball equipment. If the
equipment is defective within the terms of this warranty, Lifetime Products, Inc. will repair or replace defective parts at no cost to
the purchaser. Shipping charges to and from the factory are not covered and are the responsibility of the purchaser. Labor charges
and related expenses for removal, installation or replacement of the basketball system or its components are not covered under
this warranty.
3. This warranty does not cover scratching or scufng of the product that may result from normal usage. In addition, defects
resulting from intentional damage, negligence, unreasonable use or hanging from the net or rim will void this warranty.
4. Liability for incidental or consequential damages is excluded to the extent permitted by law. While every attempt is made to
embody the highest degree of safety in all equipment, freedom from injury cannot be guaranteed. The user assumes all risk of
injury resulting from the use of this product. All merchandise is sold on this condition, and no representative of the company may
waive or change this policy.
5. This product is not intended for institutional or commercial use; Lifetime Products, Inc. does not assume any liability for such use.
Institutional or commercial use will void the warranty.
6. This warranty is expressly in lieu of all other warranties, expressed or implied, including warranties of merchantability or tness
for use. Neither Lifetime Products, Inc., nor any representative assumes any other liability in connection with this product.
ALL WARRANTY CLAIMS MUST BE ACCOMPANIED BY A SALES RECEIPT.
To register the product, visit our Web site at www.lifetime.com
REPORT PRODUCT DEFECTS IN WRITING TO:
Lifetime Products, Inc., PO Box 160010 Cleareld, UT 84016-0010 or
call (800) 225-3865 M-F 8 a.m. to 5 p.m. MST.
Please include your dated sales receipt and photographs of damaged parts.
POLE PAD
/