
项目名称
V2312
A00
2022/12/18
说明书(欧版)
04170500001273
张琴
封面 157g 哑粉纸,内页 68g 哑粉纸 成品
尺寸为 210*140mm,胶装
140mm*210mm
K 55
版本号
设计时间
物料名称
设计师
审核
批准
料号
材质工艺要求
颜色及专色
尺寸要求

Dreame R20
Cordless Stick Vacuum
User Manual
• Theword"dreame"istheabbreviationofDreameTechnologyCo.,Ltd.anditssubsidiariesinChina.It
isthetransliterationofthecompany'sChinesename"追觅",whichmeansstrivingforexcellencein
everyendeavorandreflectsthecompany'svisionofcontinuouspursuit,explorationandsearchin
technology.
• DasWort"dreame"istdieAbkürzungvonDreameTechnologyCo.,Ltdundseinen
TochterunternehmeninChina.EsistdieTransliterationdeschinesischenNamens"追觅"dieser
Firma,wasfürdasStrebennachVollendungstehtunddieVisiondesUnternehmenswiderspiegelt,
nämlichimBereichderTechnologieunaufhaltsamweiterzustreben,zuerforschenund
entdecken.
• Dreameestl'abréviationdel'entreprisechinoiseDreameTechnologyCo.etsesfiliales,quiestla
traductionphonétiquedunomchinoisdel'entreprise,reflétantlavisiondel'entreprisequiconsiste
àpoursuivre,exploreretrechercherconstammentlesavancéestechnologiques.
• Laparola"dreame"èl'abbreviazionedell'aziendaDreameTechnologyCo.,Ltd.edellesuefiliali
inCina.Èlatraslitterazionedelnomecinesedell'azienda"追觅",chedimostralacontinuaricerca,
esplorazioneevisionediricercadell'aziendanellatecnologia.
• Lapalabra"dreame"eslaabreviaturadeDreameTechnologyCo.,Ltd.ysussubsidiariasenChina.
Eslatransliteracióndelnombrechinode"Dreame",quesignificalucharporlaexcelenciaen
cadaesfuerzoyreflejalavisióndelacompañíadecontinuamentebuscar,explorareinvestigaren
tecnologás.
• Dreame—сокращённоеназваниекитайскойкомпанииDreameTechnologyCo.,Ltd.иее
дочернихпредприятий.Dreameявляетсятранслитерациейназваниякомпаниинакитайском
языке«追觅»,вкоторомотраженокорпоративноевидениекомпаниивсференаукии
технологий—непрерывныйпоиск,исследованияистремлениекуспеху.
• Słowo "dreame" to skrót od Dreame Technology Co., Ltd. i spółek w Chinach. Jest to transliteracja
chińskiej nazwy firmy " 追觅 " co oznacza dążenie do doskonałości w każdym przedsięwzięciu,
odzwierciedlając wizję firmy, jaką jest ciągłe prowadzenie, odkrywanie i poszukiwania w nauce i
technologii.
• Het woord "dreame" is de afkorting van Dreame Technology Co., Ltd. en haar dochterondernemingen
in China. Het is de transliteratie van de Chinese naam van het bedrijf "追觅", wat betekent streven naar
uitmuntendheid in elke inspanning en de visie van het bedrijf van continu nastreven, verkennen en
zoeken in technologie weerspiegelt.
追觅
קיתעת והז .Dreame Technology Co., Ltd. and its subsidiaries תיניסה הרבחה לש רצוקמה ומש וניה Dreame
םוחתב קסופ יתלב ןפואב ףורדלו שפחל הרבחה ןוזח תא וכותב שיחממו "追觅" יניסה םשה לילצ לע ססובמה
.היגולגונכטה
Formoreinformation&after-salessupport,contactusvia
aftersales@dreame.techorhttps://global.dreametech.com
Manufacturedby:DreameTrading(Tianjin)Co.,Ltd.
MadeinChina
VTV97A-EU-A00 02/2023

THANK YOU
FOR PURCHASING THIS DREAME
VACUUM CLEANER.
With it you are obtaining a high quality product that is engineered
for optimal performance. If you have any questions on the product,
please contact us: aftersales@dreame.tech.
RegistrationQuickStart
Welcome to register a Dreame account
by scanning the QR code.
You are available for the User Manual
and Special Oers.
User Manual
Benutzerhandbuch
Manuel d'utilisation
Manuale utente
Manual de usuario
Руководство пользователя
Instrukcja Obsługi
Gebruiksaanwijzing
1
24
47
70
93
116
139
162
185
207
EN
IT
DE
ES
PL
AR
FR
RU
NL
HE

1 2
ENEN Safety Instructions
Warning
• This product can be used by children aged from 8 years and above and persons with
physical, sensory, intellectual deficiencies, or limited experience or knowledge under
the supervision of a parent or guardian to ensure safe operation and to avoid any risk
of hazards. Cleaning and maintenance shall not be carried out by children without
supervision.
• The vacuum is not a toy. Children shall not play with or operate this product. Please
exercise caution when using the vacuum near children. Do not allow children to clean or
maintain the vacuum unless supervised by a parent or guardian.
• Do not use the vacuum outdoors or on wet surfaces. Only use the vacuum on dry indoor
surfaces. Do not touch the plug or any part of the vacuum with wet hands.
• To reduce the risk of fire, explosion, or injury, make sure that the lithium battery and
charging adapter are undamaged before use. Do not use the vacuum if either the lithium
battery or charger is damaged.
• The smart multi-surface brush, motorized mini-brush, battery, carbon fiber rod, and
vacuum are electrically conductive and should not be immersed in water or other liquid.
Make sure to dry all filters after cleaning.
• To prevent injury caused by moving parts, turn off the vacuum before cleaning the
smart multi-surface brush. The smart multi-surface brush, dust cup and filter must all be
properly installed before using the vacuum.
• Only use the original charging adapter. Never use an unoriginal adapter, as this may
cause the lithium battery to catch fire.
• Do not use the vacuum to pick up flammable or combustible liquids, such as gasoline, or
bleach, ammonia, drain cleaners or other liquids.
• Do not use the vacuum to pick up drywall particles, ashes like fireplace ash, or smoking
or burning materials such as coal, cigarette butts or matches.
• Check the area to be cleaned before use. To prevent the openings from being blocked,
clear the larger paper, spitball, plastic cloth or sharp objects (such as glass, nails, screws,
coins, etc.) and any object which is larger than openings.
• Keep hair, loose clothing, fingers and other parts of the body away from the vacuum's
openings and moving parts. Do not point the hose, wand or tools at your eyes or ears or
put them in your mouth.
• Do not put any object into the vacuum's openings. Do not use the vacuum with any
opening blocked. Keep free of dust, lint, hair, or other items which may reduce airflow.
• Do not lean the vacuum against a chair, table, or other unstable surface, as this may
cause damage to the machine or personal injury. If the vacuum becomes damaged or
is otherwise malfunctioning, please contact our authorized service department. Never
attempt to disassemble the device on your own.
• All instructions in the manual for recharging the battery must be strictly followed. Failure
to properly charge the battery within the specified temperature range could damage the
battery.
To prevent accidents including electric shock or fire caused by improper use, please read
this manual carefully before use and retain it for future reference.
We, Dreame Trading (Tianjin) Co., Ltd., hereby, declares that this equipment is in
compliance with the applicable Directives and European Norms, and amendments. The
full text of the EU declaration of conformity is available at the following internet address:
https://global.dreametech.com
For detailed e-manual, please go to https://global.dreametech.com/pages/user-manuals-
and-faqs
• Only use accessories and replacement parts recommended by the manufacturer.
• Make sure the vacuum is unplugged when not used for extended periods as well as prior
to performing any maintenance or repairs.
• Please be extra careful when using the vacuum to clean stairs.
• Do not install, charge, or use this product outdoors, in bathrooms, or around a pool.
• Fire Hazard Warning: Do not apply any type of fragrance to the vacuum's filter. These
types of products are known to contain flammable chemicals which may cause the
vacuum to catch fire.
• Only use the original charger (Model ZD024M340090EU). Failing to do so may cause the
lithium-ion battery to catch fire.
• Only use the approved battery type (Model P2033-8S1P-GYA). Failing to do so may cause
the lithium-ion battery to catch fire.
• If the battery material is released, remove personnel from area until the batteries cool
down and fumes dissipate.
• Provide maximum ventilation to clear out hazardous gases and avoid skin and eye contact
or inhalation of vapors.
• Remove spilled liquid with absorbent and incinerate waste.
• Do not use and store in extremely hot or cold environments (below 0℃ /32°F or above
40℃ /104°F). Please charge the cordless vacuum in temperature above 0℃ /32°F and
below 40℃ /104°F.
• This product is designed for home use only.

3 4
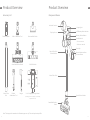
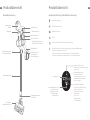
ENEN Product Overview
Component Names
Display Screen
Antistatic Contact
Carbon Fiber Rod
Release Button
Brush Release Button
Carbon Fiber Rod
Smart Multi-Surface
Brush
Charging Port
Dust Cup
LED Battery Status Indicator
On/Off Switch
• Press to turn on
• Release to turn off
Battery Release Button
Dust Cup Bottom Cover
Release Button
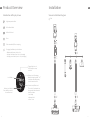
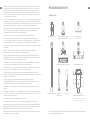
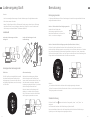
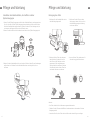
Product Overview
Accessory List
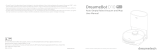
Note: The images in this manual are for illustrative purposes only. The actual product may differ.
2-in-1 Charging & Storage Mount
(Including screws ×2, wall plugs ×2, mounting
template sticker ×1)
Smart Multi-Surface Brush Soft Roller Brush
ChargerFlexible
Combination Tool
Carbon Fiber
Rod
Wide Combination ToolFlexible Adapter Motorized Mini-Brush

5 6
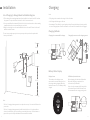
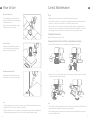
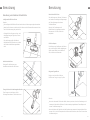
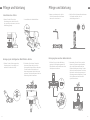
ENEN Installation
Vacuum Installation Diagram
Click
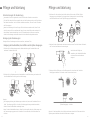
Product Overview
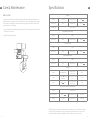
Introduction of Display Screen
Charging/Low Battery Level Indicator
• Blinking red: Battery level ≤ 10%
• Pulsing red: Battery level ≤ 10% (charging)
• Pulsing green: Battery level > 10% (charging)
Roller Brush Stuck
Air Duct Blocked
High-temperature Alert
Error
Filter uninstalled/Filter is expiring
Suction Level Switch
Lock Status
Press briefly to switch
the suction level.
Suction Level/Dust Level
Trigger Switch Lock
Press briefly to enter/
exit lock.
• Red: High
• Orange: Med
• Green: Low
The color of fan-shaped icon
changes with the amount of
dust in real time.
Battery Level Percentage
When the display shows "LO",
it indicates that the battery
level is lower than 10%.

7 8
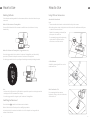
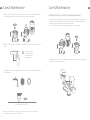
ENEN Charging
Note: Once the vacuum is fully charged, the
indicator will turn off after 5 minutes, and
the vacuum will enter energy-saving mode.
Charging the vacuum with the charger Charging the vacuum on the charging mount
Charging Methods
LED Battery Status IndicatorDisplay Screen
Battery Status Display
When charging, the indicators blink white.
When the charging is completed, the
indicators keep solid white.
The number on the display screen
represents the current battery level in a
percentage during charging. When the
number becomes 100, the battery is fully
charged.
• Fully charge the vacuum before using it for the first time.
• A full charge will take approx. 4 hours.
• Vacuuming in Turbo Mode for a prolonged period will cause the battery to heat up, which
increases charging time. Allow the vacuum to cool down for 30 minutes before charging it.
Note:
1
2
2-in-1 Charging & Storage Mount Installation Diagram
*30 cm: Leave enough space just in case you may need to purchase the replaceable
battery in the future.
1. The bottom of the mounting template sticker should be level and at least 115 cm from
the ground. The top should have at least 30 cm* of clearance above it.
2. Use a power drill with an 8 mm drill bit to drill a hole into each marker on the mounting
template sticker, then insert a wall plug into each hole.
3. Align the locating holes on the mount with the holes on the wall. Fasten it to the wall
with the included screws.
• The 2-in-1 charging & storage mount is an optional accessory. You can install it based on
your needs.
• The 2-in-1 charging & storage mount should be installed in a cool, dry place with an
electrical outlet nearby. Prior to installing, ensure that there are no electrical wires or
pipes in the space directly behind where the mount will be installed.
Note:
Installation
115 cm
30 cm

9 10
ENEN
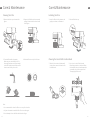
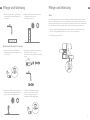
Using Different Accessories
Smart Multi-Surface Brush
- Suitable for vacuuming on the med/low
pile carpets, tiles and floors.
- For vacuuming large particles by turning
on the switch on the brush, such as
coffee beans, corn flakes and etc.
How to Use
• The smart multi-surface brush can be attached directly to the vacuum.
• When the appliance starts, the lights in front of the brush roller will automatically turn
on, which is convenient for use.
Note:
Soft Roller Brush
Suitable for cleaning hard floors such as
marble and floors.
Wide Combination Tool
For vacuuming dust from curtains,
keyboards, ceilings, sofas, vehicle interiors,
coffee tables, etc.
How to Use
Working Methods
• In this mode, briefly press the on/off switch to suspend the operation or start again and the
working mode of the vacuum will not change.
• Press the trigger switch lock again to quit Continuous Cleaning Mode.
Note:
Select from two working methods for the vacuum, which can be selected based on your
own needs.
Switching Suction Level
Press the button to switch levels between auto and turbo.
When in Turbo Mode, all fan-shaped icons will light up in white.
Only in Auto Mode, the suction level and the color of fan-shaped icon change with the
amount of inhaled dust.
Method 1: Discontinuous Cleaning Mode
Press and hold the switch of the vacuum to enable this mode, and release it to stop
immediately.
Method 2: Continuous Cleaning Mode (Trigger Switch Lock)
Press the trigger switch lock to switch to Continuous Cleaning Mode, and then briefly
press the on/off switch to keep the vacuum in Continuous Cleaning Mode.
Use the trigger switch lock to free your fingers from fatigue caused by holding the switch.

11 12
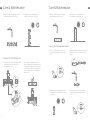
ENEN Care & Maintenance
Tips:
• Always use genuine parts to keep your warranty from becoming void.
• If the filter or nozzle becomes clogged, the vacuum will stop working shortly after being
turned on. To restore normal functions, clean the filter and/or nozzle.
• If the vacuum is not be used for an extended period, fully charge it, unplug its charger,
and store it in a cool, low-humidity environment away from direct sunlight. To avoid over-
discharging the battery, recharge the vacuum at least once every three months.
Cleaning the Vacuum
Wipe the vacuum with a soft dry cloth.
Note:
• The vacuum's cleaning ability will be reduced if the dust cup is filled to the "MAX" mark. To
regain performance, empty the dust cup in a timely manner.
• Before emptying the cup, make sure the vacuum is disconnected from the power, and do
not press its power button.
2. Push the dust cup release switch in the direction indicated by the arrow, then gently
remove the dust cup from the vacuum.
1. Press the dust cup bottom cover release button, then empty the contents.
2
1
1
Cleaning the Dust Cup, Pre-Filter, and Cyclone Assembly
How to Use
Note:
• If any rotating part becomes stuck, the vacuum may shut off automatically. Remove any
trapped objects so the device can function normally.
• When the battery becomes overheated, the vacuum will automatically shut off. Wait until
the battery temperature returns to normal, then the vacuum will work normally.
Flexible Adapter
Bending and extending the rod with one
click can easily reach under low-lying
furniture, such as bed and sofa.
Bendable and retractable brush-nozzle,
more exible to vacuum in narrow gaps.
Flexible Combination Tool
Motorized Mini-Brush
For vacuuming dirt, pet hair, and other
stubborn debris from sofas, bedding, and
other fabric surfaces.
Note: It is not recommended to vacuum
on fragile surfaces, such as silk.

13 14
ENEN
Installing the Dust Cup, Pre-Filter, and Cyclone Assembly
1. Insert the cyclone assembly vertically into the dust cup, and make sure that the handle
of the cyclone assembly line up with the slot on the left side of the dust cup. Turn the
handle clockwise until it locks, then ip the handle down.
2. Place the pre-lter with its front side facing up into the cyclone assembly.
3. Slightly tilt the dust cup so its slot aligns with the clip on the vacuum. Then gently push
the dust cup until it clicks into place.
3
1
2
3
Care & MaintenanceCare & Maintenance
3. Remove the pre-filter first, then lift the handle of the cyclone assembly and turn it
counterclockwise until it stops, then pull to lift out the cyclone assembly.
Note: It is recommended to clean the pre-filter at least once every 3 months and the
cyclone system at least once every 6 months.
1
2
3
Pre-FilterCyclone Assembly
4. Wipe the dust cup with a soft wet cloth. Pay attention to wring out the discloth before
using.
5. Rinse the cyclone assembly and pre-lter until they are clean. After washing, air dry for
at least 24 hours.
12
6
111
57
210
48
39 24 hrs
To reduce the risk
of electric shock, do
not rinse the dust
cup with water.

15 16
ENEN
2. Reinstall the dust cup.
Installing the Filter
1. Insert the lter into the vacuum and
gently press down, as illustrated.
Care & Maintenance
2. Use scissor to cut o the hairs and
bers that get stuck on the brush. Wipe
the dust from the notch and transparent
cover with a dry cloth or paper towel.
Thoroughly dry before use.
Cleaning the Smart Multi-Surface Brush
1. Turn the lock counterclockwise until
it stops, then remove the brush roller
from the brush.
4. Allow the filter to air dry for 24 hours.
12
6
111
57
210
48
39 24 hrs
Cleaning the Filter
3. Clean the lter with clean water.
Make sure you rotate the lter 360° to
thoroughly and remove all dust caught
in the lter. Lightly tap the lter several
times to remove any excess dirt.
• It is recommended to clean the filter once every 4 to 6 months.
• Only use clean water to wash the filter. Do not use detergent.
• Do not attempt to clean the filter with a brush or finger.
Note:
2. Remove the lter from the vacuum by
pulling it down in the direction shown
in the gure.
1. Remove the dust cup as shown in the
gure.
2
1
12
6
111
57
210
48
39 24 hrs
Care & Maintenance

17 18
ENEN
2. After unlocking the motorized mini-brush,
remove the brush roller, then rinse and
clean it.
4. Once the brush roller is dry, reinstall it
by following the disassembly steps in
reverse.
Cleaning the Motorized Mini-Brush
1. Use a coin as illustrated to rotate the
lock counterclockwise until you hear a
click.
3. Stand the brush roller upright in a well-
ventilated area for at least 24 hours until
it is fully dry.
Care & Maintenance
3. When it is dirty, rinse the brush roller
with clean water until it is clean.
4. Stand the brush roller upright for at
least 24 hours until it is fully dry.
12
6
111
57
210
4
3
8
924 hrs
12
6
111
57
210
4
3
8
924 hrs
Care & Maintenance
4. Stand the brush roller upright for at
least 24 hours until it is fully dry.
3. When it is dirty, rinse the brush roller
with clean water until it is clean.
Cleaning the Soft Roller Brush
1. As shown in the picture, press the brush
roller release button to remove the
roller from the slot.
2. Use scissors to cut o the hairs and
bers that get stuck on the brush roller
and the wheels. Wipe the dust from the
notch and transparent cover with a dry
cloth or paper towel. Thoroughly dry
before use.
12
6
111
57
210
4
3
8
924 hrs

19 20
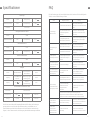
ENEN Specifications
The lithium-ion pack contains substances that are hazardous to the environment. Before
disposing of the vacuum, please remove the battery pack, then discard or recycle it in
accordance with local laws and regulations of the country or region it is used in.
Vacuum
Model VTV97A Charging Voltage 34 V
Rated Power 570 W Rated Voltage 29.6 V
Charging Time Approx. 4 hours
Smart Multi-Surface Brush
Model VMB9
Rated Power 40 W Rated Voltage 25.2 V
Soft Roller Brush
Model ASF4
RatedPower 40W RatedVoltage 25.2 V
Motorized Mini-Brush
Model VMM4
Rated Power 20 W Rated Voltage 25.2 V
Charger
Model ZD024M340090EU Average Active
Eciency 87.01%
Input 100 - 240 V 50-60 Hz,
0.8 A max
Eciency at Low Load
(10%) 77.01%
Output 34 V 0.9 A No-load Power
Consumption 0.1 W
Rechargeable Lithium-ion Battery Pack
Model P2033-8S1P-GYA
Nominal Voltage 29.6 V Nominal Capacity 2900 mAh
Energy 81.4 Wh Rated Capacity 2750 mAh
Battery Pack
The vacuum contains a removable rechargeable lithium-ion battery pack which has a
limited number of recharge cycles. After extended use, the battery pack may no longer
hold a charge. If this happens, it means the battery pack has reached the end of its life
cycle and needs to be replaced.
1. Press down the battery pack release button and slide the battery pack to the right, as
illustrated, to remove it.
2. Install the new battery pack.
Care & Maintenance
1

21 22
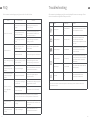
ENEN Troubleshooting
If the vacuum is not working properly, the screen display will show an error message. Please
refer to the troubleshooting table to find your solution.
Error Icon Status Error Message Solutions
Blinking Red High-temperature
Alert
Please wait and continue to use after
motor temperature is normal.
Blinking Orange Roller brush stuck
Refer to the maintenance guide
[Cleaning the Smart Multi-Surface
Brush] section to clean the fiber
material and hairs wrapped around the
brush roller.
Blinking Orange Air Duct Blocked
Check whether the dust cup, carbon
fiber rod, and smart multi-surface
brush are blocked.
Blinking Orange Filter is expiring
Please replace the filter in time. After
replacing the filter, press and hold the
trigger switch lock for 3 seconds to
reset the filter.
Solid Orange Filter uninstalled Ensure that the filter and pre-filter are
installed correctly.
Solid Red Error Please contact the after-sales
department for maintenance.
If one of the error codes from E0 to E4 appears on the display, please contact the after-sales
service team for repair.
FAQ
If the vacuum is not working properly, please refer to the table below.
Errors Possible Causes Solutions
Vacuum does not work.
Vacuum is out of battery or low
on power.
Fully charge the vacuum, then
continue to use it.
Overheat protection mode
triggered by a blockage.
Clean the suction openings or air
duct. Wait until the vacuum cools
down, then reactivate it.
Suction opening or air duct is
blocked.
Clear any blockage from suction
opening or air duct.
Weak suction force.
Dust cup is full and/or lter
assembly is clogged.
Empty the dust cup and clean the
lter assembly.
Attachment is blocked. Clear any blockage in the attachment.
Motor is making a strange
noise.
Main suction opening or carbon
ber rod is blocked.
Clear any blockage in the main
suction opening or extension rod.
The rst indicator is
red after turning on the
vacuum.
Battery pack is damaged. Please contact the after-sales service
department for maintenance.
The rst indicator blinks
red when charging the
vacuum.
The charger is incompatible. Only use the original charger to
charge the vacuum.
The battery indicator
does not light when
charging.
The charger does not plug into
the vacuum well.
Check whether the charger is properly
plugged into the vacuum.
The battery is fully charged and
went into sleep mode. The vacuum can be used normally.
If the problem persists after ruling out the above two possibilities,
please contact the after-sales service department for maintenance.
The vacuum charges
slowly.
Battery temperature is too low
or too high.
Wait until the battery's temperature
returns normal, then continue to use
the vacuum.
LED lights of the smart
multi-surface brush do
not work.
LED lights are damaged. Please contact the after-sales
department for maintenance.

24
DE
23
EN Sicherheitshinweise
Warnung
• Dieses Produkt kann von Kindern im Alter ab acht Jahren und von Personen mit
physischen, sensorischen und intellektuellen Einschränkungen oder begrenzter
Erfahrung oder Wissen benutzt werden, dies muss jedoch unter Aufsicht von Eltern
oder einer Aufsichtsperson erfolgen, um einen sicheren Betrieb zu gewährleisten und
Gefahren auszuschließen. Eine Wartung und Reinigung durch Kinder darf nur unter
Aufsicht erfolgen.
• Der Staubsauger ist kein Spielzeug. Kinder dürfen mit dem Produkt nicht spielen oder
es benutzen. Seien Sie bei der Benutzung des Staubsaugers in der Nähe von Kindern
bitte vorsichtig. Gestatten Sie es Kindern keinesfalls, den Staubsauger zu reinigen oder
zu warten, außer unter Aufsicht eines Elternteils oder Vormunds.
• Der Staubsauger darf nicht im Freien oder auf nassen Oberflächen benutzt werden.
Der Staubsauger darf nicht mit nassen Händen berührt werden.
• Um das Risiko von Bränden, Explosionen und Verletzungen zu mindern, prüfen Sie vor
der Benutzung bitte den Lithium-Akku und das Ladegerät auf Beschädigungen. Der
Staubsauger darf nicht benutzt werden, wenn der Lithium-Akku oder das Ladegerät
beschädigt ist.
• Die intelligente Multiflächen-Bürste, die motorisierte Minibürste, der Akku, der
Kohlefaserstab und der Staubsauger sind elektrisch leitfähig und sollten nicht in
Wasser oder andere Flüssigkeiten getaucht werden. Achten Sie darauf, alle Filter nach
der Reinigung zu trocknen.
• Um Verletzungen durch bewegliche Teile zu vermeiden, schalten Sie den Staubsauger
aus, bevor Sie die intelligente Multiflächen-Bürste reinigen. Die intelligente
Multiflächen-Bürste, der Staubbehälter und der Filter müssen vor der Inbetriebnahme
des Staubsaugers ordnungsgemäß installiert sein.
• Benutzen Sie ausschließlich das Original-Ladegerät. Die Benutzung eines nicht
originalen Ladegerätes kann zu einer Entzündung des Lithium-Akkus führen.
• Der Staubsauger darf nicht benutzt werden, um brennbare oder entzündliche
Flüssigkeiten wie Benzin, Bleiche, Ammoniak, Abflussreiniger oder andere
Flüssigkeiten aufzusaugen.
• Der Staubsauger darf nicht benutzt werden, um Gipspartikel, Asche (z. B. Kaminasche)
oder Rauch- oder Brennmaterialien wie Kohle, Zigarettenstummel oder Streichhölzer
aufzusaugen.
• Der Staubsauger darf nicht benutzt werden, um scharfe oder harte Objekte wie Glas,
Nägel, Schrauben oder Münzen aufzusaugen, da dies zu Schäden am Gerät führen
kann.
• Halten Sie Haare, lose Kleidung, Finger und andere Körperteile von den Öffnungen
des Staubsaugers und den beweglichen Teilen fern. Der Schlauch, das Rohr und das
Werkzeug dürfen nicht auf Augen oder Ohren gerichtet werden oder in den Mund
genommen werden.
Um zu vermeiden, dass es durch unsachgemäße Benutzung zu Stromschlägen oder
Bränden kommt, sollten Sie dieses Handbuch vor der Benutzung sorgfältig durchlesen
und es aufbewahren, um künftig nachschlagen zu können.
WEEE Information
All products bearing this symbol are waste electrical and electronic equipment
(WEEE as in directive 2012/19/EU) which should not be mixed with unsorted
household waste. Instead, you should protect human health and the
environment by handing over your waste equipment to a designated collection
point for the recycling of waste electrical and electronic equipment, appointed
by the government or local authorities. Correct disposal and recycling will help
prevent potential negative consequences to the environment and human health.
Please contact the installer or local authorities for more information about the
location as well as terms and conditions of such collection points.

25 26
DEDE Produktübersicht
Zubehörliste
Hinweis: Die Abbildungen in diesem Handbuch dienen nur als Referenz, bitte beziehen Sie
sich auf das tatsächliche Aussehen.
2-in-1 Lade- und
Aufbewahrungshalterung
(einschließlich 2 x Schrauben, 2 x Dübel und
Montagevorlage-Aufkleber)
Intelligente Multiflächen-Bürste Weiche Walzenbürste
LadegerätBiegsame
Fugenbürste
Karbonfaserstange
Eine große Anzahl an
Werkzeugkombination
Flexibler Adapter Motorisierte
Mini-Bürste
Wir, Dreame Trading (Tianjin) Co., Ltd., bestätigen hiermit, dass dieses Gerät mit
dengeltenden Verordnungen und europäischen Normen sowie etwaigen Ergänzungen
inEinklang steht. Der vollständige Wortlaut der EU-Konformitätserklärung ist unter der
folgenden Internetadresse abrufbar: https://global.dreametech.com
Ein detailliertes elektronisches Handbuch finden Sie unter https://global.dreametech.
com/pages/user-manuals-and-faqs
• Stecken Sie keine Gegenstände in die Öffnungen des Staubsaugers. Der Staubsauger
darf nicht genutzt werden, wenn eine Öffnung blockiert ist. Er muss frei von Staub,
Flusen,Haaren und anderen Gegenständen gehalten werden, die den Luftstrom
behindern könnten.nicht genutzt werden, wenn eine Öffnung blockiert ist. Er muss
frei von Staub, Flusen,Haaren und anderen Gegenständen gehalten werden, die den
Luftstrom behindern könnten.
• Lehnen Sie den Staubsauger nicht gegen Stühle, Tische oder andere instabile Flächen,
da dies zur Schäden am Gerät oder Verletzungen führen kann. Falls der Staubsauger
durch Umkippen beschädigt wird oder sonst defekt ist, wenden Sie sich bitte an unsere
autorisierte Serviceabteilung. Versuchen Sie nie, das Gerät selbst zu zerlegen.
• Beim Aufladen des Akkus sind alle Anweisungen in dieser Anleitung strikt zu befolgen.
Wenn bei der Aufladung des Akkus der angegebene Temperaturbereich nicht
eingehalten wird, kann der Akku beschädigt werden.
• Verwenden Sie nur vom Hersteller empfohlenes Zubehör und Ersatzteile.
• Stellen Sie sicher, dass der Staubsauger nicht mit dem Stromnetz verbunden ist,
wenn Sie ihn über längere Zeit nicht benutzen. Der Staubsauger muss außerdem vom
Stromnetz getrennt werden, bevor Wartungs- und Reparaturarbeiten erfolgen.
• Bitte seien Sie besonders vorsichtig, wenn Sie den Staubsauger zur Treppenreinigung
verwenden.
• Dieses Produkt darf nicht im Freien, in Badezimmern oder in der Nähe eines
Schwimmbeckens benutzt, installiert oder geladen werden.
• Warnung vor Brandgefahr: auf den Filter dürfen keinesfalls Duftstoffe jeglicher Art
aufgetragen werden. Diese Art von Produkten enthält häufig brennbare Chemikalien,
diedazu führen könnten, dass das Gerät Feuer fängt.
• Verwenden Sie nur das Original-Ladegerät (Modell ZD024M340090EU). Andernfalls
kann es zu einer Entzündung des Lithium-Ionen-Akkus kommen.
• Verwenden Sie nur den zugelassenen Akkutyp (Modell P2033-8S1P-GYA). Andernfalls
kann es zu einer Entzündung des Lithium-Ionen-Akkus kommen.
• Sorgen Sie dafür, dass sich während der Freisetzung des Batteriematerials keine
Personen in unmittelbarer Nähe befinden, bis die Batterien abgekühlt sind und sich die
Dämpfe verflüchtigt haben.
• Stellen Sie sicher, dass der Bereich bestmöglich belüftet ist, damit sich
gesundheitsgefährdende Gase schnell verflüchtigen können und der Haut- und
Augenkontakt sowie das Einatmen von Dämpfen vermieden wird.
• Entfernen Sie die verschüttete Flüssigkeit mit Absorptionsmittel verbrennen Sie die
Abfälle.
• Verwenden und lagern Sie es nicht in extrem heißen oder kalten Umgebungen (unter
0℃ /32°F oder über 40℃ /104°F). Laden Sie bei einer Ladetemperatur von 0°C bis 40°C
mit dem Original-Netzadapter.
• Das Produkt ist nur für den Heimgebrauch bestimmt.

27 28
DEDE Produktübersicht
Funktionseinführung in die Bildschirmanzeige
Kontrollleuchte für den Ladevorgang und den niedrigen Akkuladestand
• Blinkt Rot: Akkuladestand ≤ 10%
• Langsam rot blinkend: Akkuladestand ≤ 10% (Beim Aufladen)
• Langsam grün blinkend: Akkuladestand > 10% (Beim Aufladen)
Die Rollbürste sitzt fest
Luftkanal blockiert
Batterieüberhitzung
Fehler
Filter deinstalliert/Der Filter läuft bald ab expiring
Geschwindigkeitsregler
Sperrzustand
Kurz drücken, um
die Betriebsposition
des Staubsaugers
umzuschalten
Ansaugstufe/Staubstufe
Auslöseschalter-Schloss
Anklicken, um den Arbeitsmodus
zu wechseln
• Rot: Hoch
• Orange: Mittel
• Grün: Niedrig
Die Farbe des lüfterförmigen
Symbols ändert sich
in Echtzeit je nach der
Staubmenge.
Akkuladestandprozent
Wenn die Anzeige „LO“
anzeigt, bedeutet dies, dass
der Akkuladestand weniger
als 10 % beträgt.
Produktübersicht
Bauteilbezeichnung
Bildschirm
Antistatischer
Kontakt
Karbonfaserstangen-
Entriegelungsknopf
Eentriegelungstaste
für Bürsten
Karbonfaserstange
Intelligente
Multiflächen-Bürste
Ladeanschluss
Staubbehälter
Akkustandanzeige
Ein-/Aus-Schalter
• Zum Einschalten drücken
• Zum Ausschalten loslassen
Akkufreigabetaste
Freigabetaste der
Staubbehälter-
Bodenabdeckung

29 30
DEDE
115 cm
30 cm
Installation der 2-in-1 Lade- und Aufbewahrungshalterung
*30 cm: Leave enough space just in case you may need to purchase the replaceable
battery in the future.
1. Der untere Rand des Montagevorlage-Aufklebers sollte mindestens 115 cm über dem
Boden und parallel zum Boden sein, und über dem oberen Rand sollte mindestens
30 cm Platz sein.
2. Verwenden Sie eine Bohrmaschine mit einem 8-mm-Bohrer, um ein Loch in jede
Lochmarkierung auf dem Montageschablone-Aufkleber zu bohren, und setzen Sie
dann in jedes Loch einen Dübel ein.
3. Richten Sie die Befestigungslöcher der 2-in-1 Lade- und Aufbewahrungshalterung
mit den Löchern an der Wand aus und befestigen Sie die Halterung dann mit den
mitgelieferten Schrauben an der Wand.
• Die 2-in-1 Lade- und Aufbewahrungshalterung ist ein optionales Zubehörteil, das Sie
nach Ihrem persönlichen Bedarf montieren können.
• Die 2-in-1 Lade- und Aufbewahrungshalterung sollte an einem kühlen, trockenen
Ort in der Nähe einer Steckdose installiert werden. Vor der Installation sollten Sie
sicherstellen, dass sich in dem Raum direkt hinter der Wandoberfläche, an der die
Halterung installiert werden soll, keine Kabel oder Drähte befinden.
Hinweis:
InstallationInstallation
Installation des Zubehörs am Staubsauger
Hineinstecken, bis ein Klick ertönt

31 32
DEDE Benutzung
Reinigungsmodus
• Im kontinuierlichen Modus leuchtet die Verriegelungsanzeige konstant.
• Klicken Sie erneut auf das Auslöseschalter-Schloss, um den kontinuierlichen
Reinigungsmodus zu beenden.
Hinweis:
Es gibt zwei Betriebsarten für den Staubsauger, die nach Ihren eigenen Bedürfnissen
ausgewählt werden können.
Stufenschaltung
Drücken Sie die Taste , um zwischen den Saugstufen „Auto“ und „Turbo“ zu
wechseln.
Im Turbomodus leuchten alle lüfterförmigen Symbole weiß.
Nur im Auto-Modus ändern sich die Saugstärke und die Farbe des lüfterförmigen
Symbols je nach der Menge des eingesaugten Staubs.
Modus 1: Diskontinuierlicher Reinigungsmodus
Halten Sie den Schalter des
Staubsaugers gedrückt, um den
Betrieb aufzunehmen, und lassen Sie
ihn los, um sofort zu stoppen.
Modus 2: Kontinuierliche Reinigungsmodus (Auslöseschalter-Schloss)
Drücken Sie bei laufendem Gerät auf die Auslöseschalter-Schloss um in den
kontinuierlichen Reinigungsmodus zu wechseln. Lassen Sie dann den ein/aus Schalter
los, um den Staubsauger im kontinuierlichen Modus reinigen zu lassen. Verwenden
Sie die Auslöseschalter-Schloss, um Ihre Finger zu entlasten und einer Ermüdung Ihrer
Finger durch das Gedrückthalten des Schalters zu vermeiden.
Ladevorgang läuft
Hinweis: Wenn der Staubsauger voll
geladen ist, schaltet sich die Anzeige
nach 5 Minuten ab und das Gerät wird in
den Energieeinsparmodus versetzt.
Laden des Staubsaugers mit dem
Ladegerät
Laden des Staubsaugers in der
Ladehalterung
Lademodi
AkkustandanzeigeBildschirm
Anzeigen der Leistungsmodi
Die Zahl auf dem Anzeigebildschirm stellt
den aktuellen Akkustand während des
Ladevorgangs in Prozent dar. Der Akku ist
vollständig aufgeladen, wenn die Anzeige
auf 100 steht.
• Vor der erstmaligen Benutzung sollte der Staubsauger voll aufgeladen werden.
• Dies dauert etwa 4 Stunden.
• Wenn Sie über längere Zeit im Turbomodus Staub saugen, kann dies zur Erhitzung
des Akkus führen, was eine längere Ladezeit zur Folge hat. Lassen Sie daher den
Staubsauger vor dem Aufladen 30 Minuten abkühlen.
Hinweis:
1
2
Während dem Ladevorgang blinken
die drei Anzeigen und leuchten dann
immer wieder nacheinander hell auf, um
den Ladestand anzuzeigen. Wenn der
Ladevorgang abgeschlossen ist, leuchten
die drei Anzeigen dauerhaft auf.

33 34
DEDE Benutzung
Hinweis:
• Wenn ein rotierendes Teil stecken bleibt, kann es passieren, dass der Staubsauger sich
automatisch abschaltet. Entfernen Sie dann etwaige eingeklemmte Fremdkörper und
setzen Sie die Benutzung fort.
• Wenn der Motor sich überhitzt, wird der Staubsauger automatisch ausgeschaltet. Bitte
warten Sie, bis sich die Temperatur des Akkus normalisiert hat, und setzen Sie erst dann
die Benutzung fort.
Flexibler Adapter
Durch Biegen und Verlängern des Rohres
mit nur einem Klick, können tiefgelegene
Stellen unter Möbeln, sowie Bett und
Sofa, einfach erreicht werden.
Biegbare und einziehbare Bürsten,
exibler zum Saugen in engen Spalten.
Biegsame Fugenbürste
Motorisierte Mini-Bürste
Zum Aufsaugen von Schmutz, Tierhaaren
und anderen hartnäckigen Ablagerungen
auf Sofas, Bettzeug und anderen
Textiloberflächen.
Hinweis: Das Staubsaugen auf
Oberflächen, die eingezogen werden
könnten wie z. B. Seide, wird nicht
empfohlen.
Benutzung verschiedener Zubehörteile
Intelligente Multiächen-Bürste
- Geeignet für das Saugen von kurz- und
mittellanghaarigen Teppichen, Fliesen
und Böden.
- Zum Aufsaugen großer Partikel wie
Kaffeebohnen, Maisflocken usw., indem
der Schalter an der Bürste umgeschaltet
wird.
Benutzung
• Die intelligente Multiflächen-Bürste kann direkt am Staubsauger angebracht werden.
• Wenn das Gerät startet, schalten sich die Lichter vor der Bürstenrolle automatisch ein,
was für die Benutzung sehr praktisch ist.
Hinweis:
Weiche Walzenbürste
Geeignet für die Reinigung von
Hartböden wie Marmor und Parkett.
Eine große Anzahl an Werkzeugkombination
Zum Saugen von Vorhängen, Sofas,
Fahrzeuginnenräumen, Couchtischen usw.
Page is loading ...
Page is loading ...
Page is loading ...
Page is loading ...
Page is loading ...
Page is loading ...
-
 1
1
-
 2
2
-
 3
3
-
 4
4
-
 5
5
-
 6
6
-
 7
7
-
 8
8
-
 9
9
-
 10
10
-
 11
11
-
 12
12
-
 13
13
-
 14
14
-
 15
15
-
 16
16
-
 17
17
-
 18
18
-
 19
19
-
 20
20
-
 21
21
-
 22
22
-
 23
23
-
 24
24
-
 25
25
-
 26
26


Ask a question and I''ll find the answer in the document
Finding information in a document is now easier with AI
in other languages
- Deutsch: DREAME R20 Benutzerhandbuch
Related papers
Other documents
-
 DreameTech T30 User manual
-
 DreameTech T10 Cordless Vacuum Cleaner User manual
-
Xiaomi 1C User manual
-
Mi Handheld Vacuum Cleaner 1С (SCWXCQ02ZHM) User manual
-
Oneida Air Systems XSK Template
-
DreameTech H11 User manual
-
 DreameTech DreameBot D10 Plus User manual
-
-
-


