Page is loading ...

AimSafety
PM150-CO
2
Personal Single Gas Monitor
Quick Start Guide
Please refer to the PM150-CO2 User Manual for
additional product information and features.
www.aimsafety.com
AimSafety Contact Information
Technical Support
Monday - Friday 8:00 AM to 5:00 PM Central (US) time
Email: support@aimsafety.com
Phone (toll-free): 1-844-325-3050
World Headquarters
1504 W 51st Street,
Sioux Falls, SD 57105, USA
Phone: 1-877-367-7891
Fax: 1-605-951-9616 Rev.: B
WARNINGS
• Any unauthorized attempt to repair or modify the product, or any other cause of
damage beyond the range of the intended use, including damage by fire,
lightning, or other hazard, voids liability of the manufacturer.
• Activate this product only if sensor, display screen, and audible cover are clear
from contaminants such as dirt and debris that could block the area where gas is
to be detected.
• To prevent static electricity build-up, do not clean or rub the LCD screen of the
• product with a dry cloth or hands while in a hazardous environment.
• Perform cleaning and maintenance of the products in fresh air that is free of
hazardous gases.
• Test the response of the sensor regularly with a gas concentration exceeding the
alarm set point.
• Test LED, buzzer, and vibration manually.
• Gas concentration measurements from the sensor can vary based on the
environment (temperature, pressure, and humidity). Therefore, calibration of
PM150-CO2 should be performed in the same (or similar) environment of the
device’s actual use.
• If the temperature changes sharply during use of the device (e.g., indoors vs
outdoors), the value of the measured gas concentration can suddenly change.
Please use the PM150-CO2 after the gas concentration value has stabilized.
• Severe vibration or shock to the device may cause a sudden reading change.
Please use PM150-CO2 after the value of gas concentration has stabilized.
Excessive shock to PM150-CO2 can cause the device and/or sensor malfunction.
• All alarm values are set based on the alarm standard that is required by
international standards. Therefore, alarm values should be changed only under
the responsibility and approval of the administration of the work site where the
instrument is used.
• Replace the battery and sensor in a clean environment that is free of hazardous
gas.
• If the CO2 concentration reaches 0 ppm, calibration should be performed.
CAUTIONS
• Before operating this device, please read the manual carefully.
• This device is not a measurement device, but a gas detector.
• If calibration and self-test fails continuously, please do not use the device.
• Perform a calibration every 30 days in a fresh air environment.
• Before use, please check the activation date. If the activation date has passed,
please do not use the device.
• Clean detectors with a soft cloth and do not use chemical substances for
cleaning.
• View the serial number on the label at the back side of the device.
(ex, SL0101001)
ex) SL 01 01 001 2021(Year) 01(Months) 01(Day) 001(Manufacture Order)
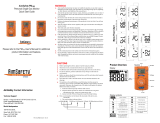
Product Overview
Display Symbols
Home Screen Navigation
Press the Function Key to
advance through the screens
Scan this QR code to view the product
page for the AimSafety PM150-CO2
Access the User Manual, Replacement
Parts, Accessories list and more!

Powering Up
1. Press and hold down the power button for approximately two seconds until “boot”
is displayed.
2. Release the power button.
3. Upon activation, the gas type (CO2), firmware version, and display appears, and the
detector performs the self-diagnostic test for 10 seconds.
4. After self-test is successful, the detector countdown is displayed for 10 seconds.
Allow the detector to stabilize for 90 seconds until warm up message (---) is no
longer displayed.
5. The detector then displays current CO2 concentration.
Note: Sensor readings may drift during shipping. All newly purchased monitors
should be bump tested to a known concentration of gas before use.
Powering Down
1. From the Measurement screen, press and hold down the power button for
approximately two seconds. A three-second countdown timer displays.
2. Continue to hold down the power button until the display turns off.
Charging
The PM150 charges via a USB Type-C connection. A power transformer and USB to
USB-C cable are included. To charge the battery:
1. Insert the USB cable into the transformer.
2. Plug the transformer into a standard wall socket.
3. Plug the USB-C connector into the PM150 charger port located on the bottom of
the monitor under the sensor inlet.
4. The battery meter appears on the right side of the display and repeatedly cycles
upward to the top. The LEDs flash.
5. The device is fully charged when the battery display reaches the top and stops
cycling. The time to charge the battery depends on the battery level.
Note: Only charge the unit in a non-hazardous environment.
Bump Test
A bump test should be conducted before each day’s use.
Ensure that you are in a clean environment before performing a Bump Test. The
monitor must be calibrated if it fails a Bump Test.
To perform a manual Bump Test (without the Bump Test Reminder active):
A bump test requires a gas concentration that is above both the low and high alarm levels.
To perform the bump test, follow the steps below:
• Press and hold the Function key and power button for three seconds in the
measurement mode.
• Press the Function key until “TEST” is displayed and press the power button two
seconds to enter the mode.
• Press the Function key until “BTS is displayed and press the power button to activate
it.
• After pressing the power button, apply the CO2 gas. Once gas is detected, a 30
second count down will start on the display.
• Once the test passes, “SUC” and the (V) icon will appears on the display. If test fails,
“FA” and the (X) icon will appear on the display.
Calibration
To access the calibration menu:
In the setting mode, users can adjust setpoints, perform calibration and reset previous values.
To enter the setting mode, press and hold the Function key & power button simultaneously for
three seconds.
The following menu ALr → CAL → Clr MAX → Clr STEL, TWA → Unit → Init →Test is
displayed. To move to the Cal menu, press the Function key. To enter the Cal menu, press and
hold down the power button.
To exit the calibration menu:
• Press the Power button once to return to the main screen.
Fresh Air Calibration
Fresh Air Calibration must be performed in a clean environment that is free from
other gases. Calibration is assumed to be performed in an environment with an
Oxygen concentration of 20.9% Vol.
To Perform a Fresh Air calibration
• In the “CAL” mode, press the Function key to move to the “ZERO(N2)” calibration.
• Attach the calibration cap to the detector and connect the calibration cylinder with N2
(99.9%vol) gas.
• Press the power button and release the N2 gas.
• After 90 seconds, when N2 calibration is successful, (V) icon appears. But, If N2
calibration failed, (X) icon appears.
Span Calibration
When performing a Span Calibration only use certified calibration gas at the
required concentration level. Do not use expired calibration gas.
To perform a Span calibration
• In the calibration mode, press the Function key to move to span calibration.
• Attach the calibration cap to the detector and connect the calibration cylinder with
CO2 (20,000 ppm)
• Press the power button and release CO2 gas.
• After 90 seconds, when the calibration is successful, the (V) icon appears. If N2
calibration fails, fail (X) icon appears.
If calibration continues to fail, contact AimSafety Technical support at 844-325-3050.
To perform the self-diagnostic test, follow below steps.
1. Press the Function key until Test is displayed
2. Press the power button for three seconds. In the “SELF” display, press the
power button for three seconds to activate the self-test. Once the test is
activated, the detector will test LED, beep, vibration, flash memory, and
sensor.
3. After the successful test, V icon is displayed.
4. If the test fails, FA icon and the X icon are displayed.
The detector stores the last 30 event logs. If the data is filled, the new log event overwrites the
oldest log event. Data logs consisting of event log, bump, and calibration events are stored in
one-minute intervals and the unit can store up to 64,000 logs.
To transfer event logs and data logs to a computer, follow below steps. Install the latest
AimSafety CO2 USB link software from the website (www.macurco.com). Connect the detector
with a computer via a USB-C cable. *Refer to the User’s Manual for more information.
Alarm indication chart
Self-Test
Adjusting Alarm Setpoints
Data Log
User Interface
Menu Navigation
/