Zebra SB1 User guide

Type
User guide

Zebra SB1 is a compact, affordable smart badge that combines 1D/2D bar code scanning, push-to-talk voice communication, and task management capabilities in a single device. With the SB1, retail associates can quickly respond to customer requests, check prices, and manage tasks, improving productivity and customer satisfaction. The SB1 is also equipped with a user-friendly interface, a long-lasting battery, and wireless connectivity options for easy integration with existing systems.

Zebra SB1 is a compact, affordable smart badge that combines 1D/2D bar code scanning, push-to-talk voice communication, and task management capabilities in a single device. With the SB1, retail associates can quickly respond to customer requests, check prices, and manage tasks, improving productivity and customer satisfaction. The SB1 is also equipped with a user-friendly interface, a long-lasting battery, and wireless connectivity options for easy integration with existing systems.

SB1
SALES DEMO
USER GUIDE
2
Zebra reserves the right to make changes to any product to improve reliability, function,
or design.
Zebra does not assume any product liability arising out of, or in connection with, the
application or use of any product, circuit, or application described herein.
No license is granted, either expressly or by implication, estoppel, or otherwise under
any patent right or patent, covering or relating to any combination, system, apparatus,
machine, material, method, or process in which Zebra products might be used. An
implied license exists only for equipment, circuits, and subsystems contained in Zebra
products.
Service Information
If you have a problem using the equipment, contact your facility’s Technical or Systems
Support. If there is a problem with the equipment, they will contact the Zebra Global
Customer Support at: http://www.zebra.com/support.
3
Introduction
Retailers are faced with shoppers who have higher expectations and more knowledge
at their fingertips than ever before. Meeting their needs and turning shoppers into
buyers requires every worker in the store to respond quickly to any customer request.
And with the SB1 smart badge, they can. This compact wearable mobile device can
serve as an electronic identity badge, a 1D/2D bar code scanner, a push-to-talk voice
communicator, a task manager and more, in a single affordable and lightweight mobile
device that is priced so retailers can purchase one for every worker. Today, over 90
percent of the retail workforce has no wireless connection to retail data, to co-workers
or to managers. With the SB1, every worker in your operation is connected to the
people and information required to exceed shopper expectations, complete tasks and
maximize productivity.
This guide provides information for demonstrating the functionality of the SB1.
Start Up
Place the SB1 in a powered cradle to turn it on. Allow the SB1 to fully charge.
Remove the SB1 from the cradle. The Home screen displays. Refer to the SB1 User
Guide for information on using the Home screen.
The SB1 is pre-loaded with a number of applications. Touch to open the
Applications screen.
Notifications Lock
User Profile
Applications Settings
4
The Applications screen has the following applications:
RD Client - Use to stage the SB1 for initial use by initiating the deployment of
settings, firmware and software. Refer to the SB1 Integrator Guide for detailed
information.
Demo-MWM - use to demonstrate the functionality of the SB1. See MWM DEMO on
page 8 for more information.
Demo-Scan - use to demonstrate the SB1 scanning functionality. See SCAN DEMO
on page 7 for more information.
Wireless - use to setup the SB1 to connect to a WLAN. Refer to the SB1 Integrator
Guide for detailed information.
FTP Client - use to copy files to the SB1 using a local ftp connection.Refer to the
SB1 Integrator Guide for detailed information.
Setting Name and Title
Use the Profile screen to set the user name and user title, sign out of the SB1 and
switch devices.
Press the Home button to display the Home screen on the side of the device.
Touch . The Profile screen appears.
5
To enter user name:
1. In the Profile screen, touch the top text box. The Enter Name screen appears.
2. Press the keypad keys to enter the user name.
Use to create capital letter.
Touch to display the numeric keypad.
Touch to display special character keypad.
To create the letter c, quickly touch three times.
Use to delete the last character in the text box.
3. Touch to save the name.
To enter user title:
1. In the Profile screen, touch the lower text box. The Enter Title screen appears.
Title Text Box
Name Text Box
6
2. Press keypad keys to enter the user title.
Use to create capital letter.
Touch to display the numeric keypad.
Touch to display special character keypad.
To create the letter c, quickly touch three times.
Use to delete the last character in the text box.
3. Touch to save the user title.
7
SCAN DEMO
The Scan Demo is a Price Check demo that uses predefined bar codes and provides a
picture of the item, price and other info. This is a good way to showcase how well the
bar code reading function works while demonstrating how a retail associate can use it
to assist shoppers with a price check or inventory lookup task.
1. Touch > . The Price Check screen appears.
2. Aim the exit window at the bar code.
3. Press the Scan button and scan one of the bar code on page 31. Ensure the red
illumination covers the entire bar code. The LED Indicator illuminates red to
indicate that the illumination is on. The LED Indicator turns green and a beep
sounds to indicate a successful decode.
4. Upon successful decode the corresponding product information screen displays.
5. Press the Back button to return to the main Price Check screen.
LED
8
MWM DEMO
The MWM Demo starts with a user logging on (any scan or numeric works), followed by
the display of an inbox that includes four tasks. As you go through each task, you
accept and complete the task. Once its completed, the task is removed from the inbox.
This is a great way to show how the E Ink and touch display works while demonstrating
task management capabilities that improve worker productivity and management
oversight.
1. Touch > .
2. The splash screen appears followed by the Enter Password screen.
3. Enter 123456 or scan the bar code below and then touch . The Inbox
appears.
Task In-progress
Task Not Assigned
Task Assigned - Not Started
9
Price Check Scenario
The Price Check scenario illustrates a task that has already been accepted by the user,
the user has already started the task and the user completes the task.
1. Touch Price Check. The Price Check screen appears.
2. Point the SB1 at a bar code on a product.
3. Press the Scan button. The SB1 reads the bar code and displays information about
the product.
Touch when the task is completed, to go back to the Inbox or to
pause the task and complete at a later time.
4. Touch to indicate that the task is complete.
5. Touch OK to confirm task completion.
6. Touch OK.
7. The Inbox re-displays.
10
Fill Delivery Scenario
The Fill Delivery scenario illustrates a task that has not been accepted by the user, the
user accepts the task and then the user completes the task.
1. Touch Fill Delivery. The Fill Delivery screen appears.
2. Touch Accept to accept the task.
3. Touch to start the task.
11
Touch when the task is completed, to go back to the Inbox or to
pause the task and complete at a later time.
4. Touch to indicate that the task is complete.
5. Touch OK to confirm task completion.
6. The Inbox re-displays with the task removed from the InBox.
Unload Truck Scenario
The Unload Truck scenario illustrates a task that has been accepted by the user and
the user completes the task.
1. In the Inbox, touch Unload Truck. The Unload Truck screen appears.
12
2. Touch to start the task.
Touch when the task is completed, to go back to the Inbox or to
pause the task and complete at a later time.
3. Touch to indicate that the task is complete.
4. Touch OK to confirm task completion.
5. The Inbox re-displays with the Unload Truck task removed from the InBox.
13
Collect Carts Scenario
The Collect Cart scenario illustrates a task that has been assigned to the user, the user
pauses the task and then go back to complete the task.
1. In the Inbox, touch Collect Carts. The Collect Carts screen appears.
2. Touch to start the task.
14
Touch when the task is completed, to cancel the task or to
pause the task and complete at a later time.
3. Touch .
4. Touch .
15
5. Touch Collect Carts.
6. Touch Resume.
7. Touch to indicate that the task is complete.
8. Touch OK to confirm task completion.
9. Touch OK.
10. The Inbox re-displays with the task removed from the InBox.
Reset MWM Demo
While using the Sales Demo application, the data can be reset to its initial state.
1. From the Inbox, touch .
2. Touch Reset demo.
3. The Inbox appears with the data reset to the initial settings.
Exit MWM Demo
To exit the Sales Demo:
1. From the Inbox, touch .
2. Touch Exit demo.
Basic Wi-Fi Setup
To access Wireless Settings, touch Home button > > > Advanced Settings
> Wireless Settings.
Task Paused
16
Use the up and down arrows to view all options.
Enable/Disable WLAN Radio
By default, the WLAN radio is on (enabled). To turn off (disabled) the WLAN radio,
touch WLAN Enabled.
The option changes to WLAN Disabled.
To turn on WLAN, touch WLAN Disabled. The option changes to WLAN Enabled.
Simple Setup
The Simple Setup application can create only a subset of wireless profiles (Open,
WPA Personal (TKIP) and WPA2 Personal (AES)) by entering ESSID and passphrase,
with all other settings set to default values. To create other types of wireless profiles
(WPA Enterprise, WPA2 Enterprise, etc), use Mobile Device Management (MDM)
software like MSP or use Import Locally application to import wireless configuration
data which is exported from a device running Fusion X2.00 or Fusion X2.01.
17
Use Simple Setup to manually configure a wireless network connection for Open,
WPA-Personal (TKIP), WPA2-Personal (AES) networks and to import a setup file
stored locally from the UserDrive.
Connecting to an Open Network
To connect to an open network:
1. Touch Simple Setup.
2. Touch Open Network.
3. In the ESSID text box, enter the ESSID name for the wireless network.
4. Touch Connect. The SB1 creates a profile with the provided information and
connects to the wireless network.
Connecting to a Secure Network
To connect to a secured network:
1. Touch Simple Setup.
18
2. Touch WPA-Personal (PSK/TKIP) or WPA2-Personal (PSK/AES).
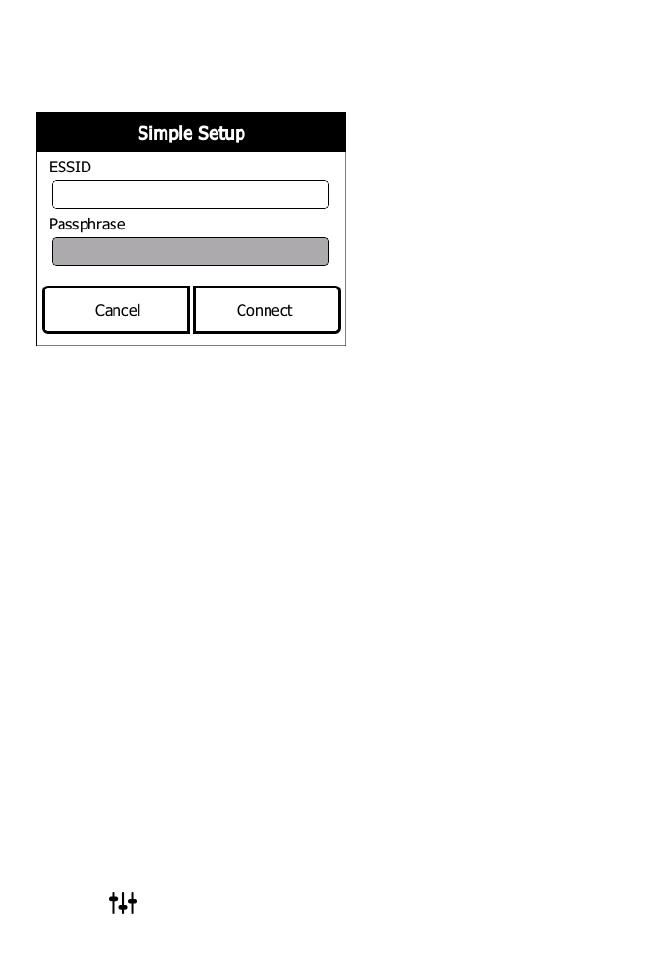
3. In the ESSID text box, enter the ESSID for the network.
4. In the Passphrase text box, enter the network passphrase.
5. Touch Connect. The SB1 creates a profile with the provided information and
connects to the wireless network.
PTT Express Settings
The following tones provide helpful cues when using the voice client.
Talk Tone: Double chirp. Plays when the PTT button (broadcast or private calls) is
depressed. This is a prompt for the user to start talking.
Access Tone: Single beep. Plays when another user just finished a broadcast or
response to the user. The user is now able to initiate a Group Broadcast or Private
Response.
Busy Tone: Continuous tone. Plays when the broadcast (or private) button is
depressed and another user is already communicating on the same talkgroup.
Network Tone:
Three increasing tones. Plays when PTT Express is acquiring the WLAN
connection and ready for voice communication.
Three decreasing tones. Plays when PTT Express has lost the WLAN
connection and is not ready for voice communication.
Enable Voice Client Communication
To enable the PTT communication:
1. Press the Home button to display the Home screen.
2. Touch . The Settings screen appears.
19
3. Touch PTT Express settings. The PTT Express screen appears.
4. Touch Voice Client Status.
5. Touch Enable.
6. Touch Save.
7. Touch .
Select a Talk Group
One of 32 talk groups can be selected by PTT Express users. However, only one talk
group may be enabled at a time on the SB1.
1. Touch . The Settings screen appears.
NOTE Upon reset, the talk group is set to Talk Group 1.
20
2. Touch PTT Express settings. The PTT Express screen appears.
3. Touch Talk Group. The Talk Group screen appears.
4. Touch a Talk Group number. Use the arrow buttons to view additional Talk
Groups.
5. Touch Save.
6. Touch to return to the PTT Express screen.
7. Press the Home button.
Disable PTT Express Voice Client Communication
To disable the PTT communication:
1. From the Home screen, touch . The Settings screen appears.
2. Touch PTT Express settings. The PTT Express screen appears.
3. Touch Voice Client Status.
4. Touch Disable.
5. Touch Save.
6. Touch to return to the PTT Express screen.
7. Press the Home button.
PTT Communication
PTT communication may be established as a Group Broadcast or Private Response.
NOTE By default, the Private Response feature is disabled. Specific
applications may enabled this feature. Check with system
administrator for more information.
  • Page 1 1
  • Page 2 2
  • Page 3 3
  • Page 4 4
  • Page 5 5
  • Page 6 6
  • Page 7 7
  • Page 8 8
  • Page 9 9
  • Page 10 10
  • Page 11 11
  • Page 12 12
  • Page 13 13
  • Page 14 14
  • Page 15 15
  • Page 16 16
  • Page 17 17
  • Page 18 18
  • Page 19 19
  • Page 20 20
  • Page 21 21
  • Page 22 22
  • Page 23 23
  • Page 24 24
  • Page 25 25
  • Page 26 26
  • Page 27 27
  • Page 28 28

Zebra SB1 User guide

Type
User guide

Zebra SB1 is a compact, affordable smart badge that combines 1D/2D bar code scanning, push-to-talk voice communication, and task management capabilities in a single device. With the SB1, retail associates can quickly respond to customer requests, check prices, and manage tasks, improving productivity and customer satisfaction. The SB1 is also equipped with a user-friendly interface, a long-lasting battery, and wireless connectivity options for easy integration with existing systems.

Ask a question and I''ll find the answer in the document

Finding information in a document is now easier with AI